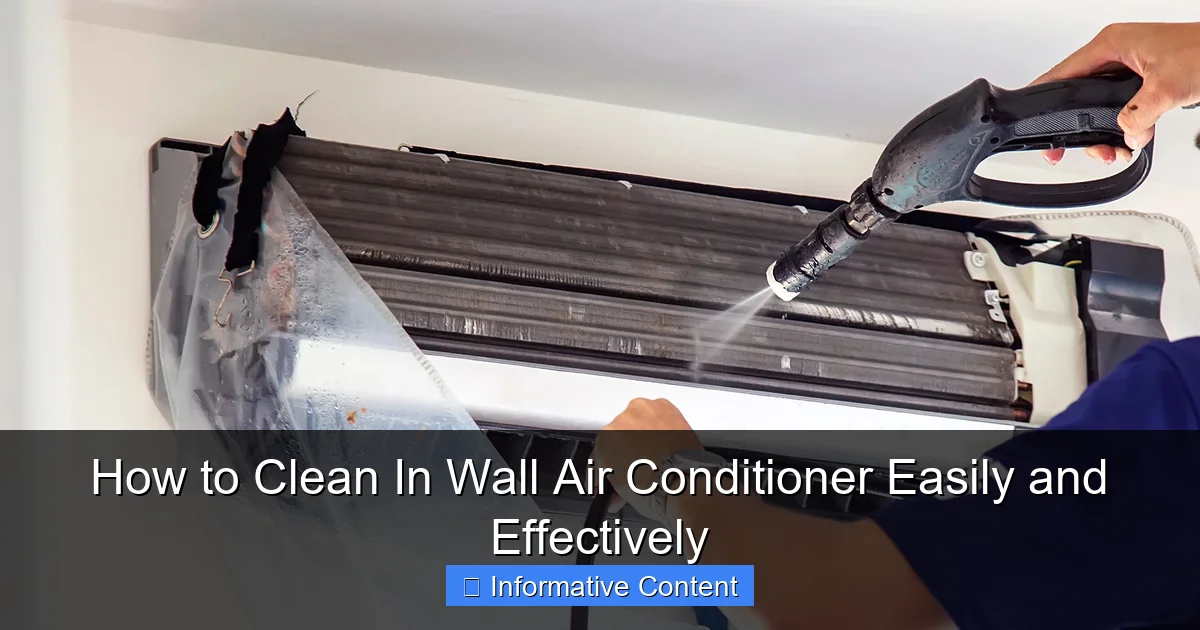
Featured image for how to clean in wall air conditioner
Image source: northbrisbaneair.com.au
Turn off the power and remove the front panel to safely access your in-wall air conditioner’s interior for cleaning. Wash reusable filters with warm soapy water and use a soft brush to clear dust from coils and fins, ensuring optimal airflow and efficiency. Finish by wiping down surfaces and reassembling—regular maintenance prevents mold, boosts performance, and extends unit life.
Key Takeaways
- Turn off power first: Always disconnect electricity before cleaning for safety.
- Remove and clean filters: Wash monthly with mild soap and water to maintain airflow.
- Vacuum interior components: Use a soft brush to remove dust from coils and fans.
- Wipe down surfaces: Clean exterior and vents with a damp cloth and non-abrasive cleaner.
- Check drainage channels: Clear clogs to prevent water leaks and mold growth.
- Schedule deep cleans: Perform thorough cleaning every 3-6 months for optimal performance.
📑 Table of Contents
- How to Clean In Wall Air Conditioner Easily and Effectively
- Why Cleaning Your In-Wall Air Conditioner Matters
- When and How Often Should You Clean Your In-Wall AC?
- Tools and Supplies You’ll Need
- Step-by-Step Guide to Cleaning Your In-Wall Air Conditioner
- Maintenance Tips to Keep Your AC Running Smoothly
- Common Mistakes to Avoid When Cleaning
- Cleaning Frequency and Performance Comparison
- Final Thoughts: A Clean AC Is a Happy AC
How to Clean In Wall Air Conditioner Easily and Effectively
There’s nothing quite like the relief of walking into a cool, refreshing room on a sweltering summer day—especially when that comfort comes from your trusty in-wall air conditioner. But what happens when that same unit starts making strange noises, blowing warm air, or worse, spreading musty odors throughout your home? Chances are, it’s time for a deep clean.
I learned this the hard way last summer. My living room AC had been running nonstop, yet the room still felt stuffy and humid. At first, I blamed the heatwave. Then I noticed a faint mildew smell every time I turned it on. After some detective work (and a little panic), I realized the problem wasn’t the weather—it was my neglected in-wall AC unit. A quick inspection revealed layers of dust, moldy filters, and clogged drainage lines. It was gross. But more importantly, it was inefficient and potentially unhealthy.
That experience taught me an important lesson: regular cleaning isn’t just about comfort—it’s about performance, energy efficiency, and indoor air quality. In this guide, I’ll walk you through exactly how to clean your in-wall air conditioner step by step. Whether you’re a DIY newbie or a seasoned home maintenance pro, you’ll find practical tips, safety reminders, and insider knowledge to keep your unit running smoothly all year long. Let’s get started!
Why Cleaning Your In-Wall Air Conditioner Matters
You might think your in-wall AC looks fine from the outside—after all, it’s mostly hidden behind a wall sleeve. But appearances can be deceiving. Over time, dust, pet dander, pollen, and moisture build up inside the unit, creating the perfect breeding ground for mold, bacteria, and allergens. And if left unchecked, these contaminants don’t just stay inside the machine—they get blown directly into your living space every time you turn it on.
Visual guide about how to clean in wall air conditioner
Image source: cleanairjournal.org.za
Health and Air Quality Benefits
Poorly maintained air conditioners can significantly impact indoor air quality. According to the Environmental Protection Agency (EPA), indoor air can be two to five times more polluted than outdoor air—and dirty HVAC systems are a major contributor. When your in-wall AC isn’t cleaned regularly, it circulates airborne irritants that can trigger allergies, asthma, and other respiratory issues. I’ve seen friends and family members experience fewer allergy flare-ups after a thorough AC cleaning, simply because they were breathing cleaner air.
Energy Efficiency and Cost Savings
A dirty air conditioner has to work harder to cool your room. Clogged filters and dusty coils restrict airflow, forcing the compressor to run longer and consume more electricity. In fact, the U.S. Department of Energy estimates that a clogged filter can increase energy consumption by up to 15%. Over time, that adds up—both on your utility bill and your carbon footprint. Cleaning your unit regularly helps maintain optimal efficiency, keeping your home cool without overworking the system.
Extending the Lifespan of Your Unit
In-wall air conditioners are built to last, but neglect can shorten their lifespan dramatically. Dust buildup on internal components like the evaporator coil, fan blades, and drainage system can lead to overheating, mechanical strain, and even premature failure. I spoke with a local HVAC technician who told me he’s seen units fail within five years due to poor maintenance—while others, cleaned annually, are still running strong after 15 years. Regular cleaning isn’t just a chore; it’s an investment in your home’s long-term comfort.
When and How Often Should You Clean Your In-Wall AC?
Timing is everything when it comes to AC maintenance. Cleaning too often is unnecessary, but waiting too long can lead to the problems we discussed earlier. So how do you strike the right balance?
Recommended Cleaning Schedule
For most households, a good rule of thumb is to clean your in-wall air conditioner at least twice a year—once before the summer cooling season begins (around late spring) and once after it ends (early fall). This ensures your unit is ready to handle peak demand and gives you a chance to winterize it properly.
However, certain factors may require more frequent cleaning:
- Pets: If you have cats or dogs that shed, consider cleaning every 3–4 months.
- Allergies or asthma: Households with sensitive individuals may benefit from quarterly cleanings.
- High pollen or pollution areas: If you live near busy roads, construction sites, or in regions with high pollen counts, dust accumulates faster.
- Humid climates: Moisture promotes mold growth, so units in humid environments need extra attention.
Signs It’s Time for a Deep Clean
Even if you’re following a schedule, watch for these red flags that indicate your AC needs immediate attention:
- Reduced airflow from vents
- Unusual odors (musty, burnt, or sour smells)
- Visible mold or mildew around the unit or vents
- Ice buildup on the coils (a sign of restricted airflow)
- Water leaks or pooling near the indoor unit
- Increased energy bills without a change in usage
I remember ignoring a faint musty smell for weeks, thinking it would go away on its own. Spoiler: it didn’t. By the time I opened the front panel, the evaporator coil was coated in black mold. Lesson learned—don’t wait for problems to escalate.
Tools and Supplies You’ll Need
Before you start cleaning, gather the right tools. Having everything on hand will make the process faster, safer, and more effective. You don’t need anything fancy—most items are probably already in your garage or cleaning closet.
Essential Cleaning Supplies
- Vacuum cleaner with hose attachment: For removing loose dust and debris from the front panel and interior.
- Soft-bristle brush or old toothbrush: Great for scrubbing tight spaces like fan blades and coil fins.
- Microfiber cloths: Ideal for wiping down surfaces without leaving lint or scratches.
- Mild detergent or coil cleaner: Use a non-abrasive cleaner designed for HVAC systems. Avoid harsh chemicals like bleach unless dealing with mold (and even then, use sparingly).
- Spray bottle: For applying cleaning solution evenly.
- Garden hose (optional): Useful for rinsing outdoor components if accessible.
- Screwdriver: To remove the front panel and access internal parts.
- Gloves and safety goggles: Protect your hands and eyes from dust, mold, and cleaning chemicals.
Optional but Helpful Tools
- Fin comb: A specialized tool for straightening bent coil fins, which can restrict airflow.
- Wet/dry vacuum: Handy for sucking up water and debris from the drain pan.
- Compressed air can: Useful for blowing dust out of hard-to-reach areas.
- Replacement air filter: Always have a new one ready to install after cleaning.
Pro tip: If you’re dealing with mold, consider using a solution of 1 part white vinegar to 1 part water. Vinegar is a natural disinfectant that kills mold spores without releasing toxic fumes. Just be sure to rinse thoroughly afterward to prevent residue buildup.
Step-by-Step Guide to Cleaning Your In-Wall Air Conditioner
Now for the main event—cleaning your in-wall AC like a pro. Follow these steps carefully to ensure a thorough and safe cleaning. Remember, safety first: always turn off the power before you begin.
Step 1: Turn Off the Power
This cannot be stressed enough. Before touching any part of your air conditioner, locate the circuit breaker and turn off the power to the unit. If your in-wall AC is plugged into a wall outlet, unplug it. This prevents accidental startup and protects you from electrical shock. I once forgot this step (don’t ask how) and got a minor shock from a loose wire. It was a wake-up call I’ll never forget.
Step 2: Remove the Front Panel and Air Filter
Most in-wall units have a front panel that snaps or screws into place. Use a screwdriver if needed, then gently pull the panel away. Inside, you’ll find the air filter—usually a flat, rectangular mesh or pleated panel. Carefully remove it and inspect it for dirt, tears, or mold. If it’s reusable (check your manual), clean it with warm, soapy water, rinse thoroughly, and let it air dry completely before reinstalling. If it’s disposable, replace it with a new one.
Step 3: Vacuum the Interior
Use your vacuum’s hose attachment to remove loose dust and debris from the interior cavity. Focus on the evaporator coil, fan blades, and drain pan. Be gentle—coil fins are delicate and can bend easily. If you notice bent fins, use a fin comb to straighten them. Bent fins block airflow and reduce efficiency.
Step 4: Clean the Evaporator Coil
The evaporator coil is where the magic happens—it absorbs heat from your room. But when it’s caked with dust and grime, it can’t do its job. Spray a coil cleaner (or your vinegar solution) onto the coil, letting it sit for 5–10 minutes to break down buildup. Then, use a soft brush to gently scrub the surface. Avoid using high-pressure water, as it can damage the fins. Wipe away residue with a damp microfiber cloth.
Step 5: Clean the Fan Blades and Motor Housing
The fan pulls air through the unit and blows it into your room. Over time, dust collects on the blades, throwing them off balance and reducing efficiency. Use your brush and vacuum to clean each blade carefully. If the motor housing is accessible, wipe it down with a damp cloth—but never spray water directly on the motor.
Step 6: Clear the Drainage System
Condensation collects in the drain pan and exits through a drain line. If this line gets clogged, water can back up and cause leaks or mold growth. Locate the drain pan (usually at the bottom of the unit) and check for standing water or debris. Use a wet/dry vacuum or a pipe cleaner to clear the drain line. Pour a cup of vinegar or bleach solution down the drain to kill any mold or algae.
Step 7: Reassemble and Restore Power
Once everything is clean and dry, reinsert the air filter, snap the front panel back into place, and secure it with screws if needed. Turn the power back on and test the unit. Listen for unusual noises and check that air is flowing properly. If everything looks good, you’re done!
Maintenance Tips to Keep Your AC Running Smoothly
Cleaning your in-wall air conditioner doesn’t have to be a once-a-year chore. With a few simple habits, you can keep it in top shape between deep cleans.
Regular Filter Checks
Check your air filter every month during peak usage. If it looks dirty, clean or replace it. This simple step improves airflow, reduces strain on the system, and keeps your indoor air clean.
Keep the Area Around the Unit Clear
Make sure there’s at least 2 feet of clearance around the indoor unit. Avoid placing furniture, curtains, or decorations too close, as they can block airflow and trap heat.
Inspect the Outdoor Vent (If Accessible)
Some in-wall units have an outdoor vent or exhaust grille. Check it periodically for leaves, dirt, or obstructions. A blocked vent forces the unit to work harder and can lead to overheating.
Schedule Professional Maintenance
While DIY cleaning is effective, it’s wise to have a licensed HVAC technician inspect your unit every 2–3 years. They can check refrigerant levels, test electrical connections, and identify potential issues before they become costly repairs.
Use a Programmable Thermostat
A programmable or smart thermostat helps regulate temperature more efficiently, reducing wear and tear on your AC. Set it to raise the temperature when you’re away and cool the house before you return.
Common Mistakes to Avoid When Cleaning
Even with the best intentions, it’s easy to make mistakes that can damage your unit or reduce its efficiency. Here are some common pitfalls to watch out for:
- Using too much water: Excess moisture can seep into electrical components or promote mold growth. Always use minimal water and ensure everything is dry before reassembling.
- Skipping the power shutoff: This is a serious safety risk. Always turn off the power before cleaning.
- Using abrasive cleaners: Harsh chemicals can corrode coils and damage seals. Stick to mild, HVAC-safe cleaners.
- Ignoring the drain line: A clogged drain is one of the most common causes of AC leaks. Don’t forget to clean it!
- Forcing bent fins back: Use a fin comb, not your fingers or tools. Bent fins reduce efficiency and can’t be fully restored.
- Overlooking the filter: A dirty filter undermines all your cleaning efforts. Make it a priority.
Cleaning Frequency and Performance Comparison
| Cleaning Frequency | Energy Efficiency | Air Quality | Unit Lifespan | Common Issues |
|---|---|---|---|---|
| Never | Low (up to 15% higher energy use) | Poor (mold, allergens, odors) | Reduced (5–7 years) | Frequent breakdowns, leaks, poor cooling |
| Once a year | Moderate | Fair | Moderate (8–10 years) | Occasional odors, reduced airflow |
| Twice a year | High | Good | Extended (12–15 years) | Minimal issues, consistent performance |
| Quarterly (high-use homes) | Very high | Excellent | Maximized (15+ years) | Rare issues, optimal comfort |
This table shows how cleaning frequency directly impacts your AC’s performance. As you can see, regular maintenance pays off in energy savings, air quality, and longevity.
Final Thoughts: A Clean AC Is a Happy AC
Cleaning your in-wall air conditioner might not be the most exciting task on your to-do list, but it’s one of the most rewarding. Not only does it keep your home cool and comfortable, but it also protects your health, saves money, and extends the life of your investment. Think of it as a small act of self-care for your home.
From my own experience, I can tell you that the peace of mind that comes from knowing your AC is clean and efficient is priceless. No more guessing why the room feels stuffy or worrying about strange smells. Just crisp, clean air and reliable cooling—exactly what you paid for.
So grab your vacuum, gather your supplies, and give your in-wall AC the attention it deserves. Whether you clean it twice a year or more often, you’re taking a proactive step toward a healthier, more efficient home. And who knows? You might even enjoy the process. After all, there’s something deeply satisfying about opening up a machine, seeing all the grime you’ve removed, and knowing you’ve made a real difference.
Stay cool, stay clean, and breathe easy.
Frequently Asked Questions
How do I clean my in wall air conditioner without removing it?
You can clean your in wall air conditioner without removal by turning off the power, vacuuming dust from the vents, and wiping the exterior with a damp cloth. Use a soft brush or compressed air to clear debris from the evaporator coils and filters.
How often should I clean my in wall air conditioner to maintain efficiency?
To keep your unit running efficiently, clean or replace the air filter every 1–2 months and deep-clean the coils and fins every 6–12 months. Regular maintenance improves airflow and extends the lifespan of your in wall air conditioner.
What cleaning supplies do I need to clean an in wall air conditioner?
Essential supplies include a soft brush, microfiber cloths, a vacuum with a brush attachment, compressed air, coil cleaner (or mild detergent), and a fin comb. Avoid harsh chemicals to prevent damaging sensitive components.
Can I use water to clean the inside of my in wall AC unit?
Never spray water directly inside the unit. Instead, dampen a cloth to wipe surfaces and use a no-rinse coil cleaner for the internal components. Excess moisture can cause electrical damage or mold growth.
Why is my in wall air conditioner not cooling well after cleaning?
If cooling is poor post-cleaning, check for reassembled parts (like filters) or bent fins blocking airflow. Ensure the unit is fully dry before restarting and verify the thermostat settings are correct.
How do I clean the air filter in my in wall AC unit?
Remove the front panel, pull out the filter, and rinse it with lukewarm water. For stubborn dirt, use a mild detergent, then let it air-dry completely before reinstalling. A clean filter boosts efficiency and air quality.