
Emptying water from your LG portable air conditioner is essential to maintain performance and prevent mold or leaks. This guide walks you through the process, from locating the drain plug to troubleshooting common issues.
Key Takeaways
- Regular water removal prevents overflow: LG portable ACs collect moisture during operation, and failing to empty it can cause leaks or shutdowns.
- Use the built-in drain plug or continuous drainage hose: Most models feature a rear drain cap that can be removed for manual emptying or connected to a hose for automatic drainage.
- Check the water tank indicator: Many LG units have a “Full” light or alert that signals when the tank needs emptying.
- Unplug the unit before draining: Always disconnect power to ensure safety during maintenance.
- Clean the filter and tank regularly: Prevent mold and odors by rinsing the water tank and air filter every few weeks.
- Use gravity drainage for best results: Position the unit on a slight incline or use a hose to direct water into a floor drain or bucket.
- Know when to use auto-evaporation mode: Some LG models automatically evaporate collected water, reducing the need for manual draining in low-humidity environments.
How to Empty Water from LG Portable Air Conditioner
If you own an LG portable air conditioner, you’ve likely noticed that it collects water during normal operation. This is completely normal—portable ACs work by pulling warm, humid air from your room, cooling it, and extracting moisture in the process. That moisture condenses into water and collects in an internal tank or reservoir. Over time, this tank fills up and needs to be emptied to keep your unit running efficiently and prevent leaks, odors, or even automatic shutdowns.
In this comprehensive guide, you’ll learn everything you need to know about how to empty water from your LG portable air conditioner. We’ll cover why it’s important, how to identify when your unit needs draining, step-by-step instructions for different drainage methods, maintenance tips, and troubleshooting advice. Whether you’re a first-time user or just need a refresher, this guide will help you keep your LG portable AC in top condition all summer long.
Why Emptying Water Is Important
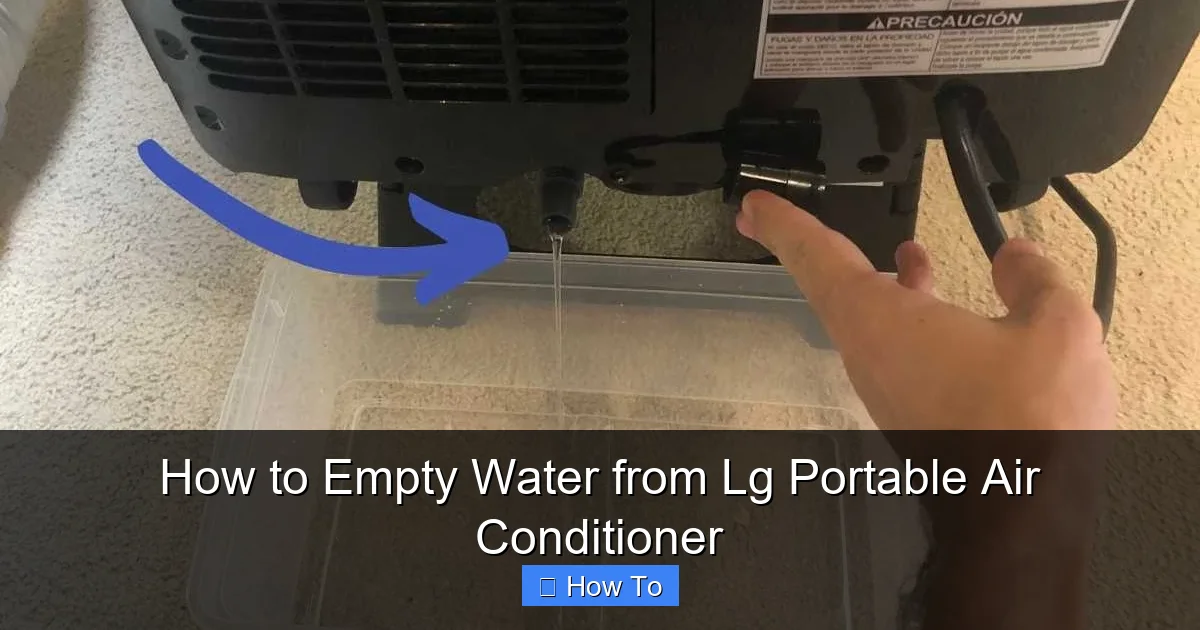
Visual guide about How to Empty Water from Lg Portable Air Conditioner
Image source: hvactrainingshop.com
Before diving into the how-to steps, it’s helpful to understand why emptying the water tank matters. Portable air conditioners don’t just cool the air—they also dehumidify it. As warm air passes over the cold evaporator coils inside the unit, moisture condenses and drips into a collection tray or tank. If this tank isn’t emptied regularly, several problems can occur:
– Water overflow: A full tank can cause water to spill out, potentially damaging your floor, carpet, or nearby electronics.
– Automatic shutdown: Most LG portable ACs are equipped with a float switch that detects when the tank is full. When triggered, the unit will stop cooling to prevent leaks.
– Mold and mildew growth: Stagnant water in the tank creates a breeding ground for bacteria and mold, which can lead to unpleasant odors and reduced air quality.
– Reduced efficiency: A clogged or overflowing tank can interfere with airflow and cooling performance.
By emptying the water tank regularly, you ensure your LG portable air conditioner runs smoothly, lasts longer, and keeps your indoor air fresh.
When to Empty the Water Tank
Knowing when to empty the water tank is just as important as knowing how. Here are some clear signs that it’s time to drain your LG portable AC:
– The “Full” indicator light is on: Most LG portable air conditioners have a red or orange light on the control panel that illuminates when the water tank is full. This is the most reliable signal.
– The unit stops cooling: If your AC suddenly stops blowing cold air, check the water tank. A full tank often triggers an automatic shutdown.
– You hear water sloshing: If you tilt the unit slightly and hear liquid movement, the tank is likely full.
– It’s been running for several hours in high humidity: On hot, humid days, portable ACs collect water faster. If your unit has been running nonstop, it’s a good idea to check the tank every 4–6 hours.
As a general rule, check the water level at least once a day during peak usage. In very humid climates, you may need to empty it multiple times per day.
Tools and Supplies You’ll Need
Emptying the water from your LG portable air conditioner is a simple process that requires minimal tools. Here’s what you’ll need:
– A flathead or Phillips screwdriver (if your model requires removing a panel)
– A small bucket or container (at least 1–2 liters capacity)
– A clean cloth or towel
– A hose (optional, for continuous drainage)
– A sponge or soft brush (for cleaning)
Most of these items are household staples, so you likely already have them on hand. If you plan to use continuous drainage, make sure the hose is long enough to reach a floor drain, sink, or outdoor area.
Step-by-Step Guide to Emptying Water Manually
The most common method for emptying water from an LG portable air conditioner is manual draining using the built-in drain plug. This method is ideal for occasional use or when you don’t have access to a permanent drainage solution.
Step 1: Turn Off and Unplug the Unit
Safety first! Before you begin, make sure your LG portable air conditioner is completely turned off. Press the power button on the control panel or remote, then unplug the unit from the wall outlet. This prevents any electrical hazards while you’re handling water and moving parts.
Step 2: Locate the Drain Plug
The drain plug is typically located on the back or bottom rear of the unit. It’s a small rubber or plastic cap, often labeled “Drain” or marked with a water droplet icon. On some models, it may be hidden behind a small access panel.
To find it:
– Lay the unit on its back or side (gently!) to get a better view of the rear panel.
– Look for a small cap or plug near the bottom edge.
– If you can’t find it, consult your user manual—LG provides a diagram for each model.
Step 3: Prepare a Container
Place a bucket, bowl, or large container beneath the drain plug. Make sure it’s deep enough to catch all the water without overflowing. A 1.5–2 liter container is usually sufficient, but if you’re unsure, use a larger one or have a second container ready.
Step 4: Remove the Drain Plug
Gently twist or pull the drain plug to remove it. Some models have a screw-on cap, while others use a push-in plug. Be careful not to force it—if it’s stuck, wiggle it slightly while pulling.
Once removed, water will begin to flow out. Let it drain completely. This may take 30 seconds to a few minutes, depending on how full the tank is.
Step 5: Wipe Away Excess Water
After the water has drained, use a clean cloth or towel to wipe away any remaining moisture around the drain opening. This helps prevent water from dripping onto the floor when you reassemble the unit.
Step 6: Reinsert the Drain Plug
Once the tank is empty, securely reinsert the drain plug. Make sure it’s tight enough to prevent leaks but don’t overtighten, as this can damage the seal.
Step 7: Plug In and Restart the Unit
Return the unit to its upright position, plug it back in, and turn it on. Check the control panel to ensure the “Full” light is off and the unit is cooling normally.
Using Continuous Drainage (Hose Method)
If you use your LG portable air conditioner frequently or live in a very humid area, manual draining can become a hassle. In these cases, setting up a continuous drainage system is a smart solution. This method uses a hose to automatically drain water as it collects, eliminating the need for daily checks.
Step 1: Check Your Model Compatibility
Not all LG portable air conditioners support continuous drainage. Check your user manual or look for a “Continuous Drain” port on the back of the unit. This is usually a small hose connector near the drain plug.
Models like the LG LP1419IVSM, LP0821WSR, and LP1217WSR support this feature.
Step 2: Attach the Drain Hose
Purchase a standard garden hose or a specialized drainage hose (available at hardware stores or online). Cut it to the appropriate length—long enough to reach a floor drain, sink, or outdoor area.
Insert one end of the hose into the continuous drain port on the back of the unit. Secure it with a hose clamp if necessary to prevent leaks.
Step 3: Route the Hose Properly
Position the other end of the hose into a drain, bucket, or outside. Make sure it’s lower than the unit to allow gravity to do the work. Avoid kinks or bends that could block water flow.
If draining indoors, place the end in a sink or use a bucket with a lid to prevent spills.
Step 4: Test the System
Turn on the unit and let it run for 10–15 minutes. Check that water is flowing steadily through the hose and not backing up. If the hose drips or leaks, tighten the connection or replace the seal.
Step 5: Monitor Occasionally
Even with continuous drainage, check the system weekly to ensure the hose hasn’t come loose or become clogged. Clean the hose and drain port every few months to prevent mold buildup.
Using Auto-Evaporation Mode
Some LG portable air conditioners, especially newer inverter models, feature an auto-evaporation system. This technology uses the hot exhaust air to evaporate collected water, reducing or eliminating the need for manual draining.
How It Works
In auto-evaporation mode, the unit redirects warm air from the condenser over the water tank, turning the water into vapor that exits through the exhaust hose. This process is most effective in dry or low-humidity environments.
When to Use It
– In air-conditioned rooms with low humidity
– During cooler months or in dry climates
– When you don’t have access to a drain
Limitations
Auto-evaporation may not keep up in very humid conditions. If you notice water pooling or the “Full” light coming on, switch to manual or continuous drainage.
To enable auto-evaporation, simply run the unit normally. Most LG models activate this feature automatically when the tank reaches a certain level.
Cleaning the Water Tank and Filter
Emptying the water is only part of the maintenance routine. To prevent mold, odors, and clogs, you should clean the water tank and air filter regularly.
Cleaning the Water Tank
1. Empty the tank completely using the manual method.
2. Remove the tank if possible (some models allow this—check your manual).
3. Rinse it with warm water and a mild detergent.
4. Use a soft brush or sponge to scrub away any residue or film.
5. Rinse thoroughly and let it air dry before reinserting.
If the tank isn’t removable, pour a mixture of water and white vinegar (1:1 ratio) into the drain opening, let it sit for 15 minutes, then drain and rinse.
Cleaning the Air Filter
1. Turn off and unplug the unit.
2. Open the front or side panel to access the filter.
3. Remove the filter and shake off loose dust.
4. Rinse it under warm water or use a vacuum with a brush attachment.
5. Let it dry completely before reinstalling.
Clean the filter every 2–4 weeks during heavy use.
Troubleshooting Common Issues
Even with proper maintenance, you may encounter problems when emptying water from your LG portable air conditioner. Here are some common issues and how to fix them.
Water Isn’t Draining
– Cause: Clogged drain plug or hose.
– Solution: Remove the plug and check for debris. Use a pipe cleaner or compressed air to clear the opening. For hoses, flush with water.
Unit Still Shows “Full” Light After Draining
– Cause: Faulty float switch or sensor.
– Solution: Gently press the float switch inside the tank (if accessible) to reset it. If the light remains on, contact LG support—the sensor may need replacement.
Water Leaking from the Bottom
– Cause: Cracked tank, loose drain plug, or improper placement.
– Solution: Inspect the tank for cracks. Tighten the drain plug. Ensure the unit is level and not tilted forward.
Hose Keeps Coming Loose
– Cause: Poor fit or missing clamp.
– Solution: Use a hose with a tighter fit or add a stainless steel clamp. Alternatively, use silicone sealant around the connection (allow to dry before use).
Unusual Odors
– Cause: Mold or bacteria in the tank or filter.
– Solution: Clean the tank with vinegar and replace the filter. Run the unit with the fan on high for 30 minutes to dry internal components.
Tips for Efficient Water Management
To minimize the hassle of emptying water, follow these best practices:
– Use a dehumidifier: Running a dehumidifier in the same room reduces the moisture your AC has to remove.
– Close windows and doors: Prevent humid outdoor air from entering the room.
– Set the thermostat higher: The cooler you set the AC, the more moisture it extracts. A setting of 72–75°F (22–24°C) is usually sufficient.
– Elevate the unit: Place the AC on a small platform or caster board to improve drainage and airflow.
– Schedule regular checks: Make it a habit to check the water level every morning or evening.
Conclusion
Emptying water from your LG portable air conditioner is a simple but essential task that ensures reliable performance, prevents damage, and keeps your indoor air fresh. Whether you use manual draining, continuous drainage, or auto-evaporation, following the steps in this guide will help you maintain your unit with confidence.
Remember to unplug the unit before draining, clean the tank and filter regularly, and monitor for signs of overflow or malfunction. With proper care, your LG portable AC will keep you cool and comfortable all season long.
By taking a few minutes each week to manage water drainage, you’ll extend the life of your appliance and enjoy cleaner, more efficient cooling. Stay cool, stay dry, and enjoy the comfort your LG portable air conditioner was designed to deliver.

