
Featured image for how to install midea u shaped air conditioner
Image source: web-res.midea.com
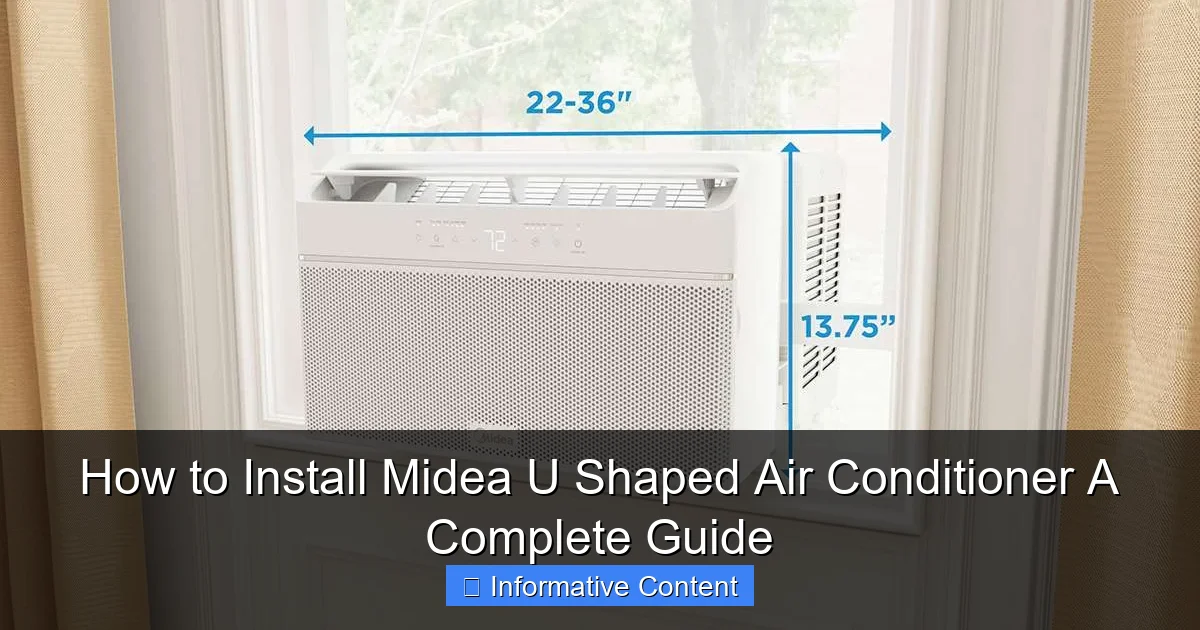
Installing the Midea U-Shaped Air Conditioner is a straightforward DIY project that ensures optimal cooling and energy efficiency when done correctly. Follow the manufacturer’s step-by-step guide to securely mount the unit, connect refrigerant lines, and seal gaps to prevent air leaks. Professional assistance is recommended for electrical and drainage connections to guarantee safety and peak performance.
Key Takeaways
- Measure your window to ensure the Midea U AC fits properly before purchase.
- Secure the brackets firmly to support the unit’s weight and prevent accidents.
- Seal gaps tightly with foam strips to improve efficiency and block hot air.
- Follow the manual step-by-step for safe, correct electrical and hose connections.
- Test operation immediately after installation to verify cooling and drainage function.
- Schedule professional help if unsure about wiring or structural modifications needed.
📑 Table of Contents
- Why Installing the Midea U-Shaped Air Conditioner Might Be Easier Than You Think
- What Makes the Midea U-Shaped AC Different (And Easier to Install)
- Tools, Materials, and Pre-Installation Checklist
- Step-by-Step Installation Guide (With Pro Tips)
- Troubleshooting Common Installation Issues
- Maintenance Tips to Keep Your Midea U-Shaped AC Running Smoothly
- Final Thoughts: You’ve Got This!
Why Installing the Midea U-Shaped Air Conditioner Might Be Easier Than You Think
Let me tell you a quick story. A few summers ago, I was sweating through another heatwave, my old window AC rattling like a coffee grinder. I wanted something better—quieter, more efficient, and maybe even a little stylish. That’s when I discovered the Midea U-shaped air conditioner. It promised whisper-quiet operation, energy efficiency, and a sleek design that didn’t look like a bulky box stuck in a window. But when it arrived, I froze. The manual had diagrams that looked like hieroglyphics, and I started wondering: Can I really install this myself?
Turns out, yes—I could. And so can you. The Midea U-shaped AC isn’t just a pretty face. It’s designed with DIY installation in mind. Unlike traditional window units that require heavy lifting, drilling into frames, or complicated mounting brackets, this unit slips into your window like a puzzle piece. It’s lighter, smarter, and built for modern living. Whether you’re a first-time installer or just tired of paying for professional setup, this guide walks you through every step—from unboxing to that sweet, cool breeze.
What Makes the Midea U-Shaped AC Different (And Easier to Install)
Before we dive into the tools and steps, let’s talk about why the Midea U-shaped air conditioner stands out. Most window ACs sit horizontally in a window frame. They’re heavy, awkward, and often require two people to install safely. But the Midea U-shaped unit flips the script—literally. It’s designed to fit vertically in a single-hung or double-hung window, with the compressor and condenser hanging outside and the fan and controls inside. The “U” shape refers to how the unit wraps around the bottom sill, creating a tight seal with minimal effort.

Visual guide about how to install midea u shaped air conditioner
Image source: media.wired.com
Key Design Advantages That Simplify Installation
- Lightweight build: Most models weigh between 40–50 lbs, making one-person installation totally doable.
- No permanent modifications: Unlike split systems or through-the-wall units, you don’t need to cut drywall or drill into the frame.
- Adjustable side panels: The unit expands to fit window widths from 24 to 48 inches—no custom sizing needed.
- Integrated window seal: The U-shape naturally creates a barrier against drafts and pests.
- Quick-release tabs: Makes removing the unit for cleaning or winter storage a breeze.
Here’s a real-world example: My neighbor, Sarah, installed hers in under 45 minutes. She’s 5’4” and didn’t need a ladder. She just opened the window, slid the unit in, extended the side panels, and tightened the screws. No swearing, no sweating (well, not from the work—it was still 90°F outside). That’s the kind of experience Midea aims for.
But don’t let the simplicity fool you. This unit still packs 8,000–10,000 BTUs (depending on the model), cools rooms up to 450 sq. ft., and runs at just 52–58 dB—quieter than a normal conversation. The secret? The compressor is outside the window, so noise stays outside too.
Tools, Materials, and Pre-Installation Checklist
Now, let’s get practical. You don’t need a toolbox full of gear to install the Midea U-shaped air conditioner, but a few essentials will make your life easier. Think of this as your “before you start” prep list.
Tools You’ll Need
- Phillips screwdriver (manual or electric)
- Measuring tape
- Level (a smartphone app works in a pinch)
- Scissors or utility knife (for trimming foam strips)
- Gloves (optional, but helpful for handling the unit)
Materials Included (Check the Box!)
- Main AC unit (with pre-installed side panels)
- Foam seal strips (2–3 pieces)
- Screws and washers (usually 4–6 sets)
- Window support bracket (if your model includes one)
- User manual (keep it handy!)
Pre-Installation Safety & Prep Tips
- Measure your window: The unit fits windows 24–48” wide and at least 14” tall. Measure the inside of the window frame, not the glass.
- Clear the area: Move furniture, curtains, or blinds that might block the window or get damaged.
- Check electrical access: The Midea U-shaped AC uses a standard 120V outlet. Make sure you have one nearby (within 6 ft). Never use an extension cord—it’s a fire hazard.
- Inspect the unit: Look for dents, cracks, or loose parts. If anything looks off, contact Midea support before installing.
- Open the window fully: You’ll need at least 16–18” of vertical clearance to slide the unit in smoothly.
Pro tip: I once tried installing an AC without checking the outlet first. The cord barely reached, so I had to rearrange my entire living room. Save yourself the hassle—plug in a lamp or phone charger to test the outlet before you start.
Also, if you live in a high-rise or have a window that’s hard to reach, consider asking a friend to help. Even though the unit is light, it’s awkward to maneuver. Better safe than sore (or worse—dropped).
Step-by-Step Installation Guide (With Pro Tips)
Alright, let’s get to the fun part. Here’s how to install your Midea U-shaped air conditioner in 5 simple steps. I’ll walk you through each one, with tips I’ve learned the hard way.
Step 1: Prepare the Window and Side Panels
Start by opening your window completely. Clean the sill and frame with a damp cloth to remove dust or debris. Then, locate the side panels on the AC unit. These are usually folded inward for shipping. Extend them outward until they click into place. Most models have a “click” or “snap” mechanism—don’t force it.
Pro tip: If the panels feel stiff, gently wiggle them side to side while pulling. They’re designed to be adjustable, not locked tight.
Step 2: Position the Unit
Now, tilt the AC unit slightly (about 10–15 degrees) and slide it into the window from the outside. The “U” shape should wrap around the bottom sill, with the indoor portion sitting on the window track. The outdoor part (with the compressor) will hang down.
Pro tip: I like to place a towel or cardboard on the sill to protect it from scratches. Also, keep one hand on the indoor side to guide it—this prevents the unit from tipping forward.
Step 3: Secure the Side Panels
Once the unit is in, extend the side panels until they press firmly against the window frame. Use the included screws and washers to secure them. Tighten just enough to hold the unit steady—over-tightening can warp the plastic.
Here’s a common mistake: People skip the foam seal strips. Don’t! Cut the foam to size and press it between the side panels and the window frame. This blocks drafts, reduces noise, and keeps bugs out.
Step 4: Install the Window Support Bracket (If Included)
Some Midea U-shaped models come with a support bracket that attaches to the window frame and holds the unit in place. If yours does:
- Position the bracket under the indoor portion of the AC.
- Use the provided screws to attach it to the window frame.
- Adjust the bracket’s height so the AC sits level.
Pro tip: Use a level here. A tilted unit can cause water leaks or vibration. If the window sill isn’t flat, place a shim (like a piece of wood or plastic) under the bracket.
Step 5: Test and Adjust
Before you plug it in, do a quick check:
- Is the unit level?
- Are the side panels snug against the frame?
- Is the foam seal compressed but not crushed?
- Does the window close securely against the top of the unit?
Now, plug in the AC. The control panel should light up. Run it for 5–10 minutes. Listen for unusual noises (grinding, rattling) and check for cool air. If everything looks good, you’re done!
Pro tip: I always run a test cycle before leaving the room. One time, I didn’t, and later found a loose screw rattling inside the fan. A quick fix, but annoying!
Troubleshooting Common Installation Issues
Even with the best prep, things can go sideways. Here are the most common problems people face when installing the Midea U-shaped air conditioner, and how to fix them.
“The Unit Won’t Fit in My Window”
Double-check your measurements. The Midea U-shaped AC needs:
- 24–48” width (inside frame)
- 14+” height (from sill to bottom of upper sash)
- 16–18” of vertical clearance to slide in
If your window is too narrow, you might need a different model. If it’s too wide, the side panels can usually extend far enough. But if the gap is more than 2”, you’ll need additional foam or a custom seal.
Real fix: My friend had a 50” wide window. She cut a piece of rigid foam board to fill the gap, then wrapped it in duct tape for a clean look. Not ideal, but it worked.
“The Window Doesn’t Close Properly”
The AC should sit low enough that the window closes against the top of the unit. If it doesn’t:
- Adjust the side panels to raise or lower the unit.
- Add a small wooden block under the indoor portion to tilt it upward.
- Trim the foam seal slightly if it’s too thick.
Pro tip: Never force the window shut. It can damage the AC or the frame. If the gap is more than 1/2”, you may need to adjust the unit’s position.
“The Unit Vibrates or Makes Noise”
Vibration usually means the unit isn’t level or the side panels aren’t tight. Try:
- Rechecking the level.
- Tightening all screws.
- Adding extra foam seal to cushion the unit.
Also, make sure nothing inside the room (like a fan or TV) is vibrating against the wall. I once thought my AC was noisy—turned out my floor lamp was rattling!
“Water Leaks Inside”
This is rare with the U-shaped design, but it can happen if:
- The unit is tilted forward (indoor side lower than outdoor).
- The drain plug (if present) isn’t closed.
- The foam seal is missing or damaged.
Fix: Use a level to ensure the AC tilts slightly outward (about 1/4” lower on the outdoor side). This helps condensation drain properly.
Maintenance Tips to Keep Your Midea U-Shaped AC Running Smoothly
Installation is just the start. To get the most out of your Midea U-shaped air conditioner, you’ll need to maintain it. Think of it like a car—regular care keeps it running efficiently and saves you money.
Monthly: Clean the Air Filter
The filter traps dust, pollen, and pet hair. A clogged filter makes your AC work harder, which means higher energy bills and less cooling. Here’s how to clean it:
- Turn off and unplug the AC.
- Locate the filter (usually behind a front panel—check your manual).
- Remove it and rinse under cool water.
- Let it dry completely before reinserting.
Pro tip: I keep a spare filter on hand. That way, I can swap them out and clean one while the other is drying.
Seasonally: Inspect the Foam Seals
Over time, foam seals can crack or compress. Check them every 3–6 months. Replace any that look worn. You can buy replacement foam strips online (search for “Midea U-shaped AC foam seal”).
Annually: Clean the Coils and Fan
Once a year (or twice if you have pets), clean the indoor and outdoor coils. Use a soft brush or vacuum to remove dust. For stubborn grime, mix mild soap and water, then rinse with a damp cloth. Never use a pressure washer—it can damage the fins.
Pro tip: I clean my coils in the spring, before I turn the AC on. It’s like a pre-season tune-up.
End of Season: Store It Properly
If you live where winters are cold, remove the AC in the fall. Here’s how:
- Unplug and remove the unit.
- Drain any water from the base (if applicable).
- Clean the filter and coils.
- Cover the outdoor portion with a waterproof cover (or store the whole unit indoors).
Leaving it in over winter can cause ice buildup, which damages the compressor. Trust me—I learned that one the hard way.
| Task | Frequency | Tools Needed | Time Required |
|---|---|---|---|
| Clean air filter | Monthly | Water, soft brush | 5–10 minutes |
| Inspect foam seals | Every 3–6 months | None | 2–3 minutes |
| Clean coils & fan | Annually | Soft brush, mild soap | 15–20 minutes |
| Check for leaks/noise | Every 3 months | Level, flashlight | 5 minutes |
| Remove & store unit | End of cooling season | Cover, storage space | 30–45 minutes |
Final Thoughts: You’ve Got This!
Installing the Midea U-shaped air conditioner isn’t just about beating the heat—it’s about taking control. You don’t need to be a handyman. You don’t need to pay for professional installation. With the right prep, a few basic tools, and this guide, you can do it yourself—safely, efficiently, and with a little pride.
Remember, every AC is a little different. If your Midea model has a feature I didn’t mention (like a smart app or dehumidifier), check the manual. And if you run into a snag? Take a breath. Step back. Most issues are fixable with a little patience.
Now, when you feel that cool air on your skin, you’ll know it’s not just comfort—it’s accomplishment. You installed it. You maintained it. And you’re ready for whatever summer throws at you. So go ahead—crank it up, kick back, and enjoy that sweet, quiet breeze. You’ve earned it.
Frequently Asked Questions
How do I install a Midea U shaped air conditioner?
To install a Midea U shaped air conditioner, begin by mounting the interior bracket on a sturdy wall, ensuring it’s level. Follow the manual to connect the refrigerant lines, electrical wiring, and drainage hose, then secure the outdoor unit and complete the vacuum and test run.
Can I install the Midea U shaped AC myself, or do I need a professional?
While DIY installation is possible, it’s recommended to hire a licensed HVAC technician for the Midea U shaped air conditioner to ensure proper refrigerant handling, electrical connections, and warranty compliance. Incorrect installation may void your warranty or cause performance issues.
What tools are needed for Midea U shaped air conditioner installation?
Essential tools include a drill, level, wrenches, vacuum pump, refrigerant gauges, and a stud finder. The Midea U shaped air conditioner installation also requires electrical testers and pipe benders for precise fitting and safety.
How long does it take to install a Midea U-shaped AC unit?
Installation typically takes 4–6 hours for a professional, depending on wall type, refrigerant line length, and electrical setup. DIY attempts may take longer due to learning curves or unforeseen challenges during the process.
Where should I place the indoor unit for optimal performance?
Mount the indoor unit on an exterior wall with enough space for airflow (at least 6 inches on all sides) and minimal sunlight exposure. Avoid placing it near heat sources or electronics for efficient Midea U shaped air conditioner operation.
Are there any special requirements for wiring the Midea U-shaped AC?
Yes, the Midea U shaped air conditioner requires a dedicated electrical circuit with the correct voltage (check the manual) and a properly grounded outlet. Always disconnect power before wiring and follow local electrical codes for safety.

