
Installing a Panasonic air conditioner can save you money and improve cooling efficiency if done correctly. This guide walks you through everything from preparation to final testing, ensuring a smooth setup. Whether you’re a beginner or experienced, follow our expert tips to avoid common mistakes and enjoy reliable comfort all year round.
Key Takeaways
- Proper Tools Are Essential: Gather a drill, level, measuring tape, screwdrivers, and a vacuum pump before starting the installation.
- Safety First: Always turn off power at the breaker and wear protective gear like gloves and goggles during setup.
- Choose the Right Location: Install the indoor unit high on a wall, away from direct sunlight and heat sources for best airflow.
- Drainage Is Critical: Ensure the condensate drain line slopes downward to prevent water backup and mold growth.
- Professional Help When Needed: If refrigerant handling is required, call a licensed technician to comply with local regulations.
- Test Thoroughly: Run the system for 15–30 minutes after installation to check cooling, noise, and drainage.
Quick Answers to Common Questions
Can I install a Panasonic air conditioner myself?
Yes, basic models like window units or simple split systems can be installed by homeowners with moderate DIY skills. However, refrigerant handling and complex wiring should only be done by professionals.
How long does installation take?
For a typical split-system install, expect 3–6 hours. Window units take less time—usually 1–2 hours. Factor in prep work like drilling and setting up drainage.
Do I need a permit to install an air conditioner?
It depends on your location. Many cities require permits for HVAC installations, especially for outdoor units. Check with your local building department before starting.
What happens if the drain line clogs?
A clogged drain line causes water to back up, leading to leaks, mold, or system shutdown. Regular cleaning and ensuring proper slope during installation help prevent this.
Why is my Panasonic AC not cooling?
Common causes include dirty air filters, incorrect thermostat settings, low refrigerant, or blocked airflow. Check the filter first, then consult your manual or a technician if issues persist.
📑 Table of Contents
- Introduction: Why Proper Installation Matters
- Step 1: Prepare Your Space and Gather Tools
- Step 2: Install the Indoor Unit
- Step 3: Install the Outdoor Unit
- Step 4: Connect the Refrigerant Lines
- Step 5: Electrical Connections and Wiring
- Step 6: Final Checks and Testing
- Maintenance Tips After Installation
- When to Call a Professional
- Conclusion: Enjoy Comfort with Confidence
Introduction: Why Proper Installation Matters
Have you just bought a new Panasonic air conditioner and are excited to beat the summer heat? Great choice! But here’s something important: even the most advanced air conditioner won’t perform well—or last long—if it’s not installed correctly. A poorly installed unit can lead to poor cooling, higher energy bills, frequent breakdowns, and even water leaks. That’s why following a proper Panasonic air conditioner installation guide is crucial.
In this comprehensive guide, we’ll walk you through every step of installing your Panasonic air conditioner, whether it’s a window model, a split-system unit, or a ductless mini-split. From gathering the right tools to final testing, we’ll make sure you feel confident and safe throughout the process. And don’t worry—we’ll keep things simple, clear, and practical, so anyone can follow along, even if you’ve never held a screwdriver before!
Step 1: Prepare Your Space and Gather Tools
Before You Begin
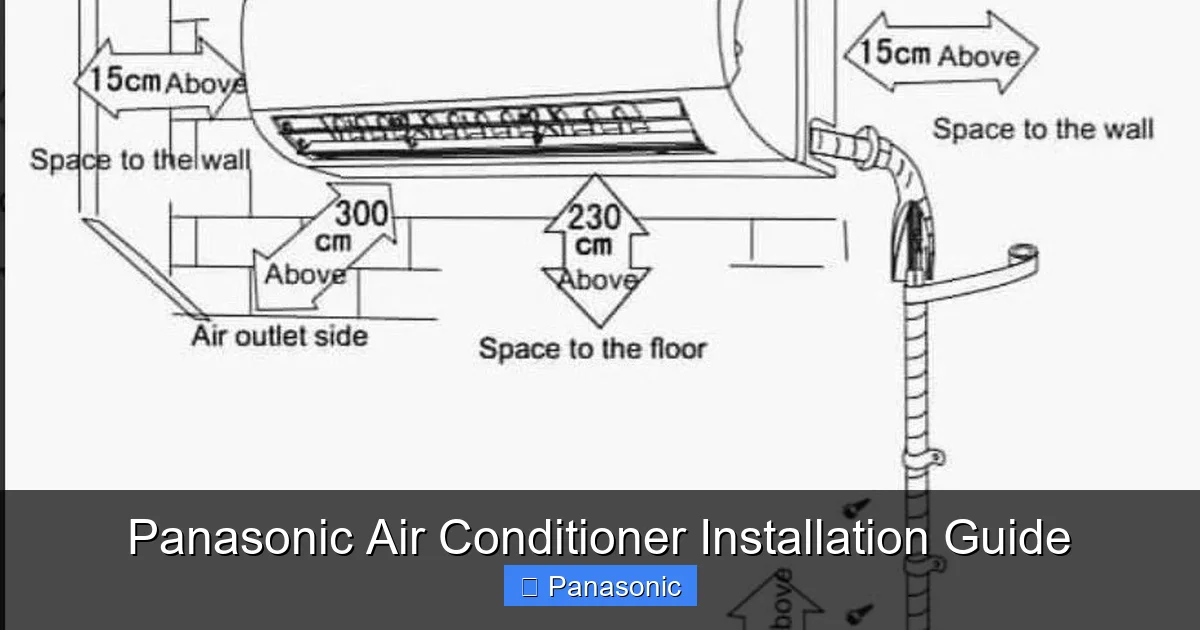
Installation starts long before you touch the unit. The first thing you need to do is assess your space. Look for a spot on an exterior wall where cool air can flow freely into your room. Avoid placing the outdoor unit near windows, doors, or areas with heavy foot traffic. Also, make sure the indoor unit has enough clearance above furniture and people—ideally 6 feet or more.
Visual guide about Panasonic Air Conditioner Installation Guide
Image source: i.pinimg.com
Next, gather your tools. Here’s what you’ll need:
- Measuring tape
- Level (a bubble level works great)
- Drill with masonry and plastic bits
- Screwdriver set (Phillips and flathead)
- Wrench or pliers
- Voltmeter (to test electrical connections)
- Vacuum pump and manifold gauge (for refrigerant models)
- Ladder (if needed)
- Protective gloves and safety glasses
Having everything ready saves time and frustration. Trust me—nothing kills excitement faster than realizing you forgot your drill halfway through!
Check Local Building Codes
Before drilling holes or mounting brackets, check your local building codes and HOA rules. Some areas require permits for air conditioning installations, especially for outdoor units. Ignoring these rules could result in fines or having to redo work later.
Step 2: Install the Indoor Unit
Mounting the Bracket
The indoor unit must be mounted securely to prevent vibration, noise, or even falling. Start by marking the center point on the wall where the bracket will go. Use a level to ensure the mark is perfectly straight—this is critical for proper drainage later.
Once marked, drill pilot holes into the wall studs or use wall anchors if mounting into drywall. Insert the provided wall bracket screws and tighten them until snug. Don’t over-tighten, as this can crack the drywall.
Attach the Drain Pipe
Most Panasonic models include a PVC drain pipe or hose. Attach it to the bottom of the indoor unit using the provided clamp. Make sure the connection is tight to prevent leaks. Then, route the pipe toward the outside of the building, ensuring it slopes downward at least 1 inch per foot. This slope helps gravity pull condensation out instead of backing up inside.
If your home doesn’t have an existing drain access, you may need to drill a small hole through the wall for the pipe to exit. Seal around the hole with silicone caulk to prevent drafts.
Mount the Indoor Unit
With the bracket secure and the drain pipe in place, carefully lift the indoor unit onto the bracket. Slide it into position until it clicks or locks in place. Most Panasonic units have a locking mechanism that audibly confirms proper seating. Give it a gentle tug to double-check it’s secure.
Step 3: Install the Outdoor Unit
Find the Best Spot
The outdoor unit should sit on a stable surface—like a concrete pad, patio, or reinforced deck. Keep it at least 18 inches away from walls or fences to allow airflow. Avoid placing it under trees with lots of leaves, as debris can clog the condenser coils.
Also, consider noise levels. Panasonic units are generally quiet, but placing the outdoor unit near bedrooms or living areas might still cause disturbance. If possible, position it on the side or back of your house.
Secure the Base
Use rubber isolators or anti-vibration pads between the outdoor unit and its mounting base. These reduce noise and protect the compressor from vibrations. Bolt the unit down firmly but don’t overtighten—this can damage the frame.
Drain and Ventilate
Ensure the outdoor unit has proper ventilation. Never block the air intake or exhaust grilles. If the unit is installed near a balcony railing, make sure it’s secured and won’t tip over in strong winds.
Step 4: Connect the Refrigerant Lines
Run the Pipes Carefully
For split systems, refrigerant lines connect the indoor and outdoor units. These are usually wrapped in insulation and passed through a wall hole. Drill a 1.5-inch hole (larger if needed) near the floor on the outside wall. Make sure it’s slightly sloped upward toward the outdoor unit to prevent rain from entering.
Gently push the insulated lines through the hole. Don’t kink or bend them sharply—this can damage the internal tubing. Leave a little slack so you can move the units slightly during connection.
Connect the Lines
At both ends, connect the liquid and gas lines to the corresponding ports on the indoor and outdoor units. Use the provided flare nuts and tighten them with a wrench. Apply refrigerant oil to the threads if recommended in your manual—this ensures a tight seal.
Wrap the joints with electrical tape and then aluminum foil tape for extra protection against moisture.
Purge Air from Lines (If Required)
Some Panasonic models require you to purge air from the refrigerant lines before turning on the system. This is typically done using a vacuum pump connected to the service valves. Follow your user manual closely—never skip this step, as air in the lines reduces efficiency and can damage the compressor.
Step 5: Electrical Connections and Wiring
Turn Off Power
Before touching any wires, shut off the circuit breaker labeled “AC” or “Air Conditioner.” Double-check with a voltmeter to confirm no current is flowing. Electricity + water = danger. Seriously, don’t skip this step.
Connect the Wires
Inside the outdoor unit, you’ll see color-coded wires. Match them to the labels on the indoor unit using the wiring diagram in your manual. Common colors include black (common), white (neutral), and red/blue/yellow (depending on the model). Strip about half an inch of insulation and twist the exposed copper securely.
Use wire connectors or crimp terminals to join the wires. Tighten each connection until firm—loose wires can cause sparks or overheating.
Seal and Protect
Cover all wire joints with electrical tape and tuck them neatly into the junction box. Make sure no bare wires are exposed. Then, replace the cover and secure it with screws.
Step 6: Final Checks and Testing
Inspect All Connections
Before powering up, do a final walkthrough. Check that:
- All screws and bolts are tight
- No tools or rags are left inside the unit
- Drain lines slope correctly
- Wires are secure and covered
- Condensate drain flows freely (you can pour a little water to test)
Power On and Test
Close all panels and restore power at the breaker. Turn on the AC and set it to cool mode. Listen for unusual noises—grinding, buzzing, or rattling means something’s loose. Feel the indoor unit for vibrations.
After 15–30 minutes, check the following:
- Is cool air blowing from vents?
- Is water draining properly (no puddles near the unit)?
- Are the displays showing normal operation?
Troubleshoot Common Issues
If the unit isn’t cooling, check the air filter—it might be dirty. If there’s a hissing sound, you might have a refrigerant leak (call a pro). If water pools inside, the drain line may be clogged or improperly sloped.
Maintenance Tips After Installation
Clean Filters Regularly
Panasonic units often have washable or replaceable filters. Clean them every 2–4 weeks during peak usage. A clogged filter restricts airflow and makes the system work harder.
Schedule Annual Servicing
Even with perfect installation, professional maintenance extends lifespan and keeps efficiency high. A technician can clean coils, check refrigerant levels, and inspect electrical components.
Keep Vents Unobstructed
Avoid placing curtains, furniture, or electronics directly in front of vents. Good airflow is key to consistent cooling.
When to Call a Professional
While many parts of the installation are DIY-friendly, some tasks require certification:
- Handling refrigerants (requires EPA Section 608 license)
- Running long refrigerant lines (over 25 feet)
- Installing in multi-story buildings without proper rigging
- Working with older homes lacking proper electrical capacity
If you’re unsure, it’s always safer—and legal—to hire a licensed HVAC technician. Panasonic also offers certified installer networks if you want peace of mind.
Conclusion: Enjoy Comfort with Confidence
You’ve got this! Installing your Panasonic air conditioner doesn’t have to be intimidating. By following this detailed Panasonic air conditioner installation guide, you’re setting yourself up for years of reliable, efficient cooling. Remember: take your time, prioritize safety, and don’t rush the electrical or refrigerant steps.
Once installed correctly, your Panasonic unit will deliver quiet operation, smart features, and energy savings. Plus, knowing you did it yourself? That’s a win worth bragging about.
Ready to stay cool? Grab those tools and get started—your comfort zone is waiting.
Frequently Asked Questions
Is it safe to install an air conditioner without experience?
Basic installations are manageable for beginners, but electrical and refrigerant work carry risks. If you’re unsure, hire a certified technician to avoid accidents or code violations.
How far apart should the indoor and outdoor units be?
For best performance, keep the distance under 25 feet. Longer runs require thicker refrigerant lines and may need professional setup to maintain efficiency.
Can I install multiple indoor units with one outdoor unit?
Yes, Panasonic offers multi-split systems where one outdoor unit serves multiple indoor units. This requires careful planning and professional installation due to refrigerant load and wiring complexity.
What type of wall is best for mounting the indoor unit?
Concrete, brick, or solid wood studs are ideal. Avoid hollow drywall unless you use heavy-duty anchors. Always confirm the wall can support the unit’s weight (usually 50–100 lbs).
Should I insulate the refrigerant lines?
Absolutely. Insulation prevents condensation buildup and improves energy efficiency. Panasonic usually includes pre-wrapped insulation, but add extra if lines run through unconditioned spaces like attics.
How often should I clean the air filter?
Clean or replace the filter every 2–4 weeks during heavy use. In dusty environments, do it weekly. A clean filter boosts airflow and protects the compressor.
