Wiring a contactor in your Carrier air conditioner is essential for proper compressor operation and system safety. This guide walks you through the process with clear steps, safety tips, and common mistakes to avoid. Whether you’re a homeowner or HVAC technician, understanding contactor wiring helps prevent electrical issues and ensures reliable cooling performance.
Quick Answers to Common Questions
Tip/Question?
Answer: Always take a photo of the existing wiring before disconnecting anything. This visual reference makes reconnection much easier and reduces the chance of errors.
Tip/Question?
Answer: Use a multimeter to test the contactor coil resistance. A healthy coil typically reads between 30–100 ohms. An open reading means the coil is bad and needs replacement.
Tip/Question?
Answer: Apply a thin layer of dielectric grease to wire terminals after tightening. This prevents corrosion and makes future removal easier without damaging the insulation.
Tip/Question?
Answer: Don’t assume the old contactor is fine just because the compressor runs. Weak contactors can overheat silently and shorten compressor life—replace them preventively.
Tip/Question?
Answer: If your Carrier model uses a 4-wire control system (including O/B for heat pumps), double-check polarity—swapping O and B reverses the reversing valve function.
How to Wire a Contactor in Carrier Air Conditioner: A Complete Guide
If you’re working with a Carrier air conditioning system—whether you’re a certified HVAC technician or a knowledgeable homeowner tackling a repair—understanding how to properly wire a contactor is a fundamental skill. The contactor plays a vital role in the operation of your air conditioner by controlling the flow of electricity to the compressor and condenser fan motor. Without a properly wired contactor, your system may fail to start, cycle erratically, or suffer from electrical damage over time.
This guide will walk you through everything you need to know about wiring a contactor in a Carrier air conditioner. We’ll cover what a contactor is, why it matters, the tools and materials required, detailed step-by-step instructions, and even troubleshooting advice. By the end, you’ll feel confident handling this essential component of your HVAC system.
What Is a Contactor?
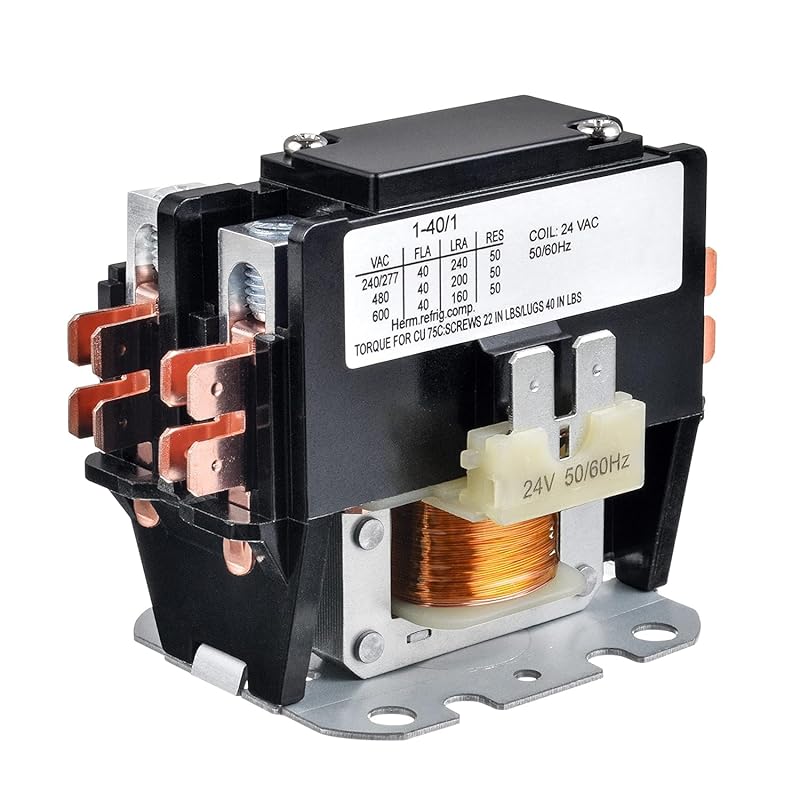
A contactor is an electromechanical switch used in HVAC systems like Carrier air conditioners. It allows low-voltage control signals from the thermostat to safely manage high-voltage power to the compressor and sometimes the condenser fan. Think of it as the “gatekeeper” of your AC’s power delivery system.
The contactor has two main parts: the coil (or solenoid) and the contacts. When the thermostat sends a signal to turn on the air conditioner, it energizes the contactor coil. This creates a magnetic field that pulls together metal contacts, completing the circuit and sending full line voltage to the compressor. Once the system reaches the desired temperature, the thermostat cuts power to the coil, opening the contacts and shutting off the compressor.
In Carrier units, especially those with single-stage compressors, the contactor is typically located inside the outdoor unit or near the indoor blower section, depending on the model. It’s often mounted on the side of the compressor or on a dedicated electrical panel.
Why Proper Wiring Matters
Incorrect wiring can lead to serious consequences. Loose connections may cause arcing, overheating, or even fire hazards. A miswired contactor might prevent the compressor from starting, leading to poor cooling or complete system failure. In extreme cases, it could damage other components like the run capacitor or overload protector.
Moreover, Carrier designs vary slightly across models and production years. Using the wrong wiring method or skipping safety checks increases the risk of voiding your warranty or violating local electrical codes. That’s why following manufacturer specifications and safety protocols is non-negotiable.
Tools and Materials You’ll Need
Before beginning any electrical work, gather the following tools and supplies:
- Voltage tester: To confirm power is off before starting.
- Multimeter: For checking continuity, voltage, and resistance.
- Wire strippers/cutters: For preparing wire ends.
- Phillips and flathead screwdrivers: Standard sizes for terminal screws.
- Torque wrench (optional but recommended): Ensures terminals are tightened to specification.
- Pliers or needle-nose pliers: For gripping small wires or connectors.
- Electrical tape or heat shrink tubing: For insulating connections if needed.
- Carrier-specific wiring diagram: Found in the installation manual or online via your model number.
Also, ensure you have replacement parts ready—especially if you suspect the contactor is faulty. Never attempt repairs without verifying the issue is truly with the contactor and not elsewhere in the circuit.
Step 1: Turn Off Power at the Breaker
Safety is paramount when dealing with HVAC systems. Before touching any wires or components, shut off power to the unit at the main breaker panel. Locate the breaker labeled for your AC or furnace—it’s usually a double-pole switch rated for 240 volts.
After turning off the breaker, use a non-contact voltage tester to double-check that no live current remains in the lines. Test both incoming power wires (typically black and red or black and white) at the disconnect box or contactor terminals. Only proceed once all indicators show zero voltage.
Step 2: Access the Contactor
Once power is confirmed off, locate the contactor. In most Carrier rooftop or split-system AC units, the contactor is housed in a plastic or metal junction box on the side of the outdoor condensing unit. Remove the cover using a screwdriver.
Inside, you’ll see the contactor assembly—a rectangular device with several thick copper or aluminum terminals and two smaller wires attached to the coil. Note its position relative to other components so you can reinstall it correctly later.
Step 3: Review the Wiring Diagram
This step cannot be emphasized enough: always refer to the official Carrier wiring diagram for your specific model. These diagrams are available in the user manual or downloadable from Carrier’s support website. Search by serial number or model name to get accurate schematics.
Typical contactor wiring includes:
- L1 and L2 (Line Voltage Input): Usually black and red wires coming from the disconnect switch.
- T1 and T2 (Load Output): Connected directly to the compressor terminals.
- Common (C) and Fan (F) terminals: May exist for auxiliary fans in some models.
- Control Coil Wires: Small-gauge wires (often yellow, blue, or white) connecting to the thermostat circuit.
Label each wire as you remove them if necessary, but try to memorize their positions based on the diagram. Taking photos before disconnection is highly recommended.
Step 4: Disconnect Old Wiring
Use a screwdriver to loosen the terminal screws securing each wire. Gently pull the wires free, keeping track of which goes where. If the old contactor was damaged, inspect the wires for signs of burning, fraying, or corrosion—replace any compromised conductors before installing the new unit.
Clean the terminal posts lightly with a wire brush if they appear tarnished. This ensures good conductivity and prevents future connection issues.
Step 5: Install the New or Repaired Contactor
Position the new contactor in the same orientation as the old one. Secure it to the mounting studs with the provided screws—do not overtighten, as this can crack the housing.
Now, begin wiring according to the diagram:
Connecting Line Voltage Input (L1/L2)
Attach the hot leads (usually black and red) from the disconnect to the L1 and L2 terminals on the contactor. Ensure tight connections; use a torque wrench if specified in the manual (typically 15–20 in-lbs).
Connecting Load Output (T1/T2)
Run the wires from these terminals directly to the compressor’s run windings. Again, match polarity if applicable (though most compressors don’t require it). Secure with wing nuts or set-screws if your model uses them.
Connecting Control Coil
The coil wires connect to the low-voltage side—typically labeled R (for 24VAC from the transformer) and C (common). Some systems also include Y (cooling stage) or O/B (heat pump reversing valve), but for standard cooling, only R and C are needed.
Double-check that all connections match the diagram exactly. Crossed wires here can cause system malfunctions or damage the thermostat board.
Step 6: Reassemble and Restore Power
Replace the contactor cover and secure it with screws. Close the outdoor unit access panel if applicable. Return to the main electrical panel and restore power to the AC unit.
Set the thermostat to cool mode and observe the system startup. Listen for a loud “click” as the contactor engages—this confirms the coil is energized and contacts are closing. The compressor should begin running within 30–60 seconds.
Step 7: Test System Operation
Monitor the system for several minutes. Check that:
- The compressor runs smoothly without unusual vibrations or noises.
- The condenser fan spins correctly (if present).
- The indoor blower activates as expected.
- The room temperature begins to drop.
If everything works as intended, congratulations—you’ve successfully wired the contactor! If not, refer to the troubleshooting section below.
Troubleshooting Common Issues
Even experienced technicians encounter hiccups. Here are frequent problems and solutions:
Problem: No Click When Thermostat Calls for Cooling
Solution: Verify 24VAC at the R and C terminals using a multimeter. If absent, check the transformer or thermostat wiring. If voltage is present but no click, the contactor coil may be open—replace the contactor.
Problem: Click Occurs But Compressor Doesn’t Start
Solution: Test continuity across T1-T2 terminals while the contactor is energized. If open, contacts are fused or worn. Also check for tripped overloads or blown fuses.
Problem: Burnt Smell or Discolored Terminals
Solution: Indicates arcing due to loose connections or failing contacts. Shut down power immediately, clean terminals, and re-torque wires. Replace the contactor if pitting is visible.
Problem: Intermittent Operation
Solution: Often caused by dirty or corroded terminals. Clean with emery cloth and apply dielectric grease to prevent oxidation.
When to Call a Professional
While basic contactor replacement is manageable for many DIYers, certain situations demand expert help:
- You’re uncomfortable working with 240V circuits.
- The original wiring is damaged beyond simple repair.
- Your system uses variable-speed motors or advanced controls (e.g., ComfortNet™).
- Local codes require licensed electricians for HVAC modifications.
Remember: HVAC systems involve high voltages and complex interactions. When in doubt, call a Carrier-certified technician. They have diagnostic tools and training to handle nuanced issues safely.
Best Practices for Long-Term Reliability
To extend the life of your contactor and overall system:
- Schedule annual maintenance with a qualified HVAC service provider.
- Keep the area around the outdoor unit clear of debris and vegetation.
- Replace contactors proactively every 5–7 years, even if they seem fine.
- Install surge protectors to guard against lightning-induced voltage spikes.
- Use OEM (Original Equipment Manufacturer) parts—generic contactors may not meet Carrier’s specs.
Following these habits reduces downtime and avoids costly emergency repairs.
Conclusion
Wiring a contactor in a Carrier air conditioner isn’t rocket science—but it does require attention to detail, respect for electrical safety, and adherence to model-specific guidelines. By following this guide, you’ve learned how to identify the component, prepare your workspace, follow the correct sequence, and verify proper function.
Whether you’re upgrading an older unit, replacing a burnt-out contactor, or simply learning more about your HVAC system, mastering this task empowers you to maintain efficient, safe, and reliable cooling year-round. And when you do it right the first time? That’s peace of mind in every season.