Replacing your Carrier air conditioner capacitor is a simple DIY task that can fix common AC issues and save you hundreds in service calls. With the right tools and safety precautions, you can restore your unit’s performance in under an hour. This guide walks you through every step, from locating the capacitor to testing the system afterward.
Quick Answers to Common Questions
Tip/Question?
Answer: Always wear insulated gloves and safety glasses when handling electrical components. Even after turning off the power, capacitors can retain dangerous charges.
Tip/Question?
Answer: Label the wires before disconnecting them. Use masking tape and a marker to note which wire goes to which terminal—this avoids confusion during reassembly.
Tip/Question?
Answer: Check the microfarad (µF) and voltage (V) ratings on the old capacitor before buying a replacement. These must match exactly for proper function.
Tip/Question?
Answer: Use a digital multimeter to test the new capacitor’s capacitance after installation. A reading within 5% of the rated value confirms it’s working correctly.
Tip/Question?
Answer: Never reuse a bulging, leaking, or cracked capacitor. These are signs of internal failure and should be replaced immediately to prevent further damage.
How to Replace Carrier Air Conditioner Capacitor: A Complete Step-by-Step Guide
If your Carrier air conditioner isn’t cooling properly, won’t start, or makes a humming noise without turning on, the issue could be a faulty capacitor. The capacitor plays a crucial role in starting the compressor and fan motors, storing and releasing electrical energy as needed. While capacitors rarely fail outright, they can wear out over time due to heat, age, or power surges. Replacing it yourself is a smart way to save on repair costs—most homeowner-friendly models allow this fix with basic tools.
This guide will walk you through everything you need to know about replacing your Carrier AC capacitor safely and effectively. Whether you’re a beginner or just brushing up on your HVAC skills, we’ll cover identification, removal, installation, and testing. By the end, you’ll have the confidence to tackle this common repair and get your air conditioning back in top shape.
Understanding the Carrier Air Conditioner Capacitor
The capacitor is like the “battery” of your air conditioning system. It stores electrical energy and delivers a surge when the compressor or fan motor needs extra power to start. Most Carrier units use a single capacitor that powers both the compressor and the condenser fan, though some larger systems may have separate capacitors for each component.
Visual guide about How to Replace Carrier Air Conditioner Capacitor
Image source: aitef.or.jp
A failing capacitor often shows signs like the outdoor fan not spinning, the compressor not kicking on, or the unit cycling on and off rapidly. Over time, the internal dielectric fluid can leak or degrade, reducing the capacitor’s ability to hold a charge. When this happens, the motor doesn’t get the kick it needs, and the system fails to operate.
Carrier capacitors are designed to last 5–10 years under normal conditions, but extreme temperatures, humidity, or electrical fluctuations can shorten their lifespan. Regular inspections during seasonal tune-ups can help catch early signs of wear.
Tools and Materials You’ll Need
Before starting, gather these items to make the job smooth and safe:

Visual guide about How to Replace Carrier Air Conditioner Capacitor
Image source: avclabs.com
- Digital multimeter – to test the capacitor’s charge and verify the new one works.
- Screwdriver set – usually Phillips or flathead, depending on your unit model.
- Insulated gloves and safety glasses – protect against electrical hazards and sharp edges.
- New capacitor – make sure it matches your old one’s specifications (see next section).
- Needle-nose pliers – helpful for removing wire connectors.
- Ladder – stable and secure, especially if the outdoor unit is high off the ground.
Optional but useful: a capacitor tester tool, which plugs into the capacitor and gives a quick read of its health. These are inexpensive and available at most hardware stores.
Step 1: Turn Off Power to the Unit
Locate the Disconnect Switch
Most Carrier AC units have a disconnect switch mounted near the outdoor unit. It looks like a large black box with a door and a switch inside. Open the door and flip the switch to the “OFF” position.
Unplug the Unit (If Applicable)
While many disconnect switches control the main power, some units also have a plug-in connection between the indoor and outdoor units. If yours does, unplug it now. This adds an extra layer of safety.
Double-Check with a Multimeter
Even after turning off the disconnect, use your multimeter to confirm there’s no voltage. Set it to DC volts, touch the leads to the capacitor terminals (do not touch metal parts yet), and verify the reading is near zero. This step prevents accidental shocks.
Step 2: Remove the Outdoor Unit Cover
Once power is confirmed off, remove the protective grille or access panel covering the outdoor unit. Most Carrier models use plastic clips or screws. Keep track of where each part goes—take photos if needed—so you can reassemble easily later.
Set the screws aside in a small container to avoid losing them. Gently pull the panel away and place it in a safe spot.
Step 3: Locate the Capacitor
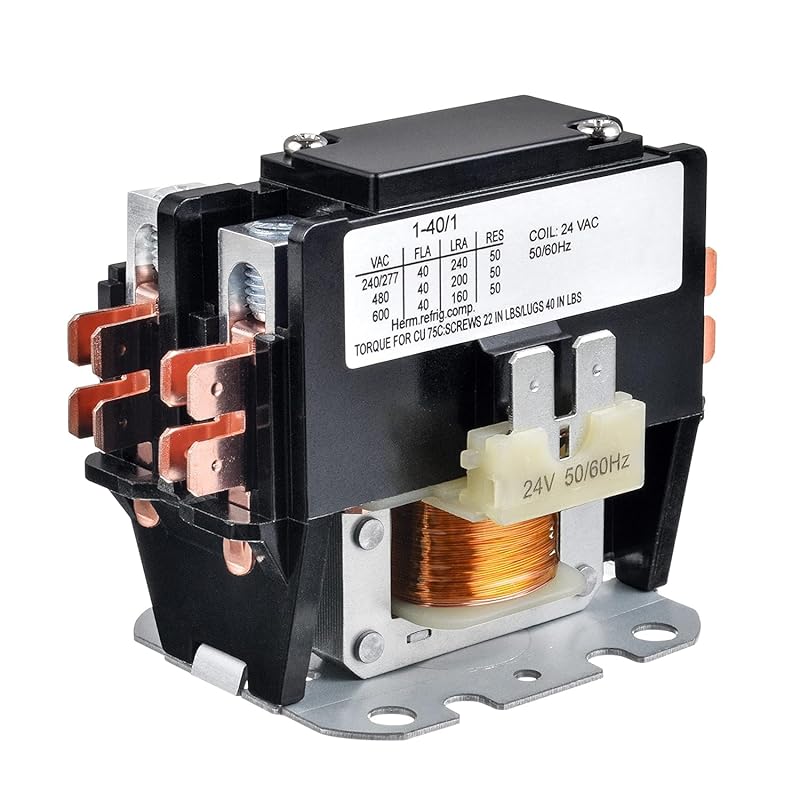
The capacitor is usually housed in a small metal or plastic case, mounted on a bracket near the compressor. It has two or three wires coming out, depending on whether it powers one or multiple motors.
Look for a label on or near the capacitor that includes numbers like “35 µF @ 440V” or “45/5 µF @ 370V.” This info is critical when ordering a replacement. Write it down or take a photo.
Step 4: Discharge the Old Capacitor (Safety Critical!)
Never skip this step. Capacitors can store dangerous electrical charges even after power is off. To discharge it safely:
- Use an insulated screwdriver or a capacitor discharge tool.
- Carefully touch the two main terminals (not the smaller ones) together with the screwdriver.
- You might see a small spark—this means the capacitor is releasing stored energy.
- Hold the terminals together for 10–15 seconds to ensure it’s fully drained.
This prevents accidental shocks while handling the capacitor or reconnecting wires.
Step 5: Remove the Wires from the Old Capacitor
Take note of which wire connects to which terminal. Usually, the black wire is the common (COM) lead, and the blue or red wire connects to the fan motor. The yellow wire often powers the compressor.
Use needle-nose pliers to gently twist and lift the wire nuts off each terminal. Don’t yank on the wires—they can break. Once loose, carefully pull the wires free.
Label the wires with tape or a marker if you’re concerned about mixing them up during reinstallation. Most people remember “black = common,” but it’s better to be safe.
Step 6: Unfasten and Remove the Old Capacitor
Most capacitors are held in place by two or three mounting brackets. Use your screwdriver to loosen the screws and slide the capacitor out of its bracket. Some models may use zip ties—cut those with diagonal cutters.
Handle the old capacitor with care. If it’s bulging, leaking, or has a cracked case, it’s definitely time to replace it.
Step 7: Install the New Capacitor
Place the new capacitor in the same orientation as the old one. Secure it with the mounting screws or brackets, ensuring it sits snugly but not too tight.
Now reconnect the wires to the matching terminals:
- Black wire → Common (COM) terminal
- Blue wire → Fan terminal
- Yellow wire → Compressor terminal
Twist the wire nut back onto each connection until it’s secure. Give each wire a gentle tug to ensure it’s not loose.
Step 8: Reassemble the Outdoor Unit
Put the access panel back in place and reattach all screws or clips. Make sure everything is aligned and the panel closes tightly. Don’t force it—if it doesn’t fit, double-check that you didn’t miss a clip.
Step 9: Restore Power and Test the System
Flip the disconnect switch back to “ON.” If there was a plug between units, plug it back in. Now turn on your thermostat and set it to cool mode.
Listen carefully. The compressor should hum and then start running smoothly. The outdoor fan should spin at full speed. If both activate within 30–60 seconds, the capacitor replacement was successful.
Step 10: Verify with a Multimeter (Optional but Recommended)
After the unit has run for a few minutes, turn it off again and use your multimeter to check the new capacitor’s voltage. Set the meter to capacitance (µF) mode and touch the leads to the terminals. The reading should be within ±5% of the rated value (e.g., 35 µF ± 1.75 µF).
This confirms the capacitor is holding a proper charge and functioning correctly.
Troubleshooting Common Issues
Unit Still Won’t Start
If the system still doesn’t run after replacing the capacitor, check other components. The issue could be a faulty contactor, tripped breaker, or wiring problem. Also, inspect the thermostat settings and air filter.
Humming But No Movement
This classic sign of capacitor failure usually resolves after replacement. However, if the motor still doesn’t turn, the compressor or fan motor itself might be damaged.
New Capacitor Doesn’t Hold Charge
Ensure the replacement matches the exact microfarad and voltage ratings. A mismatch can cause immediate failure. Also, verify all connections are tight and clean.
Wires Are Corroded or Damaged
Over time, moisture and dirt can corrode wire ends. If you see greenish residue or frayed wires, clean or replace them before installing the new capacitor.
Old Capacitor Was Already Bad
In rare cases, the capacitor failed so completely that the system couldn’t even attempt to start. In this case, replacing it is the fix—but always test to confirm.
When to Call a Professional
While most capacitor replacements are DIY-friendly, consider calling a licensed HVAC technician if:
- You’re uncomfortable working with electricity.
- The unit is hard to access or requires climbing a ladder in poor weather.
- The capacitor is located behind a sealed panel or requires refrigerant handling.
- Your system is older than 10 years or has recurring electrical issues.
A professional can also inspect the entire system and catch related problems, like failing relays or worn contacts.
Preventative Tips for Long-Term Reliability
To avoid future capacitor failures:
- Schedule annual HVAC maintenance.
- Keep the outdoor unit clear of debris, plants, and snow.
- Install a whole-house surge protector to shield sensitive electronics.
- Replace air filters every 1–3 months to reduce system strain.
- Don’t ignore warning signs—early detection saves money.
Remember, a healthy capacitor is quiet, cool, and doesn’t bulge. Trust your instincts and act quickly if something seems off.
Conclusion
Replacing a Carrier air conditioner capacitor is a straightforward repair that can restore your cooling system’s efficiency and reliability. With basic tools, attention to safety, and careful attention to detail, you can complete the job in under an hour. This simple fix often resolves common issues like no-start conditions, weak airflow, and loud humming noises—saving you time, money, and discomfort.
Always prioritize safety by cutting power and discharging the capacitor. Match the replacement to your original specs, and don’t rush the wiring connections. When in doubt, consult your Carrier manual or reach out to a certified technician.
By taking control of this maintenance task, you’re not only fixing your AC—you’re building confidence in your ability to care for your home’s systems. And who knows? You might discover a passion for DIY home improvement along the way.