Older Carrier air conditioners often have contactor failures that cause cooling issues. This guide walks you through diagnosing and fixing the problem safely and effectively. With basic tools and a little know-how, you can restore your system’s performance without calling a technician.
If your older Carrier air conditioner isn’t turning on or only runs intermittently, the problem might be a faulty contactor. This small but vital part controls the high-voltage circuit that powers your compressor and condenser fan. Over time, contactors wear out due to arcing, corrosion, or loose connections—especially in older systems. The good news? Replacing or repairing a contactor is one of the most cost-effective DIY fixes you can do on an HVAC system. In this complete guide, we’ll walk you through identifying, testing, and replacing an old Carrier contactor with confidence.
Whether you’re dealing with a humming motor that won’t start, a unit that cycles on and off, or just want to prevent future breakdowns, understanding how to handle your contactor gives you control over your home comfort—and your wallet. Let’s get started!
Quick Answers to Common Questions
Can I use any contactor as long as it fits?
No—use only a contactor rated for your exact voltage (240V), current (amperage), and number of poles. Mismatched specs can cause fire hazards or equipment damage.
How do I know if my contactor is stuck closed?
Turn off power and manually press the contactor lever. If it stays closed without electricity, it’s welded shut. This is dangerous—replace it immediately.
Why does my contactor click but the compressor doesn’t start?
This usually means the contactor contacts aren’t making full connection. Test with a multimeter or replace the contactor. Also check the compressor’s capacitor and windings.
Is it worth replacing an old contactor in a 20-year-old unit?
If the rest of the system is in good shape, yes—it’s far cheaper than replacing the whole AC. But if other parts are failing, consider an upgrade.
Do I need special tools to replace a contactor?
Basic hand tools and a multimeter are sufficient. No welding or specialty HVAC tools required unless you’re doing major system repairs.
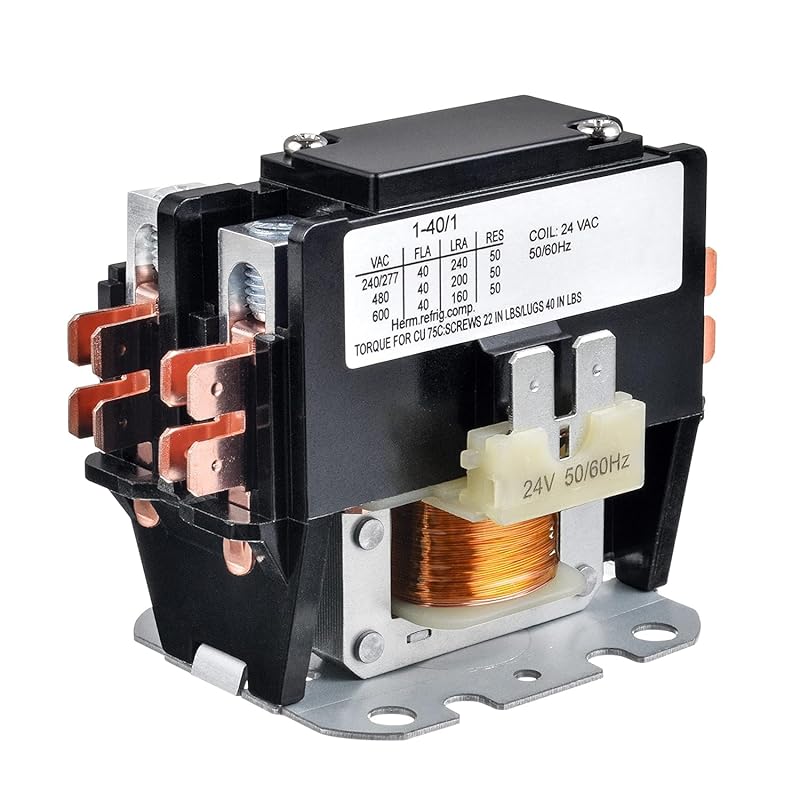
What Is a Contactor and Why Does It Matter?
Before diving into repairs, it helps to understand what a contactor does. A contactor is essentially an electrically controlled switch used to regulate the flow of electricity to major components like the compressor and outdoor fan in your Carrier air conditioner. It’s usually located inside the outdoor unit near the compressor.
When your thermostat calls for cooling, it sends a low-voltage signal (typically 24 volts) to the contactor coil. This activates the contactor, which then closes a much larger set of contacts that allow full 240V power to reach the compressor. Without a properly functioning contactor, your air conditioner simply won’t start—even if everything else looks fine.
In older Carrier models (those built before 2000), contactors are more prone to failure because they weren’t designed for today’s longer run times and higher electrical loads. Common signs include:
– The unit doesn’t turn on at all
– Clicking or buzzing from the outdoor unit
– Intermittent operation
– Tripped breakers after startup
Gather Your Tools and Safety Gear
Visual guide about How to Repair an Older Carrier Air Conditioner Contactor
Image source: m.media-amazon.com
Safety is non-negotiable when working with electrical systems. Even though you’re dealing with a secondary control board, the contactor handles live 240-volt circuits that can seriously injure or kill you if mishandled.
Here’s what you’ll need:
- Voltage tester or multimeter – to confirm power is off and test continuity
- Phillips and flathead screwdrivers – for removing panels and securing wires
- Pliers and needle-nose pliers – useful for gripping small connectors
- Screwdriver set with insulated handles – reduces risk of shock
- Replacement contactor – make sure it matches your model number
- Wire strippers (optional) – if you need to trim damaged wires
- Electrical tape or crimp connectors – for secure connections
- Work gloves and safety glasses – standard protective gear
Also, gather your Carrier unit’s service manual if available. It will list the correct part number and wiring diagram.
Step 1: Turn Off Power at the Breaker

Visual guide about How to Repair an Older Carrier Air Conditioner Contactor
Image source: q-xx.bstatic.com
This is the most important step. Never assume the power is off just because the thermostat is turned off.
Locate your main electrical panel and find the breaker labeled “AC” or “HVAC.” Flip it to the OFF position. For extra safety, turn off the breaker for the entire house or at least unplug the unit from its disconnect switch (usually mounted on the side of the outdoor unit).
Use your voltage tester to double-check that there’s no electricity flowing to the wires going into the contactor. Touch the probes to both hot leads; if the tester lights up, wait a few minutes and test again—it could mean residual charge or a mislabeled breaker.
Step 2: Remove the Outdoor Unit Access Panel
Most Carrier units have a front panel held by screws or latches. Remove the screws with your Phillips head screwdriver and gently lift the panel off. Set it aside carefully—you’ll need clear access to the contactor.
Once inside, locate the contactor. It’s typically mounted near the top of the unit, with two large wires feeding it and several smaller gauge wires connected to the terminals. Label each wire as you remove them using masking tape and a marker, noting which terminal they came from. This prevents confusion during reinstallation.
Step 3: Inspect the Contactor for Obvious Damage
With the panel off and wires disconnected (but still attached for now), visually inspect the contactor. Look for:
– Burn marks or blackened surfaces around the contacts
– Discoloration or melted plastic
– Corrosion or rust on metal parts
– Loose mounting bolts or cracked housing
If you see any of these signs, the contactor is likely bad and needs replacement. Don’t try to clean minor surface dirt—replace it instead. Cleaning rarely restores functionality and can create dangerous arcing.
Step 4: Test the Contactor with a Multimeter
Even if the contactor looks okay, internal wear may prevent it from working. Testing confirms whether it’s truly faulty.
First, identify the coil terminals (usually labeled “C” and “O” or “L1” and “L2”) and the load terminals (marked “L” for line and “C” for common). Use your multimeter in resistance mode (ohms setting).
Test the coil: Place probes across the coil terminals. You should read between 30 and 100 ohms depending on the model. If it reads open (infinite resistance), the coil is burned out.
Next, test the contacts: Set your multimeter to continuity (the symbol looks like a diode or “Ω” with a wave). With the contactor de-energized, touch one probe to the common terminal and the other to each of the three load terminals. You should hear a beep indicating continuity. If none of the contacts show continuity, the contacts are welded shut or broken.
Note: Some contactors have normally closed (NC) and normally open (NO) configurations. Make sure you understand your model’s setup before testing.
Step 5: Replace the Faulty Contactor
Now that you’ve confirmed the contactor is bad, it’s time to swap it out.
Start by disconnecting all wires from the old contactor. Keep them organized so you don’t mix up connections. Most wires are secured with nuts or spade connectors.
Remove the mounting bolts holding the contactor in place and slide it out. Take note of how it sits—some models require alignment pins or specific orientation.
Install the new contactor in the same position. Secure it tightly with the original bolts.
Reconnect the wires according to your labels. Match wire colors and terminal markings exactly. If you’re unsure, consult your service manual or take a photo before removing the old one.
Tighten all connections firmly, but don’t overtighten—this can strip threads or damage insulation.
Step 6: Restore Power and Test Operation
Once everything is reassembled, carefully reinstall the access panel and secure it with screws.
Return to the electrical panel and turn the breaker back on. Go outside and listen for a soft click—that’s your contactor engaging. The compressor should start running within 30 seconds.
Go inside and check that the indoor blower kicks on as well. Run the unit for 10–15 minutes and feel the return air ducts. They should be noticeably cooler. Monitor the system for unusual noises or tripped breakers.
If the unit starts and runs smoothly, congratulations—you’ve successfully repaired your Carrier air conditioner!
Troubleshooting Common Issues
Sometimes, even after replacing the contactor, the problem persists. Here’s how to troubleshoot:
Unit still won’t start: Check the thermostat settings, ensure the circuit breaker didn’t trip, and verify that the contactor coil receives 24 volts. Use your multimeter to test voltage at the coil terminals. If there’s no power, the issue may lie upstream—in the transformer, relay, or thermostat.
Breaker trips immediately: This suggests a short circuit or overload. Inspect all wiring for frayed insulation or loose connections. Also, check the compressor windings using a megohmmeter (available at tool rental stores) to ensure there’s no ground fault.
Clicking sound but no start: The contactor may be closing but not supplying enough current. Verify that the new contactor has the correct amperage rating (usually 30A or 40A) and matches the original model.
New contactor fails quickly: Improper installation or mismatched voltage can cause early failure. Double-check polarity and ensure the replacement is rated for 240V AC.
Remember: If multiple components seem faulty, consider upgrading to a modern programmable thermostat or having a professional perform a full diagnostic.
Preventive Maintenance Tips
To avoid future contactor issues, follow these simple steps:
– Clean the outdoor unit annually—remove debris, trim overgrown plants, and ensure airflow isn’t restricted.
– Schedule professional maintenance every 1–2 years to inspect electrical connections and tighten loose terminals.
– Replace aging contactors preemptively if your unit is over 10 years old, especially in humid climates where corrosion accelerates.
– Avoid frequent cycling by setting your thermostat to maintain a consistent temperature rather than turning the unit on/off constantly.
These habits protect not just the contactor but your entire HVAC system.
Conclusion
Repairing an older Carrier air conditioner contactor is a practical, rewarding project that saves money and keeps your home comfortable. By following safety protocols, testing thoroughly, and installing the right replacement part, you can restore your system’s reliability without spending hundreds on a new unit.
While newer Carrier models come with advanced diagnostics and warranties, older systems still respond well to proper care and timely repairs. Armed with the knowledge from this guide, you’re now equipped to tackle one of the most common HVAC headaches yourself.
And if you ever feel uncertain—don’t hesitate to call a licensed technician. Better safe than sorry when electricity and refrigeration collide.