Carrier RV air conditioner thermostats are the brains behind your mobile cooling system, ensuring precise temperature control and energy savings. Whether you’re parked at a campsite or traveling off-grid, a properly functioning thermostat keeps your space comfortable without wasting power. This guide covers everything from installation to troubleshooting, helping you make the most of your RV’s climate control.
Key Takeaways
- Energy Efficiency: A correctly calibrated Carrier RV AC thermostat reduces compressor runtime, lowering electricity usage and extending component life.
- Temperature Precision: Modern digital thermostats offer accurate readings and programmable settings, unlike older analog models that may drift over time.
- Compatibility Matters: Not all thermostats fit every Carrier model—check your unit’s specs before purchasing a replacement.
- Installation Simplified: Most RV AC thermostats are easy to install with basic tools and minimal wiring knowledge.
- Troubleshooting Tips: Common issues include sensor misalignment, loose connections, or faulty wiring—simple checks can often resolve them.
- Smart Upgrades Available: Consider upgrading to Wi-Fi-enabled smart thermostats for remote control and energy monitoring via smartphone apps.
Have you ever been relaxing in your RV, only to notice the air conditioner isn’t keeping up? Or worse—it’s running nonstop, blasting cold air even when it’s already chilly inside? If so, your Carrier RV air conditioner thermostat might be the culprit. The thermostat is more than just a little dial—it’s the command center that tells your AC when to turn on, how long to run, and when to shut off. Without a working thermostat, your RV’s cooling system becomes unreliable, inefficient, or even dangerous.
In this article, we’ll walk you through everything you need to know about Carrier RV air conditioner thermostats. From understanding how they work to installing, troubleshooting, and upgrading them, we’ve got you covered. Whether you’re a full-time RVer, weekend adventurer, or someone who just wants their rig to stay cool, knowing about your thermostat is key to comfort and peace of mind.
Key Takeaways
- Understanding carrier rv air conditioner thermostat: Provides essential knowledge
Quick Answers to Common Questions
Can I replace my Carrier RV AC thermostat myself?
Yes, most RV thermostats are designed for easy DIY replacement. With basic tools and careful attention to wiring, you can install a new thermostat in under an hour. Always turn off power first and take photos of connections for reference.
How do I know if my thermostat is bad?
Common signs include inconsistent cooling, the AC not starting when it should, continuous fan operation, or a blank/glitchy digital display. You can also test by bypassing the thermostat with a jumper wire—if the compressor starts, the thermostat is likely faulty.
Do I need a special thermostat for my RV?
Not necessarily—but compatibility is key. Look for a thermostat rated for RV use (typically 12V or 120V AC) and verify it matches your AC unit’s model number. OEM thermostats offer perfect fit, but quality aftermarket options work well too.
How often should I replace the batteries in my digital thermostat?
Once a year, or whenever the display dims or shows low-battery warnings. Regular battery changes prevent unexpected failures and ensure consistent performance.
Can I use a smart thermostat in my RV?
Yes, many smart thermostats are compatible with RV AC systems. Look for models with low-voltage support and remote sensors. Just confirm wiring and voltage compatibility before purchasing.
📑 Table of Contents
- How Carrier RV Air Conditioner Thermostats Work
- Signs Your Carrier RV AC Thermostat Needs Attention
- Installing a New Carrier RV Air Conditioner Thermostat
- Upgrading to Smart Thermostats
- Maintaining Your Carrier RV AC Thermostat
- Troubleshooting Common Thermostat Issues
- Choosing the Right Thermostat for Your RV
- Conclusion: Keep Your RV Cool and Comfortable
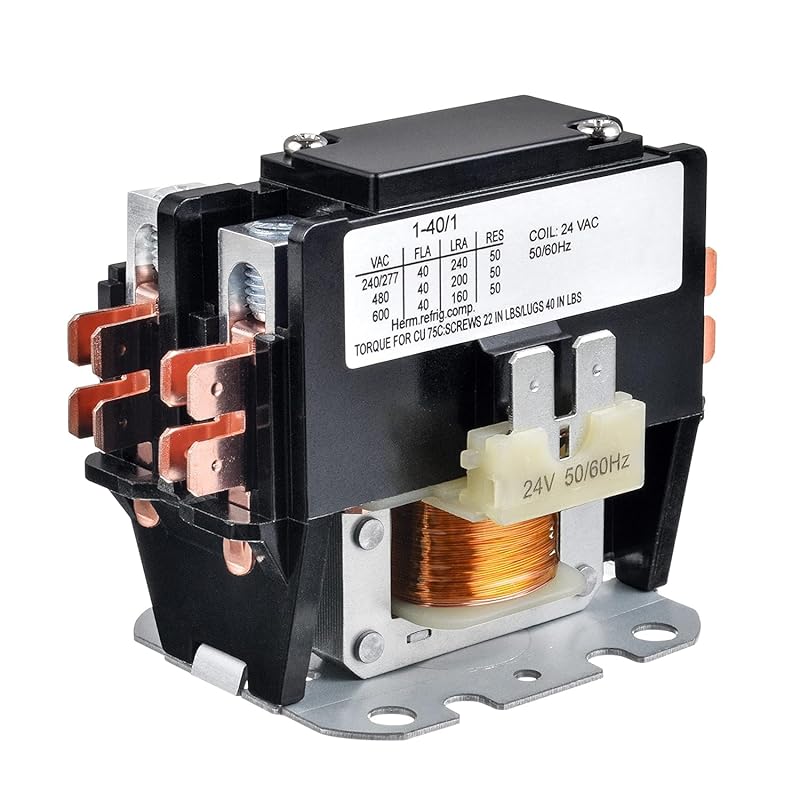
How Carrier RV Air Conditioner Thermostats Work
The thermostat in your Carrier RV air conditioner is essentially the brain of the operation. It monitors the indoor temperature and compares it to your desired setting. When the room gets warmer than your set point, the thermostat signals the compressor to kick on. Once the target temperature is reached, it sends a signal to shut things down.
Unlike household systems, RV AC units are designed to run efficiently on limited power, usually 30-50 amps. That means the thermostat must be extra sensitive and responsive. Older analog models use a bi-metallic coil that physically moves a switch based on heat. These can drift out of calibration over time, leading to inaccurate readings.
Modern digital thermostats, on the other hand, use electronic sensors and microprocessors. They provide more consistent readings and often include features like fan-only modes, sleep timers, and remote sensing. Many also come with compatibility for smart home systems, allowing you to monitor and control your RV’s climate from your phone.
The Role of Remote Sensors
One important feature in many Carrier RV AC thermostats is the remote sensor. This small device is placed away from the main thermostat—often near the front of the RV—to measure actual living space temperature rather than the hot ductwork near the unit. This prevents the AC from cycling off too early because it senses warm air near the ceiling or vents.
For example, if you’re sleeping in the back bedroom but the thermostat is mounted near the front, the remote sensor ensures the AC doesn’t shut off while you’re still uncomfortable. This small detail makes a big difference in real-world performance.
Thermostat vs. Control Board
It’s easy to confuse the thermostat with the control board, but they’re not the same thing. The thermostat is the user interface—the part you see and adjust. The control board, located inside the AC unit, interprets signals from the thermostat and controls the compressor, fan, and relays. Replacing one doesn’t fix the other. Always diagnose the source of the problem before replacing components.
Signs Your Carrier RV AC Thermostat Needs Attention
Visual guide about Carrier Rv Air Conditioner Thermostat
Image source: bosoalternativelife.com
Knowing when your thermostat is failing can save you from sleepless nights in a stuffy RV. Here are some common warning signs:
– Inconsistent cooling: The AC turns on but doesn’t cool effectively, or it cycles too frequently.
– Unit won’t start: The compressor doesn’t engage even when the thermostat calls for cooling.
– Fan runs nonstop: The blower motor operates continuously without the compressor kicking in.
– Digital display is blank or glitchy: This could indicate a dead battery, loose connection, or internal failure.
– Temperature reading is off: You set 72°F, but the thermostat says it’s 68°F—or vice versa.
If you notice any of these, it’s time to inspect your thermostat. Start with the basics: check the circuit breaker, ensure the thermostat is powered, and verify wiring connections.
Common Causes of Thermostat Failure
Over time, several factors can lead to thermostat issues:
– Dust and debris blocking sensors or vents.
– Loose or corroded wiring, especially in humid environments.
– Battery drain in digital models (replace every 1–2 years).
– Physical damage from vibrations during travel.
– Miscalibration due to prolonged use or temperature extremes.
In some cases, the issue isn’t the thermostat itself—it could be a dirty air filter, low refrigerant (rare in RVs), or a failing capacitor. Always rule out simple fixes before replacing expensive parts.
Installing a New Carrier RV Air Conditioner Thermostat

Visual guide about Carrier Rv Air Conditioner Thermostat
Image source: suckhoedoisong.qltns.mediacdn.vn
Replacing your thermostat is a DIY-friendly project for most RVers. With basic tools and a little patience, you can have your new unit up and running in under an hour. Here’s a step-by-step guide:
Step 1: Turn Off Power
Safety first! Locate your RV’s main electrical panel and turn off the breaker powering the AC circuit. If you have a generator or shore power, disconnect it temporarily. This prevents accidental shocks or short circuits.
Step 2: Remove the Old Thermostat
Most RV thermostats are wall-mounted and secured with two screws. Gently pull the faceplate off to expose the wiring. Take a photo of the connections before unplugging them—this helps when wiring the new unit.
Step 3: Test the Wiring
Use a multimeter to confirm continuity between wires. Label each wire (e.g., “R,” “Y,” “G,” “C”) based on standard HVAC color codes. Note: Some RV models use different configurations, so consult your owner’s manual.
Step 4: Install the New Thermostat
Mount the new thermostat plate to the wall using the provided screws. Connect the wires according to the label or diagram on the back of the unit. Secure with wire nuts or terminal screws.
Step 5: Restore Power and Test
Turn the breaker back on, reconnect power, and test the system. Set the thermostat to 68°F and watch for the compressor to engage. Wait 10–15 minutes to confirm proper cooling.
Pro tip: If your new thermostat has a remote sensor, place it in the center of your living area, away from direct sunlight or drafts.
Tools You’ll Need
– Phillips screwdriver
– Multimeter (optional but helpful)
– Wire strippers (if trimming wires)
– Electrical tape
– Level (for straight mounting)
Upgrading to Smart Thermostats
If you’re tired of fiddling with manual dials, consider upgrading to a smart thermostat designed for RVs. Brands like Ecobee, Honeywell, and Carrier now offer models compatible with RV AC systems. These devices let you control temperature remotely via Bluetooth or Wi-Fi, set schedules, and even monitor energy usage.
For example, imagine pulling into a crowded campground at dusk. Using your phone, you pre-cool your RV while you’re still driving. Or, if you wake up sweating at night, you can lower the temp instantly from bed.
Some smart thermostats also integrate with solar power setups, automatically adjusting based on available energy. This is especially useful for boondocking or dry camping.
Compatibility Checklist
Before buying a smart thermostat, verify:
– Voltage requirements: Most RVs use 12V DC or 120V AC—match your model.
– Wiring configuration: Ensure the new unit supports your existing setup.
– Physical size: Measure your wall space to avoid a poor fit.
– App integration: Confirm your smartphone OS (iOS/Android) is supported.
Note: Not all smart thermostats are created equal. Read reviews and contact support to confirm RV compatibility.
Maintaining Your Carrier RV AC Thermostat
Like any electronic device, your thermostat benefits from regular care. Here’s how to keep it performing well:
Clean the Housing and Vents
Dust buildup can block airflow and skew temperature readings. Use a soft brush or compressed air to gently clean around the thermostat and nearby vents. Avoid spraying liquids directly into the unit.
Replace Batteries Annually
Digital thermostats often run on button-cell batteries. Replace them once a year or when the display dims. Weak batteries can cause erratic behavior or total failure.
Check Wiring Connections Quarterly
Vibration from travel can loosen wires over time. Every three months, inspect the connections behind the thermostat. Tighten any that feel loose, and look for signs of corrosion or burn marks.
Calibrate the Thermostat
If your thermostat seems consistently off by a few degrees, you may need to recalibrate it. Many digital models allow you to reset the baseline temperature. Refer to the manual for instructions—usually involves holding a button for 10 seconds.
Protect from Extreme Temperatures
Avoid mounting your thermostat in direct sun, near heaters, or in drafty areas. Ideal locations are interior walls, away from doors and windows.
By following these maintenance steps, you can extend the life of your thermostat and avoid costly repairs.
Troubleshooting Common Thermostat Issues
Even with proper care, problems can arise. Here’s how to diagnose and fix frequent issues:
AC Runs But Doesn’t Cool
Possible causes: Dirty evaporator coils, clogged air filter, or thermostat calling for cooling but not signaling the compressor. Check the filter first—it’s the easiest fix.
Compressor Won’t Start
Test the thermostat by bypassing it with a jumper wire (connect R and Y terminals). If the compressor starts, the issue is likely the thermostat or its wiring.
Fan Runs Continuously
This usually means the thermostat isn’t sending a shutdown signal. Inspect the wiring and consider replacing the thermostat if it’s old or damaged.
Display Is Blank
Start with fresh batteries. If that doesn’t work, check for loose connections or a blown fuse in the thermostat housing.
Temperature Readings Are Inaccurate
Place a calibrated thermometer next to the thermostat to compare readings. If there’s a significant difference, recalibrate or replace the unit.
Remember: If you’re unsure about any step, consult a professional. Safety comes first, especially when dealing with electrical systems.
Choosing the Right Thermostat for Your RV
With so many options on the market, picking the right thermostat can feel overwhelming. Here’s what to consider:
Original Equipment vs. Aftermarket
OEM (Original Equipment Manufacturer) thermostats are made by Carrier specifically for their AC units. They offer perfect compatibility but can be pricey. Aftermarket brands like Lux, White Rodgers, and Honeywell often cost less and offer similar features.
Analog vs. Digital
Analog thermostats are simpler and cheaper but less precise. Digital models offer better accuracy, programmable settings, and remote sensors—ideal for modern RVers.
Features to Look For
– Remote sensor: Improves accuracy in larger RVs.
– Backlit display: Easy to read at night.
– Low-voltage operation: Ensures safe 12V compatibility.
– Mounting options: Wall-mount, surface-mount, or flush-mount.
– Warranty: Look for at least a one-year coverage.
Always cross-reference your RV’s AC model number with the thermostat specifications. A mismatch can lead to poor performance or system damage.
Where to Buy
Reliable sources include:
– Official Carrier dealers
– RV specialty stores (e.g., Camping World, Good Sam)
– Online retailers (Amazon, eBay—verify seller ratings)
– HVAC wholesalers (for bulk or commercial buyers)
Buy from reputable sellers to avoid counterfeit or incompatible units.
Conclusion: Keep Your RV Cool and Comfortable
Your Carrier RV air conditioner thermostat is far more than a simple control knob—it’s the heart of your mobile cooling system. By understanding how it works, recognizing warning signs, and performing regular maintenance, you can ensure reliable performance season after season. Whether you stick with your current setup or upgrade to a smart model, investing time in your thermostat pays off in comfort, energy savings, and peace of mind.
From installation tips to troubleshooting guides, this article has equipped you with the knowledge to take control of your RV’s climate. Remember: a well-maintained thermostat means fewer hot days, lower bills, and more enjoyable adventures on the road.
Now go ahead—check your thermostat today. You might be surprised how much it affects your overall RV experience.
Frequently Asked Questions
What is the function of a thermostat in an RV air conditioner?
The thermostat acts as the control center for your RV’s AC system. It monitors indoor temperature and signals the compressor to turn on or off based on your set preference. This ensures efficient cooling and prevents energy waste.
How do I calibrate my Carrier RV air conditioner thermostat?
To calibrate, compare your thermostat’s reading with a known accurate thermometer. If there’s a difference, most digital models allow you to reset the baseline by holding a specific button (refer to the manual). This corrects minor inaccuracies caused by drift or environmental factors.
Is it safe to replace the thermostat myself?
Yes, as long as you follow safety precautions. Always turn off the power at the breaker before handling any electrical components. If you’re unsure about wiring or testing circuits, consult a professional technician to avoid injury or damage.
Why does my RV AC run constantly even when it’s cold inside?
This could mean your thermostat is malfunctioning or miscalibrated. It may think the room is still hot and keep calling for cooling. Check the thermostat first, then inspect the air filter and remote sensor placement. A dirty filter can also restrict airflow, making the system work harder.
Can a faulty thermostat damage my RV air conditioner?
Indirectly, yes. A thermostat that repeatedly fails to shut off the compressor can cause the unit to overheat or cycle excessively, leading to wear on the compressor and other components. Prompt diagnosis and repair help prevent long-term damage.
Where should I mount my RV air conditioner thermostat?
Mount it on an interior wall, away from direct sunlight, drafts, heat sources, and moisture. Ideal locations include central living areas or near sleeping zones. Avoid placing it near windows, doors, or air vents for accurate readings.