
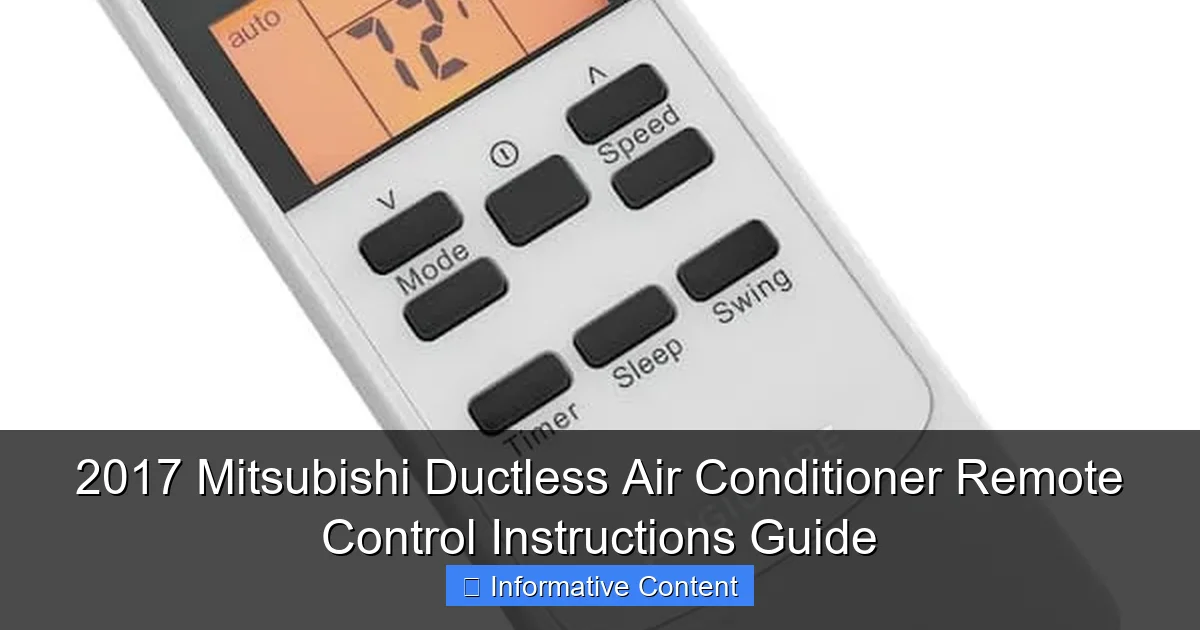
Featured image for 2017 mitsubishi ductless air conditioner remote control instructions
Image source: acsupportspoint.com
Master your 2017 Mitsubishi ductless air conditioner with ease using the intuitive remote control—this guide walks you through every function, from temperature adjustment to mode selection and timer settings. Quick-reference instructions and pro tips ensure optimal performance and energy efficiency all year long.
Key Takeaways
- Master the power button: Press and hold to toggle the unit on or off.
- Set precise temperatures: Use arrow keys to adjust in 1°F increments.
- Activate eco mode: Press the “Econo Cool” button to save energy.
- Control fan speed: Cycle through low, medium, high, or auto settings.
- Use the timer: Schedule on/off times with the “Timer” button.
- Reset filters: Press “Filter” after cleaning to reset the alert.
📑 Table of Contents
- 2017 Mitsubishi Ductless Air Conditioner Remote Control Instructions Guide
- Understanding Your 2017 Mitsubishi Ductless Remote Control
- Basic Operation: Turning On, Setting Temperature, and Modes
- Advanced Features: Timer, i-see Sensor, and Airflow Control
- Maintenance Reminders: Filter Cleaning and Remote Care
- Energy-Saving Tips and Best Practices
- Frequently Asked Questions (Without a FAQ Section)
- Conclusion: Master Your Mitsubishi Remote for Year-Round Comfort
2017 Mitsubishi Ductless Air Conditioner Remote Control Instructions Guide
So, you’ve just had a brand-new 2017 Mitsubishi ductless air conditioner installed in your home—congratulations! You’re probably already enjoying that crisp, cool air on a hot summer afternoon or the cozy warmth during a chilly winter evening. But now you’re holding the remote control, staring at a panel full of buttons, symbols, and settings, and thinking, “Okay… what does this do?”
You’re not alone. Many homeowners feel a little overwhelmed when first using their Mitsubishi ductless system’s remote. It’s sleek, modern, and packed with features—but without the right guidance, it can feel like decoding a secret language. The good news? Once you understand how it works, the remote becomes your best friend for comfort, energy savings, and convenience. In this guide, I’ll walk you through everything you need to know about the 2017 Mitsubishi ductless air conditioner remote control—from basic operation to advanced settings—so you can get the most out of your system without frustration.
Whether you’re trying to figure out how to switch from cooling to heating, set a timer, or clean the filter reminder, this guide has you covered. I’ll share practical tips, real-life examples, and even a few “aha!” moments I’ve had while using my own Mitsubishi system. By the end, you’ll feel confident using every button and feature like a pro.
Understanding Your 2017 Mitsubishi Ductless Remote Control
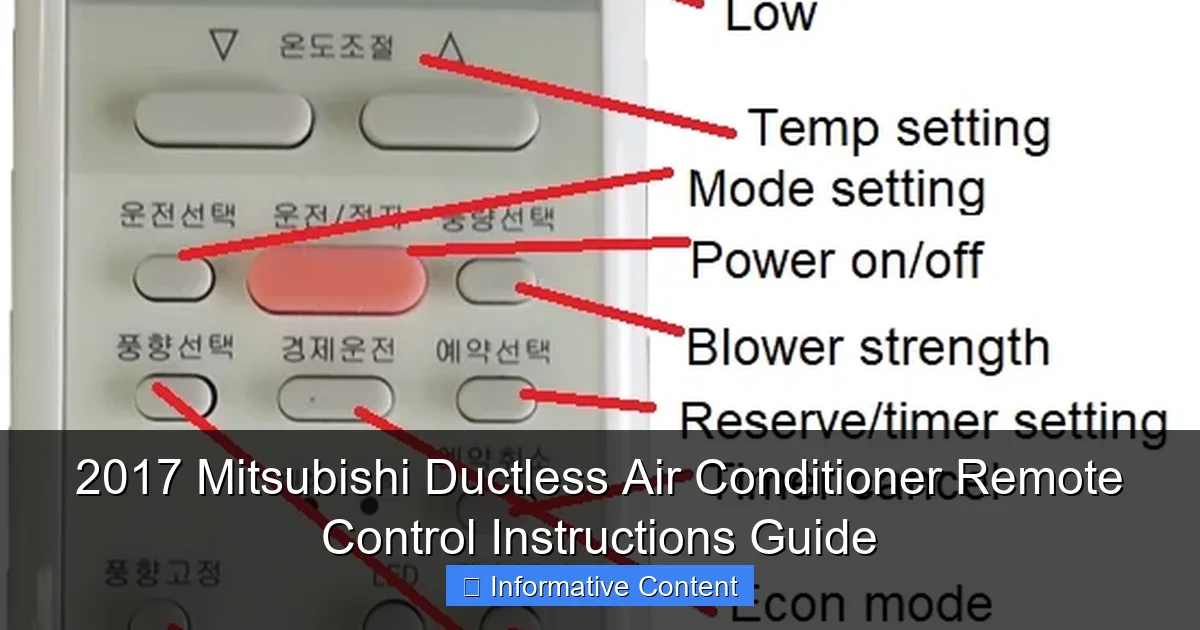
The remote control that comes with your 2017 Mitsubishi ductless air conditioner is more than just a simple on/off switch. It’s the command center for your entire HVAC system, giving you precise control over temperature, airflow, energy use, and even air quality. But to use it effectively, you first need to understand its layout and key components.
Visual guide about 2017 mitsubishi ductless air conditioner remote control instructions
Image source: alquilercastilloshinchables.info
Remote Control Layout and Key Buttons
Let’s start with the basics. The remote has a clean, intuitive design with clearly labeled buttons. Here’s a breakdown of the most important ones:
- Power Button (ON/OFF): This is your main switch. Press it once to turn the system on or off. A green light usually indicates the unit is running.
- Mode Button: Cycles through operating modes: Cool, Heat, Dry, Fan, and Auto. Each press changes the mode, and the corresponding icon appears on the display.
- Temperature Up/Down Arrows: Adjust your desired temperature in 1-degree increments. Most models allow settings between 61°F and 88°F (16°C to 31°C).
- Fan Speed Button: Controls how fast the indoor fan blows. Options typically include Low, Medium, High, and Auto. Auto lets the system decide the best speed based on demand.
- Swing/Louver Button: Adjusts the direction of airflow. You can set it to sweep side-to-side or up-and-down, or lock it in a fixed position.
- Timer Button: Sets the system to turn on or off at a specific time. Great for saving energy while you’re asleep or away.
- i-see Sensor Button (if equipped): Activates Mitsubishi’s intelligent sensor that scans the room for hot or cold spots and adjusts airflow accordingly.
- Filter Reset Button: Resets the filter cleaning reminder after you’ve cleaned or replaced the filter.
Most remotes also have a small LCD screen that shows the current mode, temperature, fan speed, and timer settings. Some models include backlighting for easier use in the dark.
How the Remote Communicates with the Unit
Your remote uses infrared (IR) signals to communicate with the indoor unit. That means you need a clear line of sight between the remote and the receiver on the air handler (usually located on the front panel). If the signal is blocked—say, by furniture or a closed door—the remote might not work properly.
Pro tip: If your remote isn’t responding, try moving closer to the unit or removing any obstructions. Also, check the batteries—weak batteries are a common culprit. Most remotes use two AAA batteries and should last about a year with normal use.
Common Symbols and What They Mean
The remote’s display uses icons to represent different functions. Here are a few you’ll see often:
- Snowflake: Cooling mode
- Sun: Heating mode
- Water Droplet: Dry mode (dehumidifies without cooling much)
- Fan Icon: Fan-only mode (no heating or cooling)
- Clock: Timer is active
- Filter Icon: Time to clean or replace the filter
- i-see Icon: Intelligent sensor is active
Understanding these symbols helps you quickly assess what your system is doing at a glance—no need to guess!
Basic Operation: Turning On, Setting Temperature, and Modes
Now that you know what the buttons do, let’s walk through the everyday tasks you’ll use most often. Whether you’re cooling down on a hot day or warming up on a cold night, these steps will get you comfortable in no time.
Step-by-Step: Turning On Your Mitsubishi Ductless System
Here’s how to start your system from scratch:
- Press the Power (ON/OFF) button. The unit will beep, and the display will light up.
- Press the Mode button until you see the desired mode (Cool, Heat, Dry, etc.).
- Use the Temperature Up/Down arrows to set your preferred temperature.
- Press the Fan Speed button to choose Low, Medium, High, or Auto.
- Press the Swing button if you want the louvers to move automatically for even airflow.
Within a minute or two, you should feel air coming from the unit. If not, double-check that the remote is aimed at the receiver and that the unit isn’t in a delay mode (some systems wait 3–5 minutes after powering on to prevent compressor damage).
Choosing the Right Mode for the Season
Your Mitsubishi ductless system is a year-round comfort solution, but you’ll use different modes depending on the weather.
- Cool Mode: Use this in summer. The system removes heat and humidity from your room. Set the temperature to around 72–76°F for comfort and efficiency.
- Heat Mode: Perfect for winter. Mitsubishi’s hyper-heating technology works even in sub-zero temperatures. Set it to 68–72°F for a cozy feel.
- Dry Mode: Great for humid days when it’s not hot enough to need full cooling. It reduces moisture without overcooling the room.
- Fan Mode: Circulates air without heating or cooling. Useful for ventilation or when you just want a breeze.
- Auto Mode: The system decides whether to heat or cool based on the room temperature. Convenient, but less precise than manual mode.
Real-life example: Last summer, I used Dry mode during a rainy week when the humidity was high but the temperature was only in the mid-70s. My room felt so much more comfortable—no sticky air, no need to blast the AC.
Setting the Right Temperature: Tips for Comfort and Efficiency
Finding the ideal temperature is personal, but here are some guidelines:
- In summer, aim for 74–78°F. Every degree below 78°F can increase energy use by 6–8%.
- In winter, 68–72°F is cozy and efficient. Wear a sweater if you’re chilly—don’t crank the heat!
- Use the remote’s temperature display to monitor changes. Some models show both set temperature and room temperature.
Bonus tip: Avoid setting extreme temperatures. If it’s 95°F outside, don’t set your AC to 65°F. The system will work harder, use more energy, and may not dehumidify properly. A 20°F difference between inside and outside is usually sufficient.
Advanced Features: Timer, i-see Sensor, and Airflow Control
Once you’ve mastered the basics, it’s time to explore the advanced features that make your Mitsubishi ductless system truly smart. These aren’t just gimmicks—they’re designed to improve comfort, save energy, and make your life easier.
Using the Timer Function
The timer is one of the most useful features, especially if you want to save energy or wake up to a comfortable room. Here’s how to use it:
Setting the ON Timer
Want the system to turn on at 6:30 a.m. so your bedroom is cool when you wake up?
- Press the Timer button until “ON” appears on the display.
- Use the Time buttons (usually Up/Down arrows) to set the desired time.
- Press Timer again to confirm.
Setting the OFF Timer
Going to bed and want the system to shut off at midnight?
- Press the Timer button until “OFF” appears.
- Set the time using the arrows.
- Press Timer to confirm.
You can set both ON and OFF timers to work together. For example, set it to turn on at 5:30 p.m. and off at 11:00 p.m.—perfect for coming home to a cool house without wasting energy all day.
Activating the i-see Sensor
If your model has the i-see sensor (look for a button labeled “i-see” or an eye icon), you’re in for a treat. This infrared sensor scans the room every few minutes, detecting where people are and where it’s hottest or coldest.
To activate it:
- Press the i-see button. The icon will appear on the display.
- The system will adjust airflow direction and intensity based on where you are in the room.
Real-life example: I have an open-concept living room and kitchen. With i-see on, the system directs more cool air toward the couch where I sit and less toward the empty dining area. It’s like having a personal climate butler!
Note: The i-see sensor works best when people are moving around. If you’re sitting still for a long time, it might think the room is empty. Just wave your hand or get up briefly to reset the scan.
Controlling Airflow with the Swing and Louver Functions
Proper airflow makes a huge difference in comfort. Stale, stagnant air feels worse than a slightly higher temperature. That’s where the swing and louver controls come in.
Using the Swing Function
Press the Swing button to make the louvers move automatically. In cooling mode, they’ll sweep up and down to distribute cool air evenly. In heating mode, they’ll direct warm air downward (since heat rises).
Locking the Louvers in Place
Sometimes you want the air to blow in a specific direction—say, away from your bed or toward a sunny window. To lock the louvers:
- Press and hold the Swing button for 3–5 seconds.
- The louvers will stop moving and stay in their current position.
- Press the button again to resume automatic swing.
Tip: In winter, angle the louvers slightly downward to push warm air into the room instead of letting it collect near the ceiling.
Maintenance Reminders: Filter Cleaning and Remote Care
Your Mitsubishi ductless system is designed to run efficiently for years, but it needs a little TLC. The remote plays a key role in reminding you when maintenance is due—especially filter cleaning.
Understanding the Filter Cleaning Reminder
After about 250 hours of use (roughly 2–3 months), the remote will display a filter icon or message like “Clean Filter.” This doesn’t mean the filter is clogged—it’s just a reminder to check it.
Here’s how to reset the reminder after cleaning:
- Press and hold the Filter Reset button (usually labeled “Filter” or has a filter icon) for 3–5 seconds.
- The icon will disappear, and the timer will reset.
Pro tip: Clean your filter every 1–2 months during heavy use. A dirty filter reduces airflow, makes the system work harder, and can lead to higher energy bills.
How to Clean the Remote Control
Your remote gets handled daily, so it collects dust, fingerprints, and germs. Here’s how to keep it clean:
- Wipe the surface with a soft, slightly damp cloth. Avoid harsh chemicals or abrasive sponges.
- Use a cotton swab dipped in rubbing alcohol to clean between buttons.
- Remove the battery cover and gently wipe the battery contacts with a dry cloth.
Never submerge the remote in water or use spray cleaners directly on it. And always remove the batteries if you won’t be using the system for a long time (like during a vacation).
Battery Replacement and Troubleshooting
If your remote stops responding, the first thing to check is the batteries. Here’s how to replace them:
- Slide open the battery compartment on the back.
- Remove the old AAA batteries.
- Insert two new batteries, matching the + and – symbols.
- Close the compartment.
If new batteries don’t fix the issue, try these troubleshooting steps:
- Make sure the remote is aimed at the receiver on the indoor unit.
- Check for obstructions or bright light (like direct sunlight) that could interfere with the IR signal.
- Reset the remote by removing the batteries for 1 minute, then reinserting them.
- Ensure the indoor unit is powered on and not in a protective mode (like defrost).
Still not working? Contact Mitsubishi customer support or your installer. The remote might need reprogramming or replacement.
Energy-Saving Tips and Best Practices
Your 2017 Mitsubishi ductless system is already energy-efficient, but smart use of the remote can make it even better. Here’s how to save energy without sacrificing comfort.
Use the Timer to Avoid Wasting Energy
One of the biggest energy wasters is leaving the AC or heat on when no one’s home. Use the timer to:
- Turn off the system at night after you’ve fallen asleep.
- Turn it on 30 minutes before you get home so you walk into a comfortable house.
- Avoid running the system during peak electricity hours (usually 2–8 p.m. in summer).
Example: I set my OFF timer for 11:00 p.m. and my ON timer for 5:30 a.m. That way, the bedroom is cool when I wake up, but I’m not cooling an empty house all night.
Set Realistic Temperatures
As mentioned earlier, small adjustments make a big difference:
- In summer, set the thermostat to 78°F when you’re home and 85°F when you’re away.
- In winter, 68°F is ideal. Use a programmable schedule if your model supports it.
Use ceiling fans to help circulate air. They use far less energy than your HVAC system and make the room feel 4–6°F cooler.
Take Advantage of Eco Mode (If Available)
Some 2017 Mitsubishi models have an Eco or Economy mode that reduces power consumption by slightly adjusting temperature and fan speed. Look for an “Eco” button or icon on your remote.
When activated, the system prioritizes efficiency over rapid cooling or heating. It’s perfect for mild weather or when you’re not in a hurry to reach your target temperature.
Regular Maintenance = Long-Term Savings
A clean filter, clear airflow, and a well-maintained system use less energy. Follow the filter cleaning schedule, keep vents unobstructed, and schedule annual professional maintenance.
Bonus: Some utility companies offer rebates for energy-efficient HVAC systems. Check if your Mitsubishi ductless unit qualifies—you might get cash back just for using it!
Frequently Asked Questions (Without a FAQ Section)
Even though we’re not including a formal FAQ section, let’s address some common questions I’ve heard from homeowners using the 2017 Mitsubishi ductless remote.
Can I use the remote with multiple units? No—each remote is paired to one indoor unit. If you have a multi-zone system, each zone has its own remote.
Why does the remote show a different temperature than my thermostat? The remote shows the set temperature, not the room temperature. Some models display both. The actual room temp may vary due to sunlight, appliances, or poor insulation.
Can I control the system with my phone? Not with the standard 2017 remote. But Mitsubishi offers Wi-Fi adapters (like the MAC-568IF-E) that let you control your system via a smartphone app. It’s a great upgrade if you want remote access.
What if I lose the remote? Contact your installer or Mitsubishi customer service. They can provide a replacement, though it may need to be programmed to your unit.
Does the remote work through walls? No—it uses infrared, so it needs a direct line of sight. If your unit is in another room, consider installing a signal repeater or using the Wi-Fi adapter for app control.
Conclusion: Master Your Mitsubishi Remote for Year-Round Comfort
Your 2017 Mitsubishi ductless air conditioner remote control is a powerful tool—once you know how to use it. From basic temperature settings to advanced features like the i-see sensor and timer, it puts comfort and efficiency at your fingertips. By following this guide, you’ve learned how to operate every function, maintain your system, and save energy without sacrificing comfort.
Remember, the key to getting the most out of your ductless system is consistency and awareness. Clean your filters regularly, use the timer wisely, and take advantage of smart features like airflow control and Eco mode. And don’t hesitate to experiment—try different fan speeds, louver angles, and temperature settings to find what feels best in your home.
Whether you’re cooling down on a sweltering July afternoon or warming up on a frosty January morning, your Mitsubishi remote is there to help you stay comfortable—efficiently and effortlessly. So go ahead, grab that remote, and take control of your climate. You’ve got this!
| Button | Function | Tip |
|---|---|---|
| Power (ON/OFF) | Turns system on/off | Green light indicates operation |
| Mode | Switches between Cool, Heat, Dry, Fan, Auto | Press repeatedly to cycle modes |
| Temperature Arrows | Adjusts set temperature | Set 74–78°F in summer, 68–72°F in winter |
| Fan Speed | Controls airflow intensity | Use Auto for balanced comfort and efficiency |
| Swing | Moves louvers automatically | Hold to lock in position |
| Timer | Sets ON/OFF times | Great for saving energy while asleep or away |
| i-see | Activates intelligent sensor | Adjusts airflow based on room activity |
| Filter Reset | Resets filter cleaning reminder | Press and hold after cleaning |
Frequently Asked Questions
How do I turn on the 2017 Mitsubishi ductless air conditioner using the remote control?
To turn on the unit, press the “ON/OFF” button on the remote. Ensure the remote is pointed toward the indoor unit and has fresh batteries for reliable operation.
What do the mode symbols (e.g., snowflake, sun, fan) mean on my Mitsubishi remote?
The snowflake symbol activates cooling mode, the sun icon switches to heating, and the fan icon runs the fan without temperature adjustment. These modes help customize comfort based on your needs.
How do I set the timer for my 2017 Mitsubishi ductless air conditioner remote?
Press the “Timer” button on the remote, then use the up/down arrows to set the desired on/off time. The timer function helps automate operation for energy efficiency and convenience.
Why is my Mitsubishi ductless air conditioner remote not responding?
First, check if the batteries are dead or inserted incorrectly. Also, ensure there’s no obstruction between the remote and the indoor unit, and verify the unit is powered on.
Can I adjust the airflow direction with the 2017 Mitsubishi remote control?
Yes, press the “Vane” or “Swing” button to adjust the vertical airflow direction. This feature helps distribute air evenly across the room for optimal comfort.
How do I activate energy-saving mode on my Mitsubishi ductless AC remote?
Press the “Econo” or “Energy Saver” button on the remote to activate this mode. It reduces power consumption by slightly adjusting temperature and fan speed while maintaining comfort.

