
Featured image for whirlpool air conditioner remote control instructions
Image source: img.auctiva.com
Master your Whirlpool air conditioner with ease using our simplified remote control instructions. From basic functions like power and temperature adjustment to advanced modes such as sleep, timer, and fan speed, this guide breaks down every button and feature for quick, hassle-free operation. No more guesswork—cool comfort is just a click away.
Key Takeaways
- Master basic functions: Learn power, mode, and fan speed controls first.
- Use temperature presets: Save energy with pre-programmed eco-friendly settings.
- Sync remote properly: Point directly at the AC unit for reliable signals.
- Replace batteries timely: Weak batteries cause unresponsive remote issues.
- Reset when needed: Fix glitches by holding power for 5 seconds.
- Clean regularly: Wipe the remote to prevent sticky buttons and malfunctions.
📑 Table of Contents
- Why Your Whirlpool Air Conditioner Remote Deserves Your Attention
- Getting Started: The Basics of Your Whirlpool Remote
- Operating Modes: Cooling, Heating, and Beyond
- Advanced Features: Timers, Sleep Mode, and Turbo
- Maintenance and Troubleshooting: Keep Your Remote Working
- Energy Efficiency and Pro Tips: Master Your AC
Why Your Whirlpool Air Conditioner Remote Deserves Your Attention
Let’s be honest—how many times have you fumbled with your air conditioner remote, pressing buttons like a confused DJ at a silent party? You’re sweating, the AC isn’t cooling, and the remote feels like it’s speaking a language only aliens would understand. If you own a Whirlpool air conditioner, you’re in luck. Their remotes are designed with simplicity in mind, but like any tech, they come with quirks that can trip up even the most patient user.
I’ve been there. I once spent 20 minutes trying to turn on the fan mode, only to realize I’d accidentally switched to “dry” mode and was slowly turning my living room into a desert. Sound familiar? The good news? Once you understand the basics of your Whirlpool air conditioner remote control instructions, you’ll never have that moment again. Whether you’re a first-time AC owner or just need a refresher, this guide will walk you through everything—from the simplest button to the most advanced settings—so you can stay cool, calm, and in control.
Getting Started: The Basics of Your Whirlpool Remote
Before you start tweaking modes or adjusting timers, let’s get comfortable with what’s in your hand. Your Whirlpool remote might look simple, but it’s packed with features. Think of it as the “brain” of your AC—without it, your unit is just a silent box on the wall.
Visual guide about whirlpool air conditioner remote control instructions
Image source: alquilercastilloshinchables.info
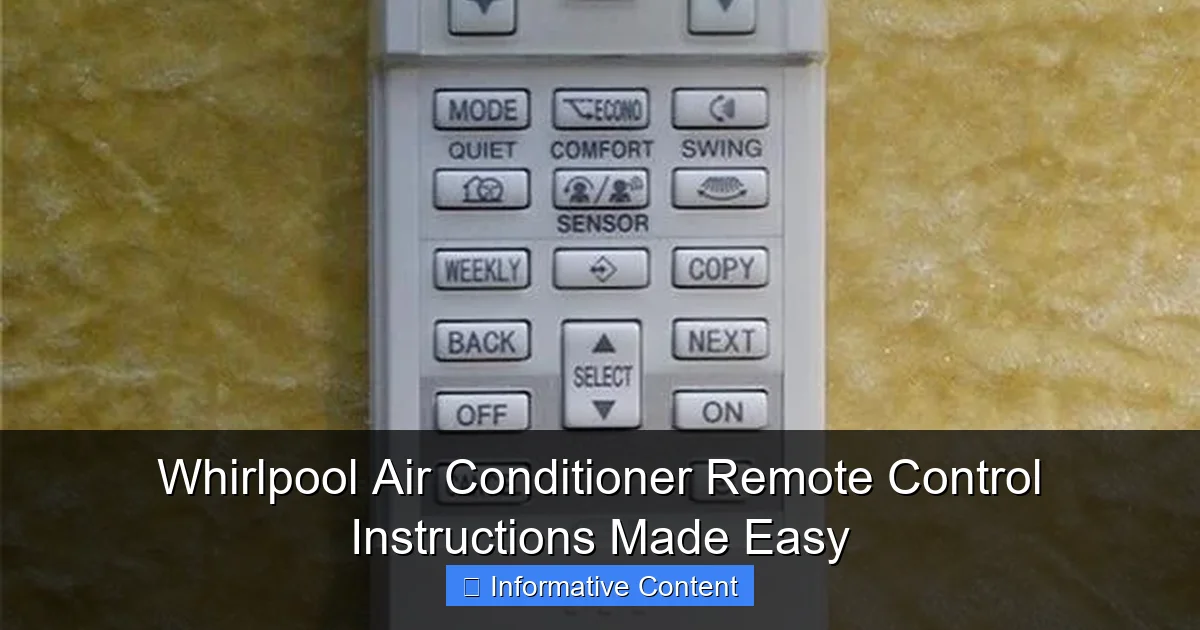
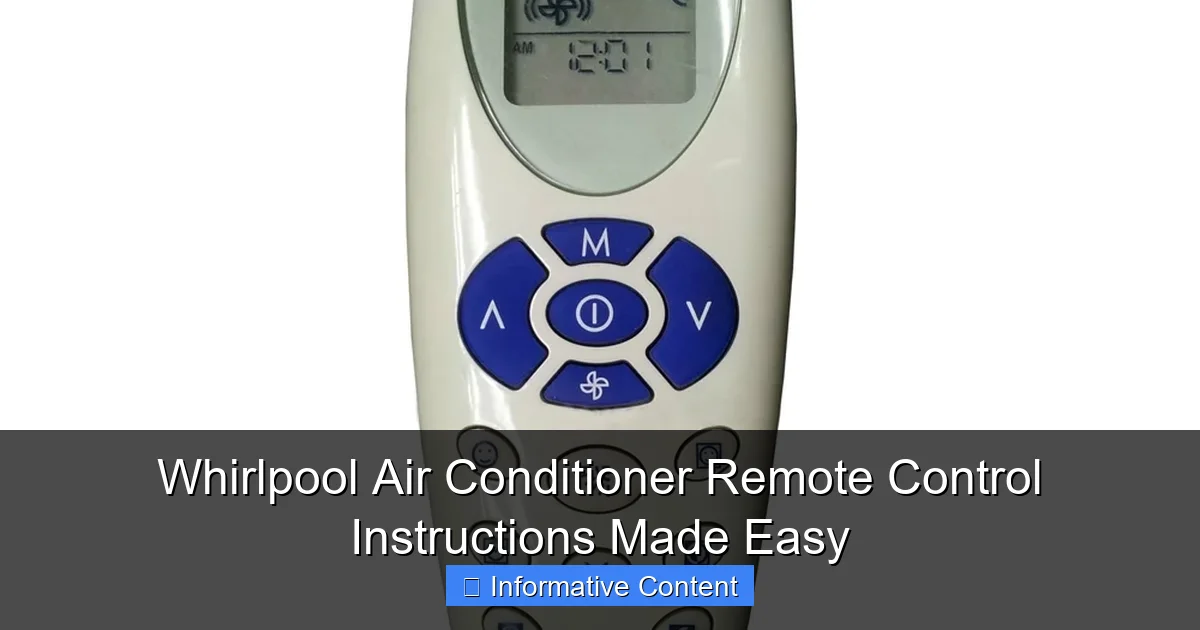
Button Breakdown: What Each Button Does
Most Whirlpool remotes follow a standard layout, but slight variations exist between models. Here’s a quick rundown of the most common buttons:
- Power (On/Off): The big button at the top. Press once to turn on, again to turn off.
- Mode: Cycles through cooling, heating (if applicable), fan-only, dry (dehumidify), and auto modes.
- Fan Speed: Lets you choose between low, medium, high, or auto fan settings.
- Temperature Up/Down: Adjusts the desired room temperature. Typically ranges from 16°C to 30°C (60°F to 86°F).
- Swing: Controls the direction of the air louvers (vertical movement).
- Timer: Sets on/off schedules. Useful for saving energy.
- Sleep: Activates a quiet, energy-saving mode that adjusts temperature gradually overnight.
- Turbo: A quick blast of maximum cooling (available on some models).
Pro tip: If your remote has an “iFeel” or “Sensor” button, it uses a built-in sensor to detect room temperature near the remote, not just the AC unit. This helps maintain more accurate comfort.
How to Insert and Replace Batteries
Battery issues are the #1 cause of remote “malfunctions.” Here’s how to handle them:
- Flip the remote over and locate the battery compartment (usually a small sliding panel).
- Use a coin or fingernail to gently pry it open.
- Insert two AAA batteries, matching the + and – signs.
- Slide the cover back until it clicks.
Common mistake: Forcing the cover shut can damage the latch. If the remote still doesn’t work after replacing batteries, check for corrosion or loose contacts. A quick wipe with a dry cloth often fixes it.
Pairing the Remote with Your AC (When Needed)
Most Whirlpool remotes are pre-paired, but if you’re using a replacement or the AC doesn’t respond, here’s what to do:
- Turn on the AC using the manual button on the unit (if available).
- Point the remote at the AC and press and hold the “Power” and “Mode” buttons together for 3–5 seconds.
- The AC will beep or flash a light to confirm pairing.
Real-life example: My neighbor once bought a second-hand Whirlpool AC and couldn’t get the remote to work. After we paired it using the steps above, it worked perfectly—no tech support needed!
Operating Modes: Cooling, Heating, and Beyond
Your Whirlpool AC isn’t just for summer. Depending on your model, it can cool, heat, dehumidify, and even purify the air. But using the wrong mode can waste energy or make you feel worse. Let’s break it down.
Cooling Mode: The Summer Lifesaver
This is the default mode for most users. Here’s how to use it effectively:
- Press the Mode button until the display shows a snowflake or “Cool” icon.
- Set your desired temperature (24°C/75°F is a good starting point).
- Choose your fan speed. For quick cooling, use “Turbo” or “High” for the first 10–15 minutes, then switch to “Medium” or “Auto” to maintain comfort.
Tip: Avoid setting the temperature too low (e.g., 16°C/60°F). It won’t cool faster—it just runs longer, using more energy and risking overcooling.
Heating Mode (For Heat Pump Models)
If your Whirlpool AC has a heat pump, you can use it in winter too:
- Press Mode until you see a sun or “Heat” icon.
- Set the temperature to your comfort level (20–22°C/68–72°F is ideal).
- Use “Auto” fan speed for balanced warmth.
Note: Heat pumps are less efficient below 5°C/41°F. If it’s freezing outside, supplement with a space heater.
Fan-Only and Dry Modes: Not Just for Summer
These modes are often overlooked but super useful:
- Fan-Only: Circulates air without cooling. Great for spring/fall days when you just need airflow. Saves energy!
- Dry Mode: Reduces humidity without cooling much. Perfect for damp days or muggy climates. Press Mode until you see a water droplet icon.
Real-life example: My friend in Seattle uses “Dry” mode all summer to combat the Pacific Northwest humidity. Her apartment feels fresher, and her clothes dry faster!
Auto Mode: Let the AC Do the Work
Auto mode lets the AC choose the best settings based on room temperature:
- Press Mode until you see an “Auto” icon.
- Set your desired temperature.
- The AC will switch between cooling, heating, and fan modes as needed.
Best for: People who forget to adjust settings throughout the day. Downside: It can feel less responsive than manual mode.
Advanced Features: Timers, Sleep Mode, and Turbo
Your Whirlpool remote isn’t just for turning the AC on and off. With a few extra buttons, you can save energy, sleep better, and cool your room in record time.
Using the Timer: Save Energy and Sleep Better
The timer is a game-changer for energy efficiency. Here’s how to use it:
- On Timer: Sets the AC to turn on at a specific time. Great for coming home to a cool house.
- Press Timer until “On” appears.
- Use Up/Down buttons to set the time.
- Press Timer again to confirm.
- Off Timer: Turns the AC off after a set period.
- Press Timer until “Off” appears.
- Set the duration (1–24 hours).
- Press Timer to confirm.
Pro tip: Use the “Off” timer at night. Set it to turn off after 2–3 hours to save energy while still cooling you to sleep.
Sleep Mode: The Secret to Comfortable Nights
Sleep mode gradually adjusts the temperature to mimic your body’s natural cooling cycle:
- Press the Sleep button. The display will show a moon or “Sleep” icon.
- The AC will raise the temperature by 1–2°C (2–4°F) every 30 minutes, then stabilize.
- After 7 hours, it returns to the original setting or turns off.
Why it works: Your body cools down at night. Sleep mode prevents overcooling, so you don’t wake up shivering. Note: Sleep mode only works in Cool or Heat modes—not Fan or Dry.
Turbo Mode: For When You Need Instant Relief
Turbo mode is like hitting the AC’s “boost” button:
- Press the Turbo button (or hold the Fan button on some models).
- The fan runs at maximum speed, and the compressor works harder.
- Great for cooling a hot room in 10–15 minutes.
Caution: Turbo uses more energy. Use it sparingly, then switch to a lower fan speed to maintain comfort.
Maintenance and Troubleshooting: Keep Your Remote Working
Even the best remotes need care. A little maintenance goes a long way in avoiding headaches.
Cleaning Your Remote: A Quick 2-Minute Fix
Dust, grime, and sticky fingerprints can block buttons or sensors:
- Turn the remote off and remove batteries.
- Wipe the surface with a slightly damp microfiber cloth (never wet!).
- Use a cotton swab dipped in rubbing alcohol to clean between buttons.
- Let it dry completely before reinserting batteries.
Never: Spray cleaner directly on the remote. Liquid can seep in and damage circuits.
Common Issues and Quick Fixes
Here are the most frequent problems—and how to solve them:
- AC doesn’t respond:
- Replace batteries.
- Check for obstructions (e.g., furniture blocking the IR sensor).
- Repair the remote (see “Pairing” above).
- Buttons feel stuck:
- Clean with a cotton swab and alcohol.
- Avoid pressing hard—this can damage the membrane.
- Display is blank or dim:
- Replace batteries.
- Check for a “backlight” button (some models have one).
- Remote works intermittently:
- Check for interference (e.g., fluorescent lights, TV remotes).
- Move closer to the AC.
Real-life example: My remote once stopped working after my cat knocked it into a glass of water. After drying it overnight and cleaning the contacts, it worked perfectly—no replacement needed!
When to Contact Support
If none of the above fixes work, it might be a hardware issue. Contact Whirlpool support if:
- The remote is damaged (cracked screen, broken buttons).
- You’ve replaced batteries and cleaned it, but it still won’t work.
- The AC responds to the manual button but not the remote.
Most Whirlpool remotes are covered under warranty for 1–2 years. Keep your receipt!
Energy Efficiency and Pro Tips: Master Your AC
Your Whirlpool AC is efficient, but a few smart habits can save you money and extend its life.
Smart Temperature Settings for Every Season
| Season | Recommended Temp | Why |
|---|---|---|
| Summer | 24–26°C (75–79°F) | Balances comfort and energy use. Every 1°C lower adds ~8% to your bill. |
| Winter (Heat Pump) | 20–22°C (68–72°F) | Prevents overworking the heat pump. Use a sweater if needed! |
| Humid Days | Use “Dry” mode at 26°C (79°F) | Removes moisture without overcooling. |
Pro Tips for Maximum Efficiency
- Use curtains or blinds during the day to block heat.
- Clean the AC filter every 2–4 weeks. A dirty filter forces the unit to work harder.
- Keep the remote in one spot (e.g., a table or hook). No more lost remotes!
- Upgrade to a smart thermostat (if compatible). Some Whirlpool models work with apps for remote control.
Real-life example: I once set my AC to 22°C (72°F) and used the timer to turn off after 3 hours. My energy bill dropped 15% compared to leaving it on all night!
Bonus: Remote Shortcuts You Might Not Know
- Hold “Mode” for 3 seconds: Some models show the current room temperature.
- Press “Turbo” twice: On select models, this activates “Super Cool” mode.
- Use “Swing” with “Fan Speed”: Adjusts both airflow direction and intensity at once.
There you have it—your Whirlpool air conditioner remote control instructions, demystified. From basic buttons to energy-saving tricks, you’re now equipped to master your AC. Remember, the remote is your best friend, not a mystery. Treat it well, and it’ll keep you cool (or warm!) for years. Next time you’re sweating or shivering, don’t panic—just grab your remote, press the right button, and breathe easy. After all, comfort shouldn’t be complicated.
Frequently Asked Questions
How do I pair my Whirlpool air conditioner remote control with the unit?
To pair your Whirlpool air conditioner remote, ensure the unit is powered on, then press and hold the “Reset” or “Pair” button on the remote for 3-5 seconds until the display flashes. The remote should automatically sync within a minute. Refer to your model’s manual for specific steps.
Why is my Whirlpool AC remote not responding?
First, check the batteries and replace them if needed. Ensure there’s no obstruction between the remote and the AC’s sensor, and try resetting the remote by removing the batteries for 30 seconds. If issues persist, re-pair the remote using the Whirlpool air conditioner remote control instructions.
How do I adjust the temperature and fan speed using the remote?
Use the “Temp+” and “Temp-” buttons to set your desired temperature. Press the “Fan” button to cycle through low, medium, high, or auto fan speeds. The display will show your selected settings.
Can I use the remote to set a timer for my Whirlpool AC?
Yes! Press the “Timer” button to set an on/off schedule. Use the arrow buttons to adjust the hours, then press “Enter” to confirm. The Whirlpool air conditioner remote control instructions provide detailed timer programming for your model.
What do the symbols on my Whirlpool AC remote mean?
Common symbols include snowflakes (cooling), a sun (heating), and a fan icon (airflow). A clock symbol indicates timer mode, while a “Sleep” button activates energy-saving mode. Consult your manual for model-specific icons.
How do I reset my Whirlpool AC remote to factory settings?
Remove the batteries, then press and hold any button for 10 seconds. Reinsert the batteries; the remote should reset. This clears all custom settings and restores default functions per the manufacturer’s guidelines.