
Featured image for universal air conditioner support instructions
Image source: i.ytimg.com
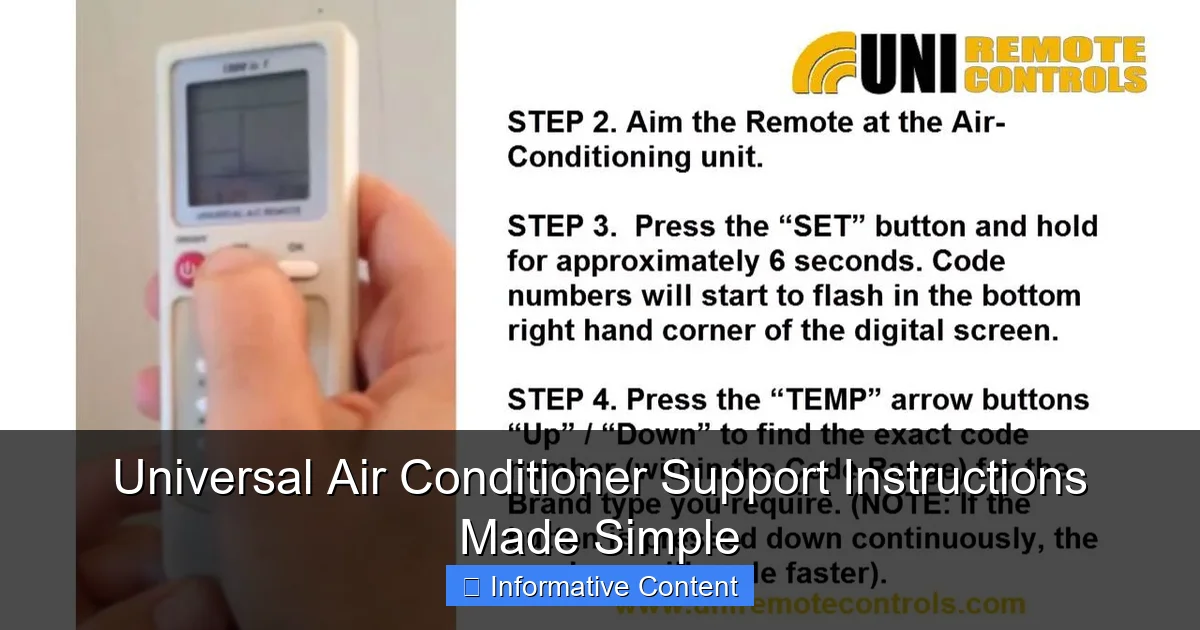
Universal air conditioner support instructions simplify installation and maintenance for all major AC brands, ensuring a perfect fit and peak performance. Step-by-step guidance and adaptable hardware eliminate guesswork, saving time and reducing errors for both DIYers and professionals. Say goodbye to brand-specific hassles with this all-in-one solution.
Key Takeaways
- Measure carefully: Ensure correct AC unit size for optimal support.
- Check compatibility: Verify bracket fit with your AC model first.
- Follow instructions: Adhere strictly to included installation steps.
- Secure tightly: Double-check all bolts and screws for safety.
- Use tools properly: Employ recommended tools to avoid damage.
- Inspect regularly: Schedule routine checks for long-term stability.
📑 Table of Contents
Universal Air Conditioner Support Instructions Made Simple
Let’s face it: when your air conditioner breaks down in the middle of summer, you don’t want to spend hours deciphering a 50-page manual filled with technical jargon. You just want to fix it—fast. That’s where universal air conditioner support instructions come in. Whether you’re a homeowner trying to troubleshoot a noisy unit, a renter dealing with a mysterious error code, or a DIY enthusiast who loves tinkering with appliances, having a clear, one-size-fits-all guide can be a game-changer.
I remember the first time my AC started making a sound like a dying robot. I panicked, called a technician, and ended up paying $150 just to learn that the filter was clogged. If I’d had a simple, reliable set of universal air conditioner support instructions, I could’ve fixed it myself in 10 minutes. That experience taught me the value of clear, accessible guidance—not just for repairs, but for maintenance, safety, and peace of mind. In this guide, we’ll break down everything you need to know about universal support, from basic troubleshooting to advanced care, all in plain, easy-to-follow language. No fluff, no filler—just real solutions.
Why Universal Support Instructions Matter
One Guide for Many Brands
Air conditioners come in all shapes and sizes—window units, split systems, portable ACs, central HVAC setups—and each brand (like LG, Carrier, Daikin, or Frigidaire) has its own quirks. But here’s the good news: many core principles are universal. A clogged filter in an LG unit behaves the same as one in a Samsung. A refrigerant leak in a Daikin feels just like one in a Mitsubishi. That’s why universal air conditioner support instructions exist: to cut through the brand-specific noise and give you a common framework for solving problems.
Visual guide about universal air conditioner support instructions
Image source: storage.googleapis.com
Think of it like learning to drive. Sure, a Tesla handles differently than a Honda Civic, but the basics—steering, braking, checking mirrors—are the same. Universal AC support works the same way. It focuses on the shared anatomy of air conditioners: filters, coils, thermostats, compressors, and drainage systems. Once you understand these, you can apply the same logic to almost any unit.
Cost and Time Savings
Calling a technician for every minor issue adds up. According to HomeAdvisor, the average AC service call costs $150–$300. But many problems—like dirty filters, tripped breakers, or frozen coils—can be fixed with a few simple steps. Universal instructions empower you to handle these common issues yourself. For example, replacing a filter takes 5 minutes and costs $10. A technician might charge $80 just to show up. That’s a 90% savings!
Plus, you save time. No waiting 3 days for an appointment. No sitting in a sweltering house. You fix it when it’s convenient for you. And if the problem does require a pro, you’ll know exactly what to tell them, which helps them diagnose faster and reduces labor time (and cost).
Safety First
Air conditioners involve electricity, refrigerants, and moving parts. Messing with them incorrectly can be dangerous. Universal support instructions emphasize safety protocols—like turning off the power before inspecting components, using insulated tools, and avoiding direct contact with refrigerant lines. These aren’t brand-specific; they’re essential for all ACs.
For instance, a universal rule: “Always disconnect the unit from the power source before opening the casing.” This applies to a $200 window unit or a $5,000 central system. It’s a simple step, but it prevents shocks, short circuits, and accidental damage to sensitive electronics.
Essential Tools and Preparations
Must-Have Tools (Most Are in Your Toolbox)
You don’t need a full HVAC toolkit to handle most AC issues. Here’s what you’ll need for universal support:
- Screwdrivers (Phillips and flathead): For opening panels and adjusting components.
- Multimeter: Checks voltage and continuity. A $20 model from Home Depot works fine.
- Fin comb: Straightens bent condenser fins (common after storms or accidental bumps).
- Soft brush: For cleaning coils and filters without damaging delicate parts.
- Bucket or towels: Catches water during drainage line cleaning.
- Flashlight: Illuminates dark corners of the unit.
- Protective gloves and goggles: Keeps your hands and eyes safe from debris and chemicals.
Pro tip: If you don’t own a fin comb, a plastic fork works in a pinch. Just gently straighten the fins without breaking them.
Pre-Check: Safety and Accessibility
Before diving in, do these quick checks:
- Power off: Turn off the unit at the thermostat and circuit breaker. For window units, unplug it.
- Clear the area: Move furniture, plants, or clutter around the AC. You need at least 2 feet of clearance on all sides for airflow and access.
- Check the manual: Even universal instructions have limits. If your unit is under warranty, check if DIY repairs void it. (Spoiler: Most routine maintenance doesn’t.)
- Take photos: Snap pictures of wiring, hoses, and panels before disconnecting anything. This helps you reassemble correctly.
Example: Last summer, my friend Mark tried to clean his AC’s coils but forgot to unplug it. He got a mild shock when his screwdriver touched a live wire. Not fun! A 2-minute safety check could’ve prevented it.
When to Call a Pro
Universal instructions cover 80% of issues, but some problems need a licensed technician:
- Refrigerant leaks: Handling refrigerants (like Freon) requires EPA certification. It’s illegal and dangerous to do it yourself.
- Electrical faults: If the unit keeps tripping breakers or emits a burning smell, stop immediately. This could indicate a fire hazard.
- Compressor failure: Compressors are complex and expensive. A pro can test it properly and advise on repair vs. replacement.
Remember: It’s better to spend $150 on a technician than $1,000 on a new unit because you made a mistake.
Step-by-Step Troubleshooting Guide
Problem 1: AC Not Turning On
This is the most common issue. Here’s how to troubleshoot:
- Check the thermostat: Is it set to “Cool”? Is the temperature lower than room temp? Replace batteries if needed.
- Inspect the circuit breaker: Go to your electrical panel. Look for a tripped switch labeled “AC” or “HVAC.” Flip it back on.
- Examine the power cord: For window units, ensure it’s securely plugged in. Check for frayed wires.
- Test the outlet: Plug in a lamp or phone charger to confirm the outlet works.
- Look for error codes: Some units display codes (e.g., “E1” for low refrigerant). Consult your manual or Google the code + your model number.
Real-world fix: My neighbor’s AC wouldn’t turn on. Turns out, the thermostat’s batteries had died. A 2-minute swap fixed it. No technician needed!
Problem 2: Weak or No Cooling
Your AC runs, but the air isn’t cold. Possible causes:
- Dirty air filter: Check it monthly. If it’s gray and clogged, replace it (every 1–3 months).
- Frozen evaporator coil: Ice buildup blocks airflow. Turn off the AC, let it thaw for 24 hours, then clean the filter and coils.
- Dirty condenser coils: Located in the outdoor unit. Use a soft brush and coil cleaner (available at hardware stores).
- Blocked vents: Move furniture or drapes away from supply vents.
- Low refrigerant: Only a technician can add refrigerant. But you can check for leaks (oil stains, hissing sounds).
Pro tip: If the coil is frozen, don’t chip off the ice with a knife. It can damage the coil. Just wait or use a hair dryer on low heat to speed up melting.
Problem 3: Water Leaks
Water dripping from the unit? Causes include:
- Clogged drain line: The most common culprit. Locate the drain pan (usually at the bottom of the indoor unit). Use a wet/dry vacuum to suck out clogs, or flush the line with vinegar.
- Cracked drain pan: If the pan is damaged, water leaks out. Replace it (~$20–$50).
- Incorrect installation: The unit must be level. If it’s tilted, water pools in one corner. Adjust the mounting brackets or shims.
Example: A reader named Sarah found water under her window AC. She used a turkey baster to clear the drain line with vinegar. Problem solved in 10 minutes!
Problem 4: Strange Noises
Air conditioners aren’t silent, but unusual sounds signal trouble:
- Buzzing: Could be a loose part, failing capacitor, or electrical issue. Tighten screws or call a pro.
- Hissing: Often refrigerant leaks. Stop using the AC and call a technician.
- Clicking: Normal when the unit turns on/off. But constant clicking may indicate a faulty relay.
- Rattling: Loose panels, debris in the fan, or bent fins. Turn off the AC and inspect.
Fun fact: My AC once sounded like a washing machine. I found a loose screw in the fan housing. A quick tighten, and it was quiet as a mouse.
Maintenance: The Key to Longevity
Monthly Checks
Prevention beats repair! Do these monthly:
- Clean or replace filters: A clogged filter reduces efficiency by up to 15%. Set a phone reminder.
- Inspect the outdoor unit: Remove leaves, grass, and debris. Trim plants 2 feet away.
- Check the drain line: Pour 1 cup of vinegar into the drain line to prevent algae buildup.
- Test the thermostat: Lower the temperature by 10°F. The AC should kick in within 5 minutes.
Bonus: Use a programmable thermostat. It saves energy (and money) by adjusting temps when you’re away.
Seasonal Maintenance (Spring and Fall)
Twice a year, give your AC a deeper clean:
- Clean condenser coils: Use a coil cleaner and soft brush. Avoid high-pressure water—it can bend fins.
- Straighten fins: Use a fin comb or plastic fork.
- Check refrigerant lines: Look for cracks or insulation wear. Wrap exposed lines with foam.
- Lubricate moving parts: Fan motors and bearings (if accessible) with non-detergent oil.
- Inspect electrical connections: Tighten loose wires. Replace corroded terminals.
Pro tip: In spring, cover the outdoor unit with a breathable cover (not plastic). This prevents debris buildup but allows airflow.
Long-Term Care
For units over 5 years old:
- Annual professional tune-up: Technicians check refrigerant levels, test efficiency, and clean hard-to-reach parts. Cost: ~$100–$200, but extends lifespan by 5–10 years.
- Monitor energy bills: A sudden spike may indicate a failing component. Compare monthly usage.
- Upgrade if needed: Units older than 10 years often have SEER ratings below 10. Newer models (SEER 13+) cut energy use by 30–50%.
Example: My parents’ 12-year-old AC used to cost $200/month in summer. After upgrading to a SEER 16 unit, their bill dropped to $120.
Data Table: Common AC Problems and Fixes
| Problem | Likely Cause | Universal Fix | When to Call a Pro |
|---|---|---|---|
| AC not turning on | Power issue, thermostat, breaker | Check thermostat, breaker, outlet | Burning smell, electrical fault |
| Weak cooling | Dirty filter, frozen coil, low refrigerant | Clean filter/coils, thaw coil | Refrigerant leak, compressor failure |
| Water leaks | Clogged drain, cracked pan | Clear drain line, replace pan | Major leaks, structural damage |
| Strange noises | Loose parts, refrigerant leak | Tighten screws, check fins | Hissing (refrigerant), buzzing (electrical) |
| High energy bills | Dirty coils, old unit | Clean coils, check filters | SEER below 10, frequent breakdowns |
Putting It All Together: Your AC Support Plan
Create a Maintenance Calendar
Don’t rely on memory. Use a calendar (Google, paper, or app) to schedule:
- Monthly: Filter check, drain line flush, thermostat test.
- Spring: Coil cleaning, fin straightening, professional tune-up (if needed).
- Fall: Pre-winter inspection (for heat pumps), cover outdoor unit.
- As needed: Noise checks, water leak inspections.
Pro tip: Set phone reminders or use a smart plug to log maintenance dates.
Keep a “Support Kit”
Store these items near your AC:
- Extra filters (check size: 16x25x1, 20x20x1, etc.)
- Coil cleaner
- Fin comb
- Multimeter
- Flashlight
- Notepad for recording error codes or issues
Example: My kit lives in a plastic bin next to the outdoor unit. It’s saved me countless trips to the hardware store.
Know When to Upgrade
Universal support can only do so much. Consider replacing your AC if:
- It’s over 10 years old.
- Repairs cost more than 50% of a new unit.
- It uses R-22 refrigerant (being phased out).
- Energy bills keep rising despite maintenance.
Remember: A new AC isn’t just a purchase—it’s an investment in comfort, efficiency, and lower bills.
At the end of the day, universal air conditioner support instructions aren’t about turning you into an HVAC expert. They’re about giving you the confidence to handle everyday issues, save money, and keep your home cool without stress. Whether you’re fixing a noisy fan, clearing a clogged drain, or just replacing a filter, these steps work across brands, models, and climates. So next time your AC acts up, take a deep breath. Grab your tools. And remember: most problems have simple solutions. You’ve got this!
Frequently Asked Questions
What are universal air conditioner support instructions?
Universal air conditioner support instructions provide standardized guidelines for safely installing, maintaining, and troubleshooting most AC units. These instructions ensure compatibility across brands while prioritizing safety and efficiency.
Can I use universal support brackets for my window AC unit?
Yes, universal support brackets are designed to fit most window air conditioners, but always verify weight capacity and dimensions first. Follow the included universal air conditioner support instructions for secure mounting.
How do I level my AC unit during installation?
Use a spirit level to check both horizontal and vertical alignment, then adjust support brackets or pads as needed. Proper leveling prevents water leaks and reduces vibration noise.
Are universal supports safe for heavy AC units?
Most universal supports hold up to 150 lbs, but always cross-check your AC’s weight with the product’s load rating. Reinforce with additional brackets if your unit exceeds 80% of the max capacity.
What tools do I need to assemble AC support brackets?
Basic tools like a drill, screwdriver, measuring tape, and level are typically required. Some kits include specialized hardware, so review the universal air conditioner support instructions before starting.
How often should I inspect my AC support system?
Inspect supports every 3–6 months for rust, loose screws, or shifting. Proactive checks prevent accidents, especially in high-wind areas or during extreme weather.

