
Featured image for split unit air conditioner installation
Image source: ramsond.com
Proper installation is the foundation of peak performance and efficiency for any split unit air conditioner. From precise indoor and outdoor unit placement to ensuring correct refrigerant line routing and electrical connections, following expert guidelines minimizes breakdowns and maximizes energy savings. Avoid common pitfalls by prioritizing professional calibration and site-specific setup—your comfort and system longevity depend on it.
Key Takeaways
- Choose the right location: Install the indoor unit away from heat sources and direct sunlight.
- Ensure proper drainage: Slope the condensate pipe downward for efficient water removal.
- Seal all gaps: Use foam tape or sealant to prevent air leaks and energy loss.
- Follow manufacturer guidelines: Adhere strictly to installation manuals for warranty and performance.
- Hire a certified technician: Professional installation ensures safety and optimal system efficiency.
- Check refrigerant levels: Incorrect levels can damage the compressor and reduce cooling capacity.
📑 Table of Contents
- Why Proper Installation Matters for Your Split Unit Air Conditioner
- 1. Planning Your Installation: The Foundation for Success
- 2. Tools, Materials, and Pre-Installation Prep
- 3. Step-by-Step Installation: Indoor and Outdoor Units
- 4. Electrical and Refrigerant Work: Safety First
- 5. Testing, Commissioning, and First Run
- 6. Maintenance Tips for Long-Term Success
- Data Table: Common Split Unit Installation Mistakes and Fixes
- Final Thoughts: Your Installation, Your Success
Why Proper Installation Matters for Your Split Unit Air Conditioner
Let’s be honest: buying a split unit air conditioner is exciting. You imagine cool, refreshing air on a sweltering summer day, or a cozy warmth during chilly winter nights. But here’s the thing—none of that magic happens if the installation isn’t done right. I learned this the hard way when I once tried to cut corners with a DIY install. Spoiler alert: it ended with a leaky wall, a noisy unit, and a very unhappy spouse. Trust me, split unit air conditioner installation is not something to rush or skip.
Whether you’re upgrading your old window unit or installing your first split system, the process can feel overwhelming. But with the right knowledge and a few expert tips, you can avoid common pitfalls and set yourself up for years of reliable, efficient cooling or heating. In this guide, I’ll walk you through everything you need to know—from choosing the right spot to sealing the deal with a professional. Let’s dive in and make sure your split unit air conditioner installation is a total success.
1. Planning Your Installation: The Foundation for Success
Before you even unbox your shiny new air conditioner, take a step back and plan. A successful split unit air conditioner installation starts with thoughtful preparation. Think of it like building a house: you wouldn’t start pouring concrete without a blueprint, right?
Visual guide about split unit air conditioner installation
Image source: eastwesthydro.com
Assess Your Space and Needs
First, ask yourself: What are you cooling or heating? A single bedroom? A large open-plan living area? The size and layout of the room will determine the capacity (measured in BTUs) you need. A 12,000 BTU unit might be perfect for a 400-square-foot room, but it could struggle in a 700-square-foot space with high ceilings. Use an online BTU calculator or consult with a professional to get it right.
Also, consider sun exposure. A south-facing room with big windows will heat up faster than a north-facing one. This affects how hard your unit will work—and how much you’ll pay in energy bills.
Choose the Right Wall and Location
The indoor unit should be mounted on an exterior wall—preferably one that’s not exposed to direct sunlight. Avoid placing it above electronics, beds, or seating areas where the airflow might feel uncomfortable. I once installed a unit above my couch, and let’s just say I spent the summer dodging cold blasts like a ninja.
- Height matters: Mount the indoor unit 7–8 feet from the floor. This allows for optimal airflow distribution.
- Clearance is key: Leave at least 6–8 inches of space on all sides (except the bottom) for proper air circulation.
- Drainage slope: The unit must tilt slightly backward (about 1–2 degrees) so condensate can drain properly.
Check Your Electrical Setup
Most split units require a dedicated 20-amp circuit. Older homes might need an upgrade, especially if your electrical panel is already maxed out. Don’t risk overloading circuits—this isn’t just inefficient, it’s a fire hazard. If you’re unsure, hire a licensed electrician to assess your setup.
2. Tools, Materials, and Pre-Installation Prep
Now that you’ve planned your layout, it’s time to gather your tools and materials. A well-prepared installer is a successful installer. Here’s what you’ll need for a smooth split unit air conditioner installation.
Essential Tools and Equipment
You don’t need a full workshop, but having the right tools makes all the difference:
- Power drill with masonry and wood bits
- Spirit level (laser level is even better)
- Tape measure and marking pencil
- Pipe flaring tool (for refrigerant lines)
- Vacuum pump and manifold gauge set
- Insulated wrenches and adjustable spanners
- Drill bit for the wall hole (usually 2–3 inches in diameter)
- Condensate drain line (typically 1/2-inch PVC or vinyl tubing)
- Wall sleeve or conduit to protect refrigerant lines
Pro tip: If you’re not familiar with refrigerant handling, leave that part to a pro. It’s not just about skill—it’s about safety and EPA regulations.
Prepare the Site
Clear the area around the installation spot. Move furniture, cover floors with drop cloths, and remove any wall hangings. If you’re installing on a brick or concrete wall, you’ll need a hammer drill and masonry anchors. For drywall or wood, standard screws and anchors will do—but make sure they’re rated for the unit’s weight.
Also, plan your refrigerant line path. The shorter the line, the better. Longer lines reduce efficiency and can cause refrigerant pressure issues. Most manufacturers recommend keeping the line under 25 feet, with a maximum of 50 feet.
Weather and Timing
Install on a dry, mild day. Rain or extreme heat can make outdoor work uncomfortable and unsafe. If you’re installing in winter, be extra careful with refrigerant handling—cold temperatures affect pressure readings and system performance.
3. Step-by-Step Installation: Indoor and Outdoor Units
Now comes the fun part: putting it all together. Follow these steps carefully, and you’ll avoid the most common mistakes in split unit air conditioner installation.
Mount the Indoor Unit Bracket
Use your level and measuring tape to mark the bracket position. Drill pilot holes, insert wall anchors, and secure the bracket with screws. Double-check the tilt—remember, the back should be slightly lower than the front. I once skipped the level and ended up with a unit that looked like it was leaning into a nap. Not ideal.
Hang the indoor unit on the bracket and secure it according to the manual. Don’t skip the locking screws—these prevent vibration and movement over time.
Drill the Wall Hole
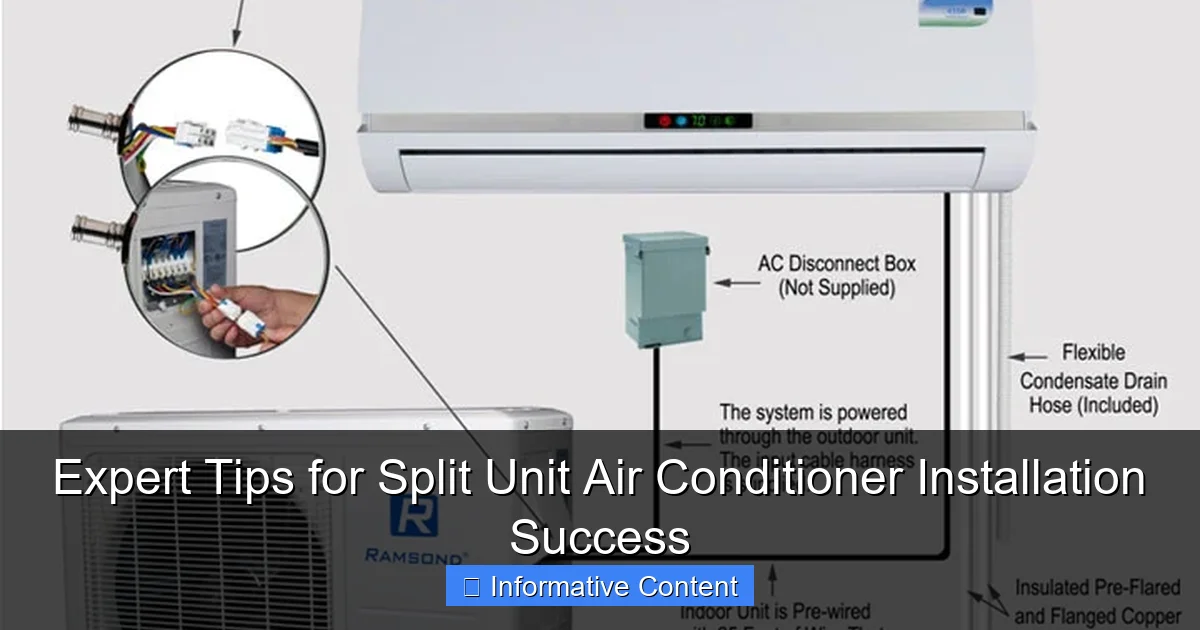
Drill a hole at a slight downward angle (1–2 degrees) from inside to outside. This helps with drainage and prevents rain from entering. Use a wall sleeve or conduit to protect the refrigerant lines, drain hose, and electrical cable as they pass through. Seal the edges with silicone or foam sealant to keep pests and drafts out.
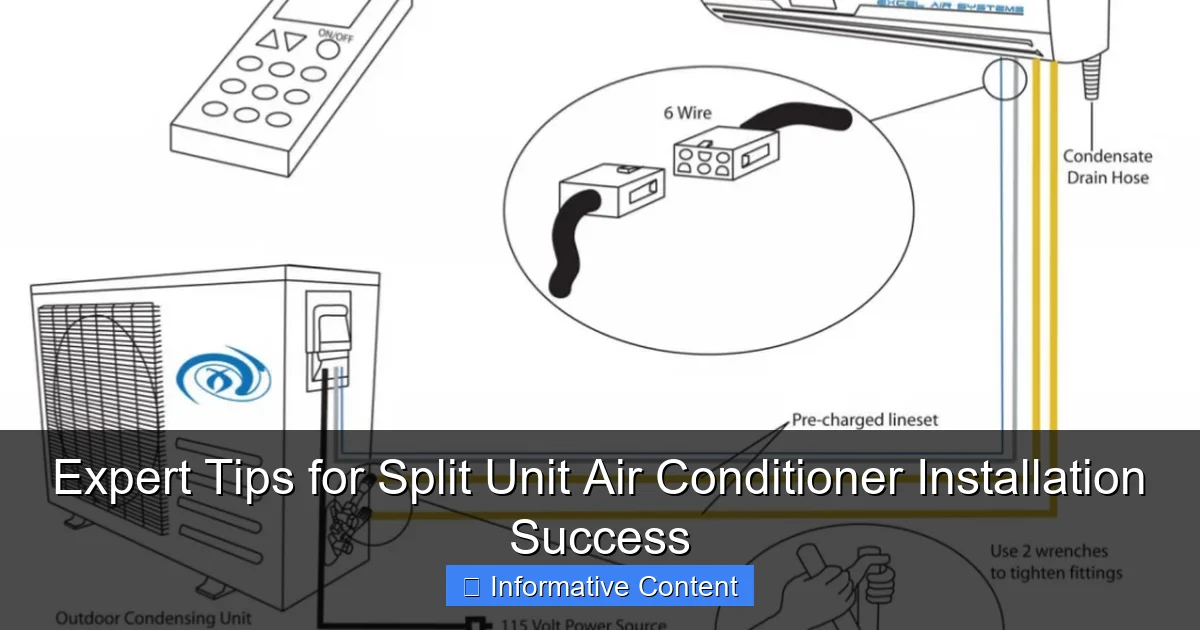
Connect Refrigerant Lines and Drain Hose
This is where many DIYers get nervous—and for good reason. Refrigerant lines must be properly flared, connected, and leak-checked. Here’s how:
- Flare the ends of the copper lines using a flaring tool. Make sure the flare is clean and smooth.
- Attach the lines to the indoor unit’s service valves. Hand-tighten first, then use two wrenches (one to hold the nut, one to turn) to secure without damaging the threads.
- Connect the drain hose and secure it with clamps. Run it downward with no kinks or loops—this prevents clogs.
Pro tip: Wrap the refrigerant lines and drain hose with insulation tape. This protects against condensation, heat loss, and physical damage.
Install the Outdoor Unit
Place the outdoor unit on a level, vibration-resistant surface—like a concrete pad or wall-mounted bracket. Never install it directly on the ground, where debris and moisture can damage it. Leave at least 12 inches of clearance on all sides for airflow.
Connect the refrigerant lines and electrical cable to the outdoor unit. Again, hand-tighten first, then use wrenches. Make sure all connections are snug but not over-torqued—this can crack fittings.
4. Electrical and Refrigerant Work: Safety First
This section isn’t for the faint of heart. If you’re not 100% confident with electrical wiring or refrigerant handling, hire a licensed HVAC technician. I can’t stress this enough. A single mistake here can void your warranty, damage your system, or worse—cause injury.
Electrical Wiring Basics
Most split systems use a 220–240V power supply. The outdoor unit typically has a disconnect switch, and the indoor unit connects via low-voltage control wires (usually 24V). Follow the manufacturer’s wiring diagram to the letter. Miswiring can fry the control board or prevent the system from starting.
- Turn off power at the main breaker before starting.
- Use wire nuts or terminal blocks for all connections.
- Label wires if you’re disconnecting them temporarily.
- Install a surge protector to guard against voltage spikes.
Evacuating the Refrigerant Lines
This is the most technical part of the installation. The refrigerant lines must be vacuumed to remove air and moisture before charging the system. Here’s how:
- Connect the manifold gauge set to the service valves on both indoor and outdoor units.
- Attach the vacuum pump to the center hose of the manifold.
- Open the valves and run the pump for at least 30 minutes (longer for longer lines).
- Check the vacuum gauge—it should read below 500 microns and hold steady for 10 minutes.
If the vacuum breaks, you’ll need to re-evacuate. Moisture in the system can cause ice buildup, corrosion, and compressor failure.
Charging the System
Once the vacuum holds, close the valves and disconnect the pump. Now, slowly charge the system with refrigerant according to the manufacturer’s specifications. Never guess the amount—overcharging or undercharging hurts efficiency and can damage the compressor.
Use a refrigerant scale to measure the charge precisely. Most modern units are pre-charged for standard line lengths, but you may need to add or remove refrigerant based on your setup.
5. Testing, Commissioning, and First Run
You’re almost there! But before you kick back and enjoy that cool air, you need to test and commission the system. This ensures everything is working safely and efficiently.
Leak Check All Connections
Spray soapy water on all refrigerant line connections. If you see bubbles, you’ve got a leak. Tighten the connection and re-test. For a more accurate check, use an electronic leak detector.
Power On and Test Functions
Turn on the power and start the system. Listen for unusual noises—grinding, buzzing, or rattling. Check that both indoor and outdoor fans are spinning. Use a thermometer to measure the temperature difference between the air inlet and outlet. A 15–20°F drop is normal for cooling mode.
Test all functions: cooling, heating (if applicable), fan speed, and remote control. Make sure the condensate drain is working—place a cup under the drain line to catch water.
Check System Performance
Monitor the system for at least 30 minutes. Watch for:
- Ice buildup on the indoor coil (a sign of low refrigerant or airflow issues)
- Water leaks from the indoor unit (check drain slope and connections)
- Unusual vibrations (ensure the outdoor unit is level and secure)
- Error codes on the display (refer to the manual for troubleshooting)
Seal and Clean Up
Once everything is running smoothly, seal the wall hole with silicone or foam. Clean up the work area, dispose of packaging responsibly, and save your manual and warranty info in a safe place.
6. Maintenance Tips for Long-Term Success
Your split unit air conditioner installation is complete—but the job isn’t over. Regular maintenance keeps your system running efficiently and extends its lifespan. Think of it like car maintenance: a little care now prevents big repairs later.
Monthly and Seasonal Tasks
- Clean or replace air filters: Every 1–2 months during heavy use. Clogged filters reduce airflow and strain the system.
- Check the condensate drain: Pour a cup of vinegar down the drain every few months to prevent algae buildup.
- Inspect outdoor unit: Clear leaves, debris, and snow. Trim vegetation to maintain airflow.
- Clean indoor unit fins: Use a soft brush or vacuum to remove dust and dirt.
Annual Professional Maintenance
Schedule a professional tune-up once a year. A technician will:
- Check refrigerant levels and pressure
- Inspect electrical connections and components
- Clean the outdoor condenser coil
- Lubricate moving parts
- Test system performance and safety controls
This can prevent breakdowns, improve efficiency, and keep your warranty valid.
Monitor Energy Bills
Keep an eye on your energy usage. A sudden spike could mean your system is working harder than it should—often due to a clogged filter, low refrigerant, or failing component.
Data Table: Common Split Unit Installation Mistakes and Fixes
| Mistake | Consequence | Fix |
|---|---|---|
| Incorrect unit tilt | Water leaks from indoor unit | Re-mount with 1–2° backward tilt |
| Long refrigerant lines without proper charge | Low cooling efficiency, compressor strain | Adjust refrigerant charge per manufacturer specs |
| Improper vacuuming | Ice buildup, poor performance | Re-evacuate and re-charge system |
| No surge protection | Electrical damage during storms | Install a surge protector on the power line |
| Clogged condensate drain | Water damage, mold growth | Clean drain line monthly, use vinegar |
Final Thoughts: Your Installation, Your Success
Installing a split unit air conditioner might seem like a big project, but with the right approach, it’s totally doable—especially if you follow these expert tips. From choosing the perfect spot to sealing the wall hole, every step plays a role in your long-term comfort and savings.
Remember: split unit air conditioner installation isn’t just about connecting wires and pipes. It’s about creating a system that works quietly, efficiently, and reliably for years. Don’t rush it. Take your time, double-check your work, and when in doubt, call a pro.
And here’s my final piece of advice: celebrate when it’s done. Sit back, turn on the unit, and enjoy that perfect breeze. You earned it. Whether you DIY’d it or hired help, you’ve just taken a big step toward a more comfortable home. Now go enjoy the cool—you’ve got this.
Frequently Asked Questions
What is the best location for split unit air conditioner installation?
The ideal location for your indoor unit is on an exterior wall, away from direct sunlight and heat sources, with enough clearance for airflow. For the outdoor unit, choose a well-ventilated area, preferably shaded, to maximize efficiency and reduce strain on the system.
How long does a split unit air conditioner installation take?
Professional installation typically takes 4–8 hours, depending on complexity, such as line routing, electrical connections, and wall type. Proper planning and hiring a certified technician can ensure a smooth and timely process.
Can I install a split unit air conditioner myself?
DIY installation is not recommended due to technical requirements like refrigerant handling, electrical wiring, and precise leveling. Hiring a licensed technician ensures safety, warranty compliance, and optimal performance of your split unit air conditioner installation.
What tools are needed for split unit air conditioner installation?
Essential tools include a drill, vacuum pump, manifold gauge set, level, pipe bender, and wrenches. Professionals also use refrigerant recovery machines and leak detectors to ensure a secure and efficient installation.
Why is proper drainage important during installation?
The condensate drain line must slope downward to prevent water pooling, which can damage the unit or cause leaks. Proper drainage also avoids mold growth and maintains indoor air quality.
How do I choose the right size for my split unit air conditioner?
Select a unit based on room size (BTU/h rating) and insulation levels; an undersized unit won’t cool effectively, while an oversized one wastes energy. Consult an HVAC expert to match your space’s needs for efficient split unit air conditioner installation.