Installing the outdoor unit of a split AC requires careful planning and proper execution to ensure optimal performance and longevity. With the rising temperatures during summer, a split AC becomes essential for maintaining a comfortable indoor environment.
However, simply purchasing a split AC is not enough; proper installation of the outdoor unit is crucial for its effective functioning. Whether you are hiring a professional or doing it yourself, this guide provides the necessary instructions for installing the outdoor unit of a split AC to get the best cooling results.
By following these steps and considering factors such as unit placement, proper support, connecting refrigerant lines, and electrical connections, you can enjoy the cool comfort of your split AC for years to come. Just make sure to observe safety precautions and refer to the manufacturer’s instructions for specific guidelines pertaining to your unit.
Planning And Preparing For Installation
When it comes to installing a split AC outdoor unit, proper planning and preparation are key. By understanding the necessary tools and supplies, selecting an appropriate location, and ensuring proper clearance for installation, you can set yourself up for a successful and efficient installation process.
Understanding The Necessary Tools And Supplies
In order to install a split AC outdoor unit, you will need certain tools and supplies to ensure a smooth installation process. Here is a list of the essential items you should have on hand:
| Tools | Supplies |
|---|---|
| 1. Screwdriver | 1. Concrete pad |
| 2. Pipe cutter | 2. Mounting brackets |
| 3. Level | 3. Electrical wires and connectors |
| 4. Tape measure | 4. Insulation tape |
| 5. Drill | 5. Fasteners |
Having these tools and supplies readily available will ensure that you have everything you need to complete the installation process without any delays or setbacks.
Selecting An Appropriate Location For The Outdoor Unit
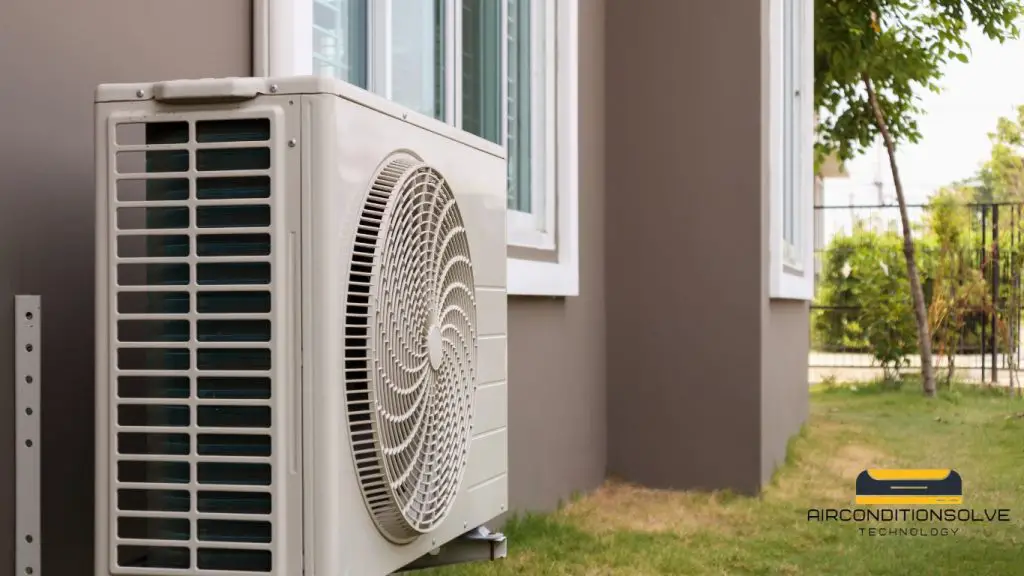
Choosing the right location for your split AC outdoor unit is crucial for optimal performance and longevity. Here are a few factors to consider when selecting a location:
- The unit should be placed on a flat and stable surface, preferably a concrete pad, to provide adequate support.
- Ensure that the location is easily accessible for maintenance and repairs.
- Keep the unit away from direct sunlight, as this can affect its efficiency.
- Minimize the exposure to elements such as rain and strong winds by selecting a sheltered area.
By carefully choosing the location for your outdoor unit, you can ensure its longevity and efficiency while minimizing the risk of damage or malfunction.
Measuring And Ensuring Proper Clearance For Installation
Proper clearance around the outdoor unit is essential for unrestricted airflow and optimal performance. Here are a few measurements to consider:
- Allow a clearance of at least 2 feet on all sides of the unit to provide proper ventilation.
- Ensure that there is ample space above the unit to allow for easy maintenance and cleaning.
- Keep the unit a safe distance away from any obstacles such as fences, walls, or vegetation.
By measuring and ensuring proper clearance, you can prevent airflow restrictions and potential damage to the unit, ultimately extending its lifespan.

Safety Precautions And Guidelines
When it comes to installing a split AC outdoor unit, prioritizing safety is of utmost importance. Whether you are a professional technician or a DIY enthusiast, following the necessary safety precautions and guidelines ensures a smooth and secure installation process. In this section, we will discuss three crucial aspects of safety to keep in mind: disconnecting power supply, using personal protective equipment (PPE), and adhering to safety tips for working at heights and with electrical components.
Importance Of Disconnecting Power Supply
Before proceeding with any installation or maintenance work on the split AC outdoor unit, it is essential to disconnect the power supply. Taking this precautionary step prevents electric shocks and other potential accidents. Here are a few simple guidelines to follow:
- Locate the main power switch or circuit breaker dedicated to the AC unit.
- Turn the switch to the “off” position or flip the circuit breaker to the “off” position.
- Verify the power is truly disconnected by attempting to turn on the AC unit. If it does not power on, the supply is successfully cut off.
Using Personal Protective Equipment (ppe)
When working with the split AC outdoor unit, it is crucial to prioritize personal safety by using appropriate personal protective equipment (PPE). Wearing the right gear minimizes the risk of injuries and exposure to harmful substances. Here are the PPE items that should be used during the installation process:
| PPE | Description |
|---|---|
| Safety glasses | To protect eyes from debris or accidental chemical exposure. |
| Gloves | To protect hands from sharp edges or electrical hazards. |
| Ear protection | To avoid damage from loud noises during drilling or cutting activities. |
| Respirator mask | To protect against harmful fumes or dust particles. |
| Protective clothing | To protect the body from physical hazards and chemical spills. |
Safety Tips For Working At Heights And With Electrical Components
Installing a split AC outdoor unit often requires working at heights and handling electrical components. To ensure safety throughout the process, follow these essential tips:
- Always use a secure and stable ladder or platform when working at heights. Ensure the ground is leveled and free from any tripping hazards.
- Inspect all electrical components and cables for any signs of damage, such as frayed wires or exposed conductors. Replace any faulty parts before proceeding.
- Never touch live electrical connections with bare hands. Use insulated tools and wear gloves to minimize the risk of electrical shock.
- Avoid working in wet conditions or during inclement weather, as water increases the chances of electrical accidents.
- When routing cables or wires, ensure they are properly secured and away from sharp edges or moving parts that could potentially damage them.
By adhering to these safety precautions and guidelines, you can significantly reduce the risk of accidents and ensure a successful split AC outdoor unit installation. Prioritizing safety not only protects you but also prolongs the life and efficiency of your AC system.

Mounting The Outdoor Unit
When it comes to installing a split AC system, mounting the outdoor unit is an essential step that requires careful attention. The outdoor unit plays a crucial role in the functionality of the AC system, and its proper installation helps ensure efficient cooling and long-term performance. In this guide, we will take you through the step-by-step process of mounting the outdoor unit, from assembling the mounting brackets to securing them to the wall, to ensuring the proper level and stability of the brackets.
Assembling The Mounting Brackets
Before you begin the installation process, make sure you have all the necessary tools and equipment, including the mounting brackets that came with your split AC system. Assembling the mounting brackets is a straightforward task that can be done quickly using the following steps:
- Remove the mounting brackets from their packaging and ensure that you have all the necessary components such as screws and bolts.
- Identify the different parts of the mounting brackets, which usually include the main bracket, support arms, and fastening screws.
- Align the support arms with the main bracket and use the provided screws to secure them in place.
- Make sure the assembled mounting brackets are sturdy and free from any loose or missing parts.
Securing The Brackets To The Wall
Once you have assembled the mounting brackets, it’s time to secure them to the wall. Proper installation of the brackets is essential to ensure the stability and safety of the outdoor unit. Follow these steps to securely attach the brackets to the wall:
- Locate the suitable position on the wall where you want to mount the outdoor unit. It should be a sturdy, load-bearing surface.
- Hold one of the assembled brackets against the wall and mark the positions for drilling holes using a pencil or marker.
- Use a drill to create the necessary holes in the marked positions, making sure to choose an appropriate drill bit size for the type of wall material.
- Align the mounting bracket with the drilled holes and insert the provided screws through the bracket into the wall.
- Tighten the screws securely to firmly attach the bracket to the wall, ensuring that it is level and parallel to the ground.
- If your split AC system requires multiple brackets, repeat the above steps for each bracket, maintaining the appropriate spacing between them.
Ensuring Proper Level And Stability Of The Brackets
Once the brackets are securely fastened to the wall, the next crucial step is to ensure their proper level and stability. This ensures that the outdoor unit is correctly positioned and doesn’t experience any unnecessary vibrations or imbalances. Follow these steps to confirm the level and stability of the brackets:
- Use a spirit level to check the horizontal level of each bracket. Adjust them as necessary by loosening the screws and making slight position changes.
- Check the vertical level of the brackets using the spirit level. Make any required adjustments to ensure that they are perfectly vertical and aligned.
- Ensure that the brackets are stable and firmly attached to the wall by giving them a gentle shake. If there is any noticeable movement, tighten the screws further or seek professional assistance.
By following these step-by-step instructions for mounting the outdoor unit of your split AC system, you can ensure a secure and stable installation. This will help optimize the cooling performance and extend the lifespan of your AC system.

Connecting Electrical And Refrigerant Lines
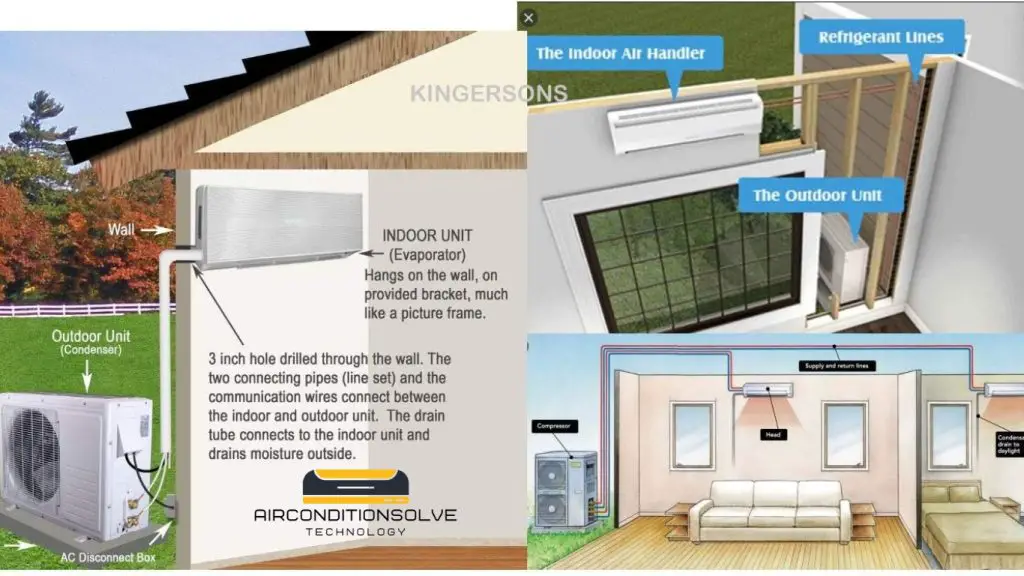
Installing a split AC outdoor unit involves connecting the electrical and refrigerant lines. This guide provides step-by-step instructions to ensure a successful installation process.
Running Electrical Wiring From The Indoor Unit To The Outdoor Unit
One crucial step in installing a split AC outdoor unit is running the electrical wiring from the indoor unit to the outdoor unit. This ensures a proper connection and allows the units to communicate effectively. To do this, you will first need to determine the length and gauge of the electrical wire needed. It is important to follow the manufacturer’s guidelines for the specific AC unit to ensure safe and efficient operation.
When running the electrical wiring, make sure to keep it away from sharp edges and areas that could cause damage. It is also crucial to avoid placing the wires near any water sources to prevent possible electrical hazards. Secure the wiring using appropriate clamps or straps to keep it in place, ensuring it is neat and organized.
Once the wiring is in place, connect the wires from the indoor unit to the corresponding terminals on the outdoor unit. The specific wiring connections may vary depending on the unit, so it is essential to refer to the manufacturer’s instructions or consult a professional if needed. Make sure to tighten the connections securely to ensure a reliable electrical connection.
Properly Insulating The Electrical Connections
Proper insulation of the electrical connections is crucial to prevent any electrical hazards and ensure the longevity of the split AC system. After the wiring connections have been made, it is important to insulate them properly. This involves using electrical insulation tape or heat shrink tubing to cover the exposed wires and connections.
Insulation not only protects the electrical connections from moisture and environmental factors but also prevents any accidental contact that could lead to short circuits or electrical shocks. Ensure that the insulation covers the entire exposed area, leaving no gaps or exposed wires. It is recommended to use high-quality insulation materials to ensure long-lasting protection.
Take the time to carefully inspect each connection to make sure it is properly insulated. Insulation should be firm, with no loose or peeling sections. If any issues are found, immediately address them before proceeding with the installation process.
Connecting The Refrigerant Lines And Ensuring A Leak-free Seal
Connecting the refrigerant lines is another critical step in split AC outdoor unit installation. These lines carry the refrigerant between the indoor and outdoor units, allowing for the cooling process to take place efficiently. It is essential to follow the manufacturer’s guidelines and specifications for proper installation.
Start by attaching the refrigerant lines to their respective fittings on both the indoor and outdoor units. Use appropriate wrenches or tools to tighten the connections securely. It is essential to double-check that all connections are tight and leak-free to avoid any refrigerant leakage, which can lead to system inefficiency and potential damage.
To ensure a leak-free seal, consider using a refrigerant leak detection solution or soapy water to test the connections for any signs of leakage. Apply the solution or soapy water to the connections, and if any bubbles appear, it indicates a leak that needs to be addressed. Tighten the connections further or consider replacing faulty seals or fittings.
By following these guidelines for connecting electrical and refrigerant lines during the split AC outdoor unit installation process, you can ensure a safe and efficient operation of your AC system. It is always recommended to consult the manufacturer’s instructions or seek professional assistance if you are unsure about any specific steps or requirements.
Testing And Commissioning The Outdoor Unit
Testing and commissioning the outdoor unit of a split AC is a crucial step to ensure its proper functioning. This process involves checking the electrical connections and voltage, testing the refrigerant lines for leaks, and verifying the overall performance of the outdoor unit. By following these steps, you can ensure that your outdoor unit is installed correctly and ready to provide efficient cooling for your space.
Checking Electrical Connections And Voltage
Before testing the outdoor unit, it is essential to check the electrical connections and voltage to ensure that the unit is receiving the necessary power supply. Follow these steps to check the electrical connections:
- Ensure that the power supply to the outdoor unit is turned off.
- Carefully inspect the wiring connections for any loose or damaged wires.
- Tighten any loose connections and replace any damaged wires.
- After checking the connections, turn on the power supply and measure the voltage using a multimeter.
- Note: The voltage should match the required specifications mentioned in the AC unit’s manual. If the voltage is not within the specified range, contact a professional electrician for further assistance.
Testing The Refrigerant Lines For Leaks
Leakage in the refrigerant lines can significantly affect the cooling efficiency of your split AC unit. To ensure there are no leaks, follow these steps:
- Inspect the refrigerant lines for any signs of oil or refrigerant leakage.
- Use a refrigerant leak detector to check for any leaks along the lines.
- If any leaks are detected, locate the source and repair it before proceeding further.
- Note: It is crucial to fix any leaks to prevent further damage to the AC system.
Verifying The Proper Functioning Of The Outdoor Unit
Once the electrical connections and refrigerant lines are checked, it is essential to verify the proper functioning of the outdoor unit. Follow these steps:
- Turn on the power supply to the outdoor unit.
- Listen for any unusual noises such as rattling or grinding.
- Observe the outdoor unit for any vibrations or excessive heat.
- Check if the fan and compressor are working correctly.
- Ensure that the outdoor unit is expelling hot air and there is adequate airflow.
- Note: If there are any abnormalities in the functioning of the outdoor unit, it is advisable to contact a professional technician to diagnose and resolve the issue.
By thoroughly testing and commissioning the outdoor unit of a split AC, you can ensure its optimal performance and longevity. It is always recommended to follow the manufacturer’s instructions and seek professional assistance if needed. With proper installation and testing, your split AC will deliver efficient cooling, providing a comfortable environment.

Credit: www.nytimes.com
Frequently Asked Questions Of Split Ac Outdoor Unit Installation Guide
How Do I Install The Outdoor Unit Of A Split Ac?
To install the outdoor unit of a split AC, first, find a suitable location with good airflow. Then, secure the unit on a stable surface, level it using a bubble level, and connect the refrigerant lines. Next, connect the electrical and drainage pipes, making sure to follow the manufacturer’s instructions.
Finally, test the unit to ensure it is working properly before using it.
What Should I Consider While Choosing The Location For The Outdoor Unit?
When choosing a location for the outdoor unit of your split AC, consider factors like accessibility for maintenance, distance from neighboring structures to ensure proper airflow, and security. Avoid placing the unit in areas that receive direct sunlight or are prone to heavy rain or wind.
Additionally, consider noise levels for neighboring residents and ensure proper ventilation for the unit.
How Far Should The Outdoor Unit Be Installed From The Indoor Unit?
The outdoor unit should be installed within a suitable distance from the indoor unit of a split AC. Ideally, the maximum recommended distance between the two units is around 15 to 30 meters. However, it is essential to refer to the manufacturer’s guidelines as specific models may have different requirements.
Installing within this distance helps ensure optimal performance and reduces energy loss.
Conclusion
Installing the outdoor unit of a split AC is a crucial step in ensuring efficient cooling for your space. By following the guidelines outlined in this installation guide, you can avoid common mistakes and achieve optimal performance. Remember to position the unit correctly, secure it properly, and maintain proper clearance for airflow.
With proper installation, your split AC outdoor unit will function seamlessly and keep your surroundings cool throughout the summer months. Enjoy the benefits of a well-installed split AC and make the most of your cooling experience.

