
Replacing a capacitor in your Carrier air conditioner can restore cooling performance and prevent system failure. This guide walks you through identifying symptoms, safely handling components, and installing a new capacitor correctly—whether you’re a DIYer or calling a pro.
Key Takeaways
- Capacitors store and release electrical energy to help start and run the compressor and fan motors in your Carrier AC unit.
- Common signs of a bad capacitor include humming noises, warm air blowing, frequent cycling, or the unit not turning on at all.
- Always discharge the capacitor before handling it—even when the power is off—to avoid dangerous electric shocks.
- Match the microfarad (µF) rating and voltage exactly when buying a replacement; using the wrong specs can damage your system.
- Turn off power at the breaker and use insulated tools for safety during replacement.
- Consider hiring a licensed HVAC technician if you’re unsure—improper installation can void warranties or cause injury.
- Regular maintenance helps prevent capacitor failure, so inspect your outdoor unit seasonally and keep it clean.
📑 Table of Contents
Understanding the Role of the Capacitor in Your Carrier Air Conditioner
Your Carrier air conditioner relies on several key components to keep your home cool and comfortable during hot weather. Among these, the capacitor plays a surprisingly vital—but often overlooked—role. Think of it as the “starter motor” for your AC’s heart: the compressor and fan motors. Without a functioning capacitor, your system may struggle to start, run inefficiently, or shut down entirely.
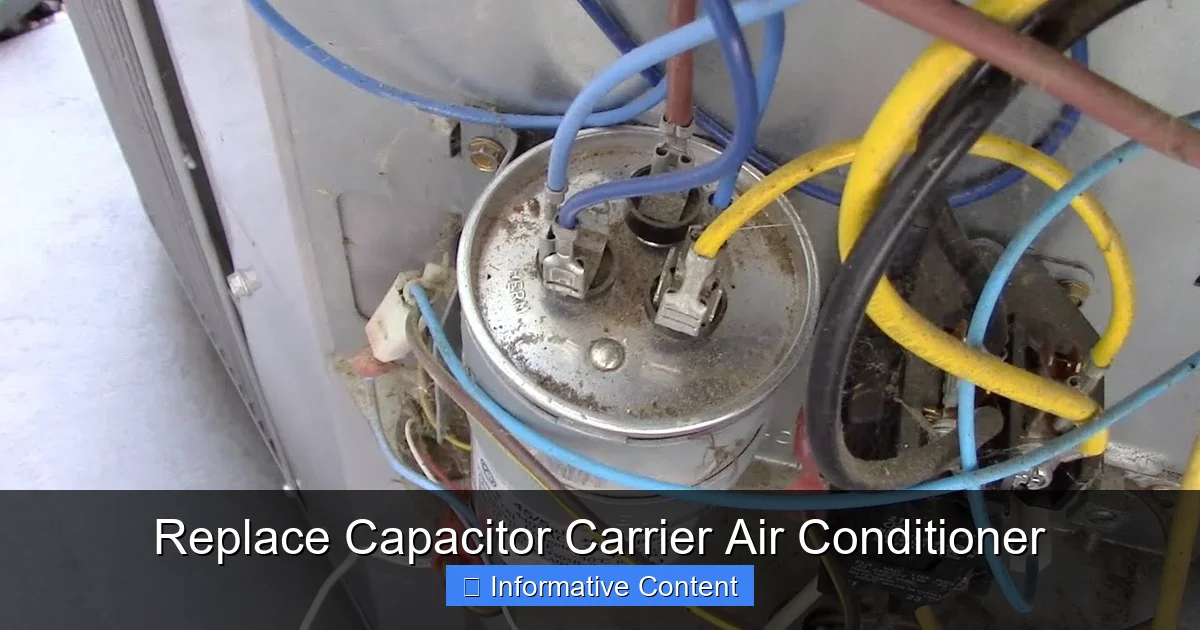
Capacitors are small cylindrical or oval-shaped devices usually found inside the outdoor condenser unit. They store electrical energy and release it in short bursts to give the motors the extra jolt they need to start up (called the “start capacitor”) or to keep running smoothly (the “run capacitor”). Some Carrier models use a dual-run capacitor that serves both the compressor and the fan motor, making it even more critical to system operation.
When a capacitor fails, it doesn’t always mean the entire AC unit is broken—but it can mimic serious problems like refrigerant leaks or compressor failure. That’s why learning to identify capacitor issues early can save you time, money, and frustration. Whether you’re dealing with a Carrier Infinity, Performance, or Comfort series unit, understanding how the capacitor works helps you make informed decisions about repairs.
Signs Your Carrier AC Capacitor Needs Replacement
Visual guide about Replace Capacitor Carrier Air Conditioner
Image source: i.ytimg.com
Recognizing the symptoms of a failing capacitor is the first step toward a quick fix. Unlike other AC problems that develop slowly, capacitor failure often shows clear warning signs—if you know what to look for.
One of the most common indicators is a **humming noise** coming from the outdoor unit when you turn on the AC. The compressor is trying to start but can’t get enough power, so it struggles and vibrates. You might also notice that the fan isn’t spinning, or it spins very slowly. In some cases, the unit will start briefly, then shut off after a few seconds—a behavior known as “short cycling.”
Another telltale sign is **warm or lukewarm air blowing from your vents**, even though the thermostat is set to cool. This happens because the compressor isn’t engaging properly, so refrigerant isn’t being pumped through the system to remove heat from your home.
You may also observe that your AC **takes longer than usual to cool your house**, or it runs constantly without reaching the desired temperature. High energy bills can be another clue—since the system is working harder (and less efficiently) to compensate for the weak capacitor.
If your Carrier AC has recently had a power surge, lightning strike, or extreme temperature fluctuation, that could have damaged the capacitor. Even normal wear and tear over 5–10 years can degrade its performance. Don’t ignore these signs—delaying replacement can lead to compressor damage, which is far more expensive to fix.
Visual Inspection Tips
Sometimes, a bad capacitor is obvious just by looking at it. Open the access panel on your outdoor unit (after turning off the power!) and locate the capacitor—it’s usually near the compressor and fan motor. Check for:
– **Bulging or swollen casing**: A capacitor that looks puffed up like a balloon has likely failed.
– **Leaking fluid or oily residue**: Electrolyte leakage is a clear sign of internal damage.
– **Burnt or melted terminals**: Overheating can char the wires or connectors.
– **Rust or corrosion**: Moisture exposure can degrade the capacitor over time.
If you see any of these, it’s time for a replacement. But even if the capacitor looks fine, it might still be faulty—capacitors can fail internally without visible damage. That’s why testing with a multimeter is the most reliable method.
Safety First: Preparing to Replace the Capacitor
Before you touch anything inside your Carrier AC unit, safety must be your top priority. Capacitors store a significant amount of electrical charge—even when the power is off—and can deliver a dangerous or even fatal shock if mishandled.
Start by **turning off the power at the main electrical breaker**. Don’t just rely on the thermostat or the disconnect switch near the unit—go to your home’s breaker panel and flip the switch labeled “AC” or “Air Conditioner.” Use a non-contact voltage tester to confirm that power is truly off before opening the unit.
Next, gather your tools. You’ll need:
– Insulated screwdrivers
– Needle-nose pliers
– A digital multimeter with capacitance testing capability
– Safety gloves and goggles
– A capacitor discharge tool (or a properly insulated screwdriver with a handle)
Never assume the capacitor is safe to touch. Even after power is off, it can hold a charge for hours or days. To discharge it safely, place the metal shaft of an insulated screwdriver across both terminals (for a dual capacitor, discharge each terminal pair). You may hear a small pop or see a spark—that’s normal and means the energy is being released.
Only proceed once you’ve confirmed the capacitor is fully discharged. Rushing this step is one of the most common causes of injury during AC repairs.
When to Call a Professional
While replacing a capacitor is one of the simpler HVAC repairs, it’s not for everyone. If you’re uncomfortable working with electricity, don’t have the right tools, or your unit is still under warranty, it’s wise to call a licensed HVAC technician. Improper handling can void your warranty, damage other components, or put you at risk.
Additionally, if your Carrier AC is more than 10 years old or has had multiple component failures, there may be underlying issues—like low refrigerant, dirty coils, or electrical problems—that a professional should diagnose.
Step-by-Step Guide to Replacing the Capacitor
Once you’ve confirmed the capacitor is faulty and taken all safety precautions, you’re ready to replace it. Follow these steps carefully to ensure a successful repair.
Step 1: Identify the Correct Replacement Capacitor
Not all capacitors are created equal. You must match the **microfarad (µF) rating** and **voltage rating** of the original capacitor exactly. These values are printed on the side of the old capacitor. For example, you might see “45/5 µF” and “370V” or “440V.”
The first number (e.g., 45) is the capacitance for the compressor, and the second (e.g., 5) is for the fan motor. If your unit uses a single-run capacitor, it will have only one µF value.
Buy a replacement from a reputable HVAC supplier or hardware store. Avoid cheap, generic capacitors—they may not meet the specifications or last as long. Look for brands like Mars, Titan, or OEM (Original Equipment Manufacturer) parts designed for Carrier units.
Step 2: Remove the Old Capacitor
With the power off and the capacitor discharged, locate the wiring connected to the terminals. Take a photo or draw a diagram of the wire connections—this will help you reconnect them correctly.
Use needle-nose pliers to gently loosen the terminal screws or clips. Carefully remove each wire, noting which terminal it came from (C for common, Herm for compressor, Fan for fan motor). Some capacitors use quick-connect terminals; others have screw terminals.
Once the wires are free, unscrew the mounting bracket or strap that holds the capacitor in place. Remove the old capacitor and set it aside.
Step 3: Install the New Capacitor
Position the new capacitor in the same location and secure it with the mounting hardware. Make sure it’s stable and won’t vibrate loose during operation.
Reconnect the wires to the correct terminals, using your photo or diagram as a guide. Tighten the screws securely—loose connections can cause arcing, overheating, or failure.
Double-check that all wires are properly seated and that no bare wire is exposed. If your new capacitor has different terminal labels, refer to the manufacturer’s instructions to ensure correct wiring.
Step 4: Restore Power and Test
Close the access panel and turn the power back on at the breaker. Set your thermostat to cool and wait a few minutes.
Listen for the compressor and fan to start smoothly. The unit should run quietly and begin cooling your home within 10–15 minutes. If the AC starts immediately and runs without humming or cycling, the replacement was successful.
Use your multimeter to verify the new capacitor is functioning correctly. Set the meter to capacitance mode and touch the probes to the appropriate terminals. The reading should match the µF rating within a small tolerance (usually ±5%).
Preventing Future Capacitor Failures
Replacing a capacitor is a fix—but preventing future failures is even better. With proper care, your Carrier AC’s capacitor can last 10–15 years or more.
Regular Maintenance Matters
Schedule annual maintenance with a qualified HVAC technician. They’ll inspect the capacitor, clean the coils, check refrigerant levels, and ensure all electrical connections are tight. A well-maintained system puts less strain on the capacitor.
Between professional visits, do your part:
– Keep the outdoor unit clean and free of debris, leaves, and dirt.
– Trim vegetation around the unit to allow proper airflow.
– Check for signs of pests—rodents can chew wires and damage components.
– Replace air filters every 1–3 months to reduce system workload.
Protect Against Power Surges
Power surges from lightning, grid fluctuations, or faulty wiring can damage capacitors. Install a whole-house surge protector to safeguard your AC and other electronics. These devices divert excess voltage away from your system during spikes.
If you live in an area with frequent storms or unreliable power, consider a dedicated HVAC surge protector installed near your outdoor unit.
Monitor System Performance
Pay attention to how your AC behaves. If you notice unusual noises, longer startup times, or reduced cooling, investigate early. Catching problems before they worsen can prevent capacitor stress and extend the life of your entire system.
Common Mistakes to Avoid
Even experienced DIYers can make errors when replacing a capacitor. Avoid these common pitfalls:
– **Using the wrong capacitor**: Always match µF and voltage. A higher voltage rating is usually safe, but a different µF value can damage the motor.
– **Skipping discharge**: Never assume the capacitor is safe. Always discharge it before handling.
– **Reversing wire connections**: Mixing up Herm and Fan terminals can cause the fan to run backward or the compressor to fail.
– **Over-tightening terminals**: This can crack the capacitor casing or strip the screws.
– **Ignoring other issues**: A failing capacitor might be a symptom of a larger problem, like a dirty condenser coil or low refrigerant.
If your new capacitor fails within a few months, don’t just replace it again—have a technician inspect the entire system.
Conclusion
Replacing a capacitor in your Carrier air conditioner is a manageable task for many homeowners, especially when you understand the signs of failure and follow safety protocols. This small component plays a big role in keeping your AC running efficiently, and addressing issues promptly can save you from costly repairs down the line.
Whether you choose to tackle the job yourself or call in a professional, the key is to act quickly when you notice symptoms like humming, warm air, or short cycling. With the right tools, a compatible replacement, and careful attention to detail, you can restore your Carrier AC to peak performance and enjoy cool, comfortable air all summer long.
Remember: safety first, accuracy second, and regular maintenance always. Your AC—and your wallet—will thank you.
Frequently Asked Questions
How do I know if my Carrier AC capacitor is bad?
Look for signs like a humming noise, warm air from vents, frequent cycling, or the unit not starting. You can also test it with a multimeter—if the capacitance reading is significantly lower than the labeled µF value, it’s likely faulty.
Can I replace the capacitor myself?
Yes, if you’re comfortable working with electricity and have the right tools. However, always turn off power, discharge the capacitor, and match the replacement specs exactly. If you’re unsure, hire a licensed technician.
What happens if I use the wrong capacitor?
Using a capacitor with the wrong microfarad (µF) rating can cause the motor to overheat, run inefficiently, or fail prematurely. Always match the original specifications.
How often do AC capacitors need to be replaced?
Most capacitors last 10–15 years, but they can fail earlier due to power surges, overheating, or manufacturing defects. Regular inspections help catch issues early.
Is a dual-run capacitor the same as two single capacitors?
Functionally, yes—but they’re housed in one unit. A dual-run capacitor serves both the compressor and fan motor, so replacing it requires careful wiring to match the original setup.
Will replacing the capacitor fix my AC not cooling?
It might—if the capacitor was the root cause. But if the system still doesn’t cool after replacement, there could be other issues like low refrigerant, dirty coils, or a faulty compressor that need professional attention.