
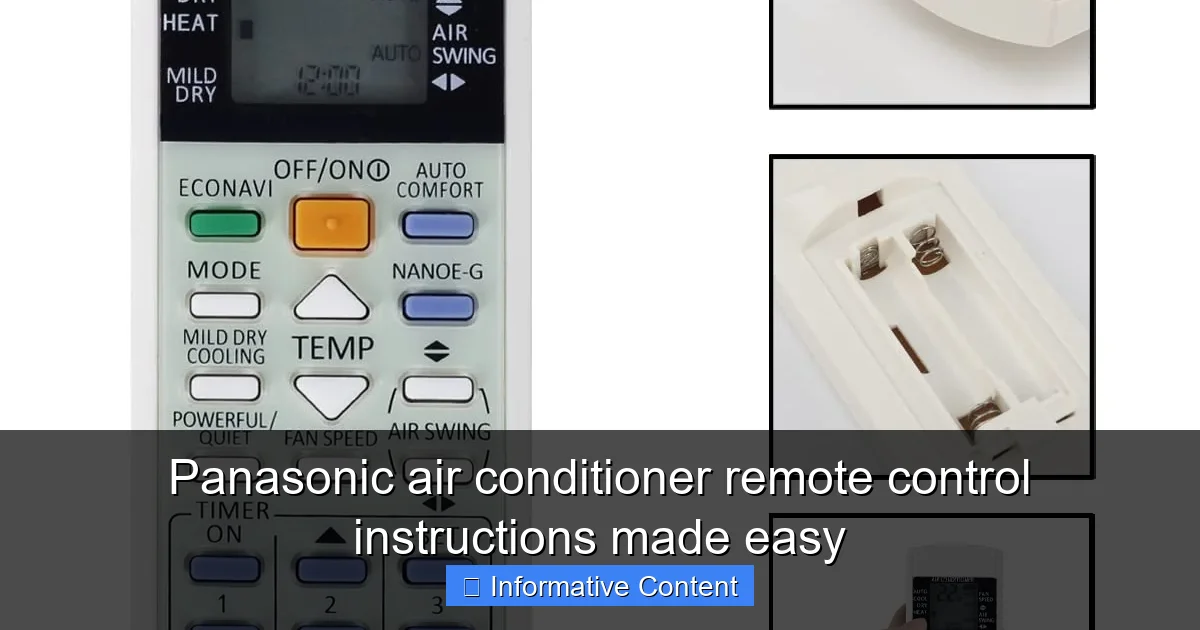
Featured image for panasonic air conditioner remote control instructions
Image source: acsupportspoint.com
Master your Panasonic air conditioner with ease using our simplified remote control instructions. This guide breaks down every button and function—from temperature settings to timer modes—so you can maximize comfort without confusion. Whether you’re a first-time user or troubleshooting an issue, clear steps and expert tips ensure quick, hassle-free operation.
Key Takeaways
- Master basic functions first: Learn power, mode, and temperature controls for quick comfort.
- Use the timer wisely: Set on/off schedules to save energy and maintain ideal room temperature.
- Activate eco mode: Reduce power consumption without sacrificing cooling performance.
- Adjust fan speed manually: Choose between auto, low, medium, or high for personalized airflow.
- Clean the remote regularly: Prevent button malfunctions by wiping with a dry cloth weekly.
- Check battery orientation: Ensure correct battery placement to avoid remote failure.
📑 Table of Contents
- Why Your Panasonic Air Conditioner Remote Control Deserves a Second Look
- Getting to Know Your Panasonic Remote: The Basics
- Mastering Temperature and Mode Settings
- Scheduling and Timer Functions: Save Energy, Sleep Better
- Advanced Features: Swing, Quiet, and Airflow Control
- Wi-Fi and Smart Features (For Connected Models)
- Troubleshooting Common Remote Issues
- Final Thoughts: Get the Most Out of Your Panasonic Remote
Why Your Panasonic Air Conditioner Remote Control Deserves a Second Look
Remember that one time your air conditioner started acting up, and you blamed it on the unit? You hit the power button, waited, hit it again, even gave the remote a little shake—nothing. Then, after a few minutes of frustration, you realized you had been pressing the wrong button all along? Yeah, we’ve all been there. The Panasonic air conditioner remote control is one of those devices that seems simple at first glance, but once you dive in, you realize it’s packed with features designed to make your life easier. Yet, most of us only scratch the surface, using just a fraction of what it can do.
Whether you’re a new Panasonic AC owner or you’ve been using one for years, understanding your remote control can transform your comfort game. From setting precise temperatures to scheduling your cooling, the remote is your personal command center. In this guide, we’ll walk you through Panasonic air conditioner remote control instructions in a way that’s clear, practical, and—most importantly—easy to follow. No confusing manuals, no tech jargon. Just real-life tips and tricks that work, whether you’re trying to beat the summer heat or keep your bedroom cool at night.
Getting to Know Your Panasonic Remote: The Basics
Before we jump into advanced features, let’s start with the foundation: getting familiar with your remote. Panasonic remotes come in several models (like the A75C2537, A75C3707, or the newer Wi-Fi-enabled versions), but most share a common layout. Knowing what each button does is the first step to mastering your AC.
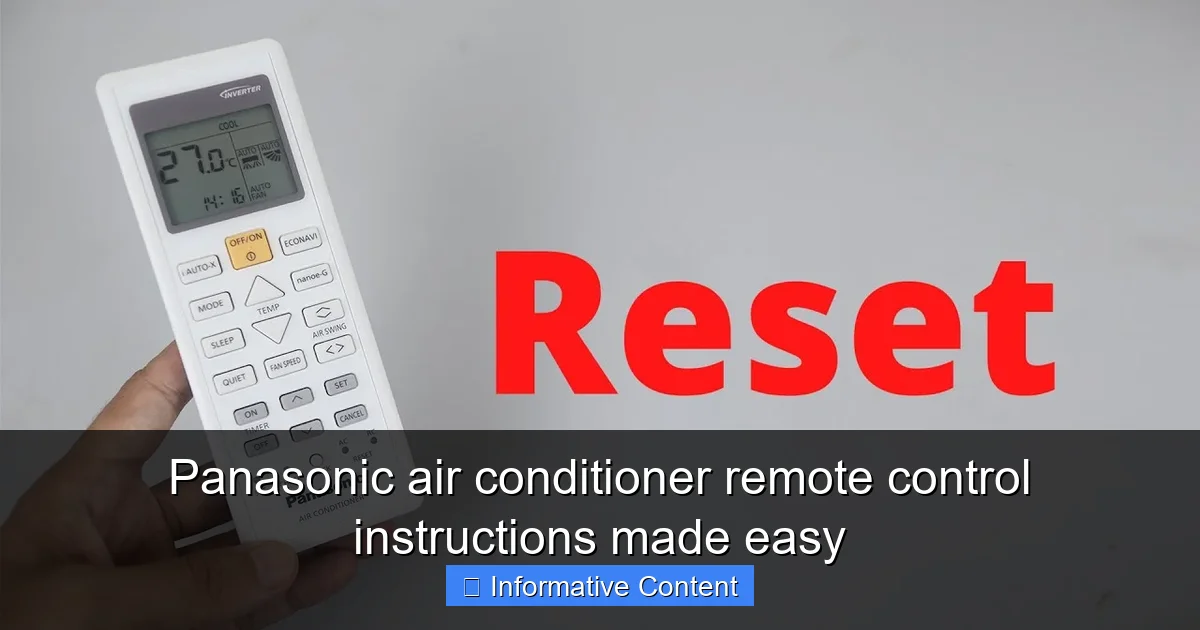
Visual guide about panasonic air conditioner remote control instructions
Image source: i.ytimg.com
Key Buttons and Their Functions
The front of your Panasonic remote typically features these essential buttons:
- Power (On/Off): The big red or green button at the top. Press once to turn on, again to turn off. Simple, right?
- Mode: Cycles through cooling, heating (if available), dry (dehumidify), fan-only, and auto modes. This is where you tell your AC what job to do.
- Temperature Up/Down: Adjusts your set temperature. Most units allow settings from 16°C to 30°C (60°F to 86°F).
- Fan Speed: Controls airflow intensity—usually Low, Medium, High, and Auto. Auto adjusts based on room temperature.
- Timer: Sets on/off schedules. Super useful for energy savings.
- Swing: Controls the horizontal and vertical louvers for better airflow distribution.
- Sleep: Activates energy-saving mode that gradually adjusts temperature during the night.
- Quiet: Reduces fan noise for quieter operation—perfect for bedrooms.
For example, if you’re setting up your AC for a good night’s sleep, you’d press Mode to select Cool, set your desired temp (say, 24°C), press Fan Speed to Auto, then hit Sleep and Quiet. Boom—your AC is now your sleep buddy.
Battery and Display Tips
Your remote runs on two AAA batteries. If the screen is dim or unresponsive, it’s likely time to replace them. Pro tip: Use alkaline batteries (not rechargeable) for longer life. Also, avoid storing the remote in direct sunlight—heat can damage the internal components and cause the display to fade.
When you press a button, the display should light up (usually green or blue). If it doesn’t, check the battery orientation and make sure the contacts are clean. A little bit of rubbing alcohol on a cotton swab can clean off corrosion if needed.
Pairing and Signal Issues
Sometimes, the remote stops responding. First, make sure you’re within 7–8 meters (20–25 feet) of the indoor unit and there’s no major obstruction (like a thick wall or metal cabinet). If the signal is weak, try removing reflective objects nearby—glass tables or mirrors can bounce the infrared signal away.
For Wi-Fi models (like those with Panasonic Comfort Cloud), you may need to re-pair the remote via the app if the connection drops. But for standard infrared remotes, a quick battery swap or repositioning usually does the trick.
Mastering Temperature and Mode Settings
Let’s be honest: most people set their AC to “cool” and leave it at that. But Panasonic remotes give you fine-tuned control over how your space feels. The right settings can mean the difference between a stuffy room and a perfectly balanced environment.
Choosing the Right Mode for Your Needs
Here’s a quick breakdown of what each mode does and when to use it:
- Cool: For hot days. The AC cools the air and dehumidifies slightly. Ideal when temps rise above 25°C (77°F).
- Heat: Available on heat pump models. Uses the same system in reverse to warm your room. Great for mild winters.
- Dry (Dehumidify): Removes moisture without drastically cooling. Perfect for humid days when it’s not hot, but you feel sticky. Think monsoon season or damp basements.
- Fan Only: Circulates air without cooling or heating. Useful when you just want a breeze or to clear out cooking smells.
- Auto: The AC decides the best mode and temperature based on room conditions. Handy if you’re lazy or want a “set it and forget it” option.
For example, during a rainy summer evening, you might not need full cooling, but the air feels heavy. Switch to Dry mode, set fan to Medium, and let your AC pull out the humidity. You’ll feel more comfortable without overcooling the room.
Temperature Precision: Why 24°C Isn’t Just 24°C
Setting your AC to 24°C doesn’t mean the room will instantly feel like 24°C. Factors like humidity, insulation, and sun exposure affect how the temperature feels. That’s where the Auto mode shines—it adjusts fan speed and cooling output to maintain a consistent feels-like temperature.
Tip: Start with 24°C in summer and 20°C in winter. Then, use the up/down buttons to fine-tune. If you feel a chill after 15 minutes, bump it up by 1°C. Small adjustments make a big difference in comfort and energy use.
Using the “I Feel” Sensor (If Available)
Some Panasonic models have a feature called “I Feel” or “Human Sensor.” It detects where you are in the room and adjusts airflow and temperature accordingly. If you’re sitting on the sofa, it focuses cooling there. If you leave the room, it may switch to energy-saving mode.
To use it, make sure the sensor is clean (dust can block it) and avoid placing large objects near the indoor unit. Also, don’t cover the sensor with curtains or furniture. It works best when unobstructed.
Scheduling and Timer Functions: Save Energy, Sleep Better
One of the most underused features on your Panasonic remote is the timer. It’s not just about turning the AC on or off—it’s about creating a smart, efficient routine that saves you money and improves comfort.
On Timer: Wake Up to a Cool Room
The On Timer lets you set the AC to turn on at a specific time. For example, if you wake up at 7:00 AM, set the On Timer to 6:45 AM. That way, your bedroom is cool and comfortable by the time you get up—no more waking up sweaty at 6:30 AM because the AC shut off at midnight.
To set it: Press the Timer button until “On” flashes. Use the up/down arrows to set the time. Press Timer again to confirm. The display will show “On” until the AC turns on.
Off Timer: Prevent Overcooling
The Off Timer is perfect for bedtime. Set it to turn off after 2 or 3 hours, so you’re not paying to cool an empty room all night. Or, use it during the day when you leave for work.
Example: You go to bed at 10:00 PM and fall asleep by 10:30. Set the Off Timer for 11:00 PM. The AC runs for 30 minutes after you’re asleep, then shuts off. You stay cool without wasting energy.
24-Hour Timer: Full-Day Control
Some models support a 24-hour timer, letting you set both On and Off times. This is ideal for people with regular schedules. Set it to turn on at 5:00 PM (after work) and off at 10:00 PM. Or, program it to run during peak cooling hours in summer.
Pro tip: Use the timer in combination with Sleep mode. Set the AC to turn on at 10:00 PM, activate Sleep mode, and turn off at 6:00 AM. You’ll have a cool, quiet night and wake up refreshed.
Weekly Timer (Wi-Fi Models)
If you have a Wi-Fi-enabled Panasonic AC, you can set a weekly schedule via the Panasonic Comfort Cloud app. This lets you program different times for weekdays vs. weekends. For example, cool the living room during work hours, then switch to the bedroom at night.
Even without Wi-Fi, you can mimic this by manually setting the timer each day. It takes a few seconds and pays off in energy savings.
Advanced Features: Swing, Quiet, and Airflow Control
Beyond cooling, your Panasonic remote gives you control over airflow and noise—two factors that can make or break your comfort.
Swing Function: Even Air Distribution
The Swing button controls the louvers (the moving flaps) on your indoor unit. When activated, it moves the louvers up and down (vertical swing) or side to side (horizontal swing), spreading air more evenly across the room.
Use vertical swing for tall rooms or high ceilings. Use horizontal swing to avoid blowing air directly at you. For example, if you’re sitting at a desk, set horizontal swing to “left” so the breeze flows beside you, not in your face.
You can also set the swing to “fixed” by pressing and holding the swing button. This locks the louvers in one position—great for targeting a specific area, like a bed or sofa.
Quiet Mode: Silent Cooling for Bedrooms
Ever tried to sleep with the AC humming loudly? The Quiet mode reduces fan speed and compressor noise, making it perfect for bedrooms, nurseries, or home offices.
When you press Quiet, the display may show a moon icon or “Q.” The AC will run at lower power, which means slightly less cooling—but for most people, it’s more than enough at night.
Tip: Combine Quiet mode with Sleep mode for the ultimate nighttime setup. Your AC will cool quietly and gradually raise the temperature as you sleep, saving energy without waking you up.
Airflow Direction and “Powerful” Mode
Some remotes have a Powerful or Turbo button. This runs the AC at maximum fan speed for 15–20 minutes to cool the room fast. Great for when you come home to a hot house.
After that, switch back to Auto or Quiet mode to maintain comfort. Don’t leave Powerful on all day—it uses more energy and can dry out the air.
Also, avoid pointing the airflow directly at people. Use the swing or manual louver adjustment to create a gentle, indirect breeze. This prevents “cold spots” and keeps the whole room comfortable.
Wi-Fi and Smart Features (For Connected Models)
If you have a newer Panasonic AC with Wi-Fi, your remote is just one part of a smarter system. With the Panasonic Comfort Cloud app, you can control your AC from your phone, tablet, or even with voice commands (via Alexa or Google Assistant).
Pairing Your AC with the App
First, download the Panasonic Comfort Cloud app (available on iOS and Android). Make sure your AC is powered on and the Wi-Fi module is active (check the indoor unit’s display for a Wi-Fi icon).
Open the app, create an account, and follow the setup wizard. You’ll need to connect your AC to your home Wi-Fi network. The process usually takes 2–3 minutes.
Once connected, you can:
- Turn the AC on/off remotely
- Adjust temperature, mode, and fan speed
- Set weekly schedules
- Monitor energy usage
- Receive filter cleaning alerts
Using Voice Commands
If you have an Alexa or Google Home device, you can say things like:
- “Alexa, turn on the living room AC.”
- “Hey Google, set the bedroom AC to 22 degrees.”
- “Alexa, switch to Dry mode.”
This is especially handy when your remote is lost under the couch or when you’re in another room.
Remote Firmware Updates
Panasonic occasionally releases firmware updates for Wi-Fi remotes and AC units. These can improve performance, add new features, or fix bugs. The app will notify you when an update is available. Just make sure your AC is connected to power and Wi-Fi during the update (it takes 5–10 minutes).
Troubleshooting Common Remote Issues
Even the best remotes can have hiccups. Here’s how to fix the most common problems—without calling a technician.
Remote Not Responding?
Check these first:
- Dead batteries: Replace with fresh AAA alkaline batteries.
- Dirty sensor: Wipe the front of the remote with a dry cloth.
- Signal blocked: Move closer to the AC. Remove objects in the line of sight.
- AC in standby: Make sure the indoor unit is powered on (check the display).
If none of these work, try resetting the remote. Remove the batteries, wait 30 seconds, then reinsert them. This often clears temporary glitches.
Buttons Not Working
If only some buttons don’t work, the remote may have a hardware issue. Try cleaning the button contacts with a cotton swab and isopropyl alcohol. If that fails, contact Panasonic support—they often offer replacements under warranty.
Wi-Fi Remote Not Connecting
For Wi-Fi models:
- Restart your router and AC.
- Re-pair the remote via the app.
- Move the AC closer to the router (if possible).
- Check for interference from other devices (microwaves, cordless phones).
Remember: not all Panasonic remotes support Wi-Fi. Make sure your model is compatible before buying a replacement.
Final Thoughts: Get the Most Out of Your Panasonic Remote
Your Panasonic air conditioner remote control is more than just a power switch. It’s a powerful tool that, when used correctly, can save energy, improve comfort, and even help you sleep better. From simple tasks like setting the timer to advanced features like Wi-Fi control, every button serves a purpose.
The key is to experiment. Try the Dry mode on a humid day. Set a timer for your morning routine. Use Quiet mode at night. You’ll be surprised how much better your AC performs when you take the time to understand it.
And if you ever get stuck? Don’t panic. Most issues have simple fixes—like fresh batteries or a quick reset. With these Panasonic air conditioner remote control instructions in your back pocket, you’re ready to master your climate control like a pro. Now go enjoy that perfectly cooled (or warmed) space—you’ve earned it.
| Feature | Button/Function | Best Use Case |
|---|---|---|
| Cooling | Mode → Cool | Hot summer days, temperatures above 25°C |
| Dehumidify | Mode → Dry | Humid, muggy weather without extreme heat |
| Energy Savings | Sleep Mode + Timer | Overnight use, reducing electricity bills |
| Air Distribution | Swing (Vertical/Horizontal) | Even cooling across large or tall rooms |
| Low Noise | Quiet Mode | Bedrooms, nurseries, quiet spaces |
| Remote Access | Wi-Fi + Comfort Cloud App | Control from anywhere, voice commands |
Frequently Asked Questions
How do I use the Panasonic air conditioner remote control for the first time?
To use your Panasonic air conditioner remote control for the first time, insert the batteries and point the remote at the unit. Press the power button to turn on the air conditioner and follow the on-screen prompts to set your preferred mode, temperature, and fan speed.
What do the symbols on my Panasonic AC remote mean?
The symbols on your Panasonic air conditioner remote control represent different functions like cooling, heating, fan speed, and timer settings. Refer to the user manual or the quick guide on the back of the remote for a detailed explanation of each icon.
Why is my Panasonic air conditioner remote not working?
If your Panasonic air conditioner remote control isn’t working, check the batteries and replace them if needed. Ensure there’s no obstruction between the remote and the unit, and that you’re within the effective range of about 20 feet.
How do I set the timer on my Panasonic AC remote?
To set the timer using your Panasonic air conditioner remote control, press the “Timer” button and use the up/down arrows to select the desired on or off time. Confirm your selection by pressing the “Set” or “Enter” button.
Can I control my Panasonic AC without the remote?
Yes, you can control your Panasonic air conditioner using the manual control panel on the unit itself. However, for full functionality and convenience, using the Panasonic air conditioner remote control is recommended.
How do I reset my Panasonic air conditioner remote control?
To reset your Panasonic air conditioner remote control, remove the batteries, wait 30 seconds, then reinsert them. Press and hold the power button for 5 seconds to restore default settings and reconnect to the unit.