
Featured image for panasonic air conditioner installation instructions
Image source: acsupportspoint.com
Installing your Panasonic air conditioner is simple and stress-free with the brand’s clear, step-by-step instructions and user-friendly design. From mounting the indoor unit to connecting refrigerant lines and configuring settings, Panasonic ensures a seamless setup process that even DIY beginners can follow confidently. With detailed manuals, labeled components, and helpful online support, professional-level installation is achievable at home.
Key Takeaways
- Read the manual first: Always review Panasonic’s official installation guide before starting.
- Choose the right location: Ensure proper wall support and clearance for optimal airflow.
- Use proper tools and safety gear: Protect yourself and equipment during installation.
- Secure the indoor unit correctly: Mount firmly to prevent vibration and noise issues.
- Ensure correct refrigerant line handling: Avoid kinks and leaks for peak performance.
- Test the system after setup: Verify cooling, drainage, and remote functionality.
📑 Table of Contents
- Panasonic Air Conditioner Installation Instructions Made Easy
- Understanding Your Panasonic Air Conditioner Model
- Preparing for Installation: Tools, Safety, and Planning
- Step-by-Step Installation Process
- Testing and Troubleshooting Your Installation
- Maintenance Tips to Keep Your Panasonic AC Running Smoothly
- When to Call a Professional
- Conclusion
Panasonic Air Conditioner Installation Instructions Made Easy
So, you’ve finally decided to beat the summer heat with a brand-new Panasonic air conditioner. Congratulations! You’ve made a smart choice—Panasonic is known for its energy-efficient, quiet, and reliable cooling systems. But now comes the part that gives many homeowners a little anxiety: installation. Let’s be honest, the idea of drilling holes in your wall, handling refrigerant lines, and dealing with electrical connections can feel overwhelming. I remember when I installed my first Panasonic unit—I spent hours watching YouTube tutorials and nervously double-checking every step. But once it was up and running, the cool breeze made it all worth it.
The good news? Installing a Panasonic air conditioner doesn’t have to be a nightmare. With the right preparation, tools, and a clear set of instructions, you can get it done safely and efficiently—even if you’re not a DIY expert. Whether you’re installing a wall-mounted split system, a window unit, or a portable model, this guide will walk you through every step in a way that’s easy to follow. We’ll cover everything from choosing the right location to testing your system after installation. And don’t worry—we’ll keep it real. No fluff, no sales pitch, just practical advice from someone who’s been there.
Understanding Your Panasonic Air Conditioner Model
Before you even think about picking up a drill, it’s essential to understand what type of Panasonic air conditioner you have. Panasonic offers a range of models, including inverter split systems, non-inverter units, window air conditioners, and portable ACs. Each has its own installation requirements, so knowing your model is the first step to a smooth setup.
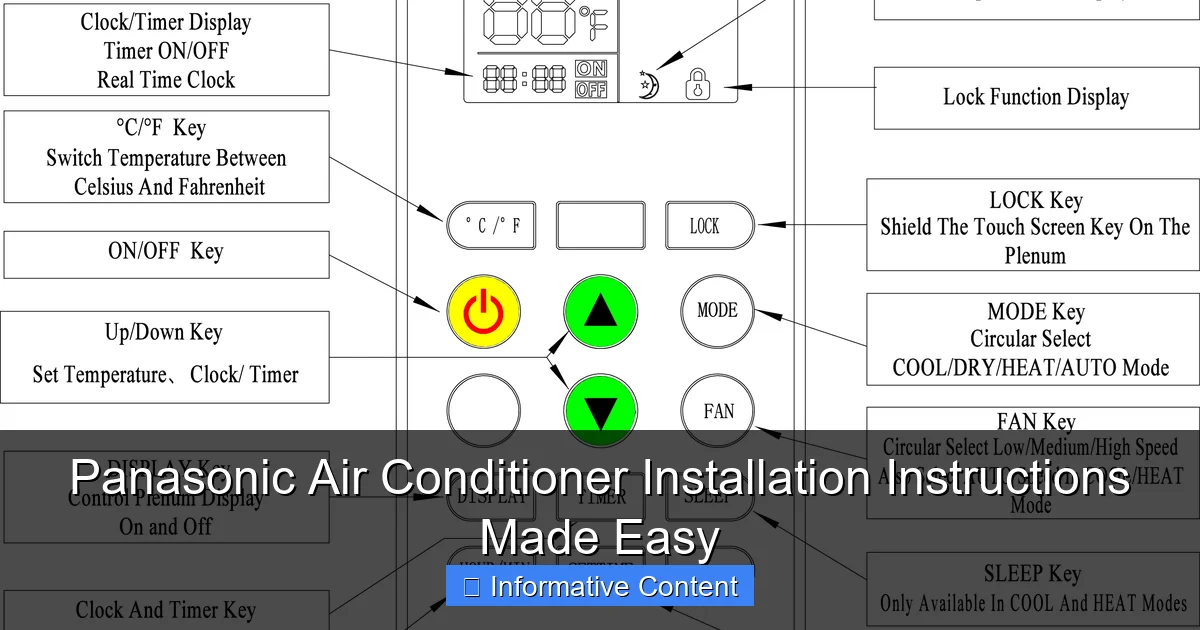
Visual guide about panasonic air conditioner installation instructions
Image source: lillen.au
Types of Panasonic AC Units
Let’s break down the most common types:
- Split System Air Conditioners: These are the most popular for home use. They consist of an outdoor unit (condenser) and an indoor unit (evaporator), connected by refrigerant lines and electrical wiring. They’re quiet, efficient, and ideal for cooling entire rooms.
- Window Air Conditioners: These are all-in-one units that fit into a window or a specially prepared wall opening. They’re easier to install than split systems but may not be as energy-efficient or aesthetically pleasing.
- Portable Air Conditioners: These are freestanding units that vent hot air through a hose, usually out a window. They’re great for renters or temporary cooling but require less permanent installation.
For this guide, we’ll focus primarily on split system installations, as they’re the most common and require the most detailed setup. But the principles—like proper placement, electrical safety, and securing the unit—apply across all models.
Checking the User Manual
Every Panasonic air conditioner comes with a detailed user and installation manual. I can’t stress this enough: read it. The manual includes model-specific instructions, safety warnings, and diagrams that are tailored to your exact unit. For example, some models require a specific type of mounting bracket or have unique refrigerant line lengths. Skipping this step could lead to improper installation, reduced efficiency, or even voiding your warranty.
Pro tip: Download a digital copy of the manual from Panasonic’s official website if you lose the physical one. It’s always good to have a backup, especially during installation when you might be working in a dusty or greasy environment.
Preparing for Installation: Tools, Safety, and Planning
Now that you know your model, it’s time to get ready. A successful installation starts long before you mount the unit. Proper preparation saves time, reduces frustration, and ensures safety.
Essential Tools and Materials
Here’s a checklist of what you’ll likely need:
- Drill and drill bits (masonry bits if drilling through concrete or brick)
- Level (a laser level is even better for precision)
- Measuring tape
- Screwdrivers (Phillips and flathead)
- Wrench set (for tightening refrigerant line connections)
- Vacuum pump (for split systems to remove air and moisture from refrigerant lines)
- Insulation tape and foam (for sealing gaps)
- Electrical tester (to ensure power is off)
- Safety gear: gloves, safety glasses, and sturdy shoes
If you’re not comfortable handling electrical wiring or refrigerant, consider hiring a licensed technician. While DIY installation can save money, safety should always come first.
Choosing the Right Location
Where you install your Panasonic air conditioner makes a big difference in performance and longevity. Here’s what to consider:
- Indoor Unit: Mount it high on an interior wall, away from direct sunlight, heat sources, and moisture. Avoid placing it above beds or seating areas where dripping condensation could be annoying. The ideal height is about 7–8 feet from the floor.
- Outdoor Unit: Place it on a stable, level surface with at least 12–18 inches of clearance on all sides for airflow. Avoid areas with heavy dust, debris, or direct exposure to rain and sunlight. A shaded, well-ventilated spot near a wall or fence works well.
- Distance Between Units: Most Panasonic split systems allow refrigerant lines up to 15–25 feet long. Keep the distance as short as possible to maintain efficiency. Longer lines may require additional refrigerant and a more powerful vacuum pump.
Example: When I installed my Panasonic CS/CU-Z24XKR model, I chose a spot on the living room wall that was centrally located and close to an exterior wall. This minimized the length of the refrigerant lines and made the outdoor unit placement straightforward.
Safety First: Electrical and Structural Checks
Before drilling or wiring, make sure your home’s electrical system can handle the AC unit. Panasonic units typically require a dedicated circuit—usually 20–30 amps depending on the model. Check your circuit breaker panel to ensure there’s an available slot and that the wiring is adequate.
Also, inspect the wall where you’ll mount the indoor unit. It should be strong enough to support the weight—usually 20–40 pounds. Avoid hollow walls or drywall without proper backing. Use a stud finder to locate solid support, or install a backing plate if needed.
Step-by-Step Installation Process
Now for the main event: installing your Panasonic air conditioner. We’ll focus on a typical split system installation, broken down into clear, manageable steps.
Mounting the Indoor Unit
Start with the indoor unit. Here’s how:
- Mark the Mounting Position: Use the mounting template provided in the manual. Hold it against the wall at the desired height and use a level to ensure it’s straight. Mark the screw holes with a pencil.
- Drill Holes: Drill pilot holes into the wall at the marked spots. If you’re drilling through an exterior wall, be careful not to damage wiring or plumbing inside.
- Install the Mounting Plate: Secure the metal mounting plate to the wall using the provided screws and anchors. Make sure it’s level and tightly fastened.
- Prepare the Wall Opening: Drill a 2.5–3 inch hole through the wall for the refrigerant lines, drain hose, and electrical wiring. Angle the hole slightly downward toward the outside to prevent water from entering.
Tip: Use a foam gasket or silicone sealant around the hole to prevent drafts and pests from getting in.
Connecting the Refrigerant Lines and Wiring
This is the trickiest part, so take your time.
- Run the Lines: Feed the refrigerant lines, drain hose, and electrical cable through the wall hole from the inside. Leave enough slack on both sides for connections.
- Connect the Indoor Unit: Attach the refrigerant lines to the indoor unit’s ports. Use a wrench to tighten the flare nuts—don’t over-tighten, as this can damage the seals. Connect the drain hose and secure it with a clamp.
- Electrical Connection: Follow the wiring diagram in the manual. Typically, you’ll connect live, neutral, and ground wires. Make sure the power is off at the breaker before working on wires.
- Insulate the Lines: Wrap the refrigerant lines with insulation tape to prevent condensation and energy loss.
Important: Never cut or shorten refrigerant lines unless specified in the manual. Altering the length can affect performance and void the warranty.
Installing the Outdoor Unit
Now move outside.
- Position the Unit: Place the outdoor unit on a concrete pad or sturdy brackets. Ensure it’s level and secure.
- Connect the Lines: Attach the refrigerant lines and electrical wiring to the outdoor unit. Again, use a wrench to tighten connections and check for leaks.
- Vacuum the Lines: Use a vacuum pump to remove air and moisture from the refrigerant lines. This step is critical—air in the system reduces efficiency and can damage the compressor. Run the pump for at least 15–20 minutes.
- Open the Valves: Once vacuumed, slowly open the service valves on the outdoor unit to allow refrigerant to flow into the system.
Pro tip: Have a helper assist with holding the lines and monitoring the vacuum gauge. It’s much easier with two people.
Finalizing the Installation
With both units connected, it’s time to finish up.
- Secure all loose wires and hoses with clips or tape.
- Seal the wall hole with expanding foam or silicone caulk.
- Attach the front panel of the indoor unit and ensure it clicks into place.
- Turn on the power at the breaker and test the system.
When you first turn it on, listen for unusual noises and check for cool air output. It may take a few minutes for the system to stabilize.
Testing and Troubleshooting Your Installation
You’ve installed your Panasonic air conditioner—now make sure it’s working properly.
Initial System Check
Run the AC in cooling mode for at least 15–20 minutes. Check the following:
- Is cold air coming from the indoor unit?
- Are the refrigerant lines cold to the touch (but not freezing)?
- Is the outdoor unit running and expelling hot air?
- Is the drain hose dripping water outside (a sign of proper condensation removal)?
If everything looks good, you’re all set! If not, don’t panic—most issues are fixable.
Common Problems and Fixes
Here are a few typical issues and how to address them:
- No Cooling: Check if the service valves are fully open. Also, ensure the air filter is clean and the thermostat is set correctly.
- Water Leaking Indoors: This usually means the drain hose is clogged or not angled properly. Clear the hose and ensure it slopes downward.
- Strange Noises: Rattling could mean loose mounting or panels. Hissing might indicate a refrigerant leak—call a technician immediately.
- Unit Won’t Turn On: Verify the circuit breaker hasn’t tripped and the remote control has fresh batteries.
Remember: If you suspect a refrigerant leak or electrical issue, stop using the unit and contact a professional. Safety first!
Maintenance Tips to Keep Your Panasonic AC Running Smoothly
Installation is just the beginning. To get the most out of your Panasonic air conditioner, regular maintenance is key.
Monthly and Seasonal Tasks
Here’s a simple maintenance schedule:
| Task | Frequency | Notes |
|---|---|---|
| Clean or replace air filter | Monthly | Dirty filters reduce airflow and efficiency. |
| Inspect drain hose | Monthly | Clear any blockages to prevent leaks. |
| Clean outdoor unit coils | Every 3–6 months | Use a garden hose to gently rinse off dirt and debris. |
| Check refrigerant levels | Annually | Best done by a licensed technician. |
| Inspect electrical connections | Annually | Ensure wires are secure and not corroded. |
Energy-Saving Tips
Your Panasonic AC is already energy-efficient, but you can do more:
- Set the thermostat to 78°F (26°C) when home and higher when away.
- Use a programmable or smart thermostat for automatic adjustments.
- Close curtains or blinds during the day to reduce heat gain.
- Seal windows and doors to prevent cool air from escaping.
By following these tips, you’ll extend the life of your unit and save on energy bills.
When to Call a Professional
While many homeowners can handle basic installation, there are times when it’s best to call in the experts.
Signs You Need Help
Consider professional installation if:
- You’re not comfortable working with electricity or refrigerant.
- Your home’s wiring or structure requires modifications.
- You’re installing a large-capacity unit (3 tons or more).
- You live in an area with strict building codes or HOA regulations.
A licensed HVAC technician has the tools, training, and certification to handle complex installations safely and efficiently. Plus, professional installation often comes with a warranty, giving you peace of mind.
Finding a Qualified Technician
Look for technicians who are:
- Certified by Panasonic or a recognized HVAC association.
- Licensed and insured.
- Willing to provide a written estimate and timeline.
Ask for recommendations from friends or check online reviews. A little research goes a long way.
Conclusion
Installing a Panasonic air conditioner might seem daunting at first, but with the right preparation and step-by-step guidance, it’s absolutely doable. From choosing the perfect location to connecting refrigerant lines and testing the system, every step brings you closer to that refreshing cool breeze on a hot summer day. Whether you’re a DIY enthusiast or prefer to leave it to the pros, understanding the process helps you make informed decisions and ensures your AC runs efficiently for years to come.
Remember, the key to success is patience, attention to detail, and safety. Don’t rush the installation. Take breaks if needed, double-check your work, and never hesitate to consult the manual or seek help. Your Panasonic air conditioner is an investment in comfort and energy savings—treat it with care, and it will reward you with reliable performance season after season. Now go enjoy that cool, crisp air!
Frequently Asked Questions
What do I need to know before installing a Panasonic air conditioner?
Before installing your Panasonic air conditioner, ensure you have the right tools, a suitable location with proper ventilation, and access to an electrical connection that meets the unit’s requirements. It’s also important to follow the manufacturer’s guidelines to maintain warranty coverage and ensure safe operation.
Can I install a Panasonic air conditioner myself?
While some basic setup steps can be done by homeowners, Panasonic recommends professional installation for split and central air conditioning systems to ensure safety and optimal performance. DIY installation may void the warranty if not performed correctly.
Where should I place my Panasonic air conditioner for best performance?
Install the indoor unit on a sturdy wall, away from direct sunlight and heat sources, and ensure the outdoor unit has ample airflow and is protected from debris. Proper placement improves efficiency and extends the lifespan of your Panasonic air conditioner.
How do I connect the refrigerant lines during Panasonic air conditioner installation?
Refrigerant lines must be carefully connected between the indoor and outdoor units, ensuring no leaks and proper insulation. This step should be handled by a licensed technician to comply with safety standards and Panasonic’s installation instructions.
What electrical requirements are needed for Panasonic air conditioner installation?
Your Panasonic air conditioner requires a dedicated circuit with the correct voltage and amperage as specified in the user manual. Always consult a qualified electrician to ensure your home’s wiring can safely support the unit.
Do I need special tools for Panasonic air conditioner installation?
Yes, tools like a drill, level, vacuum pump, and manifold gauge set are typically required, especially for split systems. Having the right tools ensures a smooth installation process and helps avoid damage to the unit or property.