
Featured image for mitsubishi remote control air conditioner instructions
Image source: imgv2-1-f.scribdassets.com
Master your Mitsubishi remote control air conditioner with ease using these simplified, step-by-step instructions. Whether adjusting temperature, switching modes, or setting timers, this guide breaks down every function for quick, hassle-free operation. Say goodbye to confusion and enjoy precise climate control at the touch of a button.
Key Takeaways
- Master the basics: Learn your Mitsubishi remote’s buttons for quick, efficient control.
- Set timers effortlessly: Use timer functions to automate cooling and save energy.
- Optimize airflow: Adjust fan speed and louver direction for even room cooling.
- Enable sleep mode: Activate sleep mode for quieter operation and energy savings.
- Reset with ease: Hold power button 3 seconds to reset remote instantly.
- Pair correctly: Ensure remote and AC unit are paired for seamless connectivity.
📑 Table of Contents
- Why Your Mitsubishi Remote Control Air Conditioner Deserves a Second Look
- Getting to Know Your Mitsubishi Remote Control
- Setting Up and Using Your Mitsubishi Remote Control Air Conditioner
- Advanced Features: Timers, Sensors, and Energy-Saving Modes
- Troubleshooting Common Mitsubishi Remote Control Issues
- Maximizing Efficiency and Comfort: Pro Tips and Best Practices
- Final Thoughts: Master Your Comfort with Confidence
Why Your Mitsubishi Remote Control Air Conditioner Deserves a Second Look
Let’s be honest—most of us treat our air conditioner remote like a TV remote. We press a few buttons, hope for the best, and never give it another thought. But here’s a secret: your Mitsubishi remote control air conditioner is way more powerful than you think. It’s not just about cooling or heating a room. It’s about creating the perfect indoor climate—efficiently, quietly, and with minimal effort.
Whether you’ve just moved into a new place with a Mitsubishi system or you’ve had one for years but never cracked the manual, this guide is for you. I remember the first time I tried to set a timer on my Mitsubishi remote. I pressed every button, held them down, and even shook it (don’t do that). After 20 minutes of frustration, I realized I was missing out on features that could have saved me money, energy, and sweat. That’s why I’ve put together this easy-to-follow, no-nonsense guide to help you master your Mitsubishi remote control air conditioner—without the headache.
Getting to Know Your Mitsubishi Remote Control
The Mitsubishi remote control isn’t just a plastic box with buttons. It’s a smart little device designed to give you full control over your comfort. But to use it well, you need to know what each button does and how to navigate its menu. Let’s break it down.
Visual guide about mitsubishi remote control air conditioner instructions
Image source: s.ecrater.com
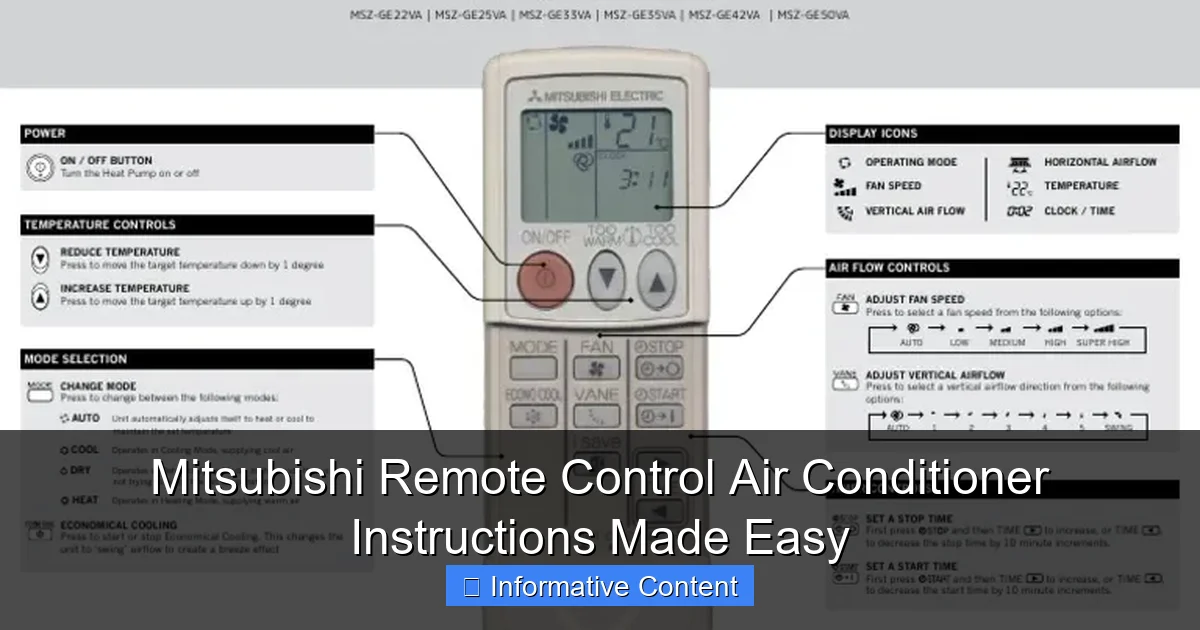
Identifying the Buttons and Their Functions
Most Mitsubishi remotes follow a similar layout, though models may vary slightly (like the MSZ-FH, MSZ-AP, or Mr. Slim series). Here’s what you’ll typically find:
- Power (On/Off): The big red or green button. Simple, but essential. Turns the unit on or off.
- Mode: Cycles through cooling, heating, dry (dehumidify), fan-only, and auto modes. This is your climate control hub.
- Temperature (+/-): Adjusts the set temperature. Usually ranges from 16°C to 30°C (60°F to 86°F).
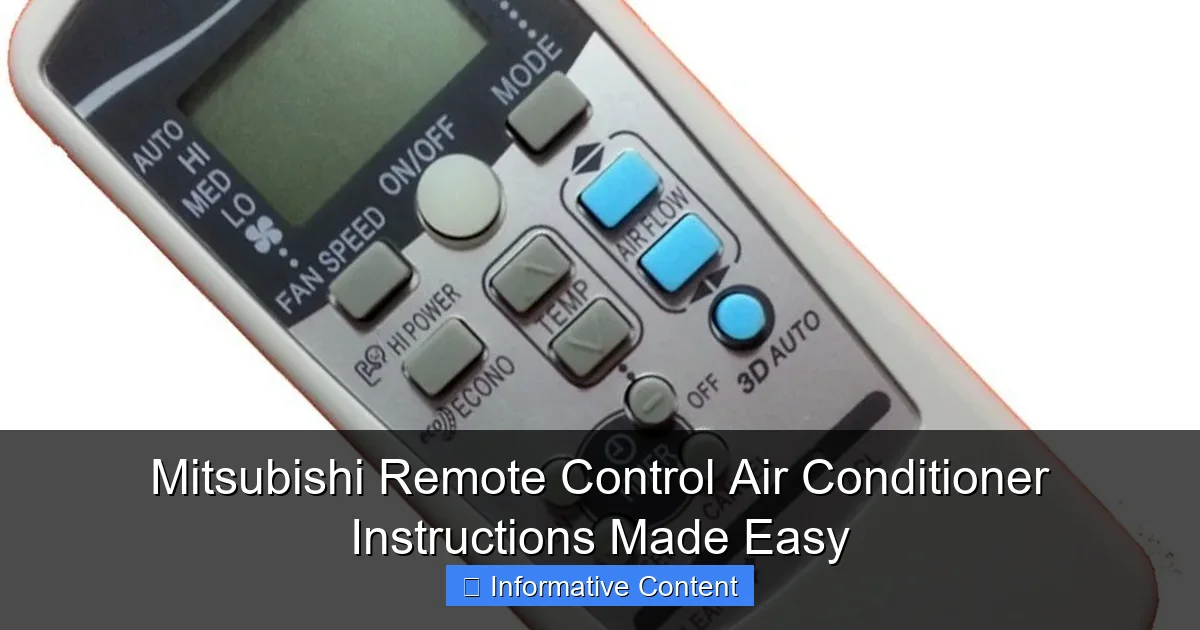
- Fan Speed: Controls airflow strength—Auto, Low, Medium, High, or Quiet (on some models).
- Swing: Activates or adjusts the louvers (the flaps inside the indoor unit) to distribute air evenly.
- Timer: Sets on/off schedules. Great for saving energy.
- Econo Cool / Powerful: Energy-saving mode (Econo Cool) or boost mode (Powerful) for quick cooling/heating.
- i-See Sensor (on select models): Uses motion detection to adjust airflow based on where people are in the room.
- Filter Reset: Reminds you when it’s time to clean the filter.
Tip: If your remote has a “Check” or “Test” button, don’t press it unless you’re troubleshooting—it can trigger diagnostic modes that confuse the system.
Understanding the Display Screen
The LCD screen is your command center. It shows:
- Current room temperature
- Set temperature
- Selected mode (e.g., “Cool,” “Heat”)
- Fan speed level
- Timer status
- Error codes (if something’s wrong)
Some remotes have a backlight—press any button to activate it in the dark. Others have a “Display” button to toggle the screen on/off to save battery.
Remote Model Variations: What to Expect
Not all Mitsubishi remotes are the same. For example:
- Standard Remote (e.g., R32 models): Basic layout, fewer smart features.
- Advanced Remote (e.g., with i-See): Includes motion sensors and personalized airflow.
- Wi-Fi Enabled (e.g., via MELCloud app): Allows remote control via smartphone, voice assistants, or home automation.
Example: My MSZ-AP25VG has a simple remote, but my friend’s MSZ-FH35VE comes with a remote that shows humidity levels and has a “Silent” mode for nighttime use. Know your model to use it best.
Setting Up and Using Your Mitsubishi Remote Control Air Conditioner
Now that you know the buttons, let’s get practical. Setting up your system correctly ensures optimal performance and energy savings.
Step-by-Step: Initial Setup
Follow these steps when you first install or reset your remote:
- Insert Batteries: Open the back panel, insert two AAA batteries (usually included), and close it.
- Point and Power On: Aim the remote at the indoor unit and press the Power button. You should hear a beep or see the unit’s indicator light up.
- Set the Time (for Timer Functions): If your remote has a clock, use the Timer or Menu button to set the current time. This is crucial for scheduling.
- Check Signal: If the unit doesn’t respond, move closer or check for obstructions (like a bookshelf blocking the IR sensor).
Pro Tip: Avoid placing the remote near heat sources (like a radiator) or in direct sunlight—this can affect battery life and signal strength.
Choosing the Right Mode for Your Needs
Each mode has a purpose. Here’s when to use them:
- Cool: For hot days. Set the temperature 3–5°C below room temp for quick relief, then raise it slightly for comfort.
- Heat: For cold seasons. Works best when set to 20–22°C (68–72°F)—warmer isn’t always better.
- Auto: The system decides between cooling and heating based on the room temperature. Great for fluctuating climates.
- Fan: Circulates air without changing temperature. Useful for mild days or improving air quality.
- Dry: Reduces humidity without overcooling. Ideal for damp rooms or muggy days.
Real-Life Example: In spring, my room gets sticky but not hot. I set my Mitsubishi to “Dry” mode at 24°C, and within an hour, the air feels fresh—no chills, no sweat.
Mastering Temperature and Fan Settings
Here’s a common mistake: setting the temperature to 16°C and cranking the fan to “High.” That’s inefficient. Instead:
- Set the temperature to a comfortable level (e.g., 24–26°C in summer).
- Use Auto fan speed for balanced airflow. The system adjusts based on room conditions.
- Switch to Quiet mode at night. It reduces noise by 30–50% and uses less energy.
Tip: If you’re in a large room, use the “Powerful” mode for the first 10–15 minutes, then switch to “Auto” to maintain temperature.
Advanced Features: Timers, Sensors, and Energy-Saving Modes
Your Mitsubishi remote has hidden gems that can save you money and boost comfort. Let’s unlock them.
Using the Timer Function (On/Off Scheduling)
The timer is a game-changer. Use it to:
- Turn on the AC before you wake up or get home.
- Turn off the AC while you’re away.
- Save energy during peak electricity hours.
How to set a timer:
- Press the Timer button. The display will show “Timer On” or “Timer Off.”
- Use the +/- buttons to set the time (e.g., 7:00 AM for wake-up).
- Press Timer again to confirm. The icon will stay lit.
- To cancel, press and hold the Timer button until it blinks, then release.
Example: I set my Mitsubishi to turn on at 6:45 AM and off at 8:00 PM. My bedroom is cool by the time I wake up, and it shuts off before bedtime—no wasted energy.
Econo Cool and Powerful Modes: When to Use Them
- Econo Cool: Limits the compressor’s power, reducing energy use by up to 30%. Use it when you don’t need rapid cooling (e.g., during the day when you’re at work).
- Powerful Mode: Boosts cooling/heating for 20 minutes. Perfect for scorching days or cold snaps.
Tip: After using “Powerful,” switch to “Auto” mode to maintain temperature without overworking the unit.
i-See Sensor and Smart Airflow (Select Models)
On models with the i-See sensor (like the MSZ-FH series), the remote detects movement and adjusts airflow to occupied areas. Here’s how it works:
- The sensor scans the room every 10 minutes.
- If it detects people, it directs airflow toward them.
- If no one is detected, it switches to “Away” mode (reduces output to save energy).
Real-Life Use: In my living room, the AC used to blow cold air at the empty sofa. With i-See, it now follows me to the kitchen or bedroom—genius!
Troubleshooting Common Mitsubishi Remote Control Issues
Even the best tech has hiccups. Here’s how to solve the most common problems.
Remote Not Responding? Try These Fixes
- Check the batteries: Weak batteries cause signal failure. Replace them every 6–12 months.
- Clean the IR window: Dust or fingerprints on the front of the remote block signals. Wipe it with a dry cloth.
- Point directly at the unit: The IR signal has a limited range (about 8 meters/25 feet).
- Remove obstacles: Curtains, furniture, or plants can block the signal.
Pro Tip: Test the remote by pressing a button and watching for the indoor unit’s indicator light to flash.
Error Codes: What They Mean and How to Fix Them
When the display shows a code like “E1” or “P5,” don’t panic. Most are easy to resolve:
| Error Code | Meaning | Solution |
|---|---|---|
| E1 | Indoor/outdoor unit communication failure | Check power supply, restart the unit, or call a technician. |
| P5 | Refrigerant leak or pressure issue | Stop using the AC and contact a licensed technician immediately. |
| U4 | Wired remote connection error | Check cable connections or replace the remote. |
| F3 | Outdoor unit overheating | Ensure outdoor unit has proper airflow (no leaves, debris). |
Note: Always consult your model’s manual for specific codes. If in doubt, call Mitsubishi support.
Resetting the Remote or System
If the remote freezes or acts strangely:
- Remove the batteries for 1 minute, then reinsert them.
- Unplug the indoor unit for 5 minutes, then plug it back in.
- Press and hold the “Filter Reset” and “Power” buttons together for 5 seconds (on some models).
Example: My remote once started beeping nonstop. I removed the batteries, waited, and it worked perfectly afterward.
Maximizing Efficiency and Comfort: Pro Tips and Best Practices
Your Mitsubishi remote control air conditioner can do more than just cool—it can make your home smarter and your energy bills smaller.
Energy-Saving Strategies for Every Season
- Summer: Use “Econo Cool” + ceiling fans to feel cooler without lowering the temperature.
- Winter: Set the temperature to 20–21°C and use “Auto” mode. Avoid cranking it to 30°C—it wastes energy.
- Spring/Fall: Use “Dry” or “Fan” mode instead of full cooling/heating.
Tip: A 1°C increase in summer (or decrease in winter) can save 5–10% on energy bills.
Cleaning and Maintenance Reminders
- Clean the air filter every 2 weeks (or monthly in low-dust areas). A dirty filter reduces efficiency by 15%.
- Reset the filter timer after cleaning by holding the “Filter Reset” button for 3 seconds.
- Schedule annual professional maintenance for the outdoor unit.
Integrating with Smart Home Systems (Wi-Fi Models)
If your Mitsubishi supports Wi-Fi (via MELCloud or similar apps):
- Control your AC from anywhere using your phone.
- Set geofencing (AC turns on when you’re near home).
- Use voice commands (“Hey Google, cool my room to 24°C”).
Example: I use MELCloud to turn on the AC 10 minutes before I leave work. My apartment is always cool when I arrive.
Final Thoughts: Master Your Comfort with Confidence
Your Mitsubishi remote control air conditioner isn’t just a tool—it’s a partner in comfort, efficiency, and smart living. From setting the perfect timer to decoding error messages, you now have the knowledge to use it like a pro. Remember, small adjustments—like using “Econo Cool” or cleaning the filter—add up to big savings and a longer lifespan for your unit.
Don’t be afraid to experiment. Try the “Dry” mode on a humid day. Test the i-See sensor. Play with the timer. The more you explore, the more you’ll appreciate how much your Mitsubishi can do. And if something goes wrong? You’ve got the troubleshooting skills to handle it.
So the next time you reach for your remote, don’t just press “On.” Press “Smart.” Your comfort—and your wallet—will thank you.
Frequently Asked Questions
How do I set the temperature on my Mitsubishi remote control air conditioner?
To set the temperature, press the “TEMP” button on your Mitsubishi remote control and use the up or down arrows to adjust to your desired level. The display will show the selected temperature, and the unit will begin cooling or heating accordingly.
Why is my Mitsubishi air conditioner remote not working?
First, check if the batteries need replacing or if the remote is properly aligned with the indoor unit’s receiver. Ensure there are no obstructions and the remote is within range—typically up to 26 feet.
How do I activate the timer function on my Mitsubishi remote control?
Press the “TIMER” button on the remote and use the arrows to set the desired on or off time. Confirm your selection, and the air conditioner will automatically start or stop at the scheduled time.
Can I use the Mitsubishi remote to switch between cooling and heating modes?
Yes, press the “MODE” button on the remote to cycle through options like Cool, Heat, Fan, and Auto. Select “Heat” for warming or “Cool” for air conditioning, depending on your needs.
What does the “i-see” sensor on my Mitsubishi remote control do?
The “i-see” sensor detects room occupancy and adjusts airflow direction and temperature for optimal comfort. It helps save energy by focusing cooling or heating where people are present.
How do I clean or maintain the Mitsubishi remote control air conditioner?
Turn off the unit and gently wipe the remote with a dry or slightly damp cloth—avoid harsh chemicals. For the indoor unit, clean or replace filters monthly and schedule professional maintenance annually.