
Featured image for mitsubishi electric air conditioner control panel instructions
Image source: tokuzato-hsg.jp
Master your Mitsubishi Electric air conditioner with ease using the intuitive control panel instructions guide. This comprehensive resource walks you through every button, setting, and function—from temperature control and mode selection to advanced features like timers and energy-saving modes—ensuring optimal comfort and efficiency. Whether you’re a first-time user or troubleshooting an issue, this guide simplifies operation and maximizes your unit’s performance.
Key Takeaways
- Master the modes: Switch between Cool, Heat, Dry, and Fan for optimal comfort.
- Adjust temperature: Use up/down arrows to set precise climate control levels.
- Enable timers: Schedule on/off times to save energy and enhance convenience.
- Use sleep mode: Automatically adjust settings for comfort and efficiency at night.
- Clean air filters: Check and clean filters monthly for better air quality and performance.
- Remote pairing: Sync remote control by following the panel’s pairing instructions carefully.
📑 Table of Contents
- Getting to Know Your Mitsubishi Electric Air Conditioner Control Panel
- Understanding the Control Panel Layout and Key Components
- Step-by-Step Guide to Operating Your Mitsubishi Electric Air Conditioner
- Advanced Features and Smart Controls
- Troubleshooting Common Control Panel Issues
- Maximizing Efficiency and Comfort with Smart Usage Tips
- Final Thoughts: Your Control Panel, Your Comfort
Getting to Know Your Mitsubishi Electric Air Conditioner Control Panel
Let’s be honest—when you first unbox your Mitsubishi Electric air conditioner, the sleek remote control might look like something out of a sci-fi movie. Buttons everywhere, symbols that look like hieroglyphics, and a tiny screen that seems to have a mind of its own. If you’ve ever stood there, remote in hand, wondering if you’re supposed to decode a secret message just to turn the thing on, you’re not alone. I remember the first time I tried to set my unit to “eco mode.” I ended up with the fan blasting at full speed and the room sounding like a wind tunnel. Not ideal.
The good news? Once you understand the Mitsubishi Electric air conditioner control panel instructions, using your unit becomes second nature. These systems are actually designed with user-friendliness in mind—they just don’t always make it obvious. Whether you’re using a wall-mounted split system, a ceiling cassette, or a portable unit, the control panel (or remote) is your gateway to comfort, efficiency, and peace of mind. This guide walks you through every button, every mode, and every setting—no engineering degree required. Think of it as a friendly chat over coffee, where I share what I’ve learned so you can avoid the same rookie mistakes I made.
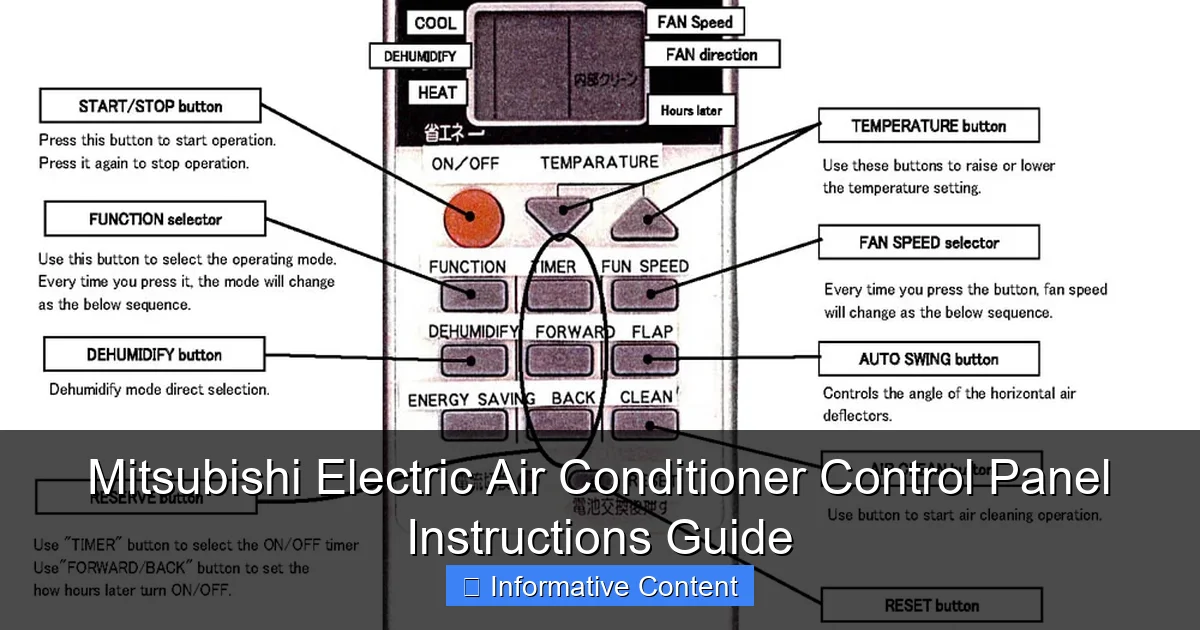
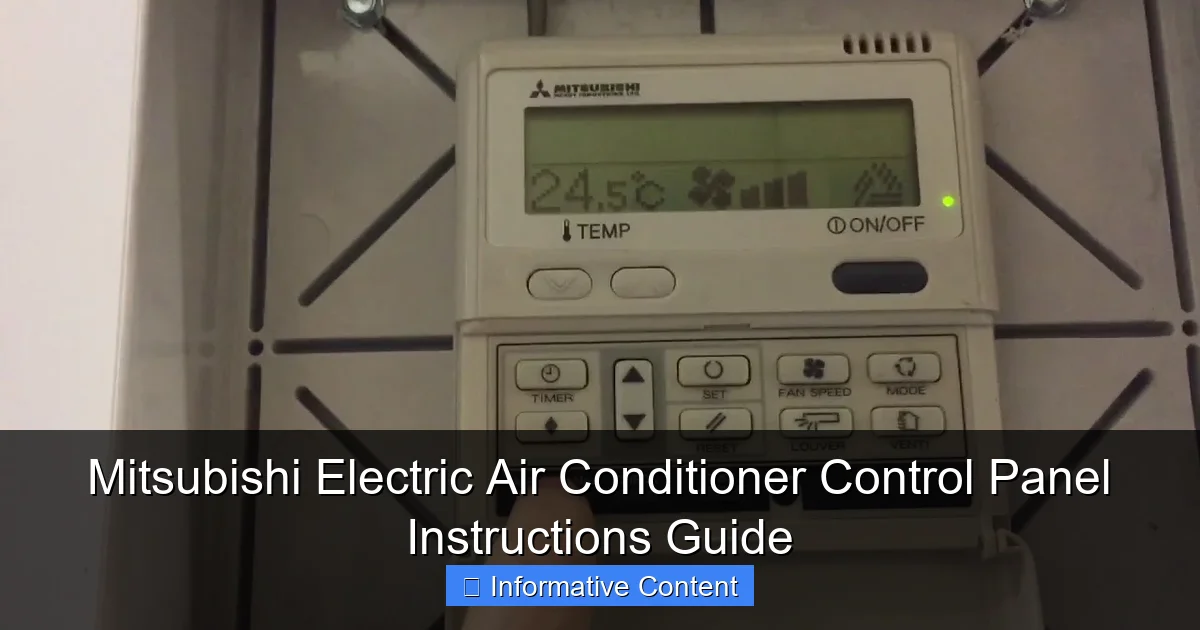
Understanding the Control Panel Layout and Key Components
Before diving into specific functions, let’s get familiar with the physical layout of your Mitsubishi Electric air conditioner control panel. Most models use a handheld remote, but some commercial or wall-mounted units have a built-in panel. Either way, the core components are the same. Once you recognize them, navigating becomes much easier.
Visual guide about mitsubishi electric air conditioner control panel instructions
Image source: i.ytimg.com
Main Buttons and Their Functions
The remote typically features a grid of buttons. Here’s what each one does:
- Power (On/Off): The big red button. Press once to turn the unit on or off. Simple, right? But don’t press and hold—this can trigger a reset or diagnostic mode (more on that later).
- Mode: Cycles through cooling, heating, dry (dehumidify), fan-only, and auto modes. Tap repeatedly to select your desired function.
- Temperature Up/Down: Adjusts the target temperature. Most models go from 16°C to 30°C (60°F to 86°F). Pro tip: Set it to 24°C (75°F) for a comfortable balance of comfort and energy efficiency.
- Fan Speed: Controls airflow. Options usually include Low, Medium, High, and Auto (where the unit adjusts based on room conditions).
- Swing/Up-Down: Toggles the louver (airflow director) to sweep air vertically. Great for even distribution.
- Timer: Sets on/off schedules. Useful for turning the unit on before you get home or off when you leave.
- i-see Sensor (on select models): Activates the room-scanning feature that detects occupancy and adjusts airflow accordingly.
Display Screen and Status Indicators
The small LCD screen shows real-time information. Here’s what to look for:
- Current temperature: The room temp the sensor reads.
- Set temperature: Your desired temp, usually in larger digits.
- Mode icon: A snowflake (cooling), sun (heating), water drop (dry), fan (fan-only), or auto symbol.
- Timer icon: A clock with “On” or “Off” if a timer is active.
- Filter clean reminder: A flashing filter symbol when it’s time to clean or replace the air filter.
- Wi-Fi or app connection icon: Appears if your model supports smart home integration (e.g., via the Kumo Cloud app).
Real-life example: My neighbor, Sarah, kept wondering why her unit wasn’t cooling. Turns out, she’d accidentally switched to “dry” mode during a heatwave. The room felt clammy, not cool. Once she realized the mode was wrong, switching to “cool” fixed it instantly. The display screen is your best friend—check it often!
Special Buttons and Hidden Features
Some buttons aren’t labeled clearly but offer powerful features:
- Econo/Quiet Mode: Reduces compressor speed and noise. Great for bedrooms at night. Look for a leaf or “Eco” symbol.
- Powerful Mode: Boosts fan and compressor speed for rapid cooling/heating. Use sparingly—it’s louder and less efficient.
- Sleep Mode: Gradually adjusts temperature over time to match your body’s natural rhythm. Ideal for overnight use.
- Reset Button (tiny hole): Use a paperclip to press if the remote freezes. Rarely needed, but good to know.
Step-by-Step Guide to Operating Your Mitsubishi Electric Air Conditioner
Now that you know the buttons, let’s put them into action. Whether you’re cooling down in summer or warming up in winter, here’s how to use your Mitsubishi Electric air conditioner control panel like a pro.
Basic Cooling Mode Setup
- Press the Power button to turn the unit on.
- Press Mode until the snowflake icon appears.
- Use the Temperature Up/Down buttons to set your desired temp (e.g., 24°C).
- Press Fan Speed to choose Low, Medium, High, or Auto. Auto is recommended for most situations.
- Press Swing to enable vertical airflow. This helps cool the entire room evenly.
Tip: If the unit is in a sunny room, set it 1–2°C lower than usual. The sun will heat the space, and the unit will compensate. I learned this after setting it to 22°C and still feeling warm—turns out the afternoon sun was adding a “bonus” 3°C!
Heating Mode for Cold Seasons
- Power on the unit.
- Press Mode until the sun icon appears.
- Set the temperature to your comfort level (e.g., 21°C).
- Use Fan Speed to control airflow. In heating mode, higher fan speeds can feel drafty, so Medium or Auto is often best.
- Enable Swing to distribute warm air from the floor up (heat rises, after all).
Pro tip: In cold weather, avoid setting the temperature too high (e.g., 26°C). The unit works harder, uses more energy, and may not heat faster. A steady 21–22°C is often sufficient.
Using Dry (Dehumidify) and Fan-Only Modes
These modes are underrated but incredibly useful:
- Dry Mode: Perfect for humid days when it’s not hot enough to cool but the air feels sticky. The unit removes moisture without lowering temperature much. Ideal for spring/fall.
- Fan-Only: Circulates air without cooling or heating. Great for mild days or when you want fresh air without the chill.
To use either, press Mode until the water drop (dry) or fan icon appears. Adjust fan speed as needed. I use dry mode in my basement during rainy weeks—it keeps mold and musty smells at bay.
Setting Timers for Energy Efficiency
- Press Timer until “On” or “Off” flashes.
- Use the temperature buttons to set the time (e.g., 7:00 AM).
- Press Timer again to confirm.
Example: Set the unit to turn on at 6:30 PM so your home is cool when you get back from work. Or, set it to turn off at 7:00 AM to save energy while you’re at the gym. Just remember—timers override manual settings, so double-check if something feels off.
Activating Special Modes (Econo, Powerful, Sleep)
- Econo/Quiet: Press the Econo or Quiet button (often labeled with a leaf or “Q”). The compressor slows, and the unit runs quieter. Best for nighttime.
- Powerful: Press the Powerful button (usually has a lightning bolt). The unit works at max capacity for 15–30 minutes, then returns to normal. Use for quick relief on extreme days.
- Sleep: Press Sleep. Over 8 hours, the unit gradually adjusts temperature (e.g., warms slightly in cooling mode) to match your body’s needs.
Advanced Features and Smart Controls
If your Mitsubishi Electric model is a bit newer or higher-end, you might have access to advanced features that take comfort and efficiency to the next level. These aren’t just gimmicks—they can genuinely improve your experience.
i-see Sensor Technology
Found on models like the MSZ-AP series, the i-see sensor scans the room every 10 minutes to detect:
- Where people are located (so it can direct airflow toward them).
- Room temperature in different zones.
- Sunlight intensity (to adjust cooling/heating accordingly).
To use it, press the i-see button. The unit will “sweep” the room with infrared sensors. If no one is detected, it switches to energy-saving mode. I love this feature—my unit now follows me from the couch to the kitchen without me lifting a finger.
Wi-Fi and Smart Home Integration
Models with Wi-Fi (often labeled “Kumo Cloud Ready”) let you control your air conditioner via a smartphone app. Here’s how:
- Download the Kumo Cloud app (iOS/Android).
- Follow the setup wizard to connect your unit to your home Wi-Fi.
- Use the app to adjust temperature, set schedules, or monitor energy use—from anywhere.
Real-world benefit: My wife and I used the app to turn on the AC before leaving the office. By the time we got home, the house was perfectly cool. No more sweating in the driveway!
Weekly Timer and Custom Schedules
Beyond simple on/off timers, some remotes allow a Weekly Timer—you can program different settings for each day. For example:
- Monday–Friday: Cool to 24°C at 5:00 PM, turn off at 9:00 AM.
- Saturday: Cool to 25°C at 10:00 AM, turn off at 8:00 PM.
- Sunday: Heating to 20°C at 8:00 AM.
Set it once, and forget it. It’s a game-changer for busy households or shift workers.
Filter Clean and Maintenance Alerts
Your unit will remind you when the air filter needs cleaning (usually every 2–3 months). When the filter icon flashes:
- Turn off the unit.
- Open the front panel and remove the filter.
- Rinse it with water, let it dry, and reinsert.
- Press and hold the Check or Filter button to reset the reminder.
Skipping this step reduces efficiency and can damage the unit over time. I learned this the hard way—my unit started making a weird noise until I cleaned the clogged filter.
Troubleshooting Common Control Panel Issues
Even the best systems have hiccups. Here are the most common issues and how to fix them—no technician needed.
Remote Not Responding
- Check the batteries: Weak batteries are the #1 cause. Replace with fresh alkaline batteries.
- Point directly at the unit: The signal can’t go through walls or glass.
- Reset the remote: Use a paperclip to press the tiny reset hole on the back.
- Check for interference: Other electronics (like routers or microwaves) can interfere. Move the remote closer.
Unit Not Cooling/Heating Properly
- Verify the mode: Is it set to Cool or Heat? (See Sarah’s story earlier.)
- Check the temperature setting: Is it higher (for cooling) or lower (for heating) than the room temp?
- Inspect the filter: A dirty filter restricts airflow. Clean it.
- Check the outdoor unit: Is it covered in leaves or debris? Clear the area around it.
Error Codes on Display
Your unit may show codes like “E1,” “E6,” or “P2.” Here’s a quick reference:
| Error Code | Meaning | Quick Fix |
|---|---|---|
| E1 | Communication error between indoor and outdoor units | Check power supply; turn off and on again |
| E6 | Indoor fan motor problem | Clean fan; contact technician if persists |
| P2 | Overheating protection | Ensure outdoor unit is clear of debris; wait 30 minutes |
| F3 | Refrigerant leak | Turn off immediately; call a professional |
Most codes resolve after a power cycle. If not, consult your manual or call support. Never ignore a refrigerant leak—it’s a job for a licensed technician.
Unresponsive Display or Frozen Screen
- Power cycle the unit: Turn it off at the circuit breaker for 1–2 minutes.
- Check for firmware updates: Some models can be updated via Wi-Fi.
- Inspect the indoor unit’s sensor: Dust on the sensor can cause erratic behavior. Gently clean with a soft cloth.
Maximizing Efficiency and Comfort with Smart Usage Tips
Your Mitsubishi Electric air conditioner is already efficient, but a few smart habits can stretch that even further—saving money and reducing wear and tear.
Optimal Temperature Settings
- Cooling: 24–26°C (75–78°F) is ideal. Every 1°C lower increases energy use by 6–8%.
- Heating: 20–21°C (68–70°F) feels warm without overworking the unit.
Use a programmable thermostat or weekly timer to maintain these temps automatically.
Airflow and Placement Tips
- Keep vents unobstructed: Furniture, curtains, or plants blocking airflow make the unit work harder.
- Use swing mode: It prevents hot/cold spots and circulates air better.
- Close doors and windows: Even a small gap can let in outside air, reducing efficiency.
Seasonal Maintenance Checklist
- Spring: Clean filters, check for debris around the outdoor unit.
- Summer: Inspect for leaks, ensure good airflow.
- Fall: Cover the outdoor unit (if recommended), clean filters.
- Winter: If in heating mode, check for ice buildup on the outdoor coil (defrost cycle should handle it, but monitor).
Energy-Saving Habits
- Use Econo mode at night: It’s quieter and more efficient.
- Set timers to match your schedule: No point cooling an empty house.
- Pair with ceiling fans: Fans create a wind-chill effect, letting you set the AC 1–2°C higher.
Personal story: Last summer, I used the weekly timer and Econo mode together. My electricity bill dropped 18% compared to the previous year. Not bad for just changing a few settings!
Final Thoughts: Your Control Panel, Your Comfort
Your Mitsubishi Electric air conditioner control panel isn’t just a remote—it’s a powerful tool for comfort, efficiency, and peace of mind. From basic cooling to smart home integration, the features are there to make your life easier. You don’t need to master every button today. Start with the basics, then explore one feature at a time. Before you know it, you’ll be setting custom schedules, using i-see sensors, and saving energy without even thinking about it.
Remember, every unit is a little different. Always keep your user manual handy (or download it from Mitsubishi Electric’s website). If something feels off, don’t panic—most issues are fixable with a few simple steps. And when in doubt, the display screen is your best guide. It tells you what the unit is doing, what mode it’s in, and when it needs a little TLC.
At the end of the day, your air conditioner is there to make your home feel like *home*. With these Mitsubishi Electric air conditioner control panel instructions, you’re not just turning a machine on and off—you’re creating a space that’s comfortable, efficient, and perfectly suited to you. So go ahead, press that power button with confidence. Your ideal climate is just a few taps away.
Frequently Asked Questions
How do I turn on the Mitsubishi Electric air conditioner using the control panel?
To turn on your Mitsubishi Electric air conditioner, press the “Power” button (usually marked with a snowflake or fan icon) on the control panel. Ensure the unit is plugged in and the breaker is on for power.
What do the symbols on my Mitsubishi Electric air conditioner control panel mean?
The control panel symbols represent modes (e.g., cool, heat, dry), fan speed (low/medium/high), and timer functions. Refer to your model’s manual for a detailed guide to these icons and their functions.
How can I adjust the temperature on my Mitsubishi Electric air conditioner control panel?
Use the “+” and “-” buttons on the control panel to set your desired temperature. The display will show the current and target temperature for easy adjustments.
Why is my Mitsubishi Electric air conditioner control panel not responding?
If the control panel is unresponsive, check if the unit has power or if the remote’s batteries are dead. A reset (unplugging for 30 seconds) can often resolve temporary glitches.
How do I set the timer function on my Mitsubishi Electric air conditioner?
Press the “Timer” button on the control panel, then use the arrow keys to set the start/stop time. This feature helps automate operation for energy efficiency and convenience.
Can I control my Mitsubishi Electric air conditioner remotely without the remote control?
Yes, many models support Wi-Fi control via the Mitsubishi Electric app or smart home devices like Alexa/Google Home. Check your manual for compatibility with Mitsubishi Electric air conditioner control panel instructions for setup steps.