
Featured image for mitsubishi ductless air conditioner remote control instructions
Image source: imgv2-1-f.scribdassets.com
Master your Mitsubishi ductless air conditioner with ease using the intuitive remote control guide. This comprehensive resource walks you through every function—from temperature settings and fan speeds to advanced modes like Econo Cool and I-See Sensor—ensuring optimal comfort and energy efficiency. Quick, clear instructions help you troubleshoot common issues and unlock the full potential of your system.
Key Takeaways
- Master the power button: Press to turn on/off or reset the unit.
- Set precise temperatures: Use up/down arrows for 1°F adjustments.
- Select modes wisely: Toggle between cool, heat, dry, and fan modes.
- Optimize airflow: Adjust louvers remotely for even room coverage.
- Enable eco mode: Save energy with automatic temperature balancing.
- Schedule operations: Program on/off times via the timer function.
📑 Table of Contents
- Getting to Know Your Mitsubishi Ductless Air Conditioner Remote
- Understanding the Remote’s Layout and Key Buttons
- Setting Up and Programming the Remote
- Mastering Advanced Features and Modes
- Troubleshooting Common Remote Issues
- Optimizing Comfort and Energy Efficiency
- Final Thoughts: Making the Most of Your Remote
Getting to Know Your Mitsubishi Ductless Air Conditioner Remote
Let’s be honest: when you’re sweating through a summer heatwave or shivering in winter, the last thing you want is to wrestle with a confusing remote control. I remember the first time I got my Mitsubishi ductless air conditioner installed—I stared at the remote like it was a spaceship control panel. But once I got the hang of it, I realized how intuitive and powerful it really is. The Mitsubishi ductless air conditioner remote control is more than just a temperature adjuster; it’s your gateway to comfort, energy savings, and smart climate control.
If you’ve ever fumbled with buttons, wondered what “i-see” means, or accidentally put your unit into a mode that made your room feel like a sauna, you’re not alone. This guide is designed to demystify the remote and help you use it like a pro. Whether you’re new to ductless systems or just need a refresher, I’ll walk you through everything step by step—no tech jargon, just clear, practical advice. By the end, you’ll feel confident adjusting settings, troubleshooting issues, and even using advanced features you might not have known existed.
Understanding the Remote’s Layout and Key Buttons
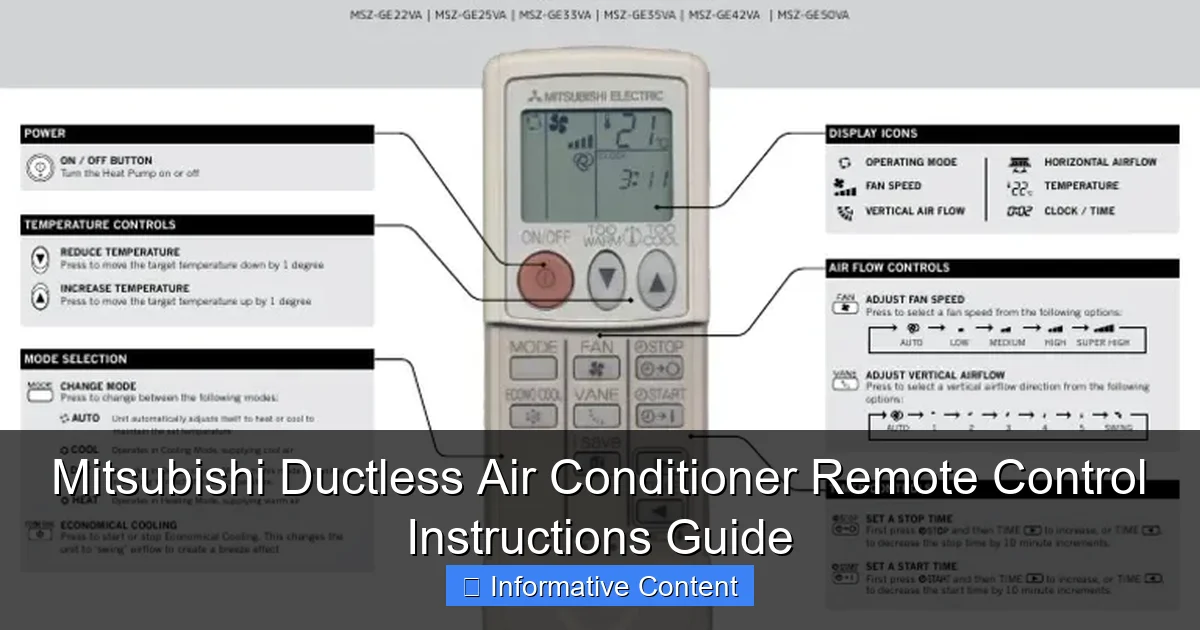
The Mitsubishi remote control is sleek, compact, and packed with features. At first glance, it might seem overwhelming, but once you learn what each button does, it becomes second nature. Think of it like learning to drive: once you know where the pedals and gears are, everything else flows smoothly.
Visual guide about mitsubishi ductless air conditioner remote control instructions
Image source: dansanderson.com
Main Control Buttons: Your Everyday Essentials
- Power (ON/OFF): This is the big red button—simple, right? Press it once to turn the unit on, again to turn it off. If the remote seems unresponsive, check that the batteries aren’t dead (a common culprit!).
- Mode (Cool, Heat, Dry, Fan, Auto): Use this to switch between cooling, heating, dehumidifying, fan-only, or automatic mode. In summer, “Cool” is your go-to. In winter, “Heat.” “Dry” helps reduce humidity without overcooling—perfect for muggy days. “Fan” just circulates air, and “Auto” lets the unit decide based on room temperature.
- Temperature Up/Down: Adjust your desired temperature in 1°F increments. Pro tip: Set it a couple of degrees higher in summer or lower in winter than you think you need—your body will acclimate, and you’ll save energy.
- Fan Speed (Low, Medium, High, Auto): Choose how fast the indoor unit’s fan runs. “Auto” is great for consistent comfort, while “High” is ideal for quick cooling or heating.
Less-Obvious Buttons: Hidden Gems
- Timer (On/Off Timer): Want your AC to turn on 30 minutes before you get home? Or shut off after you fall asleep? The timer lets you schedule operations. For example, set it to turn on at 5:30 PM so your living room is cool when you walk in from work.
- i-see Sensor (on select models): This clever feature uses infrared sensors to detect where people are in the room and adjust airflow accordingly. If you’re on the couch, the unit focuses airflow there. No one home? It stops blowing. It’s like having a personal climate assistant.
- Econo Cool (or Energy Saver): This mode adjusts the temperature slightly to save energy without sacrificing comfort. Think of it as “smart cooling”—it might run a bit longer but uses less power.
- Swing (Horizontal/Vertical Vanes): Use this to direct airflow. Horizontal swing spreads air side to side; vertical adjusts up and down. Great for avoiding drafts on your face at night.
Quick Reference: Button Cheat Sheet
Here’s a handy list of common buttons and what they do:
- Power: Turns the unit on/off
- Mode: Cycles through Cool, Heat, Dry, Fan, Auto
- Temp Up/Down: Adjusts temperature
- Fan: Sets fan speed (Low/Med/High/Auto)
- Timer: Sets on/off schedules
- i-see: Activates occupancy sensing
- Swing: Controls airflow direction
- Econo Cool: Energy-saving cooling mode
Setting Up and Programming the Remote
Setting up your Mitsubishi ductless air conditioner remote is straightforward, but a few tips can save you headaches down the road. I learned this the hard way when I accidentally set my unit to heat mode in July—my electric bill was *not* happy.
Step 1: Pairing the Remote (If Needed)
Most Mitsubishi systems come pre-paired, but if you’re replacing a remote or adding a second one, you might need to pair it. Here’s how:
- Turn off the indoor unit’s power (via the wall switch or breaker).
- Press and hold the “Check” and “Timer” buttons on the remote for 5 seconds until the display flashes.
- Turn the unit back on. The remote should now communicate with the indoor unit.
Note: If pairing fails, check that the remote’s infrared sensor (the small window on the front) isn’t blocked and that you’re within 20–30 feet of the indoor unit.
Step 2: Setting the Time and Date
The remote needs the correct time to use the timer functions. Here’s how to set it:
- Press and hold the “Clock” button until the time starts blinking.
- Use the up/down arrows to set the hour, then press “Clock” to move to minutes.
- Set the minutes, then press “Clock” again to confirm.
- To set the date (on models with a calendar), repeat the process for month/day.
Pro tip: If your remote has a “DST” (Daylight Saving Time) button, use it to avoid manual adjustments twice a year.
Step 3: Using the Timer Functions
The timer is one of the remote’s most useful features. Let’s say you want your unit to:
- Turn on at 6:00 AM to wake up to a cool room.
- Turn off at 9:00 PM when you go to bed.
Here’s how:
- Press the “Timer” button until “On Timer” appears.
- Use the up/down arrows to set 6:00 AM.
- Press “Timer” again to set the “Off Timer” to 9:00 PM.
- Press “Timer” one more time to confirm. The timer icon will appear on the display.
Example: I use the timer to turn my bedroom unit on 15 minutes before my alarm. No more groggy, sweaty mornings!
Mastering Advanced Features and Modes
Once you’ve got the basics down, it’s time to explore the advanced features that make Mitsubishi remotes stand out. These aren’t just gimmicks—they’re designed to save energy, improve comfort, and even protect your unit.
The “i-see” Sensor: Your Room’s Climate Detective
The i-see sensor is a game-changer for larger rooms or open layouts. It scans the room every 5 minutes to detect where people are and adjusts airflow to follow them. Here’s how it works:
- When people are present: The unit focuses airflow on occupied areas.
- When the room is empty: It stops blowing and switches to energy-saving mode.
How to use it: Press the “i-see” button to turn it on. A small icon will appear on the display. For best results, keep the remote near where you spend most time (e.g., your bed or desk).
Tip: If the sensor isn’t working, make sure nothing is blocking the infrared lens on the indoor unit (like furniture or curtains).
Econo Cool and Other Energy-Saving Modes
- Econo Cool: This mode adjusts the temperature by 2–4°F (warmer in summer, cooler in winter) to save energy. It’s subtle but effective—I use it during the day when I’m at home but not actively cooling.
- Night Set Mode (on some models): Automatically raises the set temperature by 2–4°F after 1 hour, then another 2–4°F after 2 hours. Perfect for sleeping—no more waking up shivering at 3 AM.
- Auto Restart: If the power goes out, the unit will resume its previous settings when power returns. No need to reprogram after an outage.
Swing and Vane Control: Customizing Airflow
Directing airflow is key to avoiding drafts. Use the “Swing” button to:
- Horizontal Swing: Press once for side-to-side airflow. Great for spreading cool air across a room.
- Vertical Swing: Press twice for up-and-down airflow. Use this to avoid blowing air directly at your face or body.
- Manual Vane Adjustment: On some models, you can press and hold the swing button to stop the vanes at a specific angle (e.g., 45° to avoid a draft).
Example: I set my bedroom unit to vertical swing and stop the vanes at 30° so the air flows over my bed instead of onto me.
Troubleshooting Common Remote Issues
Even the best remotes can act up. Before you panic and call a technician, try these fixes—they’ve saved me countless service calls.
Remote Not Working? Start Here
- Check the batteries: Weak batteries are the #1 cause of remote issues. Swap in fresh AAA batteries (not rechargeable—they can cause interference).
- Clean the infrared sensor: Dust or smudges on the remote’s sensor (the small window) can block signals. Wipe it with a soft, dry cloth.
- Check the line of sight: The remote uses infrared, so it needs a clear path to the indoor unit. Move furniture or plants blocking the signal.
- Reset the remote: Remove the batteries, press all buttons for 10 seconds, then reinsert the batteries.
Unit Not Responding to Commands
- Check the indoor unit’s display: If the display is blank or shows an error code (e.g., “E1”), the unit might be in protection mode. Wait 5 minutes, then try again.
- Verify the mode: If you’re in “Fan” mode, the unit won’t cool or heat. Switch to “Cool” or “Heat.”
- Check the filter: A dirty filter can cause the unit to shut down. Clean it monthly (see your manual for instructions).
Advanced Fixes for Persistent Problems
- Re-pair the remote: If the remote still won’t work, try the pairing process (see “Setting Up and Programming” above).
- Check for interference: Other infrared devices (e.g., TV remotes) can interfere. Turn off nearby devices and test the remote.
- Test the remote with a phone camera: Point the remote at your phone’s camera and press a button. If you see a faint light on the screen, the remote is working. If not, the IR LED might be broken.
Optimizing Comfort and Energy Efficiency
Your Mitsubishi ductless air conditioner is already energy-efficient, but small tweaks can make it even better. Here’s how to balance comfort and savings.
Smart Temperature Settings
The Department of Energy recommends setting your thermostat to 78°F in summer and 68°F in winter for optimal efficiency. But don’t feel locked in—adjust based on your comfort:
- Summer: Set to 78°F when home, 85°F when away. Use the timer to cool down 30 minutes before you return.
- Winter: Set to 68°F when home, 60°F when away. The unit will reheat quickly when you’re back.
Example: I set my unit to 78°F during the day and use the “Night Set” mode at bedtime. My electric bill dropped 15%!
Maintenance Tips to Keep the System Running Smoothly
- Clean the filter monthly: A dirty filter reduces airflow and efficiency. Rinse it with water, let it dry, then reinstall.
- Keep the outdoor unit clear: Remove leaves, grass, and debris from the outdoor unit. Trim plants to maintain 2 feet of clearance.
- Schedule annual professional maintenance: A technician can check refrigerant levels, clean coils, and ensure everything is running safely.
Data Table: Energy-Saving Settings Comparison
| Setting | Energy Use (Est. %) | Comfort Level | Best For |
|---|---|---|---|
| 78°F (Cooling) | 100% | High | Hot days, when home |
| 85°F (Away Mode) | 60% | Low | When away from home |
| Econo Cool | 85% | Medium | Daytime, light cooling |
| Night Set Mode | 70% | High | Sleeping |
| Fan Only | 20% | Medium | Humid days, light air movement |
Final Thoughts: Making the Most of Your Remote
Your Mitsubishi ductless air conditioner remote is more than just a gadget—it’s a tool to create a comfortable, energy-efficient home. By mastering the buttons, using the timer, and exploring advanced features like i-see and Econo Cool, you’ll not only stay comfortable but also save money and reduce your environmental impact.
Remember, there’s no “perfect” setting—what works for me might not work for you. Experiment with different modes, temperatures, and airflow directions until you find your ideal balance. And if you ever get stuck? Refer back to this guide, check the manual, or reach out to Mitsubishi’s customer support (they’re actually helpful, I’ve called them twice!).
Now, go enjoy your perfectly cooled or heated space—without the remote-induced frustration. You’ve got this!
Frequently Asked Questions
How do I pair my Mitsubishi ductless air conditioner remote control?
To pair your remote, point it at the indoor unit and press the “Set” or “Reset” button on the indoor unit while holding the “Remote Control Start/Stop” button on the remote for 3 seconds. The unit will beep when pairing is successful.
Why is my Mitsubishi ductless air conditioner remote not working?
First, check the batteries and replace them if needed. Ensure there are no obstructions between the remote and the indoor unit, and verify the remote is set to the correct mode (e.g., “Cool” or “Heat”).
How do I use the Mitsubishi ductless air conditioner remote control to set a timer?
Press the “Timer” button on the remote, then use the up/down arrows to adjust the on/off time. Press “Set” to confirm. This feature lets you automate cooling or heating based on your schedule.
What do the symbols on my Mitsubishi ductless air conditioner remote mean?
Common symbols include snowflakes (cooling), sun (heating), fan (air circulation), and a timer clock. Refer to your user manual for a full list, or use the “Mode” button to cycle through settings.
Can I control my Mitsubishi ductless AC remotely with a smartphone?
Yes, if your model supports Wi-Fi (e.g., with the Mitsubishi Electric Kumo Cloud app). Download the app, connect your remote-compatible unit, and control temperature, modes, and schedules from anywhere.
How do I reset my Mitsubishi ductless air conditioner remote control?
Remove the batteries, press all buttons for 5 seconds to discharge residual power, then reinsert the batteries. Alternatively, press the “Reset” button on the indoor unit while holding the remote’s “Start/Stop” button.