
Featured image for mitsubishi air conditioners remote control instructions
Image source: i2.wp.com
Master your Mitsubishi air conditioner with ease using the intuitive remote control—this guide walks you through every button, mode, and setting for optimal comfort and energy efficiency. From power and temperature control to advanced features like timer and sleep mode, learn how to fully customize your cooling experience with simple, step-by-step instructions.
Key Takeaways
- Power on/off: Press the ON/OFF button to start or stop cooling.
- Adjust temperature: Use + or – to set your ideal room temperature.
- Select mode: Press MODE to switch between Cool, Heat, Dry, or Fan.
- Set fan speed: Tap FAN to choose low, medium, or high airflow.
- Use timer: Program ON/OFF times via the TIMER button for energy savings.
- Clean filter reminder: Check remote alerts and clean filters every 2 weeks.
📑 Table of Contents
- Getting to Know Your Mitsubishi Air Conditioner Remote Control
- Understanding the Basic Layout and Buttons
- Step-by-Step Guide to Using Your Mitsubishi Remote
- Advanced Features and Smart Controls
- Troubleshooting Common Remote Control Issues
- Remote Control Tips, Tricks, and Best Practices
- Data Table: Mitsubishi Remote Control Features by Model
- Final Thoughts: Master Your Comfort
Getting to Know Your Mitsubishi Air Conditioner Remote Control
Let’s face it — when your Mitsubishi air conditioner remote control stops working, or worse, you can’t figure out how to use it, it feels like you’ve lost control of your own comfort. I remember the first time I moved into a new apartment with a Mitsubishi mini-split system. I stared at the sleek, slightly intimidating remote, pressing buttons randomly, hoping for a miracle. Spoiler: no miracle came. But after some trial, error, and a lot of reading, I cracked the code — and now, I want to help you do the same.
The Mitsubishi air conditioner remote control is more than just a temperature dial. It’s your gateway to personalized comfort, energy savings, and smart climate control. Whether you have a ductless mini-split, a multi-zone system, or a wall-mounted unit, the remote is your best friend. But like any good friend, it needs to be understood. In this guide, we’ll walk through everything you need to know — from basic functions to advanced features — so you can stop guessing and start cooling (or heating) with confidence. And yes, we’ll even cover what to do when it seems like the remote has gone on strike.
Understanding the Basic Layout and Buttons
First things first: let’s get familiar with the remote’s design. Mitsubishi remotes vary slightly by model, but most share a similar layout and button functions. Think of this as your “remote control 101” — the foundation for everything else.
Visual guide about mitsubishi air conditioners remote control instructions
Image source: remoteoz.com
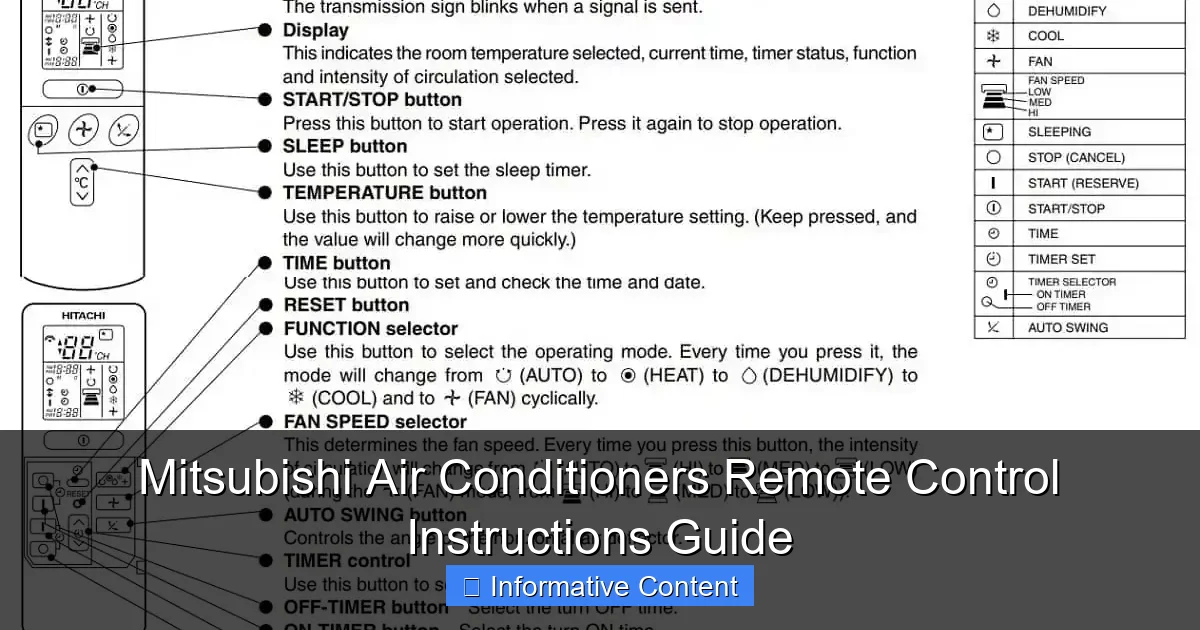
Common Buttons and Their Functions
- Power Button (ON/OFF): The most important one! Press once to turn the unit on or off. A red LED light usually confirms the command was sent.
- Mode Button (MODE): Cycles through operating modes: Cool, Dry, Fan, Heat, and Auto (on heat pump models). For example, press it once for Cool, twice for Dry, and so on.
- Temperature Up/Down (▲/▼): Adjusts the set temperature. Most units allow settings from 16°C to 30°C (60°F to 86°F).
- Fan Speed (FAN): Controls airflow intensity. Options typically include Auto, Low, Medium, High, and sometimes Quiet (on premium models).
- Timer (TIMER): Sets on/off schedules. Useful for turning the unit off after you fall asleep or turning it on before you get home.
- Swing (VANE): Adjusts the vertical and horizontal louvers for better air distribution. Press once for vertical swing, again for horizontal, and a third time to stop both.
- Sleep Button (SLEEP): Gradually adjusts temperature over 1–2 hours to match your body’s natural drop in temperature at night.
- i-see Sensor (on select models): Activates motion and temperature sensing to detect room occupancy and adjust cooling accordingly.
Pro tip: If your remote has a backlight (common on newer models), press and hold the “FILTER” or “CHECK” button to illuminate the screen in the dark — a small but game-changing feature when you’re fumbling at night.
Remote Screen Display: What the Symbols Mean
The display isn’t just for show. It gives you real-time feedback. Here’s what to look for:
- Current Set Temperature: Large, central number (e.g., 24°C).
- Operating Mode Icon: Snowflake (Cool), Water Drop (Dry), Fan Blades (Fan), Sun (Heat), or A (Auto).
- Fan Speed Indicator: One to three bars or a rotating fan symbol.
- Timer Icon: Clock symbol when a timer is active.
- Filter Reset Indicator: A small triangle or “FILTER” text that appears when it’s time to clean the air filter (usually every 2–3 months).
- Battery Level: A battery icon that appears when batteries are low.
For example, if you see a snowflake and two fan bars, your unit is cooling at medium speed. If the filter icon is blinking, it’s time for maintenance — not a malfunction.
Step-by-Step Guide to Using Your Mitsubishi Remote
Now that you know the buttons, let’s put them to work. Here’s how to use your Mitsubishi air conditioner remote control effectively, with real-life scenarios.
Turning On and Selecting the Right Mode
Start by pressing the Power button. The unit should beep and the display will light up. Then, press MODE until you reach your desired setting:
- Cool: Ideal for hot days. Set your temperature (e.g., 22°C) and let it run.
- Dry: Great for humid days when you’re not overheated. It dehumidifies without overcooling — perfect for rainy seasons.
- Heat: Only on heat pump models. Use during colder months. Avoid setting it too high (e.g., 26°C+) to save energy.
- Fan: Circulates air without changing temperature. Good for mild days or when you just want airflow.
- Auto: The unit decides between Cool and Heat based on room temperature. Convenient but not always the most efficient.
Example: It’s 28°C outside with 80% humidity. Instead of cooling to 20°C (which will make you feel like a popsicle), try Dry mode at 25°C. You’ll stay comfortable and save energy.
Adjusting Temperature and Fan Speed for Comfort
After selecting the mode, use the ▲/▼ buttons to set your temperature. For best comfort, aim for 24–26°C in summer and 20–22°C in winter.
Then, press FAN to choose airflow:
- Auto: The unit adjusts fan speed based on temperature difference. Best for hands-off use.
- Low: Quiet and gentle — ideal for bedrooms at night.
- High: Fast cooling or heating — use for quick comfort, then switch to lower speeds.
Pro tip: If your room has hot or cold spots, use Swing mode to move air around. Press VANE once for vertical swing (up/down), twice for horizontal (left/right). This helps eliminate drafts and improves efficiency.
Using the Timer for Energy Savings
The TIMER function is a game-changer for saving energy and enhancing comfort. Here’s how to set it:
- Press TIMER once for ON Timer (unit turns on at a set time).
- Press again for OFF Timer (unit turns off).
- Use ▲/▼ to set the time (e.g., 7:00 AM for ON, 11:00 PM for OFF).
- Press TIMER again to confirm.
Real-life use: Set the ON Timer to 6:30 AM so your bedroom is cool when you wake up. Set the OFF Timer to 10:30 PM to save energy overnight. Bonus: you’ll sleep better knowing you’re not wasting power.
Advanced Features and Smart Controls
If your Mitsubishi remote has extra buttons or icons, you might have access to advanced features. These aren’t just gimmicks — they can make a real difference in comfort and efficiency.
The i-see Sensor: Room Awareness at Your Fingertips
Found on models like the Mitsubishi M-Series or P-Series, the i-see Sensor (often labeled “i-see” or “Sensor”) uses infrared to detect:
- Room temperature at different heights
- Human presence and movement
- Hot or cold spots
Press the i-see button to activate it. The unit will scan the room and adjust airflow and temperature to where people are. For example, if you’re sitting on the couch, it’ll direct air there instead of cooling an empty corner.
Why it matters: It reduces energy waste and avoids overcooling unoccupied areas. It’s like having a smart thermostat built into your AC.
Quiet Mode and Night Mode for Peaceful Sleep
Many Mitsubishi remotes have a Quiet or Night mode (sometimes accessed via a dedicated button or through a menu). This reduces fan speed and compressor noise by up to 75%, making it perfect for bedrooms.
To use it:
- Press FAN until you see “Quiet” or “Q” on the display.
- Or, press a dedicated NIGHT or SLEEP button.
Note: In Quiet mode, cooling/heating is slower, but it’s worth it for a good night’s sleep. I use this every night — my AC used to sound like a jet engine, now it’s barely a whisper.
Filter Reset and Maintenance Alerts
After cleaning your air filter (a must every 2–3 months), you need to reset the filter indicator. Here’s how:
- Press and hold the FILTER or RESET button for 3–5 seconds.
- The blinking “FILTER” icon should disappear.
Some models also have a Check button that runs a self-diagnostic. If there’s an issue, the display shows an error code (e.g., “E1” for sensor fault). This helps you troubleshoot before calling a technician.
Troubleshooting Common Remote Control Issues
Even the best remotes have bad days. Here are the most common problems and how to fix them — no technician needed.
Remote Not Responding: Quick Fixes
- Dead Batteries: Replace with fresh AAA batteries. Check the polarity — it’s a common mistake!
- Obstructed Signal: The remote uses infrared. Make sure there’s a clear path to the unit. Don’t point it through glass or behind furniture.
- Remote Too Far: Stay within 8–10 meters (25–30 feet) and aim directly at the receiver on the indoor unit.
- Unit in Sleep Mode: If the display is off, the unit might be in standby. Press any button to wake it.
Pro tip: If the unit responds but the remote display is dim, the batteries are likely low — replace them before they die completely.
Incorrect Temperature Display or Mode Switching
If your remote shows 22°C but the room feels like 30°C, the issue might be:
- Sensor Placement: The indoor unit’s sensor is near the air intake. If it’s blocked (e.g., by a curtain), it reads the wrong temperature.
- i-see Sensor Interference: If enabled, it might detect a cold wall as a person. Try turning it off temporarily.
- Remote Calibration: Some models allow you to adjust the temperature offset in the settings menu (consult your manual).
Example: My living room unit was reading 2°C higher than actual. I moved a plant away from the intake, and the problem vanished.
Error Codes and What They Mean
If you see a code like “E5” or “P2” on the display, don’t panic. Here are common ones:
- E1: Indoor unit sensor fault — check for obstructions or loose wiring.
- E5: Communication error between indoor and outdoor units — often a power cycle fixes it.
- P2: Freeze protection — the indoor coil is too cold. Turn off the unit for 30 minutes, then restart.
- H7: Fan motor issue — may require professional help.
Always turn the unit off, wait 5 minutes, then restart. This often clears temporary errors.
Remote Control Tips, Tricks, and Best Practices
Now that you’re a remote pro, here are some lesser-known tips to get the most out of your Mitsubishi air conditioner remote control.
Optimize for Energy Efficiency
- Use Auto Fan: It adjusts speed based on need, saving energy.
- Set a Timer: Avoid running the AC all night. A 2–3 hour OFF timer is often enough.
- Close Doors and Curtains: The remote can’t cool a room if heat is pouring in. Use it in tandem with good insulation.
- Keep Filters Clean: A dirty filter makes the unit work harder — and the remote has to compensate.
Personalize Your Comfort
- Use Swing Mode in Large Rooms: It eliminates hot spots and improves air mixing.
- Try Dry Mode on Humid Days: It’s more comfortable than overcooling.
- Use Sleep Mode: It gently adjusts temperature to match your body’s natural rhythm.
Maintain Your Remote
- Clean the Screen: Use a soft, dry cloth. Avoid water or chemicals.
- Store in a Safe Place: Avoid dropping it or exposing it to extreme heat/cold.
- Keep Spare Batteries: You’ll thank yourself when the remote dies at 3 AM.
Data Table: Mitsubishi Remote Control Features by Model
| Model Series | Backlight | i-see Sensor | Quiet Mode | Timer (ON/OFF) | Filter Reset | Swing Control |
|---|---|---|---|---|---|---|
| M-Series (MSZ) | Yes | Yes (on MSZ-FH) | Yes | Yes | Yes | Vertical & Horizontal |
| P-Series (PZ) | Yes | Yes | Yes | Yes | Yes | Vertical Only |
| E-Series (MSY) | No | No | Yes | Yes | Yes | Vertical Only |
| K-Series (MSZ-KP) | Yes | Yes | Yes | Yes | Yes | Vertical & Horizontal |
| Basic Wall Units | No | No | No | Yes | Yes | Manual (no remote control) |
Note: Always check your specific model’s manual for exact features. This table covers common Mitsubishi air conditioner remote control capabilities.
Final Thoughts: Master Your Comfort
Your Mitsubishi air conditioner remote control is more than a gadget — it’s your personal climate manager. From simple temperature adjustments to advanced features like the i-see sensor and timer scheduling, it gives you control over your comfort, energy use, and even your sleep quality.
The key is understanding how each button works and using them in combination. Don’t just set it and forget it. Experiment with modes, timers, and swing settings. Find what works for your home, your lifestyle, and your energy goals. And when things go wrong (because they will), remember: most issues are fixable with a few simple steps.
So the next time you pick up your remote, don’t just press the power button and hope. Take a moment to appreciate the little device that keeps you cool in summer, warm in winter, and comfortable all year round. After all, a well-used Mitsubishi air conditioner remote control isn’t just a tool — it’s peace of mind, one button at a time.
Frequently Asked Questions
How do I pair my Mitsubishi air conditioner remote control with the unit?
To pair your Mitsubishi air conditioner remote control, ensure the unit is powered on, then press and hold the “Set” or “Reset” button on the remote for 3–5 seconds until the indicator light flashes. Refer to your model’s manual for model-specific steps, as some units require additional button combinations.
Why is my Mitsubishi AC remote not responding or turning on the unit?
First, replace the remote’s batteries and ensure there are no obstructions between the remote and the AC sensor. If the issue persists, check for interference from other devices or reset the remote by removing the batteries for 10 minutes before reinserting them.
Where can I find a replacement Mitsubishi air conditioner remote control?
Replacement Mitsubishi air conditioner remote controls are available through authorized dealers, online retailers (like Amazon or eBay), or directly from Mitsubishi’s customer service. Always verify compatibility with your AC model before purchasing to ensure full functionality.
How do I use the timer function on my Mitsubishi AC remote?
Press the “Timer” button on the remote, then use the arrow keys to set the desired on/off time. Confirm your selection with the “Set” button. The timer settings are displayed on the remote’s LCD screen for easy adjustments.
What do the symbols and modes (e.g., Cool, Heat, Dry) mean on my Mitsubishi remote?
The symbols correspond to operation modes: Cool (snowflake), Heat (sun), Dry (water droplet), and Fan (wind). Additional icons like “Econo” or “i-see” activate energy-saving or temperature-sensing features. Consult your manual for a full list of icons specific to your model.
How do I troubleshoot a Mitsubishi remote control with a blank or flickering display?
Clean the remote’s screen gently with a dry cloth and replace the batteries with fresh ones. If the display remains faulty, avoid exposure to moisture or extreme temperatures, and contact Mitsubishi support if the issue continues.