
Featured image for mitsubishi air conditioner controller instructions
Image source: tokuzato-hsg.jp
Master your Mitsubishi air conditioner controller in minutes with our simplified, step-by-step guide designed for effortless setup and daily use. From adjusting temperature to programming schedules, these clear instructions ensure optimal comfort and energy efficiency without the confusion. Say goodbye to manual headaches and hello to smart climate control.
Key Takeaways
- Master the basics: Learn mode, fan, and temperature controls first.
- Use timers effectively: Schedule on/off times to save energy.
- Enable eco-mode: Reduce power consumption with this simple setting.
- Clean filters regularly: Maintain efficiency and air quality easily.
- Sync multiple units: Control several ACs with one remote.
- Reset when needed: Fix glitches with a quick power cycle.
📑 Table of Contents
- Why Understanding Your Mitsubishi Air Conditioner Controller Matters
- Getting to Know Your Mitsubishi Air Conditioner Controller
- Step-by-Step Guide to Basic Operations
- Mastering the Timer and Sleep Modes
- Advanced Features and Smart Controls
- Troubleshooting Common Controller Issues
- Final Thoughts: Making the Most of Your Mitsubishi Controller
Why Understanding Your Mitsubishi Air Conditioner Controller Matters
Let’s be honest: when it comes to home appliances, the remote control often ends up as the forgotten hero. You grab it, press a few buttons, and hope for the best. But with your Mitsubishi air conditioner controller, that little device in your hand is actually a powerhouse of climate control. I remember the first time I tried to use the timer function—I ended up freezing at 3 a.m. because I didn’t understand the delay settings. Sound familiar? You’re not alone. Most of us never read the manual, and that’s okay. But what if I told you that spending just 10 minutes learning how to use your Mitsubishi air conditioner controller could save you money, improve comfort, and even extend the life of your unit?
Whether you’ve just installed a new Mitsubishi split system, upgraded to a ducted unit, or inherited a controller from a previous owner, understanding its features is key. These controllers aren’t just on/off switches. They’re smart, intuitive tools designed to help you manage temperature, airflow, energy use, and even air quality. And the best part? You don’t need to be a tech genius to master them. In this guide, I’ll walk you through everything you need to know—from basic operations to advanced settings—so you can get the most out of your Mitsubishi air conditioner controller, all in simple, everyday language.
Getting to Know Your Mitsubishi Air Conditioner Controller
Identifying Your Controller Model
First things first: not all Mitsubishi controllers are the same. Before we dive into instructions, let’s figure out which model you have. The most common types are the MSZ-AP, MSZ-FH, and MHK1/MHK2 (for ducted systems). If you’re using a wall-mounted split system, chances are it’s one of the AP or FH series. The controller will usually have a label on the back or inside the battery compartment. Look for model numbers like RC-6000, RC-7000, or RC-9000.
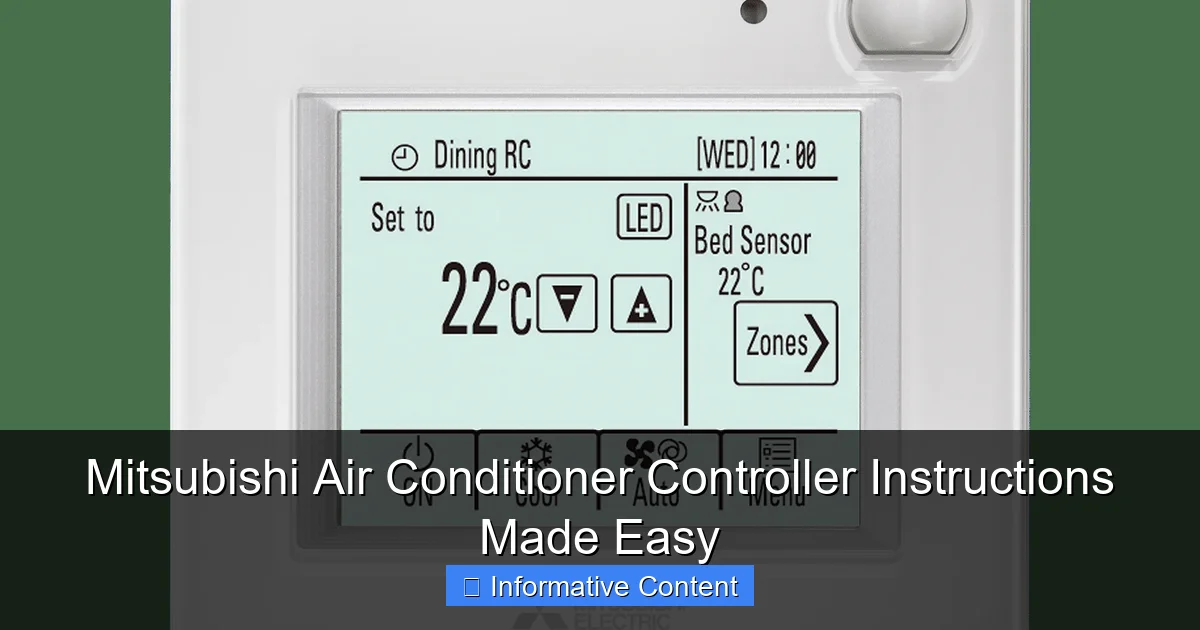
Visual guide about mitsubishi air conditioner controller instructions
Image source: mitsubishielectric.com.au
For example, the RC-6000 is sleek, with a backlit display and soft-touch buttons. It’s often paired with the MSZ-AP series and is great for bedrooms or small living spaces. The RC-7000, on the other hand, is more advanced, with Wi-Fi connectivity and a larger screen—ideal for tech-savvy users who want app control. Knowing your model helps you follow the right instructions and unlocks features that might otherwise go unnoticed.
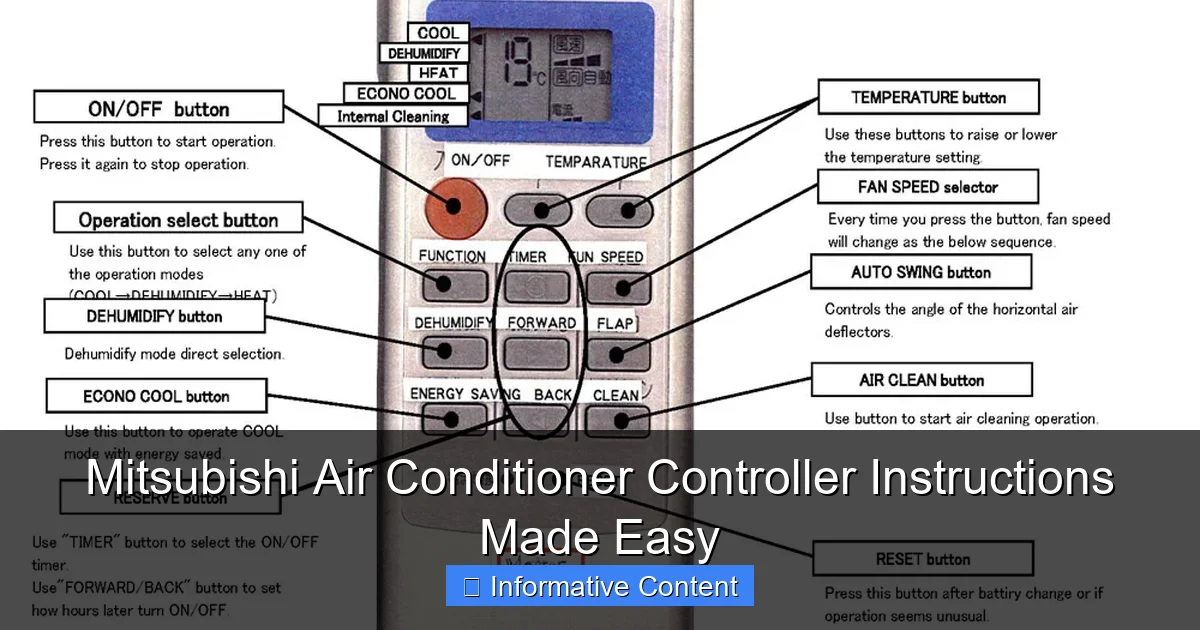
Understanding the Button Layout
At first glance, your Mitsubishi air conditioner controller might look like a puzzle. But once you break it down, it’s surprisingly intuitive. Here’s a quick rundown of the most common buttons:
- Power (ON/OFF): Self-explanatory. Turns the unit on or off.
- Mode (COOL, DRY, FAN, HEAT, AUTO): Switches between cooling, dehumidifying, fan-only, heating, and automatic climate control.
- Temperature Up/Down: Adjusts your desired room temperature. Most models allow 0.5°C increments.
- Fan Speed (AUTO, Low, Med, High, Quiet): Controls airflow intensity. “Quiet” is perfect for nighttime use.
- Swing (Up/Down, Left/Right): Adjusts the direction of airflow. Great for avoiding direct blasts.
- Timer (ON/OFF, SLEEP, PROGRAM): Sets automatic start/stop times or sleep modes.
- i-see Sensor (on select models): Uses infrared to detect room occupancy and adjust temperature accordingly.
- Wi-Fi/App Button (on MHK1/MHK2): Enables smart home integration.
One tip I learned the hard way: the “i-see” sensor on my MSZ-FH model was a game-changer. It scans the room every few minutes and adjusts the airflow to where people are actually sitting. No more cold legs or hot shoulders—just even, comfortable air.
Battery and Display Basics
Your Mitsubishi air conditioner controller runs on two AAA batteries. Replace them every 6–12 months, especially if the backlight dims or buttons stop responding. The display shows the current room temperature (in real time), set temperature, mode, fan speed, and timer status. Some models even show outdoor temperature and humidity—super helpful for planning your day.
If the display is hard to read, try adjusting the backlight. On most controllers, hold the “LIGHT” or “DISPLAY” button for a few seconds to brighten or dim it. This is especially useful at night when you don’t want a glowing screen disrupting your sleep.
Step-by-Step Guide to Basic Operations
Turning On and Setting the Mode
Let’s start simple. Press the Power button. You’ll hear a beep, and the display will light up. Now, press the Mode button until you see your desired setting:
- COOL: For hot days. Ideal in summer.
- DRY: Removes moisture without overcooling. Perfect for humid climates.
- FAN: Circulates air without cooling or heating. Great for mild days.
- HEAT: For winter. Most Mitsubishi units are heat pumps, so they can both cool and heat.
- AUTO: The unit decides the best mode based on room temperature.
Pro tip: In AUTO mode, the unit might switch between COOL and HEAT depending on the room’s temperature. If you’re in a transitional season (like spring or fall), this can prevent unnecessary energy use. But if you prefer consistency, stick to COOL or HEAT manually.
Adjusting Temperature and Fan Speed
Use the Temperature Up/Down buttons to set your comfort level. The ideal range for cooling is 24–26°C (75–79°F), and for heating, 20–22°C (68–72°F). Going below 22°C in cooling mode can lead to overworking the compressor and higher energy bills.
For fan speed, start with AUTO—the unit will adjust based on the temperature difference. If you want more control, switch to High for fast cooling or Quiet for nighttime. I keep mine on Quiet after 10 p.m. It’s barely noticeable, but still keeps the room cool.
Using the Swing Function
The Swing button controls the louvers (the flaps that direct airflow). Press it to set vertical swing (up/down) or horizontal (left/right). You can also lock the louvers in a fixed position by pressing and holding the button until the swing icon disappears.
Why does this matter? If you’re sitting on the couch, point the airflow slightly above you to avoid a direct blast. For bedrooms, set the swing to low to gently circulate air across the room. This prevents cold spots and improves comfort.
Quick Start Example
Let’s say it’s a hot afternoon, and you want to cool your living room:
- Press Power to turn on.
- Press Mode until “COOL” appears.
- Set temperature to 25°C using the up/down buttons.
- Press Fan and select “High” for quick cooling.
- Press Swing and choose “Up/Down” to distribute air evenly.
- After 20 minutes, switch fan to “Med” to save energy.
See? It’s not rocket science—just a few thoughtful steps.
Mastering the Timer and Sleep Modes
Setting the On/Off Timer
The Timer function is a lifesaver. It lets you schedule when your air conditioner turns on or off. Perfect for coming home to a cool house or avoiding overuse while you’re asleep.
To set the On Timer:
- Press Timer until “ON” flashes.
- Use the Time or Hour/Min buttons to set the start time.
- Press Timer again to confirm.
For the Off Timer:
- Press Timer until “OFF” flashes.
- Set the time you want the unit to turn off.
- Press Timer to confirm.
You can combine both timers for a full daily schedule. For example: turn on at 5:30 p.m. (after work) and off at 11:30 p.m. (after bedtime).
Using the Sleep Mode
Sleep mode gradually adjusts the temperature to match your body’s natural rhythm. It’s designed to keep you comfortable all night without overcooling or drying the air.
To activate:
- Press Sleep (or Timer > Sleep on some models).
- The unit will run for 7 hours, then automatically turn off or adjust settings.
Here’s how it works: in cooling mode, the temperature rises by 1°C after 30 minutes and another 1°C after 60 minutes. This prevents you from feeling too cold as you sleep. In heating mode, it does the opposite—slightly lowers the temperature to avoid overheating.
One thing to note: Sleep mode isn’t available in FAN or DRY modes. It’s only for COOL and HEAT.
Real-Life Timer Tips
- Morning routine: Set the On Timer for 30 minutes before you wake up. You’ll step into a cool room without running the unit all night.
- Energy savings: Use the Off Timer when you leave the house. No more “Did I turn it off?” stress.
- Weekend mode: Create a separate schedule for weekends using the Program timer (on RC-7000 and MHK2 models).
Advanced Features and Smart Controls
Using the i-see Sensor
The i-see sensor is one of Mitsubishi’s smartest features. Found on models like the MSZ-FH and MSZ-AP, it uses infrared technology to scan the room and detect where people are. Then, it adjusts airflow to focus on occupied areas and reduce waste.
To enable it:
- Press and hold the i-see button for 3 seconds.
- The icon will light up, and the unit will start scanning every 3–5 minutes.
For example, if you’re sitting on the left side of the couch, the air conditioner will direct cool air toward you. When you leave the room, it’ll switch to “unoccupied” mode and reduce output. This can save up to 20% on energy use, according to Mitsubishi’s internal studies.
Wi-Fi and App Control (MHK1/MHK2)
If you have a ducted system with an MHK1 or MHK2 controller, you can control your air conditioner from your phone. Download the Mitsubishi Electric Wi-Fi Control App (available on iOS and Android).
Setup steps:
- Press the Wi-Fi button on the controller for 5 seconds until it flashes.
- Open the app and follow the pairing instructions.
- Connect to your home Wi-Fi network.
Once connected, you can:
- Turn the unit on/off remotely.
- Adjust temperature and mode.
- Set schedules and monitor energy use.
- Receive maintenance alerts (like filter cleaning).
I use the app to turn on my air conditioner when I’m 10 minutes from home. It’s a small luxury, but it feels like a five-star experience every time.
Filter and Maintenance Reminders
Many Mitsubishi controllers have a Filter Reset or Cleaning Reminder feature. After about 250 hours of use, the unit will display a message like “Clean Filter” or “Check Filter.”
To reset:
- Press and hold the Filter or Reset button for 3–5 seconds.
- The message will disappear, and the timer will reset.
Remember: resetting the timer doesn’t clean the filter. You should clean it every 2–4 weeks, especially during peak seasons. A dirty filter reduces efficiency and can cause the unit to freeze up.
Troubleshooting Common Controller Issues
Controller Not Responding
If your Mitsubishi air conditioner controller isn’t working, check these first:
- Replace batteries: Weak batteries are the #1 cause.
- Check line of sight: The IR signal needs a clear path to the unit. Don’t hide behind furniture or curtains.
- Reset the controller: Remove batteries, wait 30 seconds, then reinsert.
- Check for interference: Other electronics (like TVs or LED lights) can block signals.
If none of these work, try pairing the controller again. On some models, you can press Power + Mode for 5 seconds to reset the connection.
Display Issues
If the screen is dim, flickering, or blank:
- Adjust the backlight (hold Light button).
- Check if the unit is in “Eco” or “Night” mode, which dims the display.
- Ensure the controller isn’t in direct sunlight—heat can damage the screen.
Unusual Sounds or Behavior
Hearing beeps or seeing error codes? Refer to your manual. Common codes include:
- E1: Communication error between indoor and outdoor units.
- U4: Remote control signal issue.
- P5: Overcurrent or voltage problem.
Most of these require professional help, but a simple reset (turning the unit off at the power point for 5 minutes) can sometimes resolve minor glitches.
Data Table: Common Mitsubishi Controller Models and Features
| Model | Wi-Fi | i-see Sensor | Timer | Sleep Mode | App Control |
|---|---|---|---|---|---|
| RC-6000 | No | Yes (on FH models) | Yes | Yes | No |
| RC-7000 | Yes | Yes | Yes (Programmable) | Yes | Yes |
| MHK1 | Yes | No | Yes | Yes | Yes |
| MHK2 | Yes | Yes (via indoor unit) | Yes (Advanced) | Yes | Yes |
Final Thoughts: Making the Most of Your Mitsubishi Controller
Your Mitsubishi air conditioner controller is more than just a remote—it’s your gateway to a smarter, more comfortable home. From basic cooling to advanced scheduling and smart features, it’s packed with tools that can save you time, money, and stress. And the best part? You don’t need to be an expert to use them. With just a little practice, you’ll find yourself using features you never knew existed.
I’ve learned that the key is consistency. Set your timer once, and you’ll never forget to turn the unit off. Use the i-see sensor, and you’ll notice your energy bills drop. Connect to the app, and you’ll feel like you’re living in the future. These small habits add up to big results.
Remember, every Mitsubishi air conditioner controller is designed with one goal: to make your life easier. So don’t let it gather dust on the coffee table. Pick it up, explore its features, and take control of your comfort. Whether you’re cooling down on a scorching summer day or warming up on a chilly winter night, your Mitsubishi controller is there to help—you just need to know how to ask.
Now go ahead—press a few buttons, experiment with settings, and find what works best for you. And if you ever get stuck? Just come back to this guide. I’ve got your back.
Frequently Asked Questions
How do I set the temperature on my Mitsubishi air conditioner controller?
To set the temperature, press the “TEMP” or up/down arrows on your Mitsubishi air conditioner controller until the desired temperature displays. Hold the button for 2-3 seconds to lock in the setting if your model has a “Hold” feature.
Why won’t my Mitsubishi air conditioner controller turn on?
First, check that the controller has power and batteries are installed correctly. If issues persist, ensure the main unit is plugged in and the circuit breaker hasn’t tripped—refer to your Mitsubishi air conditioner controller instructions for model-specific troubleshooting.
How do I switch between cooling and heating modes?
Press the “MODE” button on your controller until the display shows your preferred mode (e.g., “COOL” or “HEAT”). Some models require holding the button for 3 seconds to confirm the change.
Can I program a timer with my Mitsubishi air conditioner controller?
Yes, press the “TIMER” or “ON/OFF” button to set start/stop times. The Mitsubishi air conditioner controller instructions provide step-by-step guidance for scheduling based on your remote’s features.
What do the error codes on my controller mean?
Error codes (e.g., “E1” or “P5”) indicate specific issues like sensor problems or drainage errors. Consult your manual or Mitsubishi’s support site for code definitions and solutions.
How do I clean and maintain the controller?
Wipe the screen and buttons with a dry, soft cloth—avoid liquid cleaners. Remove dust from vents using a cotton swab, and replace batteries annually to prevent leakage.