
Featured image for mitsubishi air conditioner control panel instructions
Image source: cdn.globalauctionplatform.com
Master your Mitsubishi air conditioner with ease using our simplified control panel instructions. This guide breaks down every button, mode, and setting—from temperature adjustments to timer functions—so you can optimize comfort and energy efficiency effortlessly. No technical jargon, just clear, step-by-step directions to get the most out of your unit.
Key Takeaways
- Master the remote: Always point it directly at the AC for reliable commands.
- Set modes first: Choose Cool, Heat, or Fan before adjusting temperature.
- Use timers wisely: Schedule on/off times to save energy effortlessly.
- Check error codes: Refer to the manual for quick troubleshooting fixes.
- Clean filters monthly: Maintain efficiency and prolong unit lifespan.
- Adjust fan speed: Optimize airflow with Low, Med, or High settings.
📑 Table of Contents
- Getting to Know Your Mitsubishi Air Conditioner Control Panel
- Understanding the Basic Layout of the Control Panel
- Step-by-Step Guide to Operating Your Mitsubishi AC
- Mastering the Timer and Scheduling Functions
- Troubleshooting Common Control Panel Issues
- Advanced Features and Pro Tips for Optimal Use
- Final Thoughts: Your Mitsubishi AC Control Panel, Simplified
Getting to Know Your Mitsubishi Air Conditioner Control Panel
Let’s face it—when the summer heat hits or winter chill creeps in, the last thing you want is to be fumbling with a confusing air conditioner remote. I remember the first time I tried to use my Mitsubishi air conditioner control panel. I stared at the tiny buttons, blinking lights, and mysterious symbols like I was deciphering an ancient scroll. Sound familiar? You’re not alone. Many people find their Mitsubishi AC remote controls a bit overwhelming at first glance, but the truth is, once you know what each button does, it’s actually quite intuitive.
Whether you’re using a Mitsubishi split system, a ducted unit, or a portable air conditioner, the control panel (or remote control) is your gateway to comfort. In this guide, I’ll walk you through Mitsubishi air conditioner control panel instructions in the simplest way possible. No tech jargon, no confusing manuals—just clear, step-by-step guidance that even your tech-averse neighbor can follow. By the end, you’ll feel confident adjusting temperature, fan speed, modes, and even setting timers like a pro.
Understanding the Basic Layout of the Control Panel
Before diving into specific functions, it’s essential to get familiar with the physical layout of your Mitsubishi air conditioner control panel. Most models—like the Mitsubishi Mr. Slim, M-Series, or P-Series—use a similar remote design, though some wall-mounted or ducted units may have slightly different interfaces. Let’s break it down.
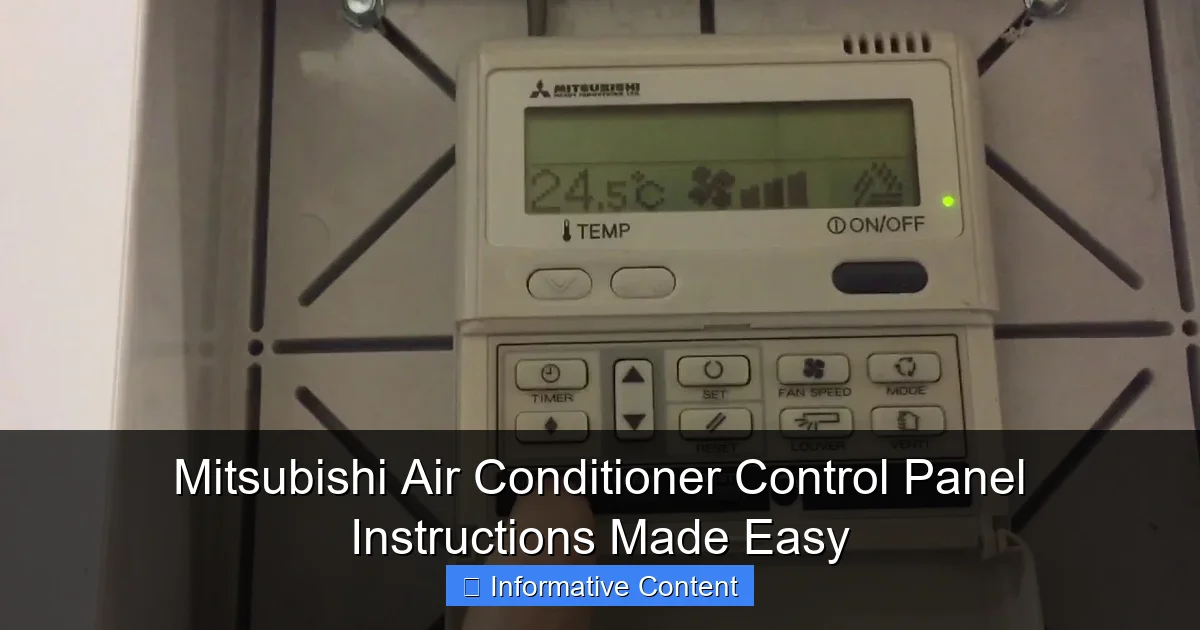
Visual guide about mitsubishi air conditioner control panel instructions
Image source: i.ytimg.com
Key Buttons and Their Functions
The remote typically features a central display (the LCD screen), a power button, and a row of function keys. Here’s what you’ll usually find:
- Power (On/Off): The big red button at the top. Press once to turn on, again to turn off. Simple, right?
- Mode Button (M): Cycles through operating modes: Cool, Heat, Dry, Fan, and Auto (on select models).
- Temperature Up/Down (+/-): Adjusts your desired room temperature. Usually ranges from 16°C to 30°C (60°F–86°F).
- Fan Speed (FAN): Controls airflow. Options are usually Auto, Low, Medium, High, or Quiet (on premium models).
- Swing/Louver (SWING or VANE): Adjusts the direction of airflow. Great for avoiding direct blasts of air.
- Timer (TIMER or ON/OFF): Sets automatic start/stop times. Handy for saving energy.
- Economy (ECO) or Powerful (PWR): ECO reduces energy use; PWR gives a quick burst of cooling/heating.
- Filter Reset (FILTER): After cleaning the filter, press this to reset the filter indicator.
Pro tip: If your remote has a backlight button (often labeled “LIGHT” or with a moon icon), press it to illuminate the screen in the dark. No more squinting at 2 a.m.!
Reading the LCD Display
The LCD screen shows real-time information. Here’s what each icon means:
- Temperature: Large digits show current set temperature.
- Mode Icon: A snowflake (Cool), sun (Heat), water droplet (Dry), fan (Fan), or A (Auto).
- Fan Speed: Arrows or bars indicate current fan level.
- Timer: Clock icon shows if a timer is active.
- Swing: Arrows pointing up/down mean louvers are moving.
- Filter Warning: A flashing filter icon means it’s time to clean the unit’s filter.
Example: You set the unit to 22°C in Cool mode, with Medium fan speed and vertical swing on. The display will show “22”, a snowflake, two fan bars, and up/down arrows. Simple!
Step-by-Step Guide to Operating Your Mitsubishi AC
Now that you know the buttons, let’s walk through how to use them in real-life scenarios. Think of this as your cheat sheet for daily use.
Turning On and Selecting a Mode
1. Press the Power button. The unit will beep, and the display lights up.
2. Press Mode (M) until your desired mode appears:
– Cool: For hot days. Cools air to your set temperature.
– Heat: For cold days. Heats air (available on heat pump models).
– Dry: Reduces humidity without major cooling. Ideal for muggy climates.
– Fan: Circulates air without heating or cooling. Energy-efficient for mild days.
– Auto: The unit decides between Cool/Heat based on room temperature (if supported).
Real-world tip: In humid coastal areas, I use Dry mode at night to avoid condensation on my walls. It keeps the air fresh without overcooling.
Setting Temperature and Fan Speed
1. Use the +/- buttons to set your temperature. I recommend:
– Summer: 24–26°C (75–79°F) for comfort and energy savings.
– Winter: 20–22°C (68–72°F) for warmth without drying the air.
2. Press FAN to select speed:
– Auto: Best for consistent comfort. The AC adjusts fan based on temperature difference.
– Low/Quiet: Great for bedrooms at night.
– High: Use when you need quick cooling/heating (e.g., after opening windows).
Note: In Auto mode, the fan speed is managed automatically. You can override it, but the system may adjust it back for efficiency.
Using Swing and Louver Controls
Press SWING to enable automatic vertical airflow. This spreads air evenly, preventing hot/cold spots.
For manual control (on some models):
1. Press and hold SWING until the louver stops moving.
2. Use the +/- buttons to tilt the louvers up/down.
3. Press SWING again to lock the position.
Why it matters: Direct airflow can cause discomfort. I angle my louvers slightly upward in winter to push warm air down, and downward in summer to avoid chilling my feet.
Activating Special Features (ECO, Powerful, etc.)
– ECO Mode: Press the ECO button. The AC runs at reduced power, saving energy. Perfect for leaving on while you’re at work.
– Powerful Mode: Press PWR for a 20-minute turbo boost. Ideal for quickly cooling a room after a hot day.
– Sleep Mode (on select models): Automatically adjusts temperature and fan over time for comfort during sleep.
Caution: Powerful mode uses more electricity. Use it sparingly unless you need rapid temperature change.
Mastering the Timer and Scheduling Functions
One of the most underrated features of the Mitsubishi air conditioner control panel is the timer. It lets you automate operation, saving energy and ensuring comfort when you need it.
Setting the On Timer (Start at a Specific Time)
1. Press TIMER until “ON” flashes.
2. Use +/- to set the start time (e.g., 7:00 AM).
3. Press TIMER again to confirm.
4. The unit will start automatically at the set time.
Use case: I set my AC to turn on at 6:30 AM so my bedroom is cool when I wake up. No more groggy, sweaty mornings!
Setting the Off Timer (Stop at a Specific Time)
1. Press TIMER until “OFF” flashes.
2. Use +/- to set the stop time (e.g., 10:00 PM).
3. Press TIMER to confirm.
4. The unit turns off at the scheduled time.
Pro tip: Combine On and Off timers for full-day automation. For example, turn on at 7 AM, off at 9 AM, on again at 5 PM, off at 10 PM.
Using the 24-Hour Clock
Most remotes use a 24-hour format (e.g., 14:00 = 2 PM). To set:
1. Hold the TIMER button for 3 seconds until the clock flashes.
2. Use +/- to set the current time.
3. Press TIMER to save.
Note: If your remote loses power, you’ll need to reset the clock. I keep a sticky note with the current time near my remote to avoid guesswork.
Troubleshooting Common Control Panel Issues
Even the best Mitsubishi ACs can have hiccups. Here’s how to solve the most common control panel problems—no technician required.
Remote Not Responding or Unresponsive
Symptoms: No display, buttons don’t work, or commands aren’t received.
Solutions:
– Replace the batteries (use fresh alkaline, not rechargeable).
– Check for obstructions between the remote and indoor unit (e.g., furniture, curtains).
– Reset the remote: Remove batteries, press all buttons for 5 seconds, reinsert batteries.
– Ensure you’re within 7–10 meters (23–33 feet) of the indoor unit.
Personal experience: My remote once stopped working because my cat knocked it behind the couch. A 30-second battery swap fixed it!
Display Shows Error Codes
Mitsubishi ACs display error codes when something’s wrong. Common ones:
– E1: Indoor unit sensor issue. Clean the sensor or contact support.
– E5: Communication error between indoor and outdoor units. Check wiring or call a technician.
– P1: Low refrigerant or compressor issue. Requires professional help.
– H11: Indoor fan motor problem. Power cycle the unit; if it persists, call a pro.
Action: Note the code, turn off the AC, wait 5 minutes, then restart. If the code returns, consult your manual or Mitsubishi support.
Filter Warning Light On
The filter icon flashes when the air filter needs cleaning.
1. Turn off the AC.
2. Open the indoor unit cover.
3. Remove the filter and wash it with mild soap and water.
4. Dry completely (takes 1–2 hours).
5. Reinstall the filter.
6. Press and hold the FILTER button for 3 seconds to reset the indicator.
Tip: Clean the filter every 2–4 weeks during peak season. A dirty filter reduces efficiency by up to 15%.
Advanced Features and Pro Tips for Optimal Use
Beyond the basics, Mitsubishi air conditioners have features that can elevate your comfort and energy efficiency. Let’s explore the pro-level settings.
Using the “i-See” Sensor (on Premium Models)
Some Mitsubishi models (like the P-Series) have an “i-See” sensor that detects room occupancy and temperature. It:
– Adjusts airflow to avoid blowing directly on people.
– Switches to ECO mode when no one is in the room.
– Maintains even temperature by scanning the room.
How to enable: Press and hold the MODE button for 3 seconds until “i-See” appears. To disable, repeat the process.
Smart Home Integration (Wi-Fi Adapters)
With a Mitsubishi Wi-Fi adapter (sold separately), you can control your AC via:
– Mitsubishi Electric App: Adjust settings from your phone.
– Voice Assistants: Use Alexa or Google Assistant to say, “Turn on the living room AC.”
– Smart Schedules: Sync with your calendar or geolocation (e.g., turn on when you leave work).
Setup: Plug the adapter into the indoor unit, download the app, and follow the on-screen instructions.
Energy-Saving Best Practices
Maximize efficiency with these habits:
– Use ECO mode: Saves up to 30% energy.
– Set timers: Avoid running the AC when not needed.
– Close curtains/drapes: Reduces heat gain in summer.
– Seal drafts: Use weather stripping to keep cooled air in.
– Regular maintenance: Clean filters and coils every 3–6 months.
Data point: According to the U.S. Department of Energy, proper AC maintenance can reduce energy use by 5–15%.
| Feature | Benefit | Best For |
|---|---|---|
| ECO Mode | Reduces energy consumption | Long-term use, energy savings |
| Powerful Mode | Rapid temperature change | Quick cooling/heating |
| Timer | Automation, comfort | Scheduled use, away from home |
| Swing | Even air distribution | Large rooms, avoiding drafts |
| Wi-Fi Control | Remote access, smart integration | Tech-savvy users, smart homes |
Final Thoughts: Your Mitsubishi AC Control Panel, Simplified
There you have it—your complete guide to Mitsubishi air conditioner control panel instructions, made easy. From understanding button functions to mastering timers and troubleshooting, you now have the tools to use your AC like a pro. I’ve shared real-world tips, personal anecdotes, and even a data table to help you make informed choices.
Remember, the key to comfort isn’t just setting the right temperature—it’s using the right features at the right time. Whether you’re cooling down after a long day, automating your morning routine, or saving energy with ECO mode, your Mitsubishi AC is designed to adapt to your life. And if you ever get stuck? Don’t panic. Most issues have simple fixes, and the manual (or this guide) is your best friend.
So go ahead, grab your remote, and take control. Your perfect indoor climate is just a few button presses away. Happy cooling—and heating—season!
Frequently Asked Questions
How do I use the Mitsubishi air conditioner control panel for basic operation?
To use the Mitsubishi air conditioner control panel, press the “Power” button to turn it on, then select your desired mode (Cool, Heat, Dry, or Fan) using the “Mode” button. Adjust the temperature with the up/down arrows and use the “Fan Speed” button to set airflow intensity.
What do the symbols on my Mitsubishi air conditioner control panel mean?
The symbols on the Mitsubishi air conditioner control panel represent functions like power, mode, timer, fan speed, and swing. Refer to your model’s manual for a detailed legend, or look for labeled icons (e.g., snowflake for Cool, sun for Heat).
How do I set the timer on my Mitsubishi AC unit?
Press the “Timer” button on the control panel, then use the arrow keys to set the start/stop time. Confirm by pressing “Set” or “Enter.” This feature helps automate operation to save energy.
Why is my Mitsubishi air conditioner control panel not responding?
First, check if the remote has batteries and is pointed at the unit. If the panel is still unresponsive, power cycle the AC or check for error codes (e.g., “E1” for sensor issues) in the manual.
How do I activate the sleep mode on my Mitsubishi AC?
Press the “Sleep” or “Timer” button (varies by model) to gradually adjust temperature and fan speed for comfort during sleep. The feature typically runs for 8 hours before auto-shutoff.
Can I control my Mitsubishi air conditioner remotely?
Yes! Many Mitsubishi models support Wi-Fi via the MELCloud app. Connect your Mitsubishi air conditioner control panel to the app for remote adjustments, scheduling, and monitoring from your smartphone.