
Featured image for mini split air conditioner installation near me
Image source: i.ytimg.com
Finding reliable mini split air conditioner installation near me ensures optimal performance, energy efficiency, and long-term savings. Hiring certified local HVAC professionals guarantees proper sizing, seamless installation, and compliance with regional codes—avoiding costly mistakes. Use trusted local services with verified reviews and manufacturer certifications for a hassle-free, expertly installed system.
Key Takeaways
- Hire local pros: Choose certified installers nearby for faster, reliable service.
- Check permits: Verify local codes to avoid legal issues during installation.
- Size matters: Get a unit matched to your space for optimal efficiency.
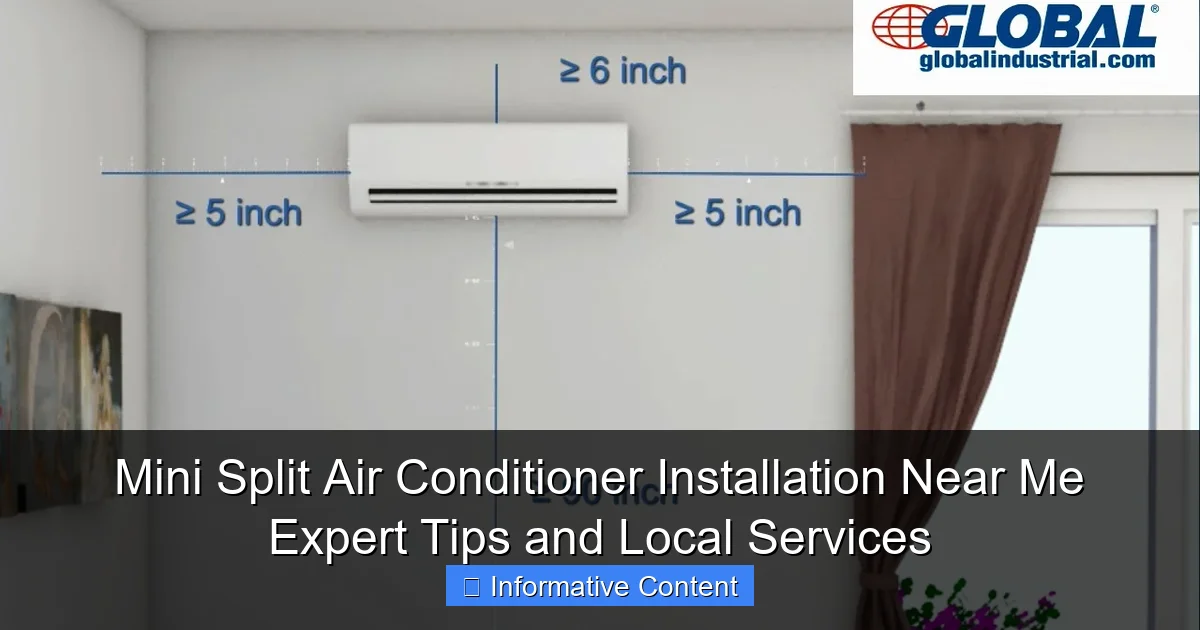
- Prioritize placement: Install indoor units high on walls for better airflow.
- Schedule maintenance: Book annual checkups to extend system lifespan.
- Compare quotes: Get 3+ estimates to balance cost and quality.
📑 Table of Contents
- Why You Should Consider a Mini Split Air Conditioner Installation Near Me
- What Makes Mini Split Systems a Smart Choice for Your Home
- How to Choose the Right Mini Split for Your Space
- Finding the Best “Mini Split Air Conditioner Installation Near Me”
- The Installation Process: What to Expect
- Maintenance Tips to Keep Your Mini Split Running Smoothly
- Cost vs. Value: Is a Mini Split Worth the Investment?
- Final Thoughts: Your Journey to Comfort Starts Today
Why You Should Consider a Mini Split Air Conditioner Installation Near Me
Imagine this: It’s a sweltering summer afternoon. The sun is relentless, and your old window unit is wheezing like a tired marathon runner. You’re sweating, frustrated, and wondering if there’s a better way to keep your home cool. Then you hear about mini split air conditioners—sleek, quiet, and incredibly efficient. You search for “mini split air conditioner installation near me,” hoping to find a local pro who can make your home a haven from the heat.
That’s exactly where I was a few years ago. I’d spent years wrestling with bulky window units, dealing with noise, uneven cooling, and sky-high electricity bills. When I finally decided to upgrade to a ductless mini split system, it felt like a revelation. Not only did it cool my house more effectively, but it also saved me money and looked way better. But the journey from “I need this” to “I have this” wasn’t always smooth. I learned a ton along the way—about what to look for, what to avoid, and how to find the best local mini split air conditioner installation near me. And now, I’m sharing those insights with you.
What Makes Mini Split Systems a Smart Choice for Your Home
Efficiency That Saves You Money
Mini split systems are like the hybrid cars of the HVAC world—they do more with less. Unlike traditional central air systems that lose energy through ducts (sometimes up to 30%!), mini splits deliver cool or warm air directly to the rooms where you need it. This targeted approach means less wasted energy and lower utility bills.
Visual guide about mini split air conditioner installation near me
Image source: cdn.shopify.com
For example, let’s say you have a two-story home. With a central AC, you’re cooling the whole house, even if you’re only using the living room and kitchen during the day. A mini split lets you cool just those two rooms—and maybe the bedrooms at night—without wasting energy on empty spaces. I’ve seen homeowners cut their cooling costs by 20-30% after switching to mini splits.
Zoned Comfort for Every Room
One of the coolest things about mini splits is zoning. Each indoor unit (called an “air handler”) can be controlled separately. That means your teenager can crank the AC in their room while you keep the living room at a comfortable 75°F. No more thermostat wars!
I remember visiting a friend who had installed a dual-zone mini split. Her bedroom was cool and quiet, while the guest room stayed off. “It’s like having two ACs in one,” she told me. “And the best part? No more arguing with my husband about the temperature!”
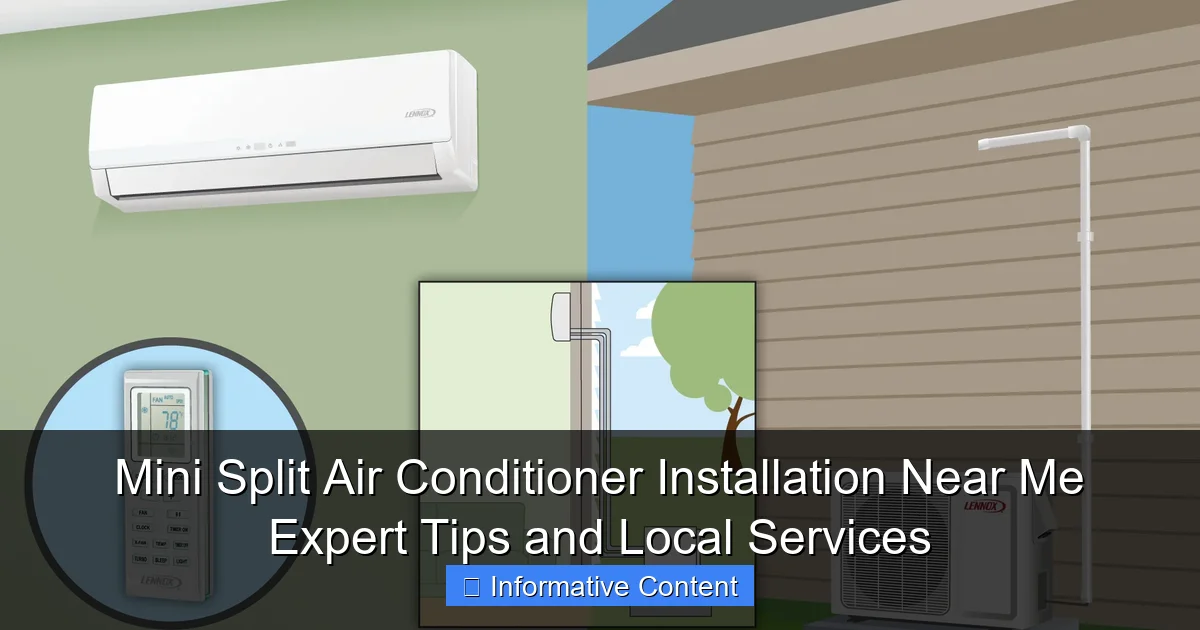
No Ducts, No Mess
If you’ve ever had to clean ducts or deal with moldy vents, you know how gross and expensive it can be. Mini splits eliminate that problem entirely. They use a small refrigerant line to connect the outdoor compressor to the indoor units, so there’s no ductwork to maintain.
This also makes them ideal for older homes, additions, or rooms that aren’t connected to your existing HVAC system. For instance, my neighbor added a sunroom last year. Instead of extending the ductwork (which would’ve cost thousands), they installed a single-zone mini split. It was cheaper, faster, and more efficient.
How to Choose the Right Mini Split for Your Space
Step 1: Calculate Your Cooling Needs
Not all mini splits are created equal. To get the right one, you need to know your home’s cooling load—essentially, how much cooling power you need. This depends on:
- Room size (square footage)
- Insulation quality
- Window size and orientation (south-facing windows get more sun)
- Number of occupants (people generate heat!)
As a general rule, you’ll need about 20 BTUs (British Thermal Units) per square foot. For example, a 300 sq ft bedroom would need a 6,000 BTU unit. But don’t just guess—use an online BTU calculator or ask a pro for help. I made the mistake of oversizing my first unit, and it short-cycled (turned on and off too often), which wore it out faster.
Step 2: Pick the Right Type
Mini splits come in a few flavors:
- Single-zone: One outdoor unit connected to one indoor unit. Perfect for a single room or small apartment.
- Multi-zone: One outdoor unit connected to multiple indoor units (up to 8 in some cases). Ideal for whole-house cooling.
- Ceiling cassette: Installed in the ceiling, great for large open spaces.
- Wall-mounted: The most common type, easy to install and maintain.
For my 1,200 sq ft home, I went with a dual-zone system: one unit in the living room and another in the master bedroom. It was the sweet spot between cost and comfort.
Step 3: Don’t Skimp on Quality
You get what you pay for with mini splits. Cheap units might save you upfront, but they’ll cost more in repairs, energy bills, and replacements down the line. Look for brands with:
- High SEER ratings (Seasonal Energy Efficiency Ratio). Aim for 18+.
- Inverter technology (adjusts compressor speed for consistent temps).
- Good warranties (10+ years on parts and compressors).
I chose a Mitsubishi Hyper-Heat system because it works in sub-zero temps (important for my chilly winters) and has a 12-year warranty. It was a splurge, but worth it for the peace of mind.
Finding the Best “Mini Split Air Conditioner Installation Near Me”
Start with Local Reputation
When I searched for “mini split air conditioner installation near me,” I got over 50 results. How do you narrow it down? Start with reputation. Look for:
- Google reviews (aim for 4.5+ stars and 50+ reviews).
- Angi or HomeAdvisor ratings (check for “Elite Service” or “Super Service Award” badges).
- Local Facebook groups (ask neighbors for recommendations).
One installer I considered had glowing reviews but was based 50 miles away. I worried they’d be less responsive if something went wrong. So I prioritized local companies—within a 20-mile radius—so I’d have faster service if needed.
Ask the Right Questions
Once you’ve got a shortlist, vet them with these questions:
- Are you licensed, bonded, and insured? This protects you if something goes wrong.
- Do you have experience with my type of home? Older houses might need different approaches.
- Can you provide a detailed quote? Beware of vague “estimates.”
- Do you handle permits? Some areas require HVAC permits.
I once hired a handyman who claimed he could install my mini split. Big mistake. He didn’t know the refrigerant line needed a precise slope, so the unit leaked. A licensed pro would’ve caught that. Lesson learned: always go with certified HVAC techs.
Compare Quotes (But Don’t Just Pick the Cheapest)
I got three quotes for my dual-zone system:
- Company A: $5,200 (lowest price, but no warranty on labor)
- Company B: $5,800 (mid-range, included 2-year labor warranty)
- Company C: $6,500 (highest price, 5-year labor warranty, free follow-up visit)
I went with Company B. The extra $600 for the warranty was worth it for my peace of mind. And sure enough, when my unit needed a minor adjustment six months later, they fixed it for free.
The Installation Process: What to Expect
Day 1: Site Survey and Planning
A good installer will start with a site survey. They’ll:
- Measure your rooms and assess cooling needs.
- Check electrical capacity (mini splits need a dedicated circuit).
- Plan the best spots for indoor and outdoor units.
My installer suggested mounting the outdoor unit on a shaded wall to improve efficiency. He also recommended a wall-mounted unit in the living room and a ceiling cassette in the bedroom (for a sleeker look). His attention to detail made a big difference.
Day 2: Drilling, Wiring, and Mounting
Installation usually takes 1-2 days. Here’s what happens:
- Drilling: A small hole (about 3 inches) is drilled through the wall to connect the indoor and outdoor units. The installer will try to hide it behind furniture or in a closet.
- Mounting: The indoor unit is secured to the wall or ceiling. The outdoor unit sits on a level pad or wall bracket.
- Wiring: Electrical lines and refrigerant pipes are connected. This is delicate work—improper connections can cause leaks or system failure.
I watched my installer carefully seal the hole with foam and caulk. He even painted the trim to match the wall! It’s the little things that show a pro’s pride in their work.
Day 3: Testing and Training
Once everything’s installed, the tech will:
- Run the system to check for leaks or errors.
- Calibrate the thermostat and remotes.
- Show you how to use the system (filter cleaning, mode settings, etc.).
My installer spent 30 minutes walking me through the remote control and app. He even set up a maintenance reminder on my phone. Now I get alerts when it’s time to clean the filter (which takes 2 minutes).
Maintenance Tips to Keep Your Mini Split Running Smoothly
Clean the Filters Every 2-4 Weeks
Dirty filters restrict airflow, making your system work harder and use more energy. Most wall-mounted units have washable filters. Just:
- Pop the cover off.
- Rinse the filter with water.
- Let it dry completely before reinstalling.
I keep a spare filter so I can swap them out while one’s drying. It’s a 5-minute job that makes a huge difference.
Check the Outdoor Unit Annually
The outdoor unit (compressor) needs space to “breathe.” Keep it free of:
- Leaves and debris
- Grass clippings (from mowing)
- Snow and ice (in winter)
Every spring, I use a garden hose to gently spray the fins (the thin metal plates). Avoid high-pressure washers—they can bend the fins and damage the unit.
Schedule a Professional Tune-Up Every 2-3 Years
Even the best DIY maintenance can’t replace a pro’s expertise. A technician will:
- Check refrigerant levels
- Inspect electrical connections
- Test the thermostat
- Clean the coils (if needed)
My installer offers a biennial tune-up for $150. It’s cheaper than an emergency repair—and keeps my system running at peak efficiency.
Cost vs. Value: Is a Mini Split Worth the Investment?
Let’s talk numbers. A typical mini split installation ranges from $3,000 to $8,000, depending on:
- Number of zones
- Unit brand and efficiency
- Installation complexity
But here’s the good news: most homeowners recoup their investment in 3-5 years through energy savings. For example, my dual-zone system cost $5,800. But I saved $300/year on cooling bills and another $100/year on heating (thanks to the heat pump function). That’s a 6.9% annual return—way better than my savings account!
Plus, mini splits add value to your home. A 2023 National Association of Realtors survey found that HVAC upgrades can increase a home’s value by up to 10%. So if you ever sell, your mini split could pay for itself twice.
Mini Split Cost Breakdown (Example)
| Item | Cost Range | Notes |
|---|---|---|
| Single-zone unit (equipment) | $1,500–$2,500 | Includes indoor and outdoor units |
| Multi-zone unit (equipment) | $3,000–$6,000 | For 2–4 zones |
| Installation (labor) | $1,000–$2,000 | Depends on complexity |
| Electrical upgrades | $200–$500 | If needed |
| Total (single-zone) | $3,000–$5,000 | |
| Total (multi-zone) | $4,500–$8,000 |
Final Thoughts: Your Journey to Comfort Starts Today
Looking for “mini split air conditioner installation near me” isn’t just about finding a contractor—it’s about finding a partner in comfort. The right installer will guide you from the first quote to the final test, ensuring you get a system that’s efficient, reliable, and perfectly sized for your home.
Here’s my final advice: don’t rush it. Take the time to research, ask questions, and choose a team you trust. And remember, a well-installed mini split isn’t just an appliance—it’s an investment in your home, your comfort, and your future. So when you’re ready to say goodbye to sweaty summers and hello to zoned, whisper-quiet cooling, start that search. Your perfect mini split (and the perfect local pro to install it) is out there. And when you find them, you’ll wonder how you ever lived without it.
Happy cooling!
Frequently Asked Questions
How do I find reliable mini split air conditioner installation near me?
Look for local HVAC companies with certified technicians and positive customer reviews. Prioritize providers offering free estimates and warranties on both labor and equipment to ensure quality service.
What factors affect the cost of a mini split installation?
The total cost depends on system size, number of indoor units, labor complexity, and whether electrical upgrades are needed. Getting multiple quotes from local installers helps you compare fair pricing for your specific project.
Can I install a mini split air conditioner myself?
DIY installation is possible but not recommended unless you have HVAC experience—improper refrigerant handling or electrical work can void warranties and create safety hazards. Professional mini split air conditioner installation near me ensures code compliance and optimal performance.
How long does a typical mini split installation take?
Most residential installations take 1–2 days, depending on the number of zones and site preparation. Complex retrofits (e.g., concrete drilling) may require additional time.
Do I need permits for mini split installation?
In most areas, yes—permits ensure the system meets local building and electrical codes. Reputable installers handle the permitting process as part of their service.
What should I ask before hiring a local installer?
Verify licensing, insurance, and manufacturer certifications (e.g., Mitsubishi Diamond Contractor). Ask for references and clarify if the quote includes cleanup, permits, and post-installation support.