
Featured image for midea portable air conditioner installation
Image source: d1pjg4o0tbonat.cloudfront.net
Installing your Midea portable air conditioner is quick and hassle-free with this step-by-step guide that walks you through setup, window kit assembly, and proper exhaust hose positioning for optimal cooling. No special tools or professional help needed—just follow the clear instructions to enjoy efficient, room-filling comfort in under 30 minutes.
Key Takeaways
- Prepare your space: Clear the area and ensure proper ventilation for optimal performance.
- Use the manual: Always follow Midea’s step-by-step instructions for safe, correct installation.
- Seal the exhaust hose: Prevent hot air leaks by securing it tightly in the window kit.
- Check drainage: Empty the water tank regularly to avoid overflow and damage.
- Test before use: Run the unit briefly to confirm it cools and functions properly.
- Maintain filters: Clean or replace filters monthly to ensure air quality and efficiency.
📑 Table of Contents
- Why Installing Your Midea Portable Air Conditioner Shouldn’t Be a Headache
- What You’ll Need Before Starting Installation
- Step-by-Step Guide to Installing Your Midea Portable Air Conditioner
- Special Cases: Sliding, Casement, and Unconventional Windows
- Common Installation Mistakes (And How to Fix Them)
- Maintenance Tips to Keep Your Midea AC Running Smoothly
- Data Table: Midea Portable AC Installation Checklist
- Final Thoughts: You’ve Got This!
Why Installing Your Midea Portable Air Conditioner Shouldn’t Be a Headache
Let’s be honest—summer heat can be brutal. One minute you’re sipping lemonade by the window, and the next, you’re sweating through your shirt like you just ran a 5K. That’s why a portable air conditioner is such a game-changer. No ductwork, no permanent installation, just cool air wherever you need it. And among the many brands out there, Midea stands out for its reliability, energy efficiency, and surprisingly quiet operation.
But here’s the thing: even the best portable AC won’t help if you can’t get it set up right. I remember the first time I tried installing one. I opened the box, stared at the hose, the window kit, and the manual with tiny diagrams, and thought, “Wait… which end goes where?” I ended up with a lopsided hose hanging out the window like a confused garden snake. Sound familiar? You’re not alone. That’s exactly why I wrote this Midea portable air conditioner installation guide—to walk you through every step, avoid common mistakes, and get you chilling (literally) in no time.
What You’ll Need Before Starting Installation
Before you even touch the AC unit, let’s make sure you’ve got everything you need. Trust me, there’s nothing worse than halfway through setup realizing you’re missing a critical piece. Think of this as your “pre-flight checklist” for cool air.
Visual guide about midea portable air conditioner installation
Image source: d1pjg4o0tbonat.cloudfront.net
Essential Tools and Supplies
- Your Midea portable AC unit (obviously!)
- Exhaust hose (usually included)
- Window installation kit (plastic panels, brackets, weather stripping—comes with most models)
- Window (double-hung, sliding, or casement—more on compatibility later)
- Measuring tape (for window width and height)
- Scissors or utility knife (to trim foam strips or plastic panels)
- Drill and screws (optional)—some kits include screws for permanent-style mounting, but most don’t need them
- Level (optional but helpful)—to make sure your unit isn’t leaning like the Tower of Pisa
- Vacuum or duster—to clean the window frame and floor before setup
Check the Manual and Model Compatibility
Every Midea model is slightly different. For example, the Midea U Inverter has a unique U-shaped exhaust design, while the Midea MAP-14S1TBL uses a standard single-hose setup. Flip through the manual that came in the box (or download it from Midea’s website if it’s missing). Look for:
- Specific window kit instructions
- Hose connection diagrams
- Minimum and maximum window opening sizes
- Clearance requirements (how far the unit must sit from walls)
Pro Tip: Measure Your Window First
I learned this the hard way. One summer, I bought a unit without measuring my apartment window. The kit was too wide. Ended up using duct tape and a cardboard shim—don’t be me. Measure your window opening from side to side and top to bottom. Most Midea kits fit windows from 17 to 50 inches wide. If your window is outside that range, you may need an extension kit (available on Amazon or directly from Midea).
Step-by-Step Guide to Installing Your Midea Portable Air Conditioner
Now that you’ve got your tools and measurements ready, let’s get into the actual Midea portable air conditioner installation process. This is where most people get tripped up—but it’s actually much simpler than it looks.
Step 1: Choose the Right Spot for the Unit
Your AC needs to be close to the window but not so close it blocks airflow. Here’s what to keep in mind:
- Distance from window: Keep it within 6–8 feet. The exhaust hose loses efficiency the longer it is.
- Clearance: Leave at least 20–30 inches on all sides, especially the back and top, for proper ventilation.
- Floor type: Use on a hard, level surface. Carpet can trap heat and reduce efficiency.
- Power source: Plug directly into a grounded outlet. Avoid extension cords unless absolutely necessary—and if you must, use a heavy-duty one rated for 15 amps.
Real-life example: I once placed my unit too close to a bookshelf. The hot air from the back vented right into the books, warping the pages. Not ideal.
Step 2: Prepare the Window and Installation Kit
Open your window and clean the frame. Wipe away dust, cobwebs, and old weather stripping. Then, lay out the window kit components:
- Plastic panels (usually two or three)
- Adjustable brackets or clamps
- Foam tape or rubber seals
Most kits are modular. You’ll need to:
- Assemble the panels to match your window width. Some kits let you stack or slide them together.
- Trim excess foam with scissors if it’s too long.
- Peel off the backing from foam strips and stick them to the panel edges that will touch the window.
Tip: If your window is narrow, use the smallest panel first. For wider windows, combine panels side by side. Some models (like the Midea U) have a single U-shaped panel—just slide it into place.
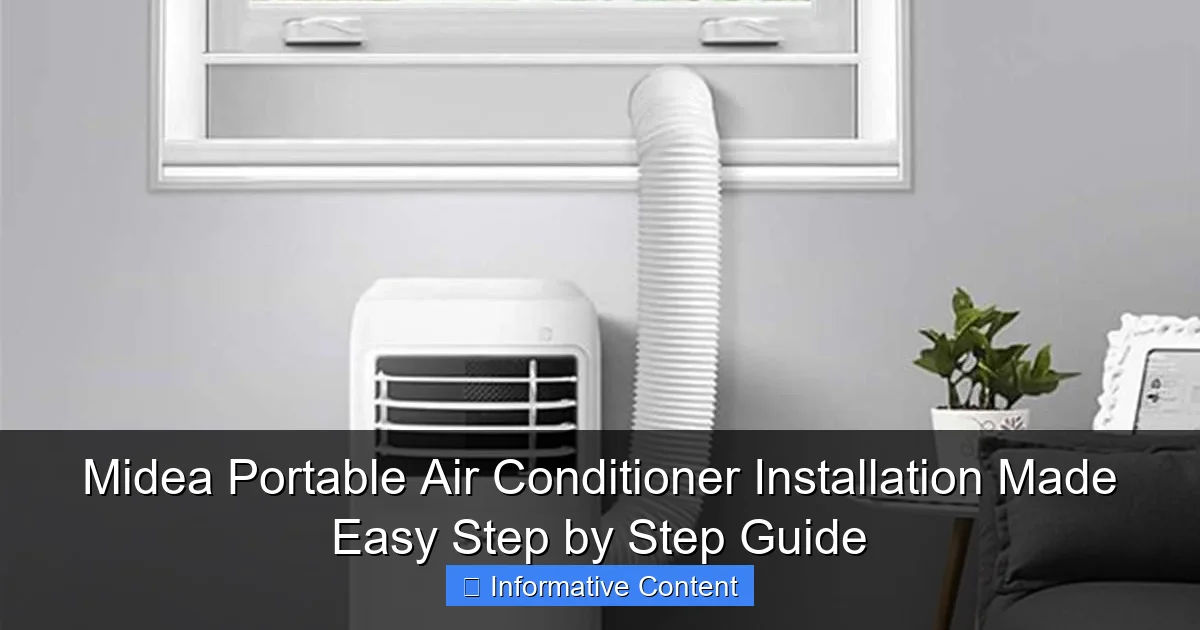
Step 3: Install the Window Kit
This is the heart of the Midea portable air conditioner installation. Here’s how:
- Lower the window sash onto the top edge of the panel (or panels).
- Push the panel down gently so the bottom edge sits flush against the window sill.
- If your kit has brackets, attach them to the window frame and secure the panel. Some use tension—no tools needed.
- For sliding windows, place the panel vertically between the sash and the frame. Adjust until snug.
- Seal gaps with included foam or tape. You want an airtight fit to prevent hot air from leaking back in.
Common mistake: Not sealing the sides. I once skipped this and felt warm air sneaking in around the edges. A quick foam tape fix saved the day.
Step 4: Connect the Exhaust Hose
Now, connect one end of the hose to the back of your AC unit. Most Midea models have a simple twist-and-lock or push-fit connector. Give it a firm push until it clicks or seats securely.
Then, attach the other end to the window kit. Look for a circular port on the panel—this is where the hose goes. Again, twist or push until it’s snug.
- Hose length: Keep it as short as possible. Bends and kinks reduce efficiency.
- Direction: Point the hose slightly downward to prevent condensation from pooling.
Step 5: Plug In and Test
Plug the unit into the outlet. Don’t turn it on yet! First, check:
- Is the hose fully connected and not kinked?
- Is the window sealed tightly?
- Is the unit level? (Use a level if you have one.)
Now, power it on. Select “Cool” mode and set the temperature to 65°F. Listen for the compressor to kick in (usually within 1–2 minutes). Feel the back of the unit—it should be warm (that’s the heat being expelled).
Special Cases: Sliding, Casement, and Unconventional Windows
Not every home has a standard double-hung window. If you’re dealing with a sliding, casement, or even a French door, don’t worry—Midea has solutions.
Sliding Windows (Horizontal)
These are the most common alternative. Use a vertical window kit that fits between the sliding sash and the fixed panel. The kit usually has an adjustable bracket that clamps to the track.
- Measure the gap between the sash and the frame.
- Assemble the panel to fit that width.
- Slide it in, then close the window to lock it in place.
Tip: Some kits include a “window lock” to prevent the window from opening accidentally. Use it!
Casement Windows (Crank-Out)
These open outward, so the standard kit won’t work. Here are two options:
- Use a casement-specific kit: Midea and third-party brands sell kits with a flat panel that mounts to the window frame. The hose exits through a hole drilled in the panel.
- Temporary seal with a custom cover: Cut a piece of plexiglass or rigid foam to fit the open window. Drill a hole for the hose. Seal edges with tape or foam. Not permanent, but works in a pinch.
Real-world fix: My friend in a historic building had crank-out windows. He used a plexiglass panel with a 4-inch hole. It looked a little DIY, but it cooled his 200 sq ft room perfectly.
French Doors or Patio Sliders
For large sliding doors, you’ll need a wide window kit or a custom setup:
- Look for kits that support up to 50-inch openings.
- Use multiple panels side by side.
- Alternatively, install the unit near a side window and run the hose under the door (not ideal, but doable).
Important: Never block a door’s emergency exit path. Safety first!
No Window Near the Room?
It happens. Maybe you’re in a basement or a room with no windows. In that case:
- Use a ventless portable AC (but note: these are less efficient and only work in small, humid spaces).
- Install a through-the-wall sleeve (requires drilling and sealing).
- Use a ceiling vent adapter (if you have an attic or drop ceiling).
For most people, though, a window is the easiest and most effective option.
Common Installation Mistakes (And How to Fix Them)
Even with a perfect setup, things can go wrong. Let’s talk about the most common issues and how to avoid or fix them.
Leaky Hose or Poor Seal
If warm air is creeping back into the room, check the seal around the window kit. Use extra foam tape or silicone caulk to seal gaps. For the hose, make sure both ends are fully connected. A loose hose can cause condensation to drip inside the unit.
Unit Not Cooling
First, check the basics:
- Is the exhaust hose connected and not kinked?
- Is the filter clean? (Clogged filters reduce airflow.)
- Is the unit in “Cool” mode and set below room temperature?
- Is the room too large for the AC’s BTU rating?
Example: I once tried cooling a 400 sq ft living room with a 8,000 BTU unit. It ran nonstop and barely made a dent. Upgraded to 12,000 BTU—problem solved.
Condensation Dripping from the Unit
Some condensation is normal, but if it’s pooling on the floor, check:
- Is the hose sloped downward toward the window?
- Is the drain plug (if your model has one) sealed?
- Is the unit level? Tilt can cause water to collect in one corner.
For models with a self-evaporating system (like many Midea units), most moisture is expelled through the exhaust. But in humid climates, you may still need to empty the internal tank occasionally.
Noisy Operation
Some noise is expected—after all, it’s a compressor and fan. But if it’s rattling or vibrating:
- Make sure the unit is on a level, hard surface.
- Check that the hose isn’t touching the unit or wall (vibrations transfer noise).
- Ensure the window kit isn’t loose or rattling in the frame.
Hose Overheating or Melting
Never run the hose through a hot attic or near a radiator. Keep it in the coolest path possible. If the hose feels hot, shorten it or insulate it with foam pipe wrap.
Maintenance Tips to Keep Your Midea AC Running Smoothly
Great installation is just the start. To keep your Midea portable air conditioner running efficiently all summer, regular maintenance is key.
Clean the Air Filter Monthly
The filter traps dust, pet hair, and allergens. A dirty filter forces the unit to work harder, reducing cooling and increasing energy use. Here’s how:
- Turn off and unplug the unit.
- Remove the filter (usually behind a front or side panel).
- Rinse under lukewarm water. No soap!
- Let it dry completely before reinstalling.
Pro tip: Keep a spare filter on hand. That way, you can swap them out and clean one while using the other.
Inspect and Clean the Exhaust Hose
Over time, dust and lint can build up inside the hose. Use a vacuum with a long attachment or a flexible brush to clean it every 2–3 months.
Drain the Water Tank (If Applicable)
Most Midea models have a “Full Tank” indicator. When it lights up:
- Unplug the unit.
- Place a towel under the drain plug.
- Open the plug and let the water drain into a container.
- Reinsert the plug and restart.
For continuous drainage, some models have a hose port. Connect a standard garden hose to drain water directly outside.
Store It Properly in Winter
When summer ends, don’t just shove it in the closet. Follow these steps:
- Drain all water from the tank and hoses.
- Clean and dry the unit thoroughly.
- Remove and clean the filter.
- Coil the hose and wrap it with a twist tie.
- Store in a dry, temperature-controlled space.
This prevents mold, mildew, and damage from freezing temperatures.
Data Table: Midea Portable AC Installation Checklist
| Step | Task | Tools Needed | Time Required | Common Pitfall |
|---|---|---|---|---|
| 1 | Measure window | Measuring tape | 5 min | Underestimating width |
| 2 | Clean window frame | Duster, cloth | 5 min | Skipping this step |
| 3 | Assemble window kit | Scissors, foam tape | 10 min | Misaligned panels |
| 4 | Install window kit | None (or drill for brackets) | 10–15 min | Air leaks around edges |
| 5 | Connect exhaust hose | None | 5 min | Kinks or loose connections |
| 6 | Test unit | Level (optional) | 10 min | Not checking for heat exhaust |
| 7 | Seal gaps | Foam tape, caulk | 5 min | Ignoring side gaps |
Final Thoughts: You’ve Got This!
Installing a Midea portable air conditioner might seem intimidating at first, but once you break it down step by step, it’s really not that hard. Think of it like assembling a puzzle—each piece has its place, and when it all fits, the result is pure, cool relief.
I’ll leave you with this: the first time I installed mine, I was sweating and frustrated. But after following this same process, I had it running in under 30 minutes. And now? I’ve helped three neighbors do the same. The key is patience, preparation, and not skipping the sealing steps. Because trust me, a little foam tape now saves a lot of warm air later.
So go ahead—unbox your Midea, grab your tape measure, and get to work. In less than an hour, you’ll be sitting back, sipping that lemonade, and enjoying a room that’s actually cool for a change. And when the heatwave hits? You’ll be ready.
Stay cool, my friend. You’ve earned it.
Frequently Asked Questions
How do I install a Midea portable air conditioner?
To install your Midea portable air conditioner, first position the unit near a window and power outlet. Attach the exhaust hose to the back of the unit, extend it to the window kit, and seal the gap with the included foam or adjustable panels.
Do I need special tools for Midea portable air conditioner installation?
No special tools are required—everything needed is included in the package, like the window kit, exhaust hose, and connectors. Just follow the manual to assemble and secure the components properly.
Can I install the Midea portable air conditioner alone?
Yes, the installation is designed for single-person setup thanks to lightweight parts and a user-friendly design. However, having a helper can make aligning the window kit easier.
How do I ensure a proper seal during Midea portable air conditioner installation?
Use the included foam strips or adjustable window panels to close gaps between the window kit and frame. A tight seal prevents hot air from re-entering and improves cooling efficiency.
What if my window doesn’t fit the standard Midea window kit?
The Midea portable air conditioner installation kit often includes adjustable panels for vertical or horizontal sliding windows. For non-standard windows, you may need to purchase a custom adapter or use a temporary board to seal the gap.
Is the exhaust hose in Midea portable AC installation permanent?
No, the exhaust hose is removable and should only be attached when the unit is in use. Detach and store it when not cooling to prevent drafts or debris from entering.