
Featured image for installing window air conditioner
Image source: media-opslag.s3.amazonaws.com
Proper installation is crucial for optimal performance and safety when installing a window air conditioner. This guide walks you through each step—from measuring your window and securing the unit to sealing gaps and testing airflow—ensuring a stable, energy-efficient setup that keeps your space cool all season long.
Key Takeaways
- Measure your window first: Ensure a proper fit before purchasing or installing the unit.
- Secure the unit tightly: Use brackets and foam seals to prevent falls and drafts.
- Check local codes: Verify if permits or inspections are required for window AC installation.
- Insulate gaps effectively: Use side panels and foam to block hot air from entering.
- Test drainage and airflow: Confirm the unit drains properly and blows cool air efficiently.
- Prioritize safety: Always disconnect power before maintenance or adjustments.
📑 Table of Contents
- Why Installing a Window Air Conditioner Is Easier Than You Think
- Choosing the Right Window Air Conditioner for Your Space
- Tools, Supplies, and Safety: What You’ll Need Before You Start
- Step-by-Step Installation Process: From Unboxing to Cooling
- Sealing, Insulating, and Testing: Ensuring Efficiency and Safety
- Common Mistakes and Pro Tips for Long-Term Success
- You’ve Got This: Your Cool Summer Awaits
Why Installing a Window Air Conditioner Is Easier Than You Think
Remember that first summer in your new apartment? The one where you opened every window, ran a fan nonstop, and still felt like you were living inside a sauna? Yeah, me too. That’s when I finally gave in and bought a window air conditioner. At first, I was intimidated—how hard could it be to install one of these things? Would I need tools? A second person? A degree in engineering? Spoiler: none of the above. After sweating through a few trial-and-error attempts (and one very awkward moment involving a ladder and a neighbor’s curious gaze), I realized installing a window air conditioner is actually a lot simpler than most people think. And the relief—both physical and emotional—is worth every minute of effort.
Whether you’re a renter trying to beat the heat without making permanent changes, a homeowner looking to cool a single room affordably, or someone who just wants to avoid the $100+ installation fee, this guide is for you. I’ll walk you through the entire process—from picking the right unit to sealing it in place—step by step. No jargon. No fluff. Just real, practical advice from someone who’s been there, done that, and learned a few lessons the hard way. By the end, you’ll be ready to install your own window air conditioner with confidence, even if you’ve never picked up a screwdriver before.
Choosing the Right Window Air Conditioner for Your Space
Match the BTUs to Your Room Size
The first step in installing a window air conditioner is choosing the right one. And the key factor? BTUs, or British Thermal Units. This measures cooling power. Too few BTUs, and your unit will run constantly without cooling the room. Too many, and it will cool too quickly without removing humidity, leaving you feeling clammy and uncomfortable.
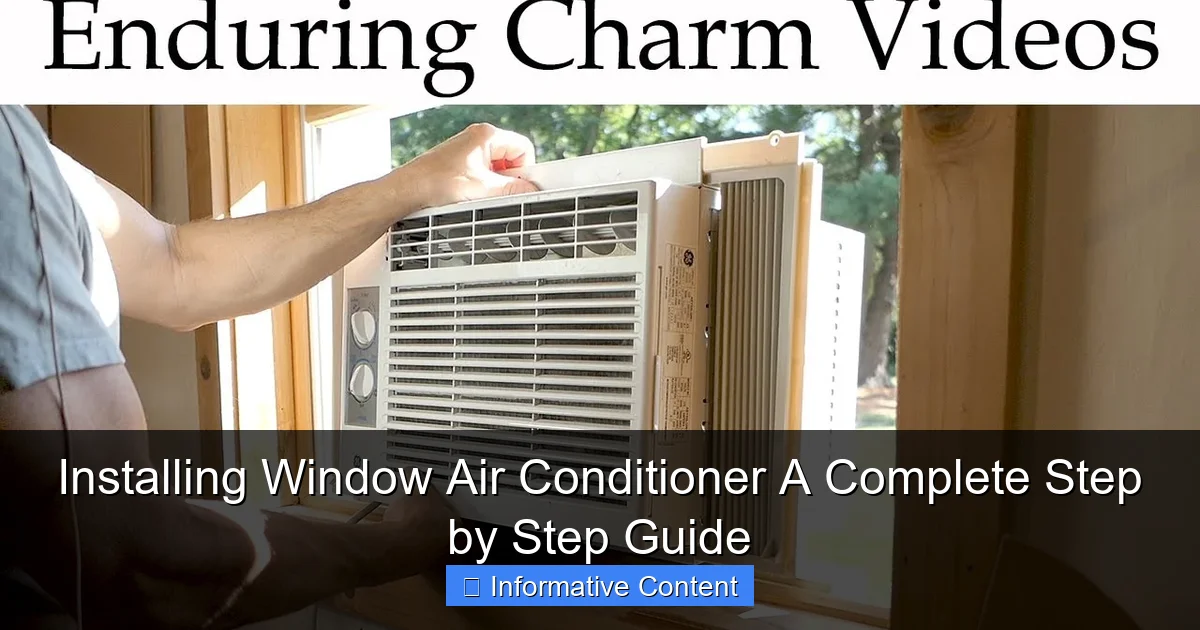
Visual guide about installing window air conditioner
Image source: i.ytimg.com
Here’s a simple rule of thumb: for a 100–150 square foot room (like a small bedroom), go for 5,000–6,000 BTUs. A 250–300 square foot living room? Aim for 7,000–8,000 BTUs. For larger spaces (400+ sq ft), you’ll want 9,000–12,000 BTUs. I once made the mistake of buying a 5,000-BTU unit for my 220 sq ft bedroom—big mistake. It ran nonstop, barely made a dent, and my electric bill skyrocketed. Learn from my sweaty regret.
Check Window Compatibility
Not all windows are created equal. Most window air conditioners are designed for double-hung windows (the kind that slide up and down). If you have casement, sliding, or fixed-pane windows, you may need special brackets or a different type of AC (like a wall unit or portable). Before you buy, measure your window:
- Width: Measure the inside of the window frame from side to side. Most units need 23–36 inches.
- Height: Measure from the sill (bottom) to the top track. You’ll need at least 13–15 inches of vertical clearance.
- Depth: Make sure the window sill can support the unit’s weight (usually 50–100 lbs) and that the AC won’t block emergency egress.
Pro tip: Take a photo of your window and bring it to the store or use it when shopping online. Some brands even offer compatibility checkers on their websites.
Look for Key Features That Make Installation Easier
Not all window air conditioners are equally user-friendly. When shopping, look for features that simplify installing window air conditioner:
- Slide-out chassis: Makes cleaning and maintenance easier.
- Adjustable side panels: These expand or contract to fit your window width.
- Pre-attached mounting hardware: Saves time and reduces confusion.
- Energy Star rating: Ensures better efficiency and lower energy bills.
- Remote control and smart features: Handy for adjusting settings without getting up (especially when you’re already cool and comfy).
I learned the value of adjustable side panels the hard way—my first AC didn’t fit my narrow window, and I had to return it. Now I always check for this feature first.
Tools, Supplies, and Safety: What You’ll Need Before You Start
Gather Your Tools (Most Are Probably in Your Garage)
You don’t need a full toolbox to install a window air conditioner, but having the right tools makes the job safer and faster. Here’s what I always keep on hand:
- Measuring tape: For double-checking window and AC dimensions.
- Screwdriver (Phillips and flathead): For tightening brackets and screws.
- Level: Ensures the AC is tilted slightly backward (critical for drainage).
- Pencil: For marking drill points (if needed).
- Drill (optional): Only if your unit requires permanent mounting.
- Work gloves: Protects your hands from sharp edges.
- Safety glasses: Because metal shavings and dust happen.
I once tried installing without a level—big mistake. The unit was tilted forward, water leaked into my apartment, and I had to redo the whole thing. A $10 level saved me hours of frustration.
Supplies to Have Ready
Beyond tools, you’ll need a few supplies:
- Foam insulation strips: For sealing gaps around the unit.
- Weather stripping or foam tape: To prevent drafts and improve efficiency.
- Support bracket (if required): Some units need extra support to handle their weight.
- Exterior caulk (optional): For sealing the top of the unit from rain.
Most ACs come with basic insulation, but I always buy extra foam tape. It’s cheap, reusable, and makes a huge difference in keeping cool air in and hot air out.
Safety First: Protect Yourself and Your Home
Installing window air conditioner involves lifting heavy objects and working near open windows—so safety can’t be an afterthought. Here are my top tips:
- Never install alone: Have someone help you lift and stabilize the unit. A 70-pound AC falling from a second-story window is no joke.
- Check the sill: Make sure it’s solid and not rotting. If it’s weak, consider a support bracket or a different window.
- Clear the area below: Move furniture, plants, and anything fragile out of the way in case of a drop.
- Use a sturdy ladder: If you’re on a second floor, make sure it’s stable and secure.
- Unplug the unit during installation: Even if it’s off, it’s safer to keep it unplugged until it’s fully mounted.
I once tried installing solo and nearly dropped the AC when the side panel slipped. My roommate saved the day (and my floor). Lesson learned: teamwork matters.
Step-by-Step Installation Process: From Unboxing to Cooling
Step 1: Unbox and Inspect the Unit
Start by unboxing your air conditioner in a clear, flat area. Check for:
- Damage during shipping (dents, cracks).
- All parts included (unit, side panels, screws, brackets, manual).
- That the unit powers on (plug it in briefly to test the fan and compressor).
I once got a unit with a missing side panel—returned it immediately. Always inspect before you install.
Step 2: Prepare the Window
Open the window and clean the sill and tracks. Remove any debris, old weather stripping, or paint flakes. Then:
- Lower the window sash (the movable part) to create a gap slightly taller than your AC’s height.
- If your unit came with side panels, slide them into the grooves on the AC.
- Adjust the side panels to match your window width (they usually extend 10–15 inches on each side).
Pro tip: If your window is wider than the AC, use the foam strips to fill gaps later. But don’t force the side panels—they should slide smoothly.
Step 3: Install the Support Bracket (If Needed)
Some units require a support bracket to bear the weight. If yours does:
- Position the bracket under the window sill, extending 6–12 inches outward.
- Use the included screws to attach it to the wall or sill. Pre-drill holes to avoid splitting wood.
- Make sure it’s level and secure before placing the AC.
I skipped the bracket on my first install because I thought it was optional. It wasn’t. The unit sagged, leaked, and I had to reinstall with the bracket. Don’t make my mistake.
Step 4: Lift and Place the AC
This is the trickiest part. With a helper:
- Position the AC at the window, tilted slightly backward (about 1/4 inch). This ensures condensation drains outside.
- Slide the unit in, with the side panels extending into the window frame.
- Lower the window sash onto the top of the AC, trapping it in place.
- Check that the unit is level using a bubble level. Adjust if needed.
Remember: never lift with your back. Bend your knees, keep the AC close to your body, and lift with your legs.
Step 5: Secure the Unit
Once the AC is in place:
- Use the included screws to attach the side panels to the window frame (usually through pre-drilled holes).
- If your unit has a top bracket, attach it to the window sash to prevent it from rising.
- Double-check that the unit can’t shift or fall.
I once forgot to screw in the side panels—wind blew the AC halfway out the window. A few quick screws fixed it, but it could’ve been much worse.
Sealing, Insulating, and Testing: Ensuring Efficiency and Safety
Seal All Gaps to Prevent Energy Loss
Even a small gap around your window air conditioner can let hot air in and cool air out. Here’s how to seal it properly:
- Side gaps: Use the foam insulation strips included with your unit. Cut to size and press into place between the side panels and window frame.
- Top gap: If there’s space between the window sash and the AC, use foam tape or a custom-cut piece of rigid foam.
- Bottom gap: If the sill doesn’t make full contact, use foam tape or a small wooden shim (covered with tape).
I use adhesive foam tape (like 3M VHB) because it’s durable and reusable. It’s saved me from drafts for three summers now.
Weatherproof the Exterior
Rain and debris can damage your AC over time. Protect it:
- Exterior caulk: Apply a thin bead along the top edge of the AC where it meets the window. This keeps water from seeping in.
- Cover the unit in winter: When not in use, cover the outside with a breathable AC cover or heavy plastic to prevent snow and ice buildup.
- Keep the condenser clean: Rinse off dirt and leaves every few weeks to maintain efficiency.
I once skipped the exterior caulk—big mistake. Rain leaked into the unit, shorted the compressor, and I had to replace it. A $5 tube of caulk could’ve saved me $200.
Test the Unit Before You Celebrate
Once everything is sealed and secure:
- Plug in the AC and turn it on.
- Set it to the lowest temperature and highest fan speed.
- Listen for unusual noises (grinding, rattling)—these could mean loose parts.
- Check for airflow: feel if cool air is blowing evenly.
- Inspect for leaks: look under the unit for water dripping inside.
- Use a thermometer to check the temperature drop after 15 minutes.
My first test revealed a loose side panel—fixed it before it caused damage. Always test before you call it done.
Common Mistakes and Pro Tips for Long-Term Success
Avoid These Installation Blunders
Even experienced DIYers make mistakes. Here are the most common—and how to avoid them:
- Not tilting the unit backward: Causes water to leak inside. Always use a level.
- Skipping the support bracket: Leads to sagging and leaks. Follow the manual.
- Overlooking insulation: Results in higher energy bills. Seal every gap.
- Ignoring the manual: Every unit is different. Read the instructions—yes, really.
- Plugging into an extension cord: Most ACs need a direct wall outlet. Extension cords can overheat.
I once used a heavy-duty extension cord. It got warm after an hour. I switched to a direct outlet—problem solved.
Pro Tips to Extend Your AC’s Life
- Clean the filter monthly: A clogged filter reduces efficiency by up to 15%. Rinse it with water and let it dry.
- Run the fan mode occasionally: Helps dry out the unit and prevents mold.
- Use a surge protector: Protects against voltage spikes during storms.
- Store it properly in winter: Remove it or cover it completely to prevent damage.
- Upgrade to a smart AC: Some models learn your habits and cool only when needed, saving energy.
My smart AC paid for itself in two summers by turning off when I left for work. Worth every penny.
When to Call a Pro
Most people can install a window air conditioner themselves. But if you:
- Live in a high-rise with no safe access.
- Have a non-standard window (casement, bay, etc.).
- Feel uncomfortable with heights or heavy lifting.
…it’s okay to hire a pro. Sometimes, peace of mind is worth the cost.
| BTU Range | Room Size (sq ft) | Recommended Use | Energy Use (kWh/year) |
|---|---|---|---|
| 5,000–6,000 | 100–150 | Small bedroom, home office | 500–600 |
| 7,000–8,000 | 250–300 | Living room, master bedroom | 700–800 |
| 9,000–10,000 | 350–400 | Large living area, open kitchen | 900–1,000 |
| 11,000–12,000 | 400–550 | Open-concept space, small apartment | 1,100–1,200 |
You’ve Got This: Your Cool Summer Awaits
Installing a window air conditioner isn’t just about beating the heat—it’s about taking control. You’re not relying on someone else to do it. You’re not overpaying for installation. You’re solving a problem with your own hands, and that feels pretty darn good. I remember the first time I turned on my AC after installing it myself. The cool air hit my face, and I just stood there, smiling. It wasn’t just the temperature drop—it was the pride of knowing I’d done it right.
From choosing the right BTUs to sealing every gap, every step matters. But don’t stress if it takes a few tries. Even the pros make mistakes. What matters is that you’re creating a cooler, more comfortable space for you and your family. And when summer rolls around again, you’ll know exactly what to do—maybe even help a friend install theirs. So take a deep breath, gather your tools, and get started. The relief is worth it. You’ve got this.
Frequently Asked Questions
How do I install a window air conditioner properly?
To install a window air conditioner, first measure your window opening and ensure the unit fits securely. Follow the manufacturer’s instructions to assemble support brackets, place the AC in the window, and seal gaps with side panels or foam insulation to prevent air leaks.
What tools do I need for installing a window air conditioner?
Common tools include a measuring tape, level, screwdriver, drill, and adjustable wrench. Some installations may also require wood shims or brackets for added stability, depending on the window type and AC model.
Can I install a window air conditioner alone?
While it’s possible, installing a window air conditioner alone can be risky due to the unit’s weight and awkward positioning. Having a helper ensures safer lifting and alignment, especially for larger units or high windows.
How do I ensure my window air conditioner is secure?
Use mounting brackets or support arms to anchor the unit to the window frame, and check that it’s level. Tighten all screws and use safety locks or brackets to prevent the AC from shifting or falling.
Do I need to insulate around my window air conditioner?
Yes, insulating around the unit with foam side panels or weatherstripping helps improve energy efficiency and reduces outside noise. This step is crucial for sealing gaps and maintaining indoor comfort during operation.
What’s the best way to remove a window air conditioner for storage?
Turn off and unplug the unit, then carefully unscrew brackets and remove side panels. Lift the air conditioner out with help, clean it thoroughly, and store it in a dry place to prevent damage during the off-season.