
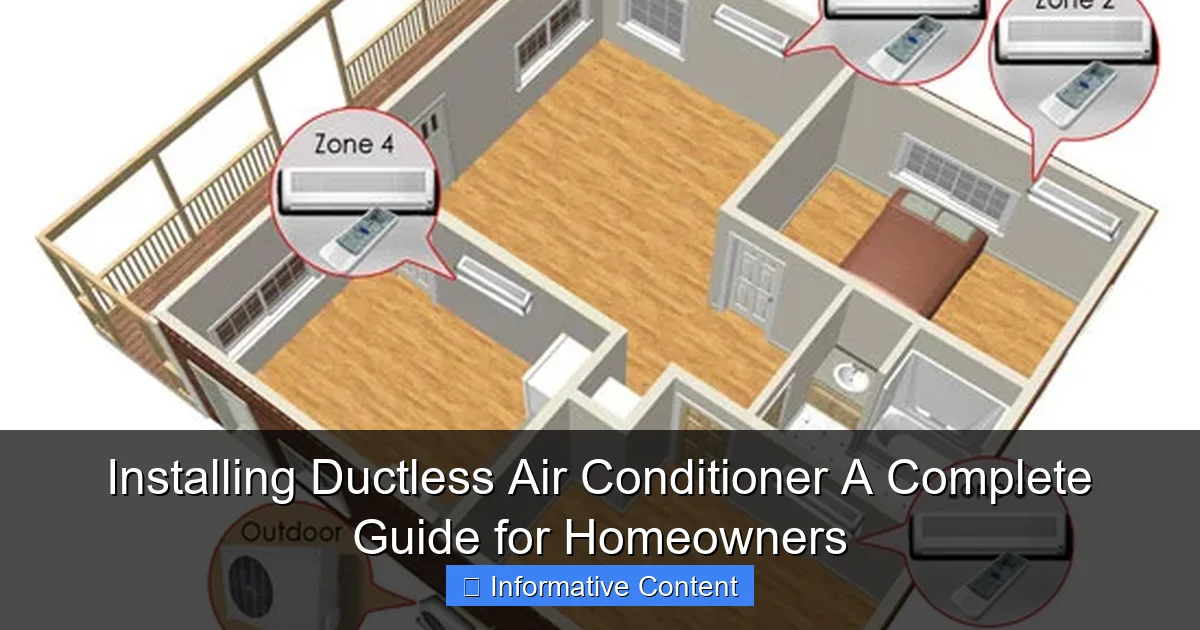
Featured image for installing ductless air conditioner
Image source: ajmadison.com
Installing a ductless air conditioner offers an efficient, flexible cooling solution for homes without ductwork, and with the right preparation, it can be a manageable DIY project. Proper sizing, strategic indoor unit placement, and professional electrical work are critical to ensure optimal performance and energy savings. This guide walks homeowners through every step—from selecting the right system to final testing—for a seamless installation experience.
Key Takeaways
- Plan carefully: Choose the right unit size and location for optimal efficiency.
- Hire professionals: Always use licensed HVAC technicians for safe electrical and refrigerant line work.
- Seal wall openings: Prevent air leaks by sealing gaps around the mounting plate and lines.
- Prioritize maintenance: Clean filters quarterly to maintain performance and air quality.
- Check warranties: Register your unit and verify coverage for parts and labor.
- Optimize placement: Install indoor units high on walls for even air distribution.
📑 Table of Contents
- Why Go Ductless? The Modern Solution for Home Cooling
- Understanding Ductless Air Conditioners: How They Work and Why They Matter
- Planning Your Installation: Assessing Your Home and Needs
- Tools, Materials, and Safety: What You’ll Need to Install a Ductless AC
- Step-by-Step Installation Guide: From Drilling to Cooling
- Maintenance and Troubleshooting: Keeping Your Ductless System Running Smoothly
- Cost, Efficiency, and Long-Term Value: Is It Worth It?
- The Bottom Line: Comfort, Control, and Confidence
Why Go Ductless? The Modern Solution for Home Cooling
Remember that summer when your old window AC unit rattled like a washing machine full of rocks, and your energy bill looked more like a phone number? I do. It was the moment I realized there had to be a better way. That’s when I discovered installing a ductless air conditioner—a game-changer for homeowners like you and me who want comfort without the noise, mess, or sky-high bills.
Ductless mini-split systems have quietly taken over as the smart alternative to traditional HVAC systems, especially for older homes without ductwork or additions where extending ducts is impractical. They’re sleek, efficient, and surprisingly easy to install—when you know what you’re doing. Whether you’re retrofitting a historic bungalow, cooling a sunroom, or just tired of sweating through August, this guide will walk you through installing a ductless air conditioner step by step. No fluff, no sales pitch—just real talk from someone who’s been there.
Understanding Ductless Air Conditioners: How They Work and Why They Matter
Before we dive into the nuts and bolts of installation, let’s clear up a common misconception: ductless doesn’t mean less powerful. In fact, it often means more control. Unlike central AC, which pushes cooled air through a maze of ducts (losing up to 30% of efficiency along the way), ductless systems deliver air directly where it’s needed—room by room.
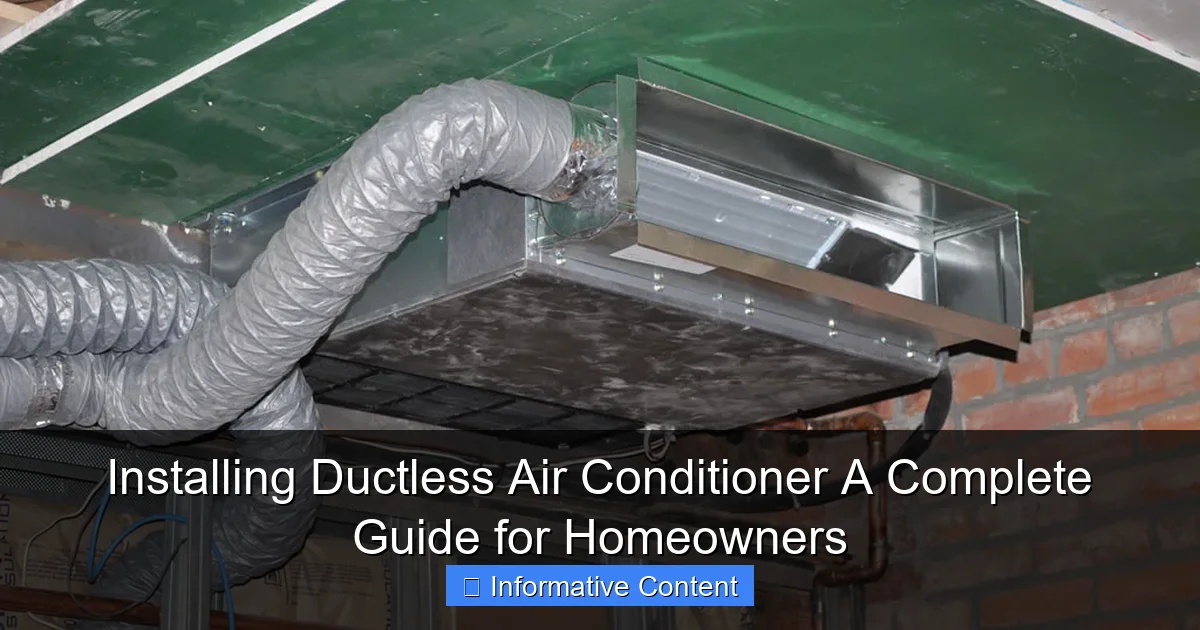
Visual guide about installing ductless air conditioner
Image source: pacificairconditioner.com
How a Ductless Mini-Split Works
At its core, a ductless air conditioner has two main parts:
- Outdoor condenser unit: This sits outside your home and houses the compressor and condenser coil. It’s the workhorse, pumping refrigerant through lines to the indoor unit.
- Indoor air handler (or blower unit): Mounted on a wall or ceiling inside, this unit blows conditioned air directly into the room. Most systems come with multiple indoor units connected to one outdoor unit—ideal for zoned cooling.
A refrigerant line, power cable, and condensate drain run between the two through a small 3-inch hole in the wall. No ductwork. No major renovations. That’s the beauty.
Why Homeowners Are Choosing Ductless
I first considered a ductless system when I added a home office in my attic. Running ducts up there would’ve cost thousands and torn up my roof. A mini-split? $1,500 installed, and I had cool air within days. Here are the real reasons people love them:
- Energy efficiency: Ductless systems are rated up to 30+ SEER (Seasonal Energy Efficiency Ratio), compared to 13–16 for most central ACs. That’s a 40–60% drop in cooling costs.
- Zoned comfort: Turn off the AC in unused rooms. No more cooling an empty guest bedroom all summer.
- Easy retrofit: Perfect for older homes, sunrooms, garages, or additions where ductwork isn’t feasible.
- Quiet operation: Indoor units run at 19–30 decibels—about as loud as a whisper. My old window unit was louder than my dog barking.
- Heating option: Many ductless systems are heat pumps, so you get both cooling and heating in one system. I use mine year-round.
One friend installed a ductless unit in her 1920s Craftsman and said it was the first time the house felt truly livable in summer. “I used to sleep with a fan pointed at my face,” she told me. “Now I sleep through the night.” That’s the power of going ductless.
Planning Your Installation: Assessing Your Home and Needs
Installing a ductless air conditioner isn’t a one-size-fits-all project. The right system depends on your home’s size, layout, insulation, and how you use your space. Rushing into a purchase without planning can lead to undersized units (struggling to cool) or oversized ones (short-cycling, wasting energy).
Step 1: Calculate Your Cooling Load
You need to know how much cooling power your room or home requires. This is called a Manual J calculation, and it considers:
- Room square footage
- Number of windows and their direction (south-facing windows add heat)
- Insulation quality (attic, walls, floors)
- Number of occupants (people generate body heat)
- Appliances (kitchens add heat)
For example, my 200 sq ft home office with two south-facing windows needed a 9,000 BTU unit. A 12,000 BTU unit would’ve been overkill—cooling too fast, not dehumidifying properly.
Tip: Use online BTU calculators as a starting point, but for whole-home systems, hire an HVAC pro to do a Manual J. It’s worth the $100–$200 to avoid costly mistakes.
Step 2: Choose the Right Type of Ductless System
Not all ductless systems are the same. Here’s what to consider:
- Single-zone: One indoor unit connected to one outdoor unit. Best for one room (e.g., a bedroom or sunroom).
- Multi-zone: One outdoor unit powers 2–8 indoor units. Great for whole-home cooling. I went with a 3-zone system for my living room, bedroom, and office.
- Ceiling cassette: Recessed into the ceiling. Ideal for open-concept spaces or where wall space is limited.
- Floor-mounted: Sits on the floor near the baseboard. Useful for rooms with low ceilings or where wall mounting isn’t possible.
- Concealed ducted: Hidden in the ceiling with small ducts to multiple vents. A hybrid option for those who want ductless efficiency with a traditional look.
My advice? If you’re cooling more than one room, go multi-zone. It’s more efficient than running multiple single-zone units, and the outdoor unit takes up less space.
Step 3: Pick the Best Location for Indoor and Outdoor Units
Where you install the units matters—a lot.
- Indoor unit: Mount high on an interior wall, ideally opposite the main heat source (e.g., windows or kitchen). Avoid direct sunlight, drafts, or heat sources like lamps. The unit needs 8–12 inches of clearance on all sides for airflow.
- Outdoor unit: Place on a level surface, at least 12 inches from the wall and 24 inches from windows or doors. Avoid areas with heavy snow, debris, or where noise might disturb neighbors. I put mine on a concrete pad in the backyard, facing north to avoid afternoon sun.
Pro tip: The refrigerant lines should be as short and straight as possible. Longer runs reduce efficiency and may require larger line sets or additional refrigerant. Most manufacturers recommend max 50–100 ft, depending on the model.
Tools, Materials, and Safety: What You’ll Need to Install a Ductless AC
Now that you’ve planned your system, let’s talk gear. I’ve seen homeowners try to cut corners with cheap tools and end up with leaks, poor airflow, or even electrical hazards. Do it right the first time.
Essential Tools and Materials
Here’s your checklist:
- Refrigerant lines: Pre-charged copper lines (usually 1/4″ and 3/8″ or 1/2″). Comes with the system, but confirm length matches your run.
- Condensate drain line: 1/2″ vinyl tubing to carry condensation outside.
- Electrical wiring: 12/2 or 14/2 NM-B cable (depending on voltage and amperage). Most units need a 240V circuit.
- Drill with masonry bit: For drilling the 3-inch hole through the wall.
- Vacuum pump: Critical for removing air and moisture from the refrigerant lines. Don’t skip this—moisture ruins the compressor.
- Refrigerant gauge set (manifold): To measure pressure and charge the system.
- Torque wrench: For tightening flare connections to manufacturer specs (over-tightening can crack fittings).
- Level and stud finder: To mount the indoor unit straight and avoid hitting pipes or wires.
- Electrical disconnect box: Required by code within sight of the outdoor unit.
- Wall anchors and mounting hardware: Usually included with the indoor unit.
- Insulation tape and foam: To seal the hole and insulate refrigerant lines.
Safety First: What You Can’t Ignore
I’ll be blunt: working with refrigerant and high-voltage electricity isn’t a DIY job for everyone. Here’s what to watch for:
- Electrical work: Most ductless units require a dedicated 240V circuit. If you’re not 100% confident wiring a breaker panel, hire an electrician. One wrong connection and you could fry the unit or start a fire.
- Refrigerant handling: Only licensed HVAC technicians can legally handle refrigerant (EPA Section 608 certification). If you’re installing a pre-charged line set (common in DIY-friendly kits), you can connect the lines, but the final vacuum and charge should be done by a pro.
- Structural integrity: Drilling through load-bearing walls or near plumbing/electrical lines can be dangerous. Use a stud finder and know your home’s layout.
- Fall protection: If you’re working on a ladder or roof, use safety gear. My neighbor slipped while installing his outdoor unit and broke his wrist. Not worth it.
Real talk: I did my own installation but hired a licensed HVAC tech to handle the refrigerant charge and electrical hookup. Cost me $300, but it gave me peace of mind. The system has run perfectly for 3 years.
Step-by-Step Installation Guide: From Drilling to Cooling
Alright, let’s get our hands dirty. I’ll walk you through the actual process, based on my own experience and best practices from HVAC pros.
Step 1: Mount the Indoor Unit
Start inside. Use the template that comes with the unit to mark the mounting location. Drill pilot holes and secure the mounting plate with anchors. Make sure it’s level—no one wants a lopsided AC unit. Then hang the indoor unit on the plate. It should snap securely into place.
Step 2: Drill the Hole
Measure and mark a spot 3–4 inches below the indoor unit. Drill a 3-inch hole through the wall at a slight downward angle (so condensation drains outside). I used a hammer drill with a masonry bit. Took 10 minutes. Wear safety goggles—dust gets everywhere.
Step 3: Run the Lines and Wiring
Feed the refrigerant lines, drain tube, and electrical cable through the hole. Bundle them together and insulate with foam. Leave enough slack inside and outside for connections. I used a fish tape to pull the lines through. Took a bit of patience, but it worked.
Step 4: Mount the Outdoor Unit
Set the outdoor unit on a level pad (concrete or pavers). Leave 12 inches of clearance on all sides. Connect the refrigerant lines to the outdoor unit’s service valves. Use a torque wrench—don’t overtighten. Then connect the electrical wiring to the disconnect box and unit. Double-check polarity and grounding.
Step 5: Vacuum and Charge the System
This is where most DIYers call in a pro. Attach the vacuum pump to the service valves and run it for at least 30 minutes to remove air and moisture. Then close the valves and disconnect the pump. A licensed tech will now add the correct amount of refrigerant (measured in pounds) based on line length. Too little? Poor cooling. Too much? Compressor damage.
Step 6: Test the System
Turn on the power and test the system. Check for:
- Cool air blowing from the indoor unit
- No refrigerant leaks (use a leak detector or soapy water on connections)
- Proper condensate drainage (water should drip outside)
- Remote control and thermostat function
I ran mine for 2 hours on a hot day. It cooled the room from 82°F to 68°F in 20 minutes. Success!
Maintenance and Troubleshooting: Keeping Your Ductless System Running Smoothly
Installing a ductless air conditioner is just the start. To keep it efficient and long-lasting, you need regular maintenance. The good news? It’s easier than central HVAC.
Routine Maintenance You Can Do Yourself
Every 1–3 months (more in dusty areas):
- Clean the indoor filter: Pull it out, rinse with water, and let it dry. A clogged filter reduces airflow and efficiency. I do this monthly.
- Inspect the outdoor unit: Clear leaves, grass, and debris from the fins. Hose it down gently if it’s dirty.
- Check the condensate drain: Pour a cup of bleach down the drain line annually to prevent algae growth and clogs.
Annually (or hire a pro):
- Inspect refrigerant lines: Look for damage, leaks, or insulation wear.
- Check electrical connections: Loose wires can cause arcing or failure.
- Lubricate the outdoor fan motor: If your unit has a grease fitting.
Common Problems and Fixes
Even great systems have hiccups. Here’s what to look for:
- No cooling: Check the filter, thermostat settings, and power supply. If it’s still not working, the refrigerant may be low (call a pro).
- Water leaks inside: Usually a clogged drain line or improper slope. Clear the drain and re-slope the tubing.
- Strange noises: Rattling could mean loose mounting screws. Humming might indicate a failing capacitor.
- Ice on refrigerant lines: Often due to low refrigerant, dirty filter, or airflow issues.
I once had an indoor unit that froze up. Turned out the filter was clogged with dust. Cleaned it, and the ice melted in an hour. Simple fix!
Cost, Efficiency, and Long-Term Value: Is It Worth It?
Let’s talk numbers. I get it—you want to know if installing a ductless air conditioner is a smart investment.
Cost Breakdown
Here’s a realistic look at what you’ll spend:
| Component | Cost Range | Notes |
|---|---|---|
| Single-zone system (equipment) | $1,800–$3,500 | Includes indoor unit, outdoor unit, lines, remote |
| Multi-zone system (2–4 zones) | $3,500–$8,000 | More zones = higher cost |
| Professional installation | $500–$2,000 | Depends on complexity and labor rates |
| Electrical work (if needed) | $200–$500 | New circuit, breaker, wiring |
| Permits (if required) | $50–$200 | Check local codes |
| Total (single-zone, DIY) | $2,000–$4,000 | You do most of the work |
| Total (multi-zone, full install) | $5,000–$12,000 | Professional install recommended |
Compare that to a central AC system: $5,000–$10,000 for the equipment and another $3,000–$8,000 for ductwork. Ductless is often cheaper, especially for retrofits.
Energy Savings and Payback Period
My ductless system uses 1.2 kWh per hour at peak load. My old window unit used 2.5 kWh. At $0.15/kWh, I save about $150 per summer. Add in heating (I use it as a heat pump in winter), and my annual savings are $250–$300. Payback period? 7–10 years—but I’d argue the comfort and quiet are worth it from day one.
Many states offer rebates for high-efficiency systems. I got $200 from my utility company. Check the Energy Star website for incentives in your area.
The Bottom Line: Comfort, Control, and Confidence
Installing a ductless air conditioner isn’t just about beating the heat. It’s about taking control of your home’s comfort. No more sweating through sticky nights. No more noisy, inefficient units. Just cool, quiet air—exactly where you want it, when you want it.
I’ll never forget the first night after my install. I turned it on, and within minutes, the room cooled down. The only sound was the gentle hum of the fan. My wife looked at me and said, “This is how we should’ve been living all along.” She was right.
Whether you DIY or hire a pro, the key is planning, patience, and doing it right. Choose the right size system. Pick good locations. Respect the safety rules. And don’t skip the maintenance.
So if you’re tired of window units, ductwork nightmares, or sky-high bills, take the plunge. Installing a ductless air conditioner might be the smartest home upgrade you’ve ever made. Your future self—and your wallet—will thank you.
Frequently Asked Questions
How do I know if my home is suitable for installing a ductless air conditioner?
Ductless air conditioners work best in homes without existing ductwork or in room additions. They require an exterior wall for the outdoor unit and sufficient electrical capacity. Most homes can accommodate a ductless system with minimal structural modifications.
What’s the average cost of installing a ductless air conditioner?
The cost to install a ductless air conditioner typically ranges from $3,000 to $8,000, depending on unit size, number of zones, and labor. While higher upfront than window units, they offer long-term energy savings and increased home value.
Can I install a ductless air conditioner myself to save money?
DIY installation is not recommended for ductless air conditioners due to refrigerant handling, electrical connections, and precise line-set requirements. Professional installation ensures proper performance, safety, and warranty compliance.
How long does it take to complete a ductless air conditioner installation?
A standard single-zone ductless air conditioner installation takes 4–8 hours. Multi-zone systems may require a full day or more, depending on complexity and access to the outdoor unit location.
What maintenance is required after installing a ductless air conditioner?
Regular maintenance includes cleaning the air filters monthly, checking the outdoor unit for debris, and scheduling annual professional servicing. Proper upkeep ensures optimal efficiency and extends the lifespan of your ductless system.
Are ductless air conditioners energy-efficient compared to central AC?
Yes, ductless air conditioners are highly energy-efficient because they avoid duct losses and allow zoning. Many models have SEER ratings of 20+ and ENERGY STAR® certification, reducing electricity costs by up to 30%.