

Featured image for install window air conditioner in sliding window
Image source: i.ytimg.com
Installing a window air conditioner in a sliding window is simple and secure with the right tools and preparation. Begin by measuring your window opening and selecting a compatible AC unit, then use a mounting bracket or support system to ensure a snug, weatherproof fit. Always prioritize safety by securing the unit properly and sealing gaps to maximize efficiency and prevent accidents.
Key Takeaways
- Measure your window first: Ensure the AC unit fits your sliding window dimensions precisely.
- Secure the AC properly: Use support brackets to prevent the unit from slipping or falling.
- Seal gaps with foam: Prevent air leaks by insulating edges with foam tape or panels.
- Angle for drainage: Tilt the unit slightly outward for proper condensation drainage.
- Check local codes: Verify installation meets safety and building regulations in your area.
- Test before finalizing: Run the AC to ensure stability, cooling, and noise levels are optimal.
📑 Table of Contents
- How to Install a Window Air Conditioner in a Sliding Window Easily
- Why Sliding Windows Need Special Attention for AC Installation
- Tools, Materials, and Safety: What You’ll Need
- Step-by-Step Installation Guide for Sliding Windows
- Common Mistakes and How to Avoid Them
- AC Kit Comparison: What Works Best for Sliding Windows?
- Final Thoughts: Cool Comfort Without the Hassle
How to Install a Window Air Conditioner in a Sliding Window Easily
Let’s face it—summer heat can be brutal, especially when your home doesn’t have central air. For many of us, a window air conditioner is the go-to solution. But what happens when you have sliding windows instead of the classic double-hung ones? I’ve been there. I remember standing in my living room, staring at my sleek sliding window, wondering if I’d need to call in a pro or break out power tools just to cool down. Spoiler: You don’t. Installing a window air conditioner in a sliding window is not only doable—it can be downright easy if you follow the right steps.
Whether you’re renting an apartment, living in a modern home, or just dealing with a unique window setup, this guide will walk you through everything you need to know. From choosing the right AC unit to sealing gaps and securing it safely, we’ll cover all the bases. And don’t worry—no engineering degree required. I’ll share my own trial-and-error lessons (yes, there was a brief moment when I thought the AC was going to fall out…), practical tips, and even a handy comparison table to help you pick the best setup for your space. By the end, you’ll feel confident enough to tackle this project solo—and save a few bucks while doing it.
Why Sliding Windows Need Special Attention for AC Installation
Sliding windows—also called horizontal sliding or glider windows—are common in modern homes, condos, and apartments. They open sideways, which makes them convenient but tricky when it comes to installing traditional window AC units. Unlike double-hung windows, which open vertically and allow the AC to rest on the sash, sliding windows don’t offer that natural support. That means you can’t just drop the unit in and close the window on top of it.
Visual guide about install window air conditioner in sliding window
Image source: i.pinimg.com
The Challenge of Weight and Support
Window ACs aren’t light. A typical 8,000–12,000 BTU unit can weigh anywhere from 45 to 75 pounds. If you try to install it like you would in a double-hung window—by placing it on the sill and closing the top sash—you’re asking for trouble. The sliding window doesn’t have a sash that locks down from above. Instead, it slides horizontally, so the AC has nothing to press against. Without proper support, the unit could tilt, vibrate, or worse—fall out.
One of my first attempts involved using foam blocks and a flimsy metal bracket. The AC worked… for about two hours. Then a gust of wind hit, and I heard a terrifying *thud* from outside. The unit had shifted, cracked the window frame, and nearly dropped onto my neighbor’s patio. Lesson learned: support is everything.
Airflow and Sealing Matter Too
Even if the AC stays put, poor sealing can ruin efficiency. Gaps around the unit let hot air in and cool air out, making your AC work harder and your electric bill rise. In sliding windows, these gaps are often larger because the window track and frame don’t align perfectly with the AC’s shape. Without proper sealing, you’re essentially cooling the outdoors.
Another issue? Condensation. When warm, humid air hits the cold surface of the AC, it drips. In a sliding window, this water can pool on the track or drip down the wall. Over time, that leads to mold, rot, and damage. So, sealing isn’t just about comfort—it’s about protecting your home.
Not All ACs Are Sliding-Window Friendly
Some window ACs are designed with sliding windows in mind. Look for models labeled “sliding window compatible” or “horizontal installation.” These often come with adjustable side panels (sometimes called accordion panels or filler kits) that extend to cover gaps. If your AC doesn’t have these, you’ll need to buy them separately—or get creative with foam, wood, or custom brackets.
Pro tip: Before buying, measure your window opening (width and height), and check the AC’s installation manual. Most manufacturers list compatible window types. If it says “double-hung only,” think twice—unless you’re ready for extra modifications.
Tools, Materials, and Safety: What You’ll Need
You don’t need a full workshop to install a window AC in a sliding window, but having the right tools and materials makes all the difference. Here’s my go-to list—based on what worked (and what didn’t) after three summers of trial and error.
Essential Tools and Materials
- Measuring tape: To get the exact window dimensions. Measure the width at the top, middle, and bottom—some windows are slightly tapered.
- Level: Ensures the AC sits evenly. A tilted unit leaks water and runs inefficiently.
- Screwdriver or drill: For securing brackets and screws.
- Utility knife: For trimming foam or insulation panels.
- Adjustable wrench: Useful if your AC comes with metal brackets that need tightening.
- Sliding window AC kit: These usually include side panels, mounting brackets, and screws. Brands like AC Safe, Frost King, and OEM kits from AC manufacturers are reliable. If your AC doesn’t come with one, buy it separately.
- Weatherstripping or foam tape: For sealing gaps. Closed-cell foam is best—it doesn’t absorb moisture.
- Wood or plastic support board: A 1×2 or 1×3 piece of lumber (cut to window width) that acts as a shelf. This is critical for supporting the AC’s weight.
- Silicone caulk (optional): For sealing small cracks around the frame. Use a waterproof, mold-resistant type.
- Work gloves and safety glasses: Protect your hands and eyes—especially when handling heavy units or cutting materials.
Safety First: Don’t Skip This
Installing a window AC involves lifting heavy objects at a height. If you’re on the second floor or higher, safety is non-negotiable.
- Work with a partner: Even a 50-pound AC can be awkward to lift alone. One person holds the unit while the other secures it.
- Clear the area below: Make sure no one is standing beneath the window. A dropped AC can cause serious injury.
- Use a step ladder or sturdy stool: Don’t stand on wobbly chairs or furniture. A 6-foot ladder is ideal for most second-story windows.
- Check the window track: Make sure it’s clean and slides smoothly. A jammed track can make installation harder—or cause the window to close improperly.
I once tried installing my AC alone, using a wobbly kitchen chair. Midway through, the chair tipped, and I dropped the unit onto the windowsill. It didn’t fall, but the impact cracked the plastic housing. Since then, I always use a ladder and a helper—even if it’s just for 10 minutes.
Optional but Helpful Extras
- Window seal kit with Velcro strips: Some kits use Velcro to attach foam panels to the window frame. It’s easier to remove and reuse than screws.
- AC cover for winter: Once the season’s over, cover the outside part of the AC to protect it from snow, rain, and debris.
- Drain pan: If your AC has a condensate drain, a small pan can catch drips and prevent water damage.
Bottom line: Prep is half the battle. Gather your tools, read the manual, and don’t rush. A few minutes of planning can save hours of frustration—and potential damage.
Step-by-Step Installation Guide for Sliding Windows
Now for the fun part—actually installing the AC. This step-by-step guide assumes you’re using a standard sliding window AC kit and a support board. Adjust as needed for your specific model, but the core principles remain the same.
Step 1: Measure and Prepare the Window
Start by measuring the window opening. Note the exact width and height. Open the sliding panel completely and clean the track. Remove any debris, dust, or old weatherstripping.
Next, measure the AC unit. Most kits include side panels that extend to fill gaps. If the gap between the AC and window frame is more than 2 inches on either side, you may need extra foam or a custom filler.
Pro tip: If your window is wider than the AC, don’t force the panels to stretch too far. Overextending can warp them or create gaps. Instead, cut a piece of rigid foam board to fill the space and secure it with tape or Velcro.
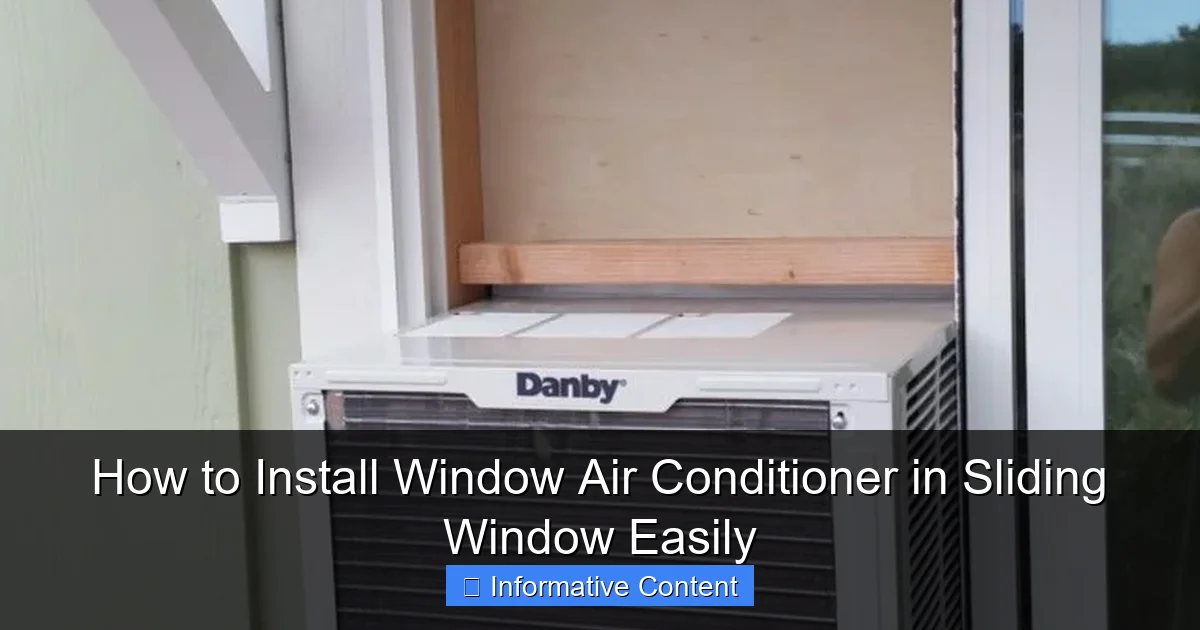
Step 2: Install the Support Board
This is the most important step. Cut a 1×2 or 1×3 board to match the width of your window opening. Place it horizontally on the windowsill, inside the room. It should extend from one side of the frame to the other, sitting flat on the sill.
Use the level to make sure it’s perfectly horizontal. If it’s tilted, the AC will lean, causing water leaks and poor airflow. Once level, secure it with screws driven into the sill. Don’t over-tighten—you don’t want to crack the wood.
Why this works: The board acts as a shelf. The AC sits on it, not on the fragile window frame. It distributes the weight evenly and prevents the unit from sliding forward or backward.
Step 3: Attach the Side Panels
Most AC kits come with accordion-style side panels. Unfold them and attach them to the sides of the AC unit using the included clips or screws. These panels expand to fill the gap between the AC and the window frame.
For sliding windows, you’ll typically attach them so they extend toward the fixed glass panel—not the sliding one. This creates a seal on the side where the window closes.
If your kit doesn’t include panels, use foam boards cut to size. Wrap them in plastic or foil tape to prevent moisture absorption. Secure with double-sided tape or Velcro strips.
Example: My 10,000 BTU Installation
My AC was 24 inches wide, but my window opening was 32 inches. The side panels extended to 28 inches, leaving 2-inch gaps. I cut two 2×24-inch strips of rigid foam, wrapped them in aluminum tape, and taped them to the sides. Worked like a charm—and I can reuse them next year.
Step 4: Position and Secure the AC
With a helper, lift the AC and place it on the support board. Slide it toward the fixed glass panel until the side panels touch the frame. Make sure the unit is level—check with your bubble level.
Now, secure it. Most kits include an L-bracket that attaches to the top of the AC and screws into the window frame. Drill pilot holes first to avoid cracking the wood. Tighten just enough to hold the AC steady—don’t over-screw.
If your AC has a front-facing bracket, use it. It prevents the unit from tilting forward when you open the window later.
Step 5: Close the Window and Seal Gaps
Carefully slide the window panel shut. It should press gently against the side panels or foam fillers. Don’t force it—if it’s too tight, adjust the panels or add more foam.
Once closed, check for gaps. Use weatherstripping or foam tape to seal any cracks around the top, sides, and bottom. Pay special attention to the area between the AC and the window track—this is a common leak spot.
For extra protection, run a bead of silicone caulk along the top edge where the AC meets the frame. Let it dry before turning the AC on.
Step 6: Test and Adjust
Plug in the AC and turn it on. Listen for vibrations or strange noises. If it rattles, the support board might be loose or the unit isn’t level.
Check for leaks. After running for 15 minutes, look for water dripping from the back or sides. If you see moisture, add more sealant or adjust the tilt slightly (the back should be 1/4 inch lower than the front to drain properly).
Finally, test the window. Open and close it slowly. If it sticks or the AC shifts, you may need to loosen the bracket or add padding.
Common Mistakes and How to Avoid Them
Even with a good guide, mistakes happen. Here are the most common pitfalls I’ve seen (and made)—and how to dodge them.
1. Skipping the Support Board
This is the #1 error. I’ve seen people try to install ACs directly on the sill, using only brackets to hold the weight. Big mistake. The sill can crack, the AC can tip, and the seal fails.
Solution: Always use a support board. It’s cheap, easy, and makes the installation safer and more stable.
2. Poor Sealing
Foam panels that don’t fit snugly, or gaps filled with loose towels, are inefficient. Hot air sneaks in, cool air escapes, and your AC runs constantly.
Solution: Use rigid foam, weatherstripping, or a full seal kit. Test the seal by holding a lit candle near the edges—if the flame flickers, there’s a draft.
3. Ignoring the Window Track
If the track is dirty or misaligned, the window won’t close properly. This creates gaps and makes the AC vibrate.
Solution: Clean the track with a vacuum and a damp cloth. Lubricate with silicone spray if it’s stiff.
4. Wrong AC Size
Too small, and it can’t cool the room. Too big, and it short-cycles, wasting energy and not dehumidifying well.
Solution: Use a BTU calculator. For most rooms, 20 BTUs per square foot is a good rule. A 200 sq ft room needs about 8,000 BTUs.
5. Forgetting About Condensation
Water pooling in the track can rot the wood and damage the wall.
Solution: Ensure the AC tilts slightly backward (1/4 inch). Use a drain pan if needed, and check the track weekly.
6. Not Testing Before Full Use
Some people plug in the AC and crank it to full blast right away. If there’s a leak or loose bracket, this can cause damage.
Solution: Run the AC on low for 30 minutes. Listen, check for leaks, and make adjustments before using it normally.
AC Kit Comparison: What Works Best for Sliding Windows?
Not all AC kits are created equal. I’ve tested several over the years, and here’s a quick comparison to help you choose the right one.
| Kit Name | Best For | Pros | Cons | Price Range |
|---|---|---|---|---|
| AC Safe Sliding Window Kit | Wide gaps, heavy ACs | Durable metal brackets, adjustable panels, includes support board | Bulky, requires drilling | $40–$60 |
| Frost King Foam Seal Kit | Budget installs, light ACs | Easy to cut, reusable, no tools needed | Less durable, can compress over time | $15–$25 |
| OEM Kit (from AC manufacturer) | Exact fit, best performance | Precise measurements, includes all hardware, warranty-friendly | Expensive, not always available | $50–$80 |
| DIY Foam + Velcro Kit | Custom setups, rentals | Removable, no damage to window, cheap | Less secure, not ideal for heavy ACs | $10–$20 |
My pick: For most people, the AC Safe kit is the sweet spot. It’s sturdy, easy to install, and handles wide gaps well. If you’re renting or want a no-drill option, go with the Frost King or DIY foam.
Final Thoughts: Cool Comfort Without the Hassle
Installing a window air conditioner in a sliding window isn’t as scary as it seems. With the right tools, a solid support board, and a good sealing strategy, you can have cool, quiet comfort in just a few hours. I’ve done it in apartments, condos, and even my own home—each time with better results.
Remember: the key is preparation. Measure twice, buy the right kit, and don’t skip the safety steps. A little extra time upfront saves headaches (and potential damage) later. And if you’re unsure, watch a few YouTube tutorials—sometimes seeing it in action makes all the difference.
Once it’s in, enjoy that crisp, cool air. Whether you’re binge-watching shows, working from home, or just trying to sleep through a heatwave, a well-installed AC makes summer bearable. So grab your tools, enlist a friend, and get ready to beat the heat—one sliding window at a time.
And hey, if you run into trouble? Don’t sweat it. We’ve all been there. Take a breath, double-check the steps, and keep going. You’ve got this.
Frequently Asked Questions
Can I install a window air conditioner in a sliding window?
Yes, you can install a window air conditioner in a sliding window using a support bracket or foam side panels to secure the unit. Many modern ACs come with sliding window installation kits to ensure a safe, snug fit.
What tools do I need to install a window air conditioner in a sliding window?
You’ll typically need a measuring tape, screwdriver, support bracket (often included), foam insulation panels, and safety brackets. Some installations may also require a drill or level for proper alignment.
How do I secure an air conditioner in a sliding window without gaps?
Use adjustable side panels or foam seals provided in the AC’s installation kit to close gaps around the unit. For extra security, install a support brace under the AC and lock the window track to prevent movement.
Is it safe to install a window air conditioner in a sliding window?
Yes, as long as you use a sturdy support bracket and follow the manufacturer’s instructions. Ensure the sliding window frame is structurally sound and the AC is properly sealed to prevent leaks or falls.
How to install window air conditioner in sliding window without drilling?
Use a no-drill installation kit with adjustable side panels and a pressure-mounted support brace. These kits rely on tension and foam seals to hold the AC securely without damaging the window frame.
What size air conditioner fits a sliding window?
Measure your sliding window’s height and width, then check the AC’s minimum and maximum window requirements. Most window ACs are designed to fit sliding windows ranging from 24 to 36 inches wide.