
Featured image for install split system air conditioner
Image source: mepacademy.com
Installing a split system air conditioner like a pro starts with precise placement and proper mounting of both indoor and outdoor units to ensure optimal airflow and efficiency. Follow manufacturer guidelines closely, use quality materials, and always prioritize safety by turning off power and securing refrigerant lines correctly. A professional-grade installation not only boosts performance but also extends the unit’s lifespan and prevents costly repairs down the road.
Key Takeaways
- Plan carefully: Choose optimal indoor and outdoor unit locations for efficiency and airflow.
- Hire a pro: Refrigerant handling and electrical connections require licensed expertise.
- Seal gaps: Prevent leaks by properly insulating and sealing refrigerant lines.
- Level units: Ensure indoor and outdoor units are perfectly level during mounting.
- Test thoroughly: Run system checks and measure airflow before finalizing installation.
- Follow codes: Always adhere to local building and safety regulations for compliance.
📑 Table of Contents
- Why Installing a Split System Air Conditioner Is Easier Than You Think
- Understanding Your Split System: The Basics Before You Begin
- Planning Your Installation: Location, Location, Location
- Step-by-Step Installation: From Mounting to Wiring
- Common Mistakes and How to Avoid Them
- Maintenance and Long-Term Care
- Cost and Efficiency: What to Expect
- Final Thoughts: You’ve Got This!
Why Installing a Split System Air Conditioner Is Easier Than You Think
Remember that sweltering summer day when your old window AC unit finally gave up? You stood there, sweat dripping down your back, wondering if you’d ever feel cool again. I’ve been there too. That’s when I discovered split system air conditioners—and how surprisingly doable they are to install, even if you’re not a pro.
Split system ACs are the unsung heroes of home cooling. They’re sleek, quiet, and way more efficient than those bulky window units. But the idea of installing one can feel intimidating. After all, it involves drilling holes, running refrigerant lines, and connecting electrical wires. Sounds like a job for a licensed HVAC technician, right?
Well, not necessarily. With the right tools, a bit of patience, and a solid plan, you can install a split system air conditioner like a pro—and save a few hundred dollars in labor costs. I’ve installed three of these in my own home, and I’m here to walk you through every step. Whether you’re a DIY enthusiast or just want to understand the process before hiring someone, this guide will give you the confidence to tackle the job (or at least know what to expect).
Understanding Your Split System: The Basics Before You Begin
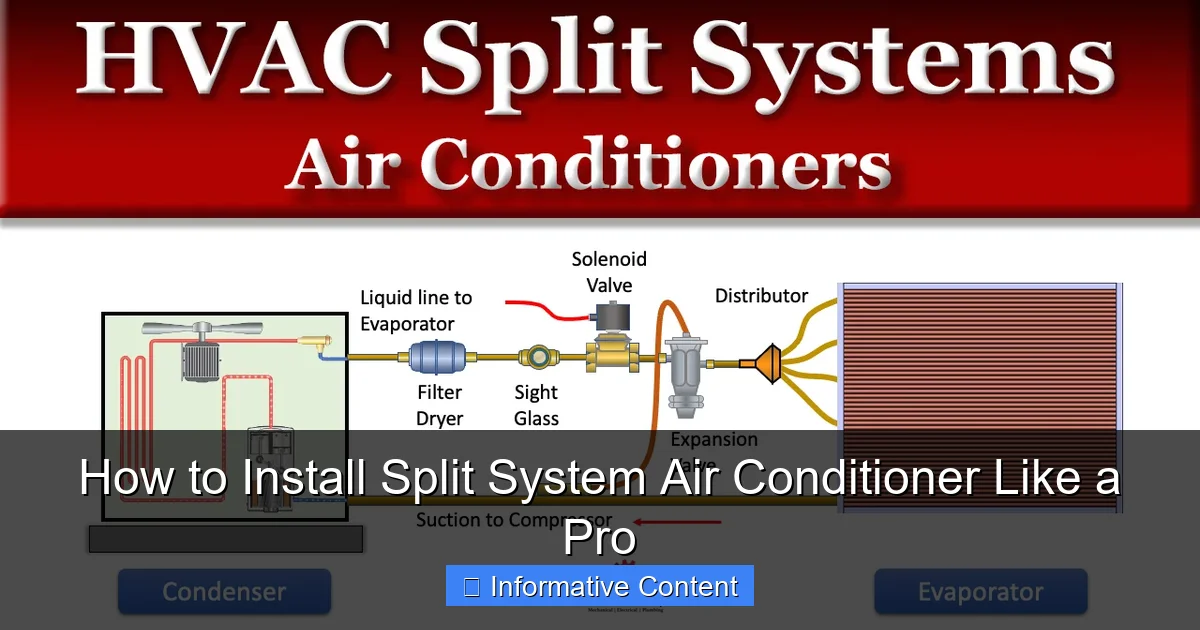
Before you grab your drill, let’s get familiar with the two main parts of a split system: the indoor unit (also called the air handler or evaporator) and the outdoor unit (the condenser). These are connected by copper refrigerant lines, a condensate drain line, and electrical wiring—all housed in a protective conduit. Think of it like a team: the indoor unit pulls in warm air and cools it, while the outdoor unit releases the heat outside.
Visual guide about install split system air conditioner
Image source: i.pinimg.com
Types of Split Systems
Not all split systems are created equal. Here’s a quick rundown of the most common types you’ll encounter:
- Mini-Split (Single-Zone): One indoor unit paired with one outdoor unit. Perfect for cooling a single room or a small apartment. I used this for my home office—quiet and efficient.
- Multi-Split: One outdoor unit connects to multiple indoor units. Great for whole-home cooling without the ductwork. My neighbor installed this in his two-story house and loves it.
- Ductless Mini-Split: Same as a mini-split, but specifically marketed for retrofitting older homes. No ducts = no mess, no loss of efficiency.
Pro tip: If you’re cooling just one or two rooms, a mini-split is your best bet. Multi-splits are more complex (and expensive), so unless you’re doing a full-home upgrade, stick with single-zone.
What’s Included in the Kit?
Most split system kits come with:
- Indoor unit (wall-mounted or ceiling cassette)
- Outdoor unit (condenser)
- Pre-charged refrigerant lines (typically 15–25 feet)
- Drain hose (for condensate)
- Remote control and mounting hardware
- Insulated line set cover (optional but recommended)
Some kits include the mounting bracket and wall sleeve. Always check the box contents before starting. I once opened a kit missing the wall sleeve—had to order it separately, which delayed the job by a week. Not fun.
Know Your Tools
You don’t need a full HVAC toolkit, but here’s what you’ll want on hand:
- Drill and masonry bit (for drilling through walls)
- Level (critical for proper drainage)
- Wrench set (for refrigerant line connections)
- Vacuum pump (for evacuating air from refrigerant lines)
- Manifold gauge set (to monitor pressure)
- Insulated screwdrivers and wire strippers
- Measuring tape and marker
Don’t skip the vacuum pump. It’s essential for removing moisture and air from the refrigerant lines—skip it, and you’ll risk poor performance or even compressor damage.
Planning Your Installation: Location, Location, Location
You wouldn’t buy a house without checking the neighborhood, right? Same goes for your AC. The placement of both indoor and outdoor units can make or break your system’s efficiency and lifespan.
Choosing the Indoor Unit Spot
The indoor unit should be:
- High on an interior wall (at least 7 feet up) to allow cold air to sink evenly.
- Centered in the room for balanced airflow. Avoid corners or near furniture that blocks airflow.
- Near an exterior wall so the refrigerant lines can run straight out to the condenser. This minimizes bends and reduces friction in the lines.
- At least 6 inches from the ceiling to allow proper air intake and discharge.
My first mistake? Installing the unit too low. The cold air pooled near the floor, and the room felt uneven. Lesson learned: follow the 7-foot rule.
Outdoor Unit Placement Tips
The condenser needs space to breathe. Here’s what to look for:
- Level ground—use a concrete pad or a sturdy metal stand. Never place it on grass or soil (it can sink).
- At least 12 inches of clearance on all sides for airflow. More is better, especially on the intake side.
- Away from direct sunlight if possible. Shade improves efficiency, especially in hot climates.
- Protected from debris—keep it clear of leaves, snow, and falling branches.
One friend placed his condenser under a tree for shade. Great idea—until fall came. Leaves clogged the fins, and airflow dropped by 30%. Now he uses a simple mesh cover.
Line Set Routing and Wall Penetration
The refrigerant lines, drain hose, and power cable run from the indoor to the outdoor unit through a hole in the wall. Here’s how to do it right:
- Use a 3-inch hole saw for the wall penetration. This gives you enough room for all three lines plus insulation.
- Drill at a slight downward angle (about 1/4 inch per foot) to help condensate drain outside.
- Seal the hole with expanding foam or silicone sealant to prevent air leaks and pests.
- Route lines as straight as possible—sharp bends reduce refrigerant flow and efficiency.
I once had to reroute lines because I drilled through a load-bearing beam. Oops. Always check your home’s blueprints or use a stud finder with a metal/pipe detection mode.
Step-by-Step Installation: From Mounting to Wiring
Now the fun begins. Let’s break it down into clear, manageable steps. I’ll share what worked for me—and what I’d do differently next time.
Mounting the Indoor Unit
- Use the template provided (or trace the mounting bracket) and mark the wall. Double-check with a level.
- Drill pilot holes and secure the bracket with wall anchors. I used toggle bolts for extra support in drywall.
- Hang the indoor unit on the bracket. It should click into place—listen for it.
- Connect the condensate drain hose. Attach it to the unit’s outlet and run it toward the wall hole. Use a slight downward slope (no dips or loops).
Tip: Don’t overtighten the bracket screws. The unit should sit flush but not warp the casing.
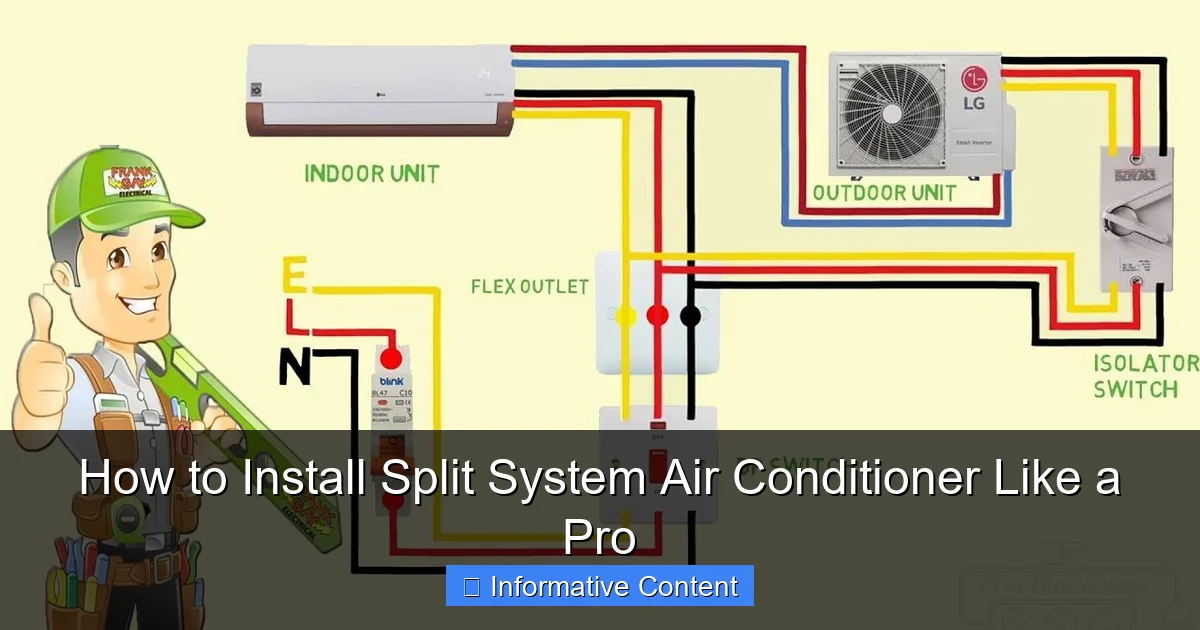
Running the Line Set and Wiring
- Feed the refrigerant lines, drain hose, and power cable through the wall hole from inside to outside. Use a fish tape if needed.
- On the outside, connect the lines to the outdoor unit’s service valves. Use a torque wrench (follow the manufacturer’s specs) or tighten by hand and give it a 1/8 turn with a wrench.
- Secure the lines to the wall with insulated clamps every 18–24 inches. Avoid metal-on-metal contact.
- Connect the electrical wiring. Most units need a dedicated 240V circuit. Match the wires (usually red, black, and green) to the terminals. Tighten securely.
Warning: Never connect the refrigerant lines until the system is ready for vacuuming. Exposure to air can damage the compressor.
Mounting the Outdoor Unit
- Place the condenser on its pad or stand. Level it with shims if needed.
- Secure the unit with bolts or brackets (if provided).
- Connect the refrigerant lines to the service valves. Again, hand-tighten first, then a 1/8 turn with a wrench.
- Attach the drain hose (if the unit has a secondary drain).
My pro tip: Wrap the refrigerant lines in foam insulation (included or sold separately). This protects against condensation and improves efficiency.
Evacuating the Refrigerant Lines
This step is critical. Air and moisture in the lines can cause ice buildup, reduced cooling, or even compressor failure.
- Attach the manifold gauge hoses to the service ports on both units.
- Connect the vacuum pump to the center hose.
- Open the gauge valves and turn on the pump. Run it for at least 30 minutes (longer for longer line sets).
- Check the pressure—it should read below 500 microns. Hold for 15 minutes to confirm no leaks.
- Close the valves and disconnect the pump.
Don’t rush this. I once skipped the 30-minute vacuum and ended up with a system that cooled poorly. Learned my lesson the hard way.
Charging the System and Testing
Most kits come pre-charged, but you’ll need to open the valves to release the refrigerant.
- Slowly open the service valves on both units using the valve stem key.
- Turn on the power and set the thermostat to cool.
- Let the system run for 15–20 minutes. Check for cool air, even airflow, and no leaks.
- Use the manifold gauges to check pressure and temperature. Compare to the manufacturer’s specs.
If everything looks good, seal the service ports with caps. Congrats—you’re done!
Common Mistakes and How to Avoid Them
Even pros make mistakes. Here are the ones I’ve seen (and made)—and how to steer clear.
Drilling the Wrong Hole
Drilling into a stud, pipe, or electrical wire can be dangerous. Always:
- Use a stud finder with deep-scan mode.
- Check for pipes and wires before drilling.
- Start with a small pilot hole to confirm the path.
One installer I know drilled through a gas line. The repair cost more than the AC unit. Ouch.
Ignoring the Level
An unlevel indoor unit can cause:
- Poor condensate drainage (leading to leaks).
- Strange noises from the fan.
- Reduced airflow.
Always use a level on the mounting bracket and the unit itself.
Skipping the Vacuum
As I mentioned, this is a dealbreaker. Moisture in the lines can freeze and block refrigerant flow. Always vacuum for at least 30 minutes.
Overlooking the Drain
The condensate drain must slope downward. If it’s flat or uphill, water will back up and leak. Use a level to check the slope (aim for 1/4 inch per foot).
Improper Refrigerant Line Bending
Sharp bends create resistance and reduce efficiency. Use a pipe bender (or your hands) to make smooth, gradual curves. No kinks!
Maintenance and Long-Term Care
Your split system will last 15–20 years with proper care. Here’s how to keep it running smoothly.
Cleaning the Filters
Most indoor units have washable filters. Clean them every 2–4 weeks during peak use. Just:
- Remove the front panel.
- Take out the filter.
- Rinse with water (no soap).
- Dry completely before reinstalling.
Dirty filters reduce airflow and make the system work harder—raising your energy bill.
Checking the Condenser Coils
Once a year (spring is ideal), clean the outdoor unit’s coils:
- Turn off the power.
- Remove debris from the fins with a soft brush.
- Spray with a coil cleaner (available at hardware stores).
- Rinse with water (use low pressure).
Dirty coils can cut efficiency by up to 30%. Not worth it.
Monitoring Performance
Pay attention to:
- Cooling speed (should take 10–15 minutes to cool the room).
- Unusual noises (buzzing, rattling).
- Condensate leaks (check the indoor unit and drain pan).
If something feels off, don’t ignore it. Small issues can become big (and expensive) problems.
Cost and Efficiency: What to Expect
Let’s talk numbers. Here’s a realistic breakdown of what you’ll spend and save.
Installation Cost Comparison
| Method | Cost Range | Time Required | Best For |
|---|---|---|---|
| DIY Installation | $200–$400 (tools + permits) | 6–12 hours | Experienced DIYers, single-zone systems |
| Professional Installation | $800–$2,500 | 4–8 hours | Multi-splits, complex routing, code compliance |
| Hybrid (DIY + Pro Help) | $400–$800 | 4–6 hours (you prep, pro finishes) | Those who want to save money but need help with tricky steps |
Note: Permits and electrical work may add $100–$300. Always check local codes.
Energy Efficiency and Savings
Split systems are 30–50% more efficient than window units. A typical 12,000 BTU unit uses about 1,200 watts per hour. At $0.15/kWh, that’s $0.18 per hour to run. Compare that to a 1,500-watt window AC at $0.225/hour.
Over a 90-day cooling season (5 hours/day), you’ll save about $20–$30 per unit. Not huge, but it adds up—and you get quieter, better-looking cooling.
Final Thoughts: You’ve Got This!
Installing a split system air conditioner isn’t rocket science. It’s a mix of careful planning, steady hands, and a willingness to learn. I won’t sugarcoat it—there will be moments of frustration (like when I dropped a wrench into the wall cavity). But the payoff is huge: a cool, quiet, energy-efficient home.
Remember, every expert was once a beginner. Take your time, follow the steps, and don’t skip the vacuum. If you’re unsure about electrical or refrigerant work, call a pro. There’s no shame in asking for help.
And when you finally turn on that remote and feel the first blast of cool air? It’s pure magic. You did that. You installed a split system air conditioner like a pro. Now go enjoy your cool, comfortable space—and maybe treat yourself to an ice-cold drink. You’ve earned it.
Frequently Asked Questions
How do I install a split system air conditioner myself?
While DIY installation is possible, it requires technical skills like refrigerant handling and electrical wiring. For safety and warranty compliance, hiring a licensed HVAC technician to install your split system air conditioner is often recommended.
What tools are needed to install a split system air conditioner?
You’ll need a drill, level, pipe cutter, vacuum pump, manifold gauge set, and electrical testers. Proper tools ensure precise mounting, refrigerant line sealing, and electrical safety during installation.
Can I install a split system air conditioner without professional help?
Some DIY-friendly models exist, but local codes and refrigerant handling laws may require a certified technician. Always check regulations—incorrect installation can void warranties or cause system failure.
Where is the best location to install a split system air conditioner?
The indoor unit should be on an exterior wall, away from direct sunlight and heat sources, while the outdoor unit needs clear airflow and stable ground. Proper placement maximizes efficiency and airflow.
How long does it take to install a split system air conditioner?
A standard installation takes 4–8 hours, depending on complexity, wall type, and refrigerant line length. Additional time may be needed for electrical upgrades or custom mounting solutions.
What are common mistakes when installing a split system air conditioner?
Incorrect refrigerant line sizing, poor drainage slope, and improper electrical connections are frequent errors. These issues reduce efficiency, cause leaks, or damage the compressor—always follow the manufacturer’s guidelines.