
Featured image for install rv air conditioner
Image source: outdoorbits.com
Installing an RV air conditioner is a straightforward DIY project that ensures cool comfort on the road. With the right tools, a compatible unit, and careful attention to roof measurements and electrical requirements, you can complete the installation in just a few hours—saving money and enhancing your travel experience. Always follow manufacturer instructions and prioritize safety when working with electrical and rooftop components.
Key Takeaways
- Measure carefully: Ensure correct AC unit size for your RV roof opening.
- Power off first: Always disconnect power before starting installation.
- Seal properly: Use butyl tape to prevent leaks and ensure a tight fit.
- Secure wiring: Follow manufacturer guidelines for safe, correct electrical connections.
- Test thoroughly: Run the AC before finalizing to check cooling and stability.
- Maintain regularly: Clean filters and inspect seals for long-term efficiency.
📑 Table of Contents
- Why a Proper RV Air Conditioner Installation Matters
- Choosing the Right RV Air Conditioner for Your Needs
- Tools and Materials You’ll Need for Installation
- Step-by-Step: How to Install RV Air Conditioner (Rooftop)
- Testing, Troubleshooting, and Maintenance Tips
- Data Table: RV Air Conditioner Comparison (Top Models for 2024)
- Final Thoughts: Enjoy Cool Comfort on the Road
Why a Proper RV Air Conditioner Installation Matters
Imagine this: You’re on a cross-country road trip, the sun is blazing, and your RV feels more like an oven than a home on wheels. You’ve packed snacks, planned your stops, and even downloaded that new podcast series—but you forgot one crucial thing: a properly installed RV air conditioner. One minute you’re sipping lemonade and enjoying the view, and the next you’re wiping sweat off your brow, wondering if you’ll survive the next rest stop.
This is where a well-installed RV air conditioner becomes your best friend. It’s not just about comfort—it’s about safety, energy efficiency, and preserving the integrity of your RV. Whether you’re a weekend warrior or a full-time nomad, knowing how to install RV air conditioner systems correctly can save you time, money, and a whole lot of frustration. And while it might sound intimidating, I’ve been there—sweaty tools in hand, manual in one hand, YouTube tutorial on my phone—and I can tell you: it’s absolutely doable with the right guidance.
In this guide, I’ll walk you through everything you need to know—from choosing the right unit to sealing it properly and testing it for peak performance. No fluff, no sales pitches—just real, practical advice based on real experiences. So grab a cold drink, roll up your sleeves, and let’s get your RV cool and comfy.
Choosing the Right RV Air Conditioner for Your Needs
Before you even think about drilling holes or lifting heavy units, you need to pick the right air conditioner. Not all RVs are the same, and neither are their cooling needs. A wrong choice here can lead to poor performance, wasted energy, or even damage to your rig. So let’s break it down step by step.

Visual guide about install rv air conditioner
Image source: gorvlifestyle.com
Understand Your RV’s Roof Size and Weight Capacity
Every RV has a roof load rating—this is the maximum weight your roof can safely support. Most standard RV air conditioners weigh between 70 and 100 pounds. But if you’re adding a second unit or upgrading to a high-capacity model, you need to check your RV’s specs. For example, a 15,000 BTU unit might weigh 95 lbs, while a 13,500 BTU model could be around 75 lbs.
Here’s a tip: Check your RV manual or contact the manufacturer. If your roof is older or has had previous modifications, it might not handle the extra weight. I once helped a friend install a dual-zone AC on a 10-year-old Class C—turns out the roof had weakened over time. We ended up reinforcing it with additional crossbars before installing. Better safe than soggy!
BTU Rating: Match Cooling Power to RV Size
BTUs (British Thermal Units) measure cooling capacity. The general rule of thumb:
- Up to 25 feet: 13,500 BTU
- 25–35 feet: 15,000 BTU
- Over 35 feet: Consider dual units or a 15,000 BTU with ducted airflow
But don’t just go by length. Think about your RV’s insulation, sun exposure, and how many people will be inside. A well-insulated Airstream in Oregon might need less cooling than a poorly insulated fifth wheel in Arizona. I learned this the hard way when I assumed a 13,500 BTU would work in my 30-foot motorhome during a Texas heatwave. Spoiler: It didn’t. We upgraded to 15,000 BTU, and the difference was night and day.
Types of RV Air Conditioners: Rooftop vs. Portable
There are two main types:
- Rooftop units: Permanent, efficient, and the most common. They mount on the roof and connect to your RV’s ductwork or ceiling vents.
- Portable units: Plug-and-play, no installation required. But they’re less efficient, take up floor space, and need to vent through a window or door.
For long-term comfort and energy savings, rooftop is the way to go. Portable units are great as backups or for small trailers, but they won’t cut it in extreme heat. Plus, they use more power per BTU—meaning higher electricity bills at campgrounds.
Features to Look For: Quiet Operation, Energy Efficiency, and Smart Controls
Modern RV ACs come with features that make life easier:
- Low-noise compressors: Look for units with decibel ratings under 60 dB. Trust me, you don’t want a loud hum keeping you up at night.
- Energy efficiency (EER rating): Aim for an EER of 10 or higher. This means less strain on your generator or shore power.
- Heat pumps: Some units double as heaters in cooler months—perfect for shoulder seasons.
- Smart thermostats: Allow remote control via smartphone apps. Great if you want to cool down your RV before you get back from a hike.
One of my favorite upgrades was switching to a variable-speed compressor AC. It adjusts cooling output based on demand, so it’s quieter and more efficient. It cost a bit more upfront, but the comfort and savings were worth it.
Tools and Materials You’ll Need for Installation
Now that you’ve picked your unit, it’s time to gather your gear. A smooth install starts with having everything ready. Nothing worse than being halfway through and realizing you’re missing a critical tool.
Essential Tools
- Ladder: Tall enough to safely reach your RV roof. A 6-foot step ladder usually works, but for taller RVs, consider an extension ladder.
- Drill and bits: You’ll need a cordless drill with a variety of bits, including a hole saw for the ceiling cutout.
- Socket wrench set: For tightening mounting bolts and brackets.
- Jigsaw or reciprocating saw: To cut the ceiling opening (if not using a template).
- Measuring tape: Precision matters—measure twice, cut once!
- Level: Ensures your AC sits flat and doesn’t leak.
- Utility knife: For trimming insulation or sealant.
- Safety gear: Work gloves, safety glasses, and non-slip shoes. Roof work can be dangerous.
Materials and Supplies
- Roof sealant: Use non-hardening, UV-resistant RV roof sealant (like Dicor or EternaBond). Avoid regular silicone—it cracks over time.
- Butyl tape: Used between the AC base and roof for a flexible, waterproof seal.
- Ceiling mounting kit: Most ACs come with one, but double-check. It includes the ceiling assembly, bolts, and trim ring.
- Wire connectors (wire nuts): For connecting power wires.
- Electrical tape: Extra insulation on wire joints.
- Insulation foam or foam tape: To seal gaps around the ceiling unit.
- Vacuum cleaner: To clean up dust and debris after cutting.
Pro Tip: Work in Cool Weather
Install on a cool, dry day. Hot roofs can cause sealants to cure too fast, leading to cracks. I once tried installing in 95°F heat—the sealant started hardening before I could smooth it out. Not good. Now I wait for morning or late afternoon, even if it means delaying the project by a day.
Have a Helper (or Two)
Even if you’re a solo DIYer, having someone to hand you tools, hold the ladder, or help lift the AC is a game-changer. Rooftop units are heavy and awkward. I once dropped a corner of my AC onto the roof (thankfully, no damage), but it could’ve been worse. A helper also lets you double-check measurements and alignment.
Step-by-Step: How to Install RV Air Conditioner (Rooftop)
Alright, let’s get into the nitty-gritty. This is where you’ll spend most of your time, so take it slow. Rushing leads to mistakes—and mistakes lead to leaks or electrical issues.
Step 1: Choose the Right Location
Most RVs have a pre-cut hole or designated AC spot. Check your roof for:
- A square or rectangular cutout (usually 14” x 14”)
- Existing ductwork (if your RV is ducted)
- Clearance from roof vents, skylights, or solar panels
If there’s no existing hole, use your AC’s template (included in the manual) to mark the spot. Make sure it’s centered over a roof beam for support. Use a stud finder or tap gently to locate beams.
Step 2: Remove the Old Unit (If Applicable)
If you’re replacing an old AC:
- Turn off RV power at the main breaker.
- Remove the ceiling assembly from inside the RV.
- Unplug the power wires and disconnect ducting (if ducted).
- On the roof, remove mounting bolts and carefully lift off the old unit. Have a helper!
- Clean the roof surface—scrape off old sealant and debris.
Tip: Take photos as you go. It helps with reassembly and troubleshooting.
Step 3: Prepare the Roof Opening
For a new installation:
- Trace the template on the roof.
- Use a hole saw to cut the 14” x 14” opening. Go slowly to avoid cracking the fiberglass.
- Remove insulation carefully—don’t let it fall into the RV.
- Vacuum the area to remove dust.
Pro tip: Place a piece of cardboard or plastic under your cutting area to catch debris and protect the RV interior.
Step 4: Apply Sealant and Butyl Tape
This is where most leaks happen—so don’t skip this step.
- Run a continuous bead of roof sealant around the perimeter of the AC base.
- Add a layer of butyl tape on top of the sealant. This creates a flexible, waterproof barrier.
- Make sure the tape overlaps at corners to prevent gaps.
I like to use a putty knife to smooth the sealant evenly. It looks better and seals better.
Step 5: Lift and Position the AC Unit
With a helper, carefully lift the AC onto the roof. Align it with the opening. Lower it slowly—don’t force it. The base should sit flush with the roof.
Check for level using a spirit level. Adjust by adding thin shims under the base if needed. Uneven units can cause condensation leaks.
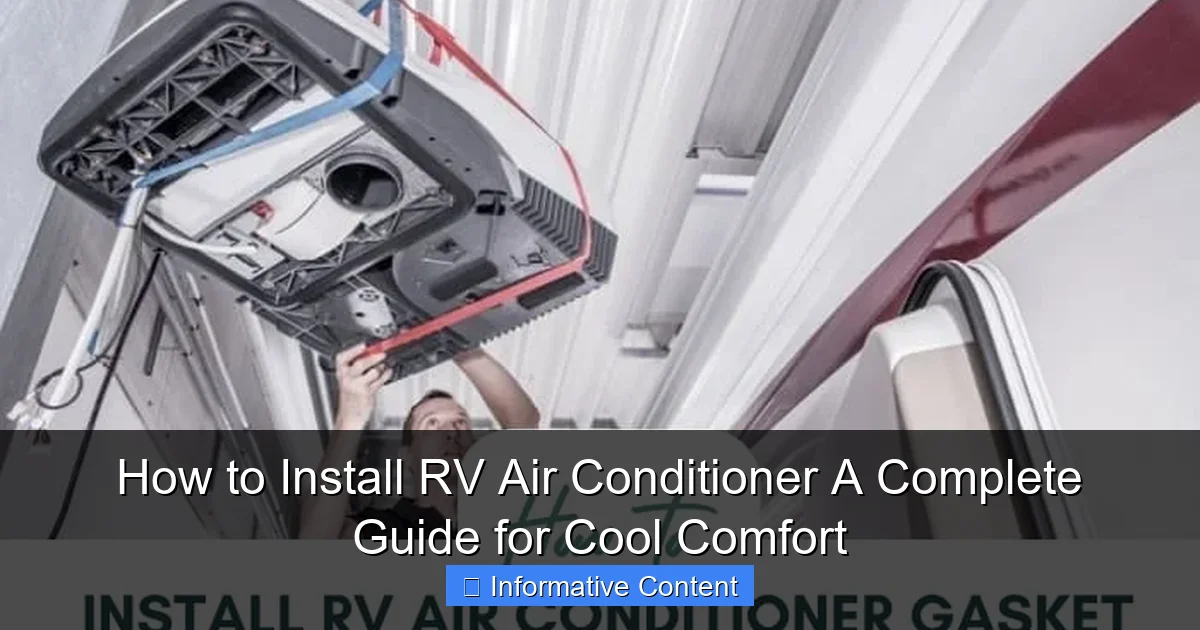
Step 6: Secure the AC and Connect Wiring
From inside the RV:
- Insert the ceiling assembly through the roof hole.
- Attach the mounting bolts and tighten evenly (don’t overtighten—it can crack the roof).
- Connect the power wires (black to black, white to white, green to ground). Use wire nuts and wrap with electrical tape.
- Reconnect ducting if your RV has a ducted system.
- Snap the ceiling trim into place.
Double-check all connections. A loose wire can cause arcing or fire hazards.
Step 7: Final Seal and Trim
Back on the roof:
- Apply another bead of sealant around the base, covering the bolts.
- Smooth it out with a putty knife or gloved finger.
- Let it cure for 24–48 hours before testing.
Optional: Add a UV-protective coating (like RV roof coating) over the sealant for extra durability.
Testing, Troubleshooting, and Maintenance Tips
You’re almost done! But don’t power it on just yet. A proper test ensures everything works safely.
Initial Test Run
- Turn on RV power and set the thermostat to “Cool.”
- Set the temperature 10–15°F below room temp.
- Listen for the compressor to kick in (usually after 30–60 seconds).
- Feel the air coming from the vents—it should be cool, not just ambient.
If nothing happens, check:
- Breakers and fuses
- Thermostat settings
- Wiring connections
- Power supply (use a multimeter to check voltage at the unit)
Common Issues and Fixes
- AC won’t start: Could be a tripped breaker, loose wire, or faulty thermostat. Check connections first.
- Weak airflow: Clogged filter, blocked vents, or duct damage. Clean the filter and inspect ducts.
- Water leaks inside: Usually due to poor roof sealing or a clogged drain tube. Recheck sealant and clear the drain.
- Loud noises: Loose parts, fan issues, or compressor problems. Tighten bolts and lubricate fan motor if accessible.
Regular Maintenance for Longevity
To keep your AC running smoothly:
- Clean the filter monthly: Rinse with water and let it dry. A dirty filter reduces efficiency.
- Inspect roof sealant every 6 months: Look for cracks or peeling. Reapply if needed.
- Clear debris from the roof unit: Leaves, dirt, and bugs can block airflow.
- Check wiring annually: Look for frayed wires or corrosion.
I keep a small maintenance log in my RV—dates of filter cleaning, sealant checks, etc. It helps me stay on top of things and catch issues early.
Data Table: RV Air Conditioner Comparison (Top Models for 2024)
| Model | BTU | Weight (lbs) | Noise Level (dB) | EER Rating | Special Features | Best For |
|---|---|---|---|---|---|---|
| Dometic Brisk II | 13,500 | 77 | 62 | 10.2 | Low profile, easy install | Small to mid-size RVs |
| Atwood 15K | 15,000 | 95 | 60 | 11.5 | High efficiency, heat pump option | Larger RVs, hot climates |
| Furrion Chill | 14,500 | 88 | 58 | 12.0 | Smart thermostat, Wi-Fi control | Tech-savvy travelers |
| Maxxair MaxxFan Plus | 13,500 (fan + AC) | 82 | 64 | 10.8 | Integrated vent fan, remote control | RVs with limited roof space |
| Airxcel Mach 15 | 15,000 | 90 | 61 | 11.2 | Corrosion-resistant, long warranty | Coastal or humid areas |
Note: EER (Energy Efficiency Ratio) = BTU / Watts. Higher EER = more efficient. All models fit standard 14” x 14” roof openings.
Final Thoughts: Enjoy Cool Comfort on the Road
Installing an RV air conditioner isn’t just a project—it’s an investment in your comfort, safety, and overall RV experience. I remember the first time I powered on my newly installed AC after a long day in the sun. That first blast of cold air? Pure joy. It made the whole journey feel like a vacation, not a survival mission.
Yes, the process takes time. You’ll need patience, the right tools, and maybe a little help. But once it’s done, you’ll have a reliable cooling system that keeps you comfortable for years. And the best part? You did it yourself. There’s a real sense of pride in knowing how to install RV air conditioner units properly—and in being able to fix or upgrade it down the road.
Remember: Take your time with the sealant. Check your wiring twice. Test before you celebrate. And always prioritize safety—especially when working on a roof. A small mistake can lead to big problems, but a careful, methodical approach leads to lasting results.
Whether you’re upgrading an old unit, adding a second AC for a larger RV, or installing your very first one, you’ve got this. The road ahead is cooler, quieter, and much more enjoyable. So go ahead—hit the road, explore new places, and stay cool while you do it.
Happy travels, and stay frosty out there.
Frequently Asked Questions
How do I install an RV air conditioner for the first time?
To install an RV air conditioner, start by selecting the correct unit size for your RV’s roof opening and electrical system. Follow the manufacturer’s instructions for mounting, sealing, and wiring to ensure a secure and weatherproof fit.
What tools do I need to install an RV air conditioner?
Basic tools include a screwdriver, drill, socket wrench, wire strippers, and a caulking gun for sealing. You may also need a voltage tester to confirm proper electrical connections during the install RV air conditioner process.
Can I install an RV air conditioner myself, or do I need a professional?
Most DIYers can install an RV air conditioner with basic mechanical skills and safety precautions. However, if you’re unsure about electrical work or roof modifications, consult a professional to avoid damage or hazards.
How do I ensure my RV air conditioner is properly sealed during installation?
Use high-quality butyl tape or RV roof sealant around the base of the unit to prevent leaks. Tighten mounting brackets evenly and recheck seals after a few days to account for settling.
What size air conditioner do I need for my RV?
Measure your RV’s roof opening and match it to a compatible unit (e.g., 14″ x 14″ standard). Consider BTU ratings—13,500–15,000 BTUs work well for most RVs—to ensure efficient cooling.
How do I connect the electrical wiring when installing an RV air conditioner?
Turn off power at the source, then connect the AC unit’s wiring to your RV’s breaker panel using the gauge specified in the manual. Double-check connections to avoid short circuits or overloads during the install RV air conditioner process.