
Featured image for install portable air conditioner
Image source: coolandportable.com
Installing a portable air conditioner is quick and hassle-free with the right setup—just ensure your window kit fits, the unit is near a power source, and the exhaust hose is properly vented. Follow these five straightforward steps to cool your space efficiently in under 30 minutes, no professional help needed.
Key Takeaways
- Choose the right size: Match BTU to room size for optimal cooling.
- Vent properly: Use the included kit to seal the exhaust hose securely.
- Clear drainage: Empty the water tank or set up continuous drainage.
- Insulate the window: Seal gaps to prevent hot air from re-entering.
- Maintain airflow: Keep vents unobstructed for efficient performance.
📑 Table of Contents
- Why Portable Air Conditioners Are a Game-Changer
- Step 1: Choose the Right Location and Prepare Your Space
- Step 2: Set Up the Exhaust Hose and Window Kit
- Step 3: Manage Condensation and Drainage
- Step 4: Power Up and Test Your Setup
- Step 5: Optimize for Comfort and Efficiency
- Data Table: Portable AC Installation Checklist
- Final Thoughts: Cool Comfort Made Simple
Why Portable Air Conditioners Are a Game-Changer
Let’s be honest—summer heat can feel like a personal attack. Whether you’re working from home, trying to sleep, or just relaxing on the couch, a hot, stuffy room can ruin your day. That’s where portable air conditioners come in. They’re not just convenient—they’re a smart, flexible solution for cooling specific spaces without the high cost or permanence of central air or window units. I remember my first summer in a third-floor walk-up apartment. The ceiling fan did little, and installing a window AC wasn’t an option due to landlord restrictions. That’s when I discovered portable ACs. Within an hour of unboxing, I had cool air circulating—and I didn’t even need a contractor.
But here’s the catch: even the best portable air conditioner won’t cool your room if it’s not installed properly. Unlike traditional ACs, portable units require a few extra steps to vent hot air outside. If you skip this, you’ll end up with a noisy fan that barely lowers the temperature. The good news? Installing a portable air conditioner is simpler than you think. In this guide, I’ll walk you through how to install a portable air conditioner in 5 easy steps, sharing real-life tips and common pitfalls I’ve learned the hard way. Whether you’re a first-timer or upgrading your setup, you’ll walk away with a cooler, more comfortable space—no sweat (pun intended).
Step 1: Choose the Right Location and Prepare Your Space
Before you even plug in your portable air conditioner, the location matters—a lot. Think of it like placing a campfire: you want the heat to escape, not circle back into your tent. The same goes for your AC’s exhaust. If you place it in the wrong spot, you’re just recycling hot air, and your unit will struggle (and waste energy).
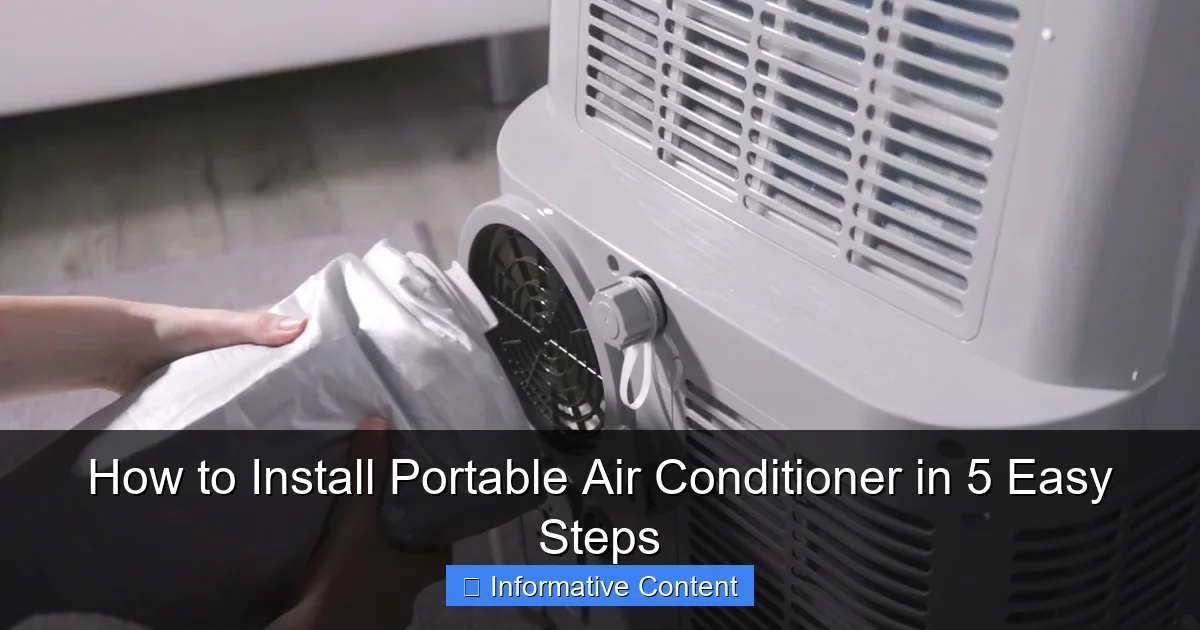
Visual guide about install portable air conditioner
Image source: i.ytimg.com
Find a Spot Near a Window or Door
The golden rule? Your portable AC needs a clear path to vent hot air outside. That means placing it within 4 to 6 feet of a window or sliding door. I once tried to stretch my exhaust hose across a 10-foot living room to reach a far window—big mistake. The hose kinked, the airflow dropped, and the unit shut off due to overheating. Now, I always measure the hose length (usually 5–6 feet) and place the unit accordingly. If your room is large, position the AC near the center for even cooling, but never more than a foot or two from the window kit setup.
Also, avoid corners or tight spaces. Portable ACs need about 12–18 inches of clearance on all sides for proper airflow. I learned this after placing my unit in a narrow alcove—it ran constantly and barely cooled the room. Once I moved it out, the difference was night and day.
Check Floor Stability and Surface
Portable ACs are heavy—typically 50 to 80 pounds when full of water (yes, they collect condensation). Place yours on a flat, stable surface like hardwood, tile, or low-pile carpet. Avoid thick rugs or uneven floors, which can block the unit’s intake vents or cause it to tilt. I once had a unit on a slightly warped wooden floor. It vibrated loudly and drained water unevenly. A quick fix? I used a small shim under one corner to level it.
Pro tip: If your AC has casters (wheels), lock them in place once positioned. This prevents the unit from shifting and damaging the exhaust hose or window seal.
Clear the Area of Obstructions
Remove furniture, curtains, or decor near the unit. Blocked intake vents reduce efficiency, and flammable materials (like paper or fabric) near the exhaust can be a fire hazard. I keep a small shelf behind my AC for remotes and filters—but always at least 18 inches away.
Step 2: Set Up the Exhaust Hose and Window Kit
This is the heart of how to install a portable air conditioner. The exhaust hose removes hot air from the room, and the window kit seals the gap to prevent air leaks. Skip this, and your AC becomes an expensive fan.
Unbox and Inspect All Parts
Open the box and lay out the components: exhaust hose, hose adapters (if needed), window kit panels, and mounting screws or brackets. Most kits include a universal window adapter, but some are brand-specific. For example, my Honeywell MN12CES came with a telescoping panel that fit my double-hung window perfectly. But my friend’s LG LP1419IVSM required a custom bracket for her sliding glass door. Always check the manual first.
Common issue: Missing parts. I once opened a box to find no screws—thankfully, the hardware store had spares. Keep a small toolkit nearby just in case.
Assemble the Window Kit
Most window kits use a “telescoping” design: two or three panels that slide to fit your window width. Here’s how to install them:
- Measure your window opening. Open the window and measure the width at the top, middle, and bottom. Use the narrowest measurement to avoid gaps.
- Slide the panels together. Extend them to match your measurement. Some kits have locking clips; others use friction. I prefer clips—they feel more secure.
- Secure with screws (if provided). This prevents the kit from shifting when the window is closed. For sliding doors, use the included brackets to anchor the kit to the track.
Real-world tip: If your window is oddly shaped (e.g., arched top), use foam weatherstripping to seal gaps. I used this trick in my old apartment with a half-moon window—it worked like a charm.
Connect the Exhaust Hose
Attach one end of the hose to the AC’s exhaust port (usually on the back or side). Most units use a twist-and-lock mechanism. For the other end, connect it to the window kit’s vent opening. Ensure the hose is straight and free of kinks. A bent hose restricts airflow, forcing the AC to work harder. I once found my hose coiled like a snake—after straightening it, the unit cooled 20% faster.
Never extend the hose beyond 5–6 feet. Longer hoses reduce efficiency. If you need more reach, consider a unit with a longer hose or a dual-hose model (more on that later).
Step 3: Manage Condensation and Drainage
Here’s a little-known fact: portable ACs collect condensation as they cool—up to a gallon a day in humid climates. If not drained, this water can overflow, damage floors, or even trip the unit’s safety switch. I learned this the messy way when my AC’s reservoir overflowed onto my hardwood floor. Not fun.
Understand Your AC’s Drainage Options
Portable ACs handle condensation in three ways:
- Self-evaporative: Most modern units use this. The AC reuses condensation to cool the condenser coils, reducing drainage needs. Ideal for dry climates (like Arizona) or moderate use. My Honeywell MN12CES rarely needs draining.
- Manual drain: Older or budget models have a reservoir you must empty. Look for a “full tank” indicator light. I once ignored mine for a week—the unit shut off mid-heatwave. Lesson learned.
- Continuous drain: Use a hose to channel water outside or into a floor drain. Best for humid areas or 24/7 operation. I use this in my basement, where humidity hits 80%.
Set Up Continuous Drainage (If Needed)
To install a drain hose:
- Locate the drain port (usually a small hole on the back or bottom).
- Attach a 3/4-inch garden hose (included with some units) or buy one separately.
- Route the hose outside (e.g., through a window) or into a sink/bucket. Ensure the hose slopes downward to avoid backflow.
- Secure it with zip ties or clips to prevent leaks.
Pro tip: Add a small valve to the hose for easy control. I use a garden hose shut-off valve—it lets me pause drainage during short AC breaks.
Prevent Mold and Odors
Stagnant water breeds mold. To avoid this:
- Clean the reservoir monthly with mild soap and water.
- Use a dehumidifier in humid rooms to reduce AC workload.
- For continuous drain, add a few drops of vinegar to the hose to prevent algae.
I once skipped cleaning for months—my AC started smelling like a gym locker. A deep clean with vinegar and a toothbrush fixed it.
Step 4: Power Up and Test Your Setup
Now for the exciting part: turning on your AC! But first, a few safety checks.
Check Electrical Requirements
Portable ACs need a dedicated 110–120V outlet. Never use an extension cord—they can overheat and cause fires. I once used a heavy-duty extension cord “just for a week.” The cord got warm, and my breaker tripped. Now, I always plug directly into the wall. If your outlet is far, consider relocating the AC or hiring an electrician to install a new outlet.
Voltage matters: Most units draw 1,200–1,500 watts. Use a power meter to check. If your circuit is already loaded (e.g., fridge, microwave), your AC might trip the breaker.
Turn On and Monitor Performance
Plug in the unit and power it on. Listen for:
- Smooth startup: No grinding or rattling noises.
- Airflow: Cold air from the front, hot air from the exhaust hose. If the hose blows cold air, the hose is loose or disconnected.
- Drainage: Check the reservoir after 1–2 hours. If it fills quickly, your climate is humid—consider continuous drain.
I once noticed my AC’s exhaust hose was blowing warm air. Turns out, the window kit had shifted, creating a gap. A quick adjustment fixed it.
Adjust Settings for Efficiency
Set the thermostat to 72–75°F (22–24°C). Lower temps don’t cool faster—they just run longer. Use the “fan-only” mode on mild days to save energy. I use a smart plug to schedule my AC: it turns on 30 minutes before I get home, so the room is cool when I arrive.
Step 5: Optimize for Comfort and Efficiency
Installing your portable AC is just the start. To get the best performance, tweak your setup.
Seal Gaps and Improve Insulation
Even a small gap around the window kit lets hot air in. Use:
- Foam weatherstripping: For thin gaps. I cut strips to fit my window edges.
- Plastic film insulation: For large gaps. Apply with double-sided tape.
- Curtains or blinds: Close them during the day to block sunlight. My blackout curtains cut cooling time by 20%.
Clean Filters and Vents Regularly
Dirty filters reduce airflow and strain the motor. Clean them every 2–4 weeks:
- Unplug the AC.
- Remove the filter (usually behind a front panel).
- Rinse with water and let it dry completely.
- Reinstall. (Never use the AC with a wet filter!)
I clean mine on the first Sunday of every month—it’s now a habit.
Consider a Dual-Hose Model
Single-hose ACs pull air from the room to exhaust heat, creating negative pressure that draws in hot air from outside. Dual-hose models use a second hose to bring in outside air, reducing this effect. They’re 30–40% more efficient but cost more. I upgraded to a dual-hose unit last year—my energy bill dropped by $15/month.
Data Table: Portable AC Installation Checklist
| Task | Why It Matters | Frequency |
|---|---|---|
| Check exhaust hose for kinks | Prevents airflow restriction | Before each use |
| Seal window kit gaps | Stops hot air from entering | After installation, as needed |
| Empty reservoir or check drain hose | Prevents overflow and mold | Daily (manual), weekly (self-evaporative) |
| Clean filters | Maintains airflow and efficiency | Every 2–4 weeks |
| Inspect power cord and outlet | Ensures safety and performance | Monthly |
| Level the unit | Prevents water leaks | After moving |
Final Thoughts: Cool Comfort Made Simple
Installing a portable air conditioner isn’t rocket science—it’s about following a few key steps to ensure your unit works efficiently and safely. From choosing the right spot to sealing gaps and managing drainage, each step plays a role in turning your hot room into a cool oasis. I’ve made every mistake in the book (kinked hoses, overflowing reservoirs, you name it), but each one taught me how to install a portable air conditioner better.
Remember, the goal isn’t just to cool—it’s to do it smartly. A well-installed portable AC uses less energy, lasts longer, and keeps you comfortable without the hassle of permanent installation. Whether you’re renting, have a tricky window setup, or just want a flexible solution, this guide gives you the tools to succeed. So go ahead—unbox that unit, follow these steps, and enjoy the cool. Summer doesn’t stand a chance.
Frequently Asked Questions
How do I install a portable air conditioner properly?
To install a portable air conditioner, choose a location near a window and power outlet, set up the exhaust hose through the window kit, and secure it tightly. Follow the manufacturer’s instructions to ensure proper ventilation and drainage for optimal performance.
Can I install a portable air conditioner in any window?
Most portable air conditioners work with double-hung or sliding windows using an adjustable window kit. However, check your unit’s specifications to confirm compatibility with your window type before installation.
Do I need special tools to install a portable air conditioner?
No special tools are required—most units come with a window installation kit, including foam seals and brackets. Just ensure the exhaust hose is properly attached and the window is sealed to prevent hot air leaks.
How do I vent a portable air conditioner without a window?
If you lack a window, you can vent through a sliding glass door (using a door seal kit) or a drop ceiling, though efficiency may decrease. Always direct the exhaust hose outdoors to avoid recirculating hot air.
What’s the best way to secure the exhaust hose during installation?
Use the included window kit to seal gaps and prevent hose kinks. Keep the hose as short and straight as possible to maximize airflow and cooling efficiency.
How often should I check my portable AC after installation?
Inspect the exhaust hose, seals, and drainage every 1–2 weeks to ensure no leaks or blockages. Regular maintenance keeps your unit running smoothly and extends its lifespan.