
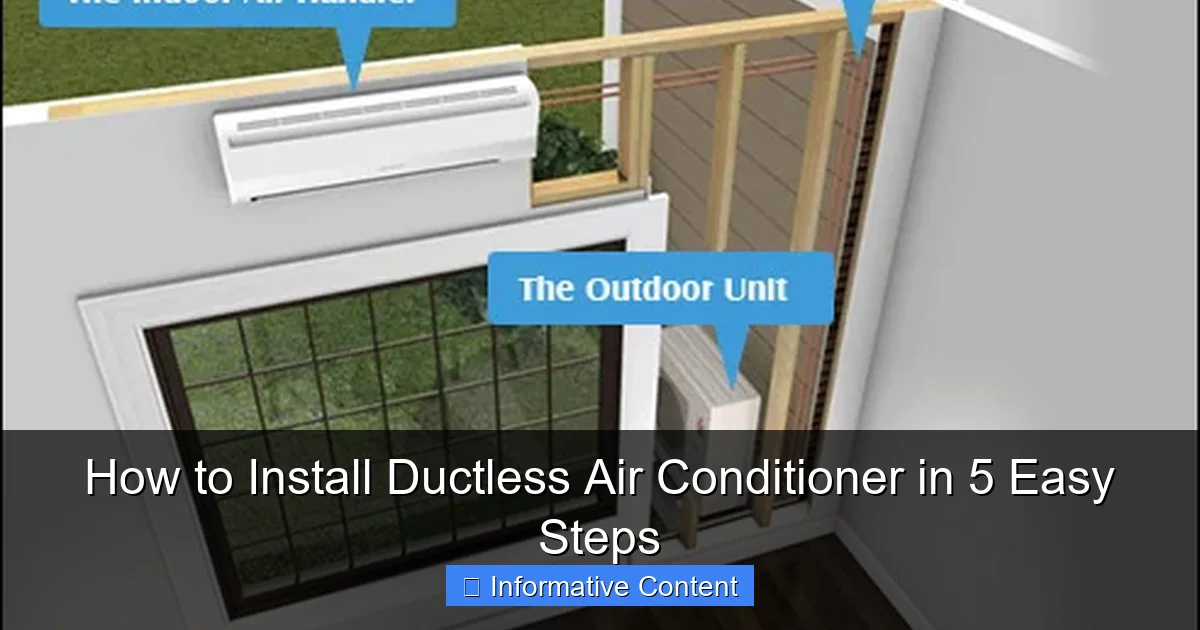
Featured image for install ductless air conditioner
Image source: refrigeranthq.com
Installing a ductless air conditioner is a straightforward DIY project that can dramatically improve your home’s comfort and energy efficiency. With the right tools and our simple 5-step guide—mounting the indoor unit, drilling a small hole for refrigerant lines, connecting the outdoor compressor, wiring, and testing—you can complete the job in just a few hours. No ductwork required, making it ideal for older homes or room additions.
Key Takeaways
- Plan carefully: Choose the right unit size and optimal indoor/outdoor locations.
- Prepare tools: Gather drill, level, wrench, and refrigerant lines before starting.
- Mount securely: Ensure wall bracket is level and anchored to support unit weight.
- Seal connections: Insulate refrigerant lines and seal wall gaps to prevent leaks.
- Test thoroughly: Run system and check airflow, cooling, and drainage.
- Follow manual: Always adhere to manufacturer instructions for safety and warranty.
📑 Table of Contents
- How to Install Ductless Air Conditioner in 5 Easy Steps
- Step 1: Choose the Right Ductless Air Conditioner for Your Space
- Step 2: Gather Tools and Materials (Plus Safety First!)
- Step 3: Install the Indoor and Outdoor Units
- Step 4: Connect and Evacuate the Refrigerant Lines
- Step 5: Test the System and Optimize Performance
- Cost and Efficiency Comparison: Ductless vs. Traditional AC
- Final Thoughts: Enjoy Your Cool, DIY Success
How to Install Ductless Air Conditioner in 5 Easy Steps
Imagine this: It’s the peak of summer, and your home feels like a sauna. You’ve tried fans, open windows, even ice packs behind your neck, but nothing seems to cool you down. That’s when you realize it’s time for a real solution—a ductless air conditioner (also known as a mini-split system). These sleek, efficient units offer targeted cooling without the need for bulky ductwork, making them perfect for older homes, room additions, or even just a single hot spot in your house. I remember my own journey with ductless AC installation—initially intimidated by the technical aspects, but ultimately relieved and impressed by how straightforward the process turned out to be.
Ductless air conditioners are more than just a trendy gadget; they’re a smart investment in comfort and energy efficiency. Unlike traditional central AC systems, which cool your entire house regardless of need, ductless units let you control the temperature in individual rooms. This zoned cooling not only keeps you comfortable but can also save you money on energy bills. And the best part? Installing one doesn’t require tearing up walls or hiring a team of HVAC experts. With some basic tools, a little patience, and a clear plan, you can install a ductless air conditioner yourself—saving hundreds of dollars in labor costs. In this guide, we’ll walk you through the entire process in five simple steps, sharing practical tips, relatable anecdotes, and real-world insights to make your installation smooth and stress-free.
Step 1: Choose the Right Ductless Air Conditioner for Your Space
Understand Your Cooling Needs
Before you even think about drilling holes or mounting brackets, you need to pick the right unit for your space. This is where many people trip up—choosing a system that’s either too small (leaving you sweating) or too large (wasting energy and causing short-cycling). The key is to calculate the cooling load for the room or zone you’re targeting. This depends on factors like room size, insulation quality, sun exposure, and the number of occupants.
Visual guide about install ductless air conditioner
Image source: grainger-prod.adobecqms.net
For example, a 200-square-foot bedroom with good insulation and minimal sun exposure might need a 9,000 BTU (British Thermal Units) unit. But the same room with large south-facing windows and poor insulation could require a 12,000 BTU unit. I learned this the hard way when I installed a 9,000 BTU unit in my sun-drenched sunroom—it struggled to keep up, and the compressor ran nonstop. A quick call to the manufacturer’s support line helped me realize I should have gone with a 15,000 BTU model.
Consider the System Type and Features
Ductless systems come in two main configurations: single-zone and multi-zone. A single-zone system has one indoor unit connected to one outdoor unit—perfect for cooling a single room. A multi-zone system lets you connect multiple indoor units to a single outdoor unit, ideal for cooling several rooms or an entire floor.
When I upgraded my home office (a converted garage), I went with a single-zone system. It was simpler to install and cost-effective. But if you’re planning to cool your living room, bedroom, and kitchen, a multi-zone system might be worth the extra investment. Also, look for features like:
- Variable-speed compressors: These adjust cooling output to maintain steady temperatures and save energy.
- Inverter technology: Reduces power consumption by avoiding frequent on/off cycles.
- Smart controls: Wi-Fi-enabled units let you control temperature remotely via smartphone apps.
- Dehumidification: Especially useful in humid climates or basements.
- Quiet operation: Check decibel ratings—some units are whisper-quiet, while others can be noisy.
Measure the Installation Space
Measure the room where you’ll install the indoor unit. Ensure there’s enough wall space—most indoor units require at least 12 inches of clearance on all sides and 6 feet from the floor. Avoid placing the unit near heat sources like lamps or electronics. Also, consider the outdoor unit’s location. It should be on a level surface, away from direct sunlight, and with good airflow (at least 12 inches of clearance on all sides).
One common mistake I’ve seen is placing the indoor unit too close to a ceiling fan. While it might seem like a good idea to circulate cool air, the fan can interfere with the unit’s airflow sensors, causing it to cycle improperly. Give your indoor unit some breathing room!
Step 2: Gather Tools and Materials (Plus Safety First!)
Essential Tools for Installation
You don’t need a full workshop to install a ductless AC, but having the right tools makes the job much easier. Here’s what I recommend:
- Drill with masonry bit: For drilling through walls (usually 2.5–3 inches in diameter).
- Jigsaw or hole saw: To cut the hole for the conduit.
- Level: Ensures the indoor and outdoor units are perfectly aligned.
- Stud finder: Helps locate wall studs so you can secure the mounting bracket properly.
- Wrench set: For tightening refrigerant line connections.
- Vacuum pump and manifold gauge set: Critical for evacuating air and moisture from the refrigerant lines (more on this later).
- Refrigerant charging kit: If your unit requires manual charging (some are pre-charged).
- Electrical tester: To verify power supply and grounding.
- Safety gear: Gloves, safety glasses, and a dust mask (especially when drilling).
Pro tip: Rent the vacuum pump and gauge set from a local HVAC supply store if you don’t want to buy them. They’re expensive and only needed once unless you plan to install more units later.
Safety Precautions You Can’t Skip
Installing a ductless AC involves electricity, refrigerant, and working at heights. Safety isn’t optional—it’s essential. Here are my top safety tips:
- Turn off power: Before working on electrical connections, shut off the circuit breaker and verify it’s off with your tester.
- Wear protective gear: Safety glasses protect your eyes from dust and debris. Gloves prevent cuts and burns.
- Secure the ladder: If you’re drilling from outside, use a sturdy ladder with someone holding it or a ladder stabilizer.
- Handle refrigerant carefully: Refrigerant can cause frostbite if it leaks. Never open refrigerant lines without proper training and tools.
- Check local codes: Some areas require permits or licensed electricians for electrical work. When in doubt, consult a pro.
I once skipped the ladder stabilizer while installing an outdoor unit on a second-floor balcony. The ladder shifted, and I nearly dropped the heavy unit—lesson learned! Always prioritize safety over speed.
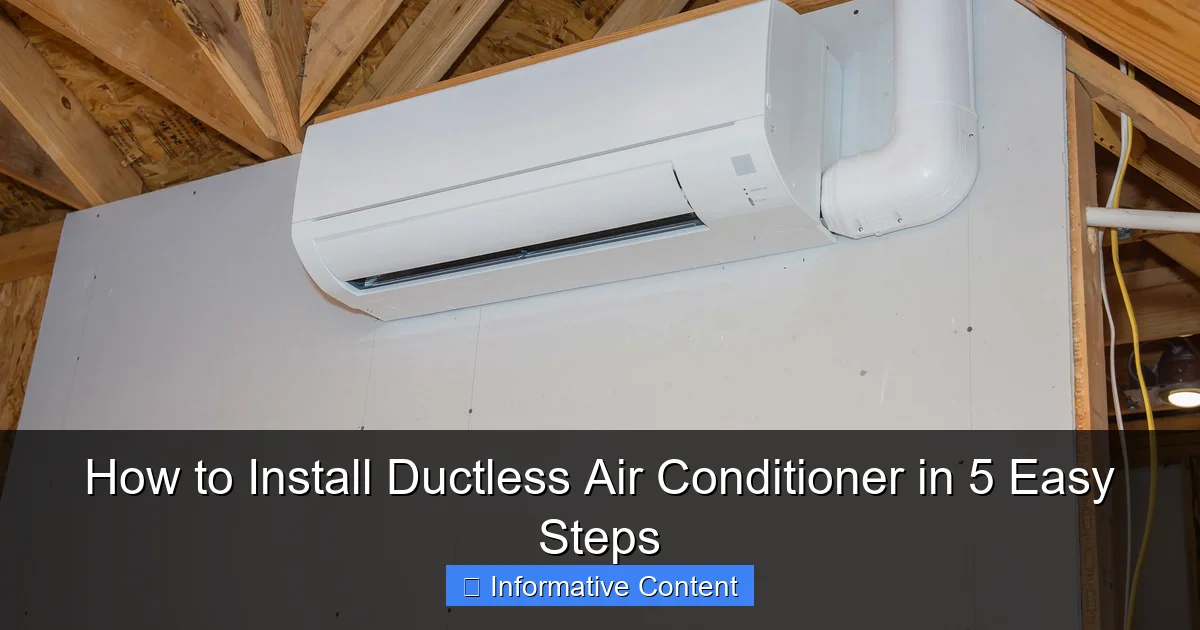
Step 3: Install the Indoor and Outdoor Units
Mount the Indoor Unit
This is where the physical work begins. Start by mounting the indoor unit’s bracket on the wall. Use a level to ensure it’s perfectly horizontal—this prevents water drainage issues later. Mark the screw holes, drill pilot holes, and secure the bracket with wall anchors (for drywall) or lag bolts (for wood or masonry).
Next, drill a 2.5–3 inch hole through the wall for the conduit (a protective sleeve that houses the refrigerant lines, drain pipe, and electrical wiring). The hole should slope slightly downward from inside to outside to allow condensation to drain properly. I learned this the hard way when my first installation had a flat hole—water pooled and dripped inside the room!
Now, hang the indoor unit on the bracket. Connect the refrigerant lines and drain pipe to the unit. Wrap the connections with insulation tape to prevent condensation. Secure the conduit through the wall hole. Don’t tighten the refrigerant lines yet—you’ll do that after connecting them to the outdoor unit.
Set Up the Outdoor Unit
Place the outdoor unit on a level surface, ideally on a concrete pad or rubber vibration isolators (to reduce noise and vibration). Ensure it’s at least 12 inches away from walls or obstacles for proper airflow. If you’re installing it on a balcony or roof, use a secure mounting bracket.
Connect the refrigerant lines from the indoor unit to the outdoor unit. Use a wrench to tighten the flare nuts—don’t overtighten, or you risk damaging the threads. Connect the drain pipe to a nearby floor drain or use a condensate pump if gravity drainage isn’t possible.
Finally, connect the electrical wiring. Most ductless units require a 240-volt circuit (similar to an electric dryer). Run the wiring through a conduit or armored cable to the outdoor unit. Connect the wires according to the manufacturer’s instructions (usually color-coded: black to black, white to white, green to ground). Double-check all connections with your electrical tester.
One tip: Label the wires before disconnecting them from the indoor unit. It’s easy to mix them up later, especially if you’re working alone.
Step 4: Connect and Evacuate the Refrigerant Lines
The Critical Vacuum Process
This step is where DIYers often make mistakes—but it’s crucial for your system’s performance and longevity. The refrigerant lines must be free of air and moisture, or your AC won’t cool properly and could suffer compressor damage.
Here’s how I do it:
- Connect the manifold gauge set to the service ports on both the indoor and outdoor units.
- Attach the vacuum pump to the center hose of the manifold.
- Open the valves on the manifold and turn on the vacuum pump.
- Let it run for at least 30 minutes (longer for longer refrigerant lines). The gauge should show a vacuum of -30 inHg.
- Close the valves and turn off the pump. Wait 10 minutes—if the vacuum holds, you’re good. If it rises, there’s a leak.
- If the vacuum holds, open the valves to release the refrigerant charge (if your unit is pre-charged) or use the charging kit to add refrigerant.
Why this matters: Air in the lines reduces cooling efficiency and can cause the compressor to overheat. Moisture leads to ice buildup and corrosion. I once skipped this step because I was impatient—my AC ran for a week before it stopped cooling entirely. A technician found air in the lines and had to evacuate and recharge it. Lesson learned: patience pays off!
Check for Leaks
After charging the refrigerant, check all connections with a leak detector (available at HVAC supply stores). Apply a soapy water solution to joints and look for bubbles. Even a tiny leak can reduce efficiency and harm the environment.
If you find a leak, tighten the connection slightly or use a refrigerant sealant (for minor leaks). For major leaks, you may need to replace the line or call a professional.
Step 5: Test the System and Optimize Performance
Power Up and Run Initial Tests
Now comes the moment of truth—turning on your new ductless AC. Here’s what to do:
- Turn on the circuit breaker.
- Set the remote control to “cool” mode and a low temperature (e.g., 68°F).
- Listen for the outdoor unit to start. The indoor unit should blow cool air within a few minutes.
- Check for unusual noises, vibrations, or leaks.
- Verify that the drain pipe is dripping condensation (a sign the system is working).
If the system doesn’t start, check:
- Is the remote control set correctly?
- Are the circuit breakers on?
- Are the refrigerant valves open?
- Is there a “error code” on the indoor unit’s display? (Refer to the manual.)
My first test run was nerve-wracking—the indoor unit beeped and displayed “E1.” I panicked until I realized it was a communication error between the indoor and outdoor units. A quick check showed I had reversed two wires. After fixing them, the system ran smoothly.
Optimize Settings for Comfort and Efficiency
Once the system is running, fine-tune the settings for maximum comfort and energy savings:
- Set the temperature: 72–78°F is usually comfortable. Lower isn’t always better—it wastes energy.
- Use the “auto” fan mode: The unit will adjust fan speed based on cooling demand.
- Enable sleep mode: Automatically adjusts temperature overnight for comfort and savings.
- Clean the filters: Most units have washable filters—clean them every 2–4 weeks to maintain airflow.
- Schedule annual maintenance: Even DIY systems benefit from professional check-ups.
Cost and Efficiency Comparison: Ductless vs. Traditional AC
Is a Ductless AC Worth the Investment?
Let’s talk numbers. Here’s a comparison of ductless vs. traditional central AC systems for a typical 1,500-square-foot home:
| Feature | Ductless Mini-Split | Traditional Central AC |
|---|---|---|
| Installation Cost (DIY) | $1,500–$3,500 | $3,000–$7,000 (with ductwork) |
| Installation Cost (Pro) | $2,000–$5,000 | $4,000–$10,000 |
| Energy Efficiency (SEER) | 18–30 SEER | 14–20 SEER |
| Zoning Capability | Yes (per room) | Limited (requires dampers) |
| Lifespan | 15–20 years | 12–15 years |
| Maintenance | Low (clean filters, check lines) | Higher (duct cleaning, filter changes) |
The table shows that ductless systems have higher upfront efficiency (SEER ratings) and offer superior zoning. While DIY installation saves money, even professional installation is often cheaper than retrofitting ductwork in older homes. Plus, the energy savings can pay back the difference in 3–5 years.
I calculated my own savings: My 12,000 BTU unit costs about $0.15 per hour to run. With 4 hours of daily use in summer, that’s $18/month. My old window AC cost $0.25/hour, totaling $30/month. Over a 3-month season, I save $36—and that’s just one room!
Final Thoughts: Enjoy Your Cool, DIY Success
Installing a ductless air conditioner might seem daunting at first, but as I’ve learned through my own trials and errors, it’s entirely doable with the right approach. The five steps we’ve covered—choosing the right unit, gathering tools, mounting the units, evacuating refrigerant, and testing—are designed to take you from overwhelmed to accomplished in a weekend (or two, if you’re taking it slow).
The best part? Every time you feel that cool breeze from your newly installed AC, you’ll remember the satisfaction of doing it yourself. No waiting for technicians, no surprise labor fees, just pure, cool accomplishment. And if you ever need to add another unit or troubleshoot an issue, you’ll have the confidence to handle it.
Remember, ductless ACs are more than just a summer luxury—they’re a long-term investment in your home’s comfort, efficiency, and value. Whether you’re cooling a single room or an entire floor, the flexibility and performance of a ductless system make it a smart choice for modern living. So go ahead, take the plunge, and enjoy the cool, quiet comfort of your DIY success. Your future self (and your energy bill) will thank you.
Frequently Asked Questions
How do I install a ductless air conditioner in 5 easy steps?
To install a ductless air conditioner, follow these steps: mount the indoor unit, drill a hole for refrigerant lines, connect the lines and wiring, mount the outdoor unit, and test the system. Always refer to the manufacturer’s manual for specific details and safety precautions.
Can I install a ductless air conditioner myself, or do I need a professional?
While DIY installation is possible for those with technical skills, hiring a certified HVAC technician is recommended for proper handling of refrigerant lines and electrical connections. Improper installation may void warranties and reduce efficiency.
What tools are needed to install a ductless air conditioner?
You’ll need a drill, level, wrenches, vacuum pump, manifold gauge, and wire strippers. Some kits include specialized tools, but always confirm with your ductless air conditioner model’s requirements.
Where should I place the indoor unit for optimal performance?
Install the indoor unit high on an exterior wall, away from direct sunlight, heat sources, and obstructions. This ensures efficient airflow and maximizes cooling or heating coverage in the room.
How long does it take to install a ductless air conditioner?
Professional installation typically takes 4–8 hours, depending on complexity. DIY projects may take longer, especially if you’re unfamiliar with electrical and refrigerant line connections.
Is a permit required to install a ductless air conditioner?
In many areas, a permit is required for HVAC installations due to electrical and refrigerant handling regulations. Check local building codes to ensure compliance and avoid fines.