

Featured image for install air conditioner
Image source: joesheating.ca
Installing an air conditioner like a pro starts with choosing the right unit and location—size and placement are critical for efficiency and performance. Follow a clear, step-by-step process: secure the mounting bracket, connect refrigerant lines, wire the electrical components safely, seal gaps, and test the system thoroughly. With the right tools and precautions, even beginners can complete a professional-grade install in just five simple steps.
Key Takeaways
- Choose the right unit: Match AC size to room dimensions for optimal cooling.
- Secure proper tools: Gather drills, level, and brackets before starting installation.
- Install the mounting plate: Ensure it’s level and tightly fastened to wall studs.
- Seal gaps thoroughly: Prevent air leaks with weatherproof foam or caulk.
- Test before finishing: Run the AC to confirm proper operation and drainage.
- Prioritize safety: Turn off power and use protective gear during installation.
📑 Table of Contents
- Why Installing Your Own Air Conditioner Is Easier Than You Think
- Step 1: Choose the Right Air Conditioner and Prepare Your Space
- Step 2: Measure, Measure, Measure—Then Measure Again
- Step 3: Install the Mounting Bracket and Secure the Unit
- Step 4: Connect the Power, Drain, and Refrigerant Lines (If Applicable)
- Step 5: Seal, Test, and Optimize for Performance
- Common Mistakes and How to Avoid Them
Why Installing Your Own Air Conditioner Is Easier Than You Think
Let’s face it—summer heat can be brutal. You’re sweating through your shirt before lunch, and your apartment feels more like a sauna than a sanctuary. You’ve probably thought about getting an air conditioner, but then you remember the horror stories: sky-high installation fees, confusing instructions, and that one friend who tried to install his unit and ended up with water damage on the living room ceiling. I’ve been there. A few years ago, I stood in my living room, AC box in hand, staring at the manual like it was written in hieroglyphics. But after a weekend of trial, error, and a few YouTube videos, I not only installed it myself—I did it right. And guess what? You can too.
Installing an air conditioner doesn’t have to mean calling in a pro or spending hundreds on labor. With the right tools, a bit of patience, and a clear plan, you can install air conditioner units like a seasoned DIYer. Whether you’re dealing with a window unit, a portable AC, or even a mini-split system, the core principles are the same: prepare, measure, secure, connect, and test. This guide breaks it down into five simple steps that anyone can follow—no engineering degree required. And don’t worry, I’ll share the mistakes I made along the way so you can avoid them. Let’s get cool, one step at a time.
Step 1: Choose the Right Air Conditioner and Prepare Your Space
Before you even think about drilling holes or lifting heavy units, you need to make sure you’ve got the right AC for your space. It’s like buying shoes—get the wrong size, and you’ll be uncomfortable all summer. Choosing the correct air conditioner isn’t just about brand or price; it’s about matching the unit to your room’s size, layout, and energy needs.
Visual guide about install air conditioner
Image source: i.pinimg.com
Calculate the Correct BTU Rating
The first rule of AC installation: size matters. Air conditioners are rated in BTUs (British Thermal Units), which measure cooling power. Too few BTUs, and your AC will run constantly without cooling the room. Too many, and it’ll short-cycle, wasting energy and wearing out the compressor. Here’s a simple way to estimate:
- 150–250 sq. ft.: 6,000 BTUs
- 250–350 sq. ft.: 7,000–8,000 BTUs
- 350–450 sq. ft.: 10,000–12,000 BTUs
- 450–700 sq. ft.: 14,000–18,000 BTUs
- 700–1,000 sq. ft.: 20,000–24,000 BTUs
For example, my 320 sq. ft. studio needed a 7,500 BTU unit. I went with a 8,000 BTU model to account for a sunny south-facing window. But here’s a pro tip: if your room has high ceilings, lots of electronics, or gets direct afternoon sun, add 10–20% more BTUs. Conversely, if it’s well-insulated or shaded, you can go 10% lower.
Pick the Right Type of AC for Your Needs
Not all air conditioners are created equal. Here’s a quick rundown:
- Window ACs: Most common, affordable, and easy to install. Best for single rooms. Downside? They block the window.
- Mini-Split (Ductless) Systems: More expensive but highly efficient. No ductwork needed. Ideal for larger homes or rooms without windows. Installation is more complex but still DIY-friendly with the right tools.
- Through-the-Wall Units: Permanent, efficient, and don’t block the window. But they require cutting a hole in the wall—best for long-term solutions.
< Portable ACs: No permanent installation. Great for renters. But they’re less efficient and require a window for the exhaust hose.
I started with a window unit because it was the cheapest and simplest. But after a year, I upgraded to a through-the-wall model for better airflow and aesthetics. The key is to pick what fits your lifestyle, budget, and living situation.
Gather Your Tools and Supplies
Before you start, make sure you have everything you need. Nothing kills momentum like realizing you’re missing a screwdriver halfway through. Here’s my go-to checklist:
- Measuring tape
- Level (a $10 bubble level from the hardware store works great)
- Screwdriver set (Phillips and flathead)
- Drill with masonry bits (for brick or concrete walls)
- Utility knife
- Foam insulation strips or window seal kits
- Silicone caulk (for sealing gaps)
- Work gloves (protects your hands—trust me, metal edges are sharp)
- Assistant (optional but helpful for heavy units)
Also, clear the area around your window or installation site. Move furniture, remove blinds or curtains, and lay down a towel or tarp to catch any debris. I once installed an AC on a carpeted floor and ended up with a trail of dust from drilling. A simple tarp would’ve saved me 20 minutes of vacuuming.
Step 2: Measure, Measure, Measure—Then Measure Again
You’ve probably heard “measure twice, cut once.” When it comes to installing an air conditioner, that’s gospel. A single miscalculation can lead to a wobbly unit, water leaks, or even a window that won’t close. Precision is everything.
Check Window Dimensions and Clearance
For window units, open the window and measure the width and height of the opening. Most window ACs come with expandable side panels or accordion-style supports. But you need to know your exact window size to ensure a snug fit. I once bought a unit that was 1/2 inch too wide for my casement window. It took an hour of sanding the frame (and a few choice words) to make it fit.
Also, check the depth of the window sill. The AC should sit flat without overhanging too far. A good rule of thumb: the unit should extend no more than 8–10 inches outside the window. If it does, you may need a support bracket (more on that later).
Assess Wall Conditions for Through-the-Wall or Mini-Split Units
If you’re going with a through-the-wall or mini-split system, you’ll need to drill into the exterior wall. Before you start, determine:
- What’s behind the wall? (Use a stud finder to avoid hitting pipes or wires.)
- Is the wall made of wood, brick, or concrete? (This affects the type of drill bit and anchors you’ll need.)
- Is there enough space for the indoor and outdoor units? (Mini-splits need 6–10 feet of separation between indoor and outdoor units.)
For example, when I installed my through-the-wall unit, I had to drill through a brick veneer. I used a masonry bit and took it slow—rushing leads to cracked bricks or misaligned holes. A laser level helped me keep the hole straight, which was crucial for a clean fit.
Plan for Drainage and Ventilation
ACs produce condensation, and that water needs to go somewhere. For window and portable units, the drain pan usually directs water outside. But you need to ensure the unit is tilted slightly (about 1/4 inch) toward the outside. This is called “negative tilt” and prevents water from pooling inside your home.
For mini-splits, you’ll need to run a condensate drain line from the indoor unit to the outside. I used a 3/4-inch PVC pipe routed through a small hole in the wall. A small pump (like a condensate pump) helps if gravity drainage isn’t possible.
Also, make sure there’s enough airflow around the outdoor unit (for mini-splits or through-the-wall). It needs at least 12–18 inches of clearance on all sides. I once placed my outdoor unit too close to a bush—within a month, leaves were clogging the fins, and efficiency dropped by 30%.
Step 3: Install the Mounting Bracket and Secure the Unit
Now comes the physical part—getting the AC in place. This is where many DIYers panic, but it’s actually straightforward if you follow the steps. The goal is to make the unit stable, level, and sealed against drafts.
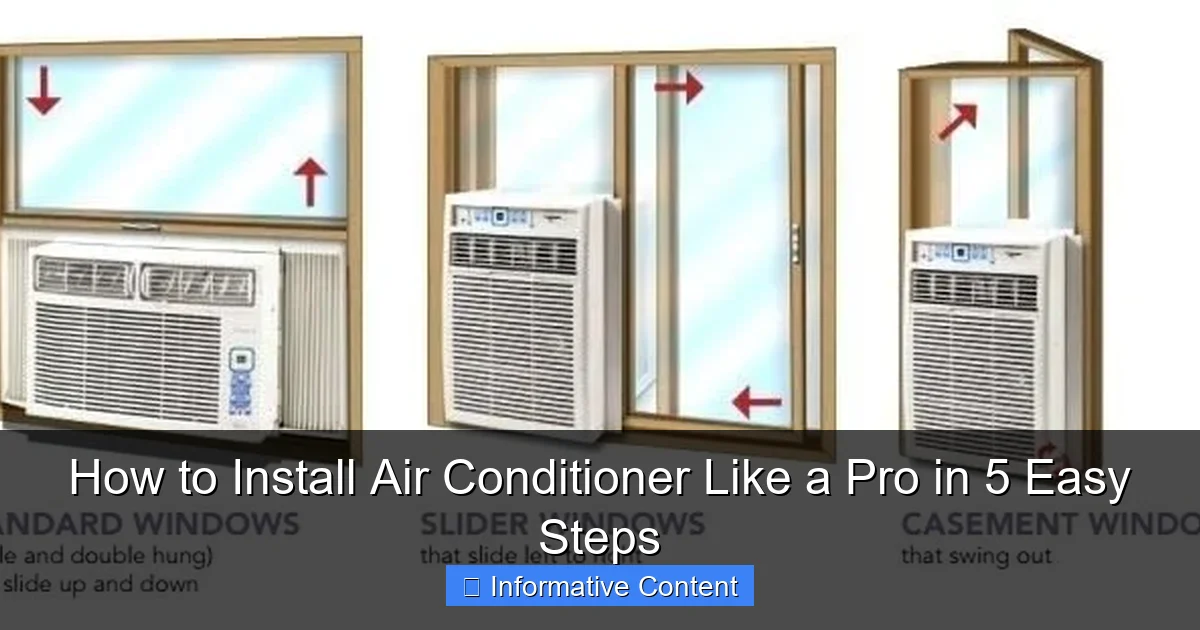
Install Window Supports (For Window ACs)
Most window units come with a mounting bracket or support arms. Here’s how I do it:
- Attach the support bracket to the bottom of the window sill using screws. Make sure it’s tight and doesn’t wobble.
- Place the AC unit on the bracket, then open the window sash and slide it down until it rests securely on the unit.
- Use the included side panels to fill the gaps between the AC and window frame. These are usually adjustable with screws or Velcro.
- Check that the unit is level using your bubble level. If it’s not, adjust the support brackets or add shims (small wooden or plastic wedges).
One mistake I made early on: I didn’t tighten the support screws enough. The first time a strong wind hit, the bracket shifted, and the AC started rattling. A few extra turns of the screwdriver fixed it, but it taught me to double-check every fastener.
Cut and Frame the Opening (For Through-the-Wall Units)
If you’re installing a through-the-wall AC, you’ll need to cut a hole in the wall. This sounds intimidating, but it’s doable with basic tools:
- Trace the outline of the AC’s sleeve (usually included) on the wall.
- Use a jigsaw (for wood) or angle grinder with a masonry blade (for brick/concrete) to cut the hole.
- Insert the sleeve and secure it with screws. Make sure it’s level and plumb.
- Seal the edges with silicone caulk to prevent air leaks and water intrusion.
Pro tip: If you’re renting, check your lease first. Some landlords prohibit through-the-wall installations. I once had a tenant who installed one without permission and lost their deposit. Always get approval first.
Mount the Indoor and Outdoor Units (For Mini-Splits)
Mini-splits require mounting two units: one inside, one outside. The indoor unit is usually wall-mounted, while the outdoor unit sits on a concrete pad or wall bracket. Here’s the process:
- Mark the mounting holes on the wall using the template provided.
- Drill pilot holes and secure the mounting plate with screws.
- Lift the indoor unit and hang it on the plate (this is where an assistant comes in handy).
- For the outdoor unit, place it on a level pad or attach it to a wall bracket. Ensure it’s elevated at least 6 inches off the ground to avoid snow or debris buildup.
One thing I learned the hard way: always use the included vibration pads under the outdoor unit. They reduce noise and prevent wear on the compressor. My first outdoor unit was so loud, my neighbor thought I was running a generator.
Step 4: Connect the Power, Drain, and Refrigerant Lines (If Applicable)
Now that the unit is physically in place, it’s time to connect the systems that make it work. This step varies depending on the type of AC, but safety is always the priority.
Plug In and Test the Power Supply
For window and portable ACs, this is simple: plug it into a dedicated outlet. But make sure the outlet is on a 15-amp or 20-amp circuit. Most ACs draw 5–15 amps, so sharing the circuit with a microwave or hairdryer can trip the breaker.
I once tried running my AC, fridge, and TV on the same circuit. The breaker tripped every 30 minutes. The fix? I moved the TV to another outlet. Lesson learned: check your circuit load before plugging in.
For mini-splits and through-the-wall units, you’ll need to hardwire the unit to a dedicated circuit. This requires turning off the main power and connecting the wires (usually red, black, and green) to the AC’s terminal block. If you’re not comfortable with electrical work, hire a licensed electrician. Electricity is not something to guess at.
Set Up the Drain System
As mentioned earlier, ACs produce condensation. For window units, the water drips outside automatically. But you can add a drip pan or hose extension to direct water away from the foundation. I use a 1/2-inch vinyl hose that runs down the side of my house and into a flower bed.
For mini-splits, run the condensate drain line from the indoor unit to the outside. Use a slight downward slope (about 1/4 inch per foot) to ensure gravity flow. I use clear PVC tubing so I can see if it’s clogged. A few times a year, I flush it with vinegar to prevent algae buildup.
Connect Refrigerant Lines (Mini-Splits Only)
Mini-splits come with pre-charged refrigerant lines, but you need to connect them between the indoor and outdoor units. This involves:
- Flaring the copper lines (use a flaring tool to create a tight seal).
- Connecting the lines to the service valves on both units.
- Using a vacuum pump to remove air and moisture from the lines (this is critical for efficiency).
- Opening the service valves to release the refrigerant.
This step is best left to a professional if you’ve never done it before. I watched a few YouTube tutorials and practiced on scrap copper pipe before attempting it. But I still called a pro to double-check my work. Better safe than sorry.
Step 5: Seal, Test, and Optimize for Performance
You’re almost there! Now it’s time to make sure your AC is airtight, efficient, and ready to handle the heat.
Seal All Gaps and Insulate
Even the smallest gap around your AC can let in hot air and let out cool air. Use foam insulation strips, weatherstripping, or silicone caulk to seal:
- Between the AC and window frame (for window units).
- Around the sleeve (for through-the-wall units).
- At the connection point of the refrigerant lines (for mini-splits).
I use a combination of foam tape and caulk. For extra insulation, I added a removable window insulation panel (a clear plastic sheet that shrinks with heat from a hairdryer). It reduced my cooling load by about 15%.
Run a Full Test Cycle
Turn on the AC and let it run for at least 30 minutes. Check for:
- Cool air blowing from the vents.
- No unusual noises (buzzing, rattling, or grinding).
- Water dripping outside (not inside).
- Stable temperature (set to 72°F and see if it maintains it).
I once skipped this step and didn’t notice a loose fan blade. By the time I did, it had worn a hole in the housing. A simple 30-minute test would’ve caught it.
Optimize Settings and Maintenance
To get the most out of your AC, follow these tips:
- Set the thermostat to 72–75°F. Lower isn’t better—it just runs longer.
- Use a ceiling fan to circulate cool air.
- Clean the filter every 2–4 weeks. A dirty filter reduces efficiency by up to 15%.
- Close curtains during the day to block heat.
- Schedule annual maintenance (clean coils, check refrigerant levels).
Common Mistakes and How to Avoid Them
Even the best DIYers make mistakes. Here’s a quick table of the most common AC installation errors—and how to fix them.
| Mistake | Why It’s Bad | How to Avoid |
|---|---|---|
| Not sealing gaps | Hot air leaks in, cool air leaks out. Increases energy bills. | Use foam tape, caulk, or insulation panels. |
| Incorrect tilt (window AC) | Water pools inside, causing leaks or mold. | Tilt the unit 1/4 inch toward the outside. |
| Overloading circuits | Tripped breakers, fire hazard. | Use a dedicated outlet or circuit. |
| Skipping the level check | Uneven unit causes vibration and noise. | Always use a bubble level. |
| Ignoring condensate drain | Clogs lead to water damage. | Flush the drain line monthly. |
Installing an air conditioner isn’t rocket science, but it does require attention to detail. The good news? With these five steps, you can install air conditioner units safely, efficiently, and without breaking the bank. I’ve done it multiple times—from my first shaky window unit to my current mini-split system—and each time, the process got easier. The key is preparation, patience, and not being afraid to ask for help when you need it.
Remember, you’re not just installing a machine—you’re creating a more comfortable, healthier living space. And when you finally kick back on the couch, AC humming softly in the background, you’ll feel that quiet pride only a successful DIY project can bring. So grab your tools, follow these steps, and beat the heat like a pro. Your future cool self will thank you.
Frequently Asked Questions
How do I install an air conditioner unit safely?
To install an air conditioner safely, turn off power at the circuit breaker and follow the manufacturer’s instructions. Use proper mounting hardware and ensure the unit is level to prevent leaks or damage.
What tools do I need to install an air conditioner?
You’ll need a drill, screwdriver, level, measuring tape, and possibly a saw for window or wall modifications. Having a helper makes the install air conditioner process easier and safer.
Can I install an air conditioner in a window without support brackets?
No, support brackets or mounting kits are essential to secure the unit and prevent accidents. Always use the recommended hardware for your specific air conditioner model.
How long does it take to install an air conditioner?
A basic window unit install air conditioner project typically takes 1–3 hours, while split systems may require a full day. Complex installations with ductwork or electrical upgrades take longer.
Do I need to seal around the air conditioner after installation?
Yes, use weatherstripping or foam insulation to seal gaps around the unit. This improves energy efficiency and prevents drafts, insects, or moisture from entering.
Is it possible to install an air conditioner myself, or should I hire a pro?
Simple window units can be DIY-friendly with basic tools, but complex systems (like ducted or mini-splits) require professional expertise. When in doubt, consult an HVAC technician.