

Featured image for how to use daikin air conditioner wall remote
Image source: i.ytimg.com
Unlock full control of your Daikin air conditioner in minutes by mastering the wall remote’s intuitive interface and essential functions. From adjusting temperature and fan speed to activating eco modes and timers, this guide simplifies every step for instant comfort and efficiency.
Key Takeaways
- Power on/off easily: Press the On/Off button to control AC operation instantly.
- Adjust temperature precisely: Use +/- buttons to set your ideal room temperature quickly.
- Select modes effortlessly: Toggle between Cool, Heat, Dry, Fan with the Mode button.
- Set fan speed: Press Fan Speed to cycle through airflow levels for comfort.
- Use timer functions: Schedule on/off times with Timer for energy-efficient cooling.
- Enable sleep mode: Press Sleep to reduce noise and save energy overnight.
📑 Table of Contents
- Master How to Use Daikin Air Conditioner Wall Remote in Minutes
- Understanding Your Daikin Wall Remote: A Quick Overview
- Step-by-Step Guide: Basic Operations Made Simple
- Advanced Features: Unlocking the Full Potential
- Troubleshooting Common Issues
- Maintenance Tips to Keep Your Remote and AC Running Smoothly
- Comparison Table: Daikin Wall Remote Models
- Final Thoughts: You’ve Got This!
Master How to Use Daikin Air Conditioner Wall Remote in Minutes
So, you’ve just installed your brand-new Daikin air conditioner—congratulations! You’re probably already imagining cool, crisp air on a sweltering summer afternoon or cozy warmth during those chilly winter nights. But then you look at the wall-mounted remote control and… pause. It looks sleek, modern, and packed with buttons—some labeled, some not. Suddenly, you’re wondering: How do I even use this thing?
You’re not alone. Many homeowners feel a mix of excitement and slight overwhelm when first encountering the Daikin wall remote. It’s not your average TV remote—it’s a sophisticated control center designed to give you full command over your indoor climate. But here’s the good news: once you understand its layout and functions, using it becomes second nature. In this guide, I’ll walk you through everything you need to know—from basic operations to hidden features—so you can master your Daikin wall remote in just minutes. Think of this as your friendly, no-jargon cheat sheet to getting the most comfort (and energy efficiency) out of your AC system.
Understanding Your Daikin Wall Remote: A Quick Overview
Before diving into button-by-button instructions, let’s get familiar with what you’re working with. The Daikin wall remote—often called a wired or wireless wall controller—is designed to be mounted near your main living area for easy access. Unlike handheld remotes, this one stays put, which means no more losing it behind the couch or under a magazine. It’s sleek, usually white or light gray, and features an LCD screen that displays temperature, mode, fan speed, and more.
Visual guide about how to use daikin air conditioner wall remote
Image source: hhaircon.com.au
What Makes the Daikin Wall Remote Special?
Daikin’s wall remotes are known for their intuitive design and reliability. They’re built to last and engineered to communicate seamlessly with your indoor unit. Unlike cheaper models that might lag or lose signal, Daikin remotes offer consistent performance. Plus, they often support advanced features like scheduling, zone control (if your system supports it), and energy-saving modes.
One thing to note: not all Daikin wall remotes are identical. Depending on your model—such as the BRC1E71, BRC1E72, or newer smart-enabled versions—the button layout and available functions may vary slightly. But the core principles remain the same. Whether you’ve got a basic unit or a high-end inverter model, the fundamentals we’ll cover apply across the board.
Key Components of the Remote
Let’s break down the main parts of the remote so you know what you’re looking at:
- LCD Display: Shows current temperature, operating mode, fan speed, timer settings, and error codes (if any).
- Power Button: Turns the AC on or off. Usually marked with a circle or power symbol.
- Mode Button: Cycles through cooling, heating, fan-only, auto, and dehumidify modes.
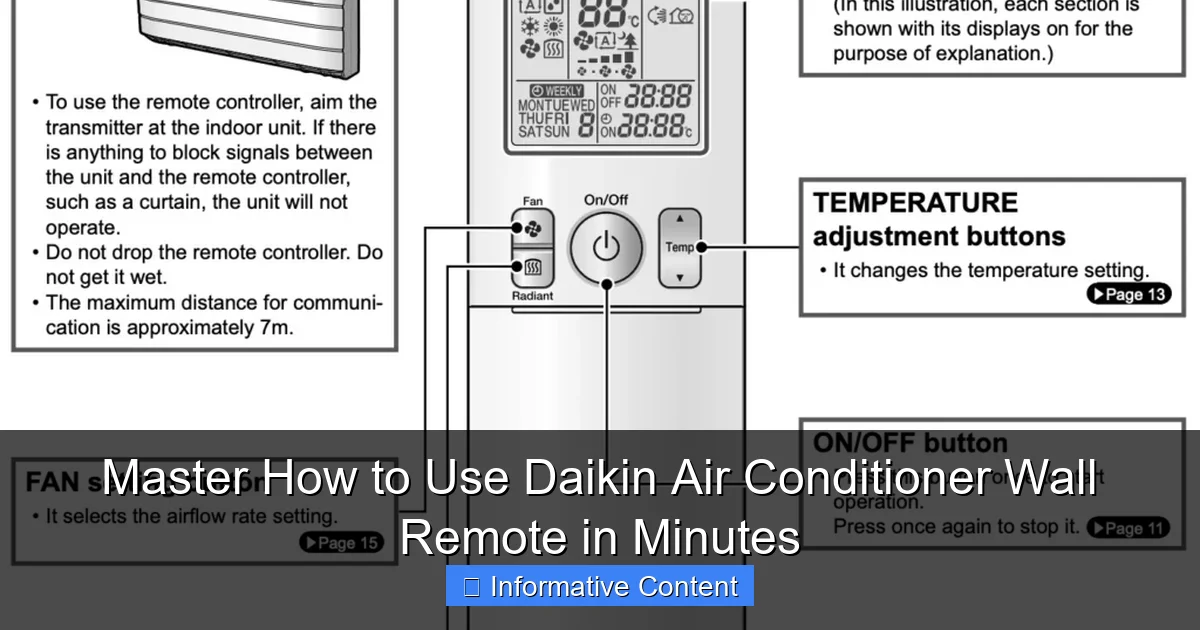
- Temperature Up/Down Arrows: Adjust your desired room temperature.
- Fan Speed Button: Lets you choose between low, medium, high, or auto fan settings.
- Timer Buttons: Set start and stop times for automatic operation.
- Swing/Louver Button: Controls airflow direction (if your unit has adjustable louvers).
- Filter Reset or Clean Button: Reminds you when it’s time to clean or replace the filter.
Some models also include a “Quiet” or “Eco” button for energy-saving operation, and newer smart remotes may have Wi-Fi indicators or app connectivity options. Don’t worry—we’ll go over each of these in detail.
Step-by-Step Guide: Basic Operations Made Simple
Now that you know what each part does, let’s walk through the most common tasks you’ll perform with your Daikin wall remote. Think of this as your daily driver’s manual—simple, practical, and designed for real-life use.
Turning On and Off Your Air Conditioner
This one’s straightforward, but it’s worth covering because it’s the foundation of everything else. To turn on your Daikin AC:
- Press the Power button (usually at the top of the remote).
- The LCD screen will light up, and you’ll hear a soft beep or see the indoor unit’s indicator light turn on.
- The default mode is often “Auto,” but you can change it immediately using the Mode button.
To turn it off, simply press the Power button again. The unit will shut down, and the display will go dark (or show standby status, depending on the model).
Pro Tip: If your remote doesn’t respond, check that it’s properly connected to the indoor unit. Some models require a wired connection, while others use infrared or radio frequency. Also, ensure the remote hasn’t been locked (we’ll cover remote lock later).
Setting Your Desired Temperature
Once the AC is on, use the Up and Down arrow buttons to set your ideal temperature. Most Daikin units allow settings between 16°C (61°F) and 30°C (86°F). The display will show your selected temperature in real time.
For example, if it’s a hot afternoon and you want to cool down quickly, set it to 22°C. The AC will run at full capacity until the room reaches that temperature, then adjust to maintain it.
Real-Life Example: I once set my AC to 18°C on a 35°C day, thinking “the colder, the better.” Big mistake. Not only did it take forever to cool, but my energy bill spiked. Now I stick to 24–26°C in summer—comfortable, efficient, and wallet-friendly.
Choosing the Right Operating Mode
The Mode is your gateway to different functions. Press it repeatedly to cycle through the options. Here’s what each one does:
- Cool: Lowers room temperature. Ideal for hot days.
- Heat: Warms the room. Great for winter or chilly mornings.
- Fan: Circulates air without cooling or heating. Useful for ventilation.
- Auto: The system decides whether to cool or heat based on the set temperature and room conditions.
- Dry (Dehumidify): Reduces humidity without significantly lowering temperature. Perfect for muggy days.
Most people use Cool and Heat the most, but don’t overlook Dry mode—especially if you live in a humid climate. It can make a huge difference in comfort without overcooling.
Adjusting Fan Speed for Comfort and Efficiency
The Fan Speed button lets you control how fast the indoor fan spins. Options typically include Low, Medium, High, and Auto.
- Low: Quiet operation, ideal for nighttime or light cooling.
- Medium: Balanced noise and airflow—great for everyday use.
- High: Maximum cooling or heating power, best for quick temperature changes.
- Auto: The system adjusts fan speed based on how far the room temperature is from your set point.
I usually keep mine on Auto during the day and switch to Low at night. It’s quieter and still keeps the room comfortable.
Advanced Features: Unlocking the Full Potential
Now that you’ve mastered the basics, let’s explore some of the more advanced—and often underused—features of your Daikin wall remote. These can make your life easier, save energy, and improve comfort.
Using the Timer Function for Smart Scheduling
The timer is one of the most useful features, especially if you want your AC to turn on or off automatically. This is perfect for coming home to a cool house or avoiding wasted energy when you’re away.
To set a timer:
- Press the Timer button (may be labeled “Timer On/Off” or have a clock icon).
- Use the arrows to set the desired start or stop time.
- Press the Timer button again to confirm.
For example, set the timer to turn on at 5:30 PM so your living room is cool by the time you get home from work. Or set it to turn off at 11:00 PM to save energy while you sleep.
Pro Tip: Some models allow you to set both a start and stop timer. Check your user manual to see if yours supports dual timers.
Controlling Airflow Direction with Swing Mode
If your Daikin unit has adjustable louvers (flaps that direct airflow), you can control where the air goes using the Swing button.
- Press the Swing button once to activate automatic oscillation—air moves up and down (or side to side, depending on the unit).
- Press it again to stop at a fixed position.
- Use the arrow buttons (if available) to manually adjust the louver angle.
This is great for avoiding direct airflow on people—especially babies, elderly family members, or anyone sensitive to drafts. I always angle the louvers upward in summer so the cool air circulates without blowing directly on us.
Activating Energy-Saving Modes
Many Daikin remotes include an Eco or Quiet mode. These reduce power consumption and noise by slightly adjusting compressor and fan operation.
- Eco Mode: Limits maximum power output, helping you save up to 20–30% on energy bills.
- Quiet Mode: Reduces fan and compressor noise—ideal for bedrooms or quiet environments.
I use Eco mode during mild weather when full cooling isn’t needed. It’s a small change, but over time, it adds up in savings.
Remote Lock: Preventing Accidental Changes
Got kids or pets who love pressing buttons? Use the remote lock feature to prevent unwanted changes.
To lock the remote:
- Press and hold the Mode and Fan Speed buttons simultaneously for 3–5 seconds.
- The display will show a lock icon or “LOCK” message.
- To unlock, repeat the same button combination.
This is a lifesaver during parties or when you’re away and don’t want someone accidentally cranking the heat in July.
Troubleshooting Common Issues
Even the best systems can have hiccups. Here are some common problems and how to fix them—no technician required.
Remote Not Responding
If your remote isn’t working, try these steps:
- Check the power connection. Wired remotes need a secure cable link to the indoor unit.
- Ensure the remote isn’t locked (see above).
- Replace the batteries (if it’s a wireless model).
- Reset the remote by turning off the AC at the circuit breaker for 30 seconds, then turning it back on.
Incorrect Temperature Reading
If the displayed temperature doesn’t match how you feel, the remote’s sensor might be blocked or poorly placed.
- Make sure nothing is covering the remote (like a curtain or furniture).
- Avoid mounting it near heat sources (radiators, windows in direct sunlight).
- Some models allow you to enable “remote sensor” mode, which uses the remote’s sensor instead of the unit’s. Check your manual.
Error Codes on the Display
If you see a code like “E1” or “F3,” don’t panic. These are diagnostic messages. Refer to your user manual for specific meanings. Common ones include:
- E1: Remote communication error.
- F3: Indoor fan motor issue.
- P1: Voltage problem.
Most can be resolved with a power reset. If the code persists, contact Daikin support.
Maintenance Tips to Keep Your Remote and AC Running Smoothly
A little care goes a long way. Here’s how to keep your Daikin system in top shape.
Cleaning the Remote
Wipe the remote with a soft, dry cloth weekly. Avoid harsh chemicals—they can damage the screen or buttons. If needed, use a slightly damp cloth, but never spray liquid directly on the remote.
Filter Maintenance
The remote may display a “Clean Filter” reminder. When it does:
- Turn off the AC.
- Open the front panel of the indoor unit.
- Remove the filter and rinse it with water.
- Let it dry completely before reinserting.
- Press the Filter Reset button (if available) to clear the reminder.
Cleaning the filter every 2–4 weeks improves airflow and efficiency.
Seasonal Checks
Before summer and winter, do a quick system check:
- Test all modes (cool, heat, fan).
- Check for unusual noises or odors.
- Ensure the outdoor unit is clear of debris.
This helps catch issues early and ensures peak performance when you need it most.
Comparison Table: Daikin Wall Remote Models
| Model | Display Type | Timer Function | Eco Mode | Remote Lock | Wi-Fi Compatible |
|---|---|---|---|---|---|
| BRC1E71 | LCD | Yes | Yes | Yes | No |
| BRC1E72 | Backlit LCD | Yes | Yes | Yes | No |
| BRC1H71 (Smart) | Color Touchscreen | Yes | Yes | Yes | Yes |
| BRC1E68 | Basic LCD | Limited | No | Yes | No |
This table helps you compare key features across popular Daikin wall remote models. If you’re unsure which one you have, check the label on the back or consult your installation paperwork.
Final Thoughts: You’ve Got This!
Using your Daikin air conditioner wall remote doesn’t have to be complicated. With a little practice, you’ll be adjusting temperatures, setting timers, and optimizing airflow like a pro. Remember, the goal isn’t to use every feature at once—it’s to find the settings that make your home comfortable and efficient.
Start with the basics: power, mode, temperature, and fan speed. Once you’re comfortable, explore the timer, swing, and eco modes. And don’t forget maintenance—clean filters and a well-placed remote make all the difference.
Whether you’re cooling down on a hot day or warming up on a cold night, your Daikin remote is your command center. Master it, and you’ll enjoy better comfort, lower bills, and peace of mind. So go ahead—press that power button and take control of your climate. You’ve got this!
Frequently Asked Questions
How do I turn on my Daikin air conditioner using the wall remote?
To turn on your Daikin air conditioner, press the Power button (usually marked with a circle icon) on the wall remote. Ensure the unit is plugged in and the circuit breaker is on—the indoor unit will beep and start operating in your last used mode.
What do the different modes (Cool, Heat, Dry, Fan) do on my Daikin remote?
The mode buttons let you select your desired climate function: Cool for air conditioning, Heat for warmth (if heat pump-equipped), Dry to dehumidify, and Fan for air circulation without temperature change. Match the mode to your comfort needs for optimal efficiency.
How do I set the temperature and fan speed with the Daikin wall remote?
Use the Temperature Up/Down arrows to adjust your desired temperature (typically 16–30°C). For fan speed, press the Fan button to cycle through Auto, Low, Medium, High, or Powerful—ideal for balancing comfort and noise.
Why is my Daikin remote not responding? How can I troubleshoot?
First, check if the remote has fresh batteries and isn’t blocked by obstructions. If unresponsive, reset it by holding the Power button for 5 seconds or checking the indoor unit’s signal receiver for interference.
How do I use the timer function on my Daikin air conditioner wall remote?
Press the Timer button to set an on/off schedule: choose On-Timer or Off-Timer, then adjust the time with the arrows. This helps automate usage for energy savings—ideal for bedtime or leaving home.
Can I lock the Daikin remote to prevent accidental changes?
Yes, press and hold the Silent and Power buttons simultaneously for 3 seconds to enable/disable child lock. This prevents unintended adjustments, especially useful in homes with kids or shared spaces.