
Resetting your Carrier air conditioner can solve common issues like unresponsiveness, error codes, or cooling problems. This guide walks you through simple, safe methods to restore normal operation and improve efficiency.
Key Takeaways
- Power cycling is the easiest reset method: Turn off the unit at the thermostat and breaker, wait 5–10 minutes, then restore power.
- Use the reset button on some models: Newer Carrier units may have a physical reset button on the outdoor unit or control board.
- Check the air filter first: A dirty filter can cause performance issues that mimic the need for a reset.
- Reset the thermostat separately: Sometimes the issue lies with the thermostat, not the AC unit itself.
- Know when to call a professional: If the unit doesn’t respond after multiple resets, there may be an electrical or mechanical fault.
- Regular maintenance prevents frequent resets: Clean filters, clear debris, and schedule annual servicing to keep your system running smoothly.
- Document error codes: Write down any blinking lights or error messages before resetting to help diagnose recurring problems.
📑 Table of Contents
- Why You Might Need to Reset Your Carrier Air Conditioner
- How to Reset Carrier Air Conditioner: Step-by-Step Guide
- Alternative Reset Methods for Specific Carrier Models
- Troubleshooting After a Reset: What If It Doesn’t Work?
- Preventing the Need for Frequent Resets
- When to Call a Professional
- Conclusion
Why You Might Need to Reset Your Carrier Air Conditioner
Your Carrier air conditioner is a reliable workhorse, designed to keep your home cool and comfortable during the hottest months. But like any complex system, it can occasionally run into hiccups. Maybe your AC won’t turn on, it’s blowing warm air, or the thermostat seems unresponsive. In many cases, the solution isn’t a costly repair—it’s as simple as resetting the system.
Resetting your Carrier air conditioner is like giving it a fresh start. It clears temporary glitches, resets internal sensors, and restores communication between the indoor and outdoor units. This process is especially helpful after power outages, during seasonal startups, or when the system has been running nonstop for days. Think of it as the digital equivalent of turning your phone off and on again—sometimes, that’s all it takes to get things back on track.
Common Signs Your AC Needs a Reset
Before jumping into the reset process, it’s important to recognize the signs that your Carrier air conditioner might benefit from a reboot. These symptoms don’t always mean something is broken—they could simply indicate a temporary malfunction that a reset can fix.
- Unit won’t turn on: You press the “cool” button on the thermostat, but nothing happens. No fan, no compressor, no cool air.
- Blinking error codes: Many Carrier models have indicator lights that flash in specific patterns to signal issues like low refrigerant, high pressure, or electrical faults.
- Thermostat unresponsive: The display is blank, frozen, or not responding to button presses.
- AC runs but doesn’t cool: The fan is spinning, but the air coming out is warm or lukewarm.
- Frequent cycling: The unit turns on and off rapidly, never completing a full cooling cycle.
- Strange noises or odors: Unusual sounds like clicking, buzzing, or grinding, or a burning smell, may indicate an electrical issue that a reset could resolve.
If you notice any of these signs, don’t panic. In many cases, a simple reset can restore normal function. However, if the problem persists after a reset, it may be time to call a certified HVAC technician.
How to Reset Carrier Air Conditioner: Step-by-Step Guide
Resetting your Carrier air conditioner is a straightforward process, but it’s important to follow the steps carefully to avoid damaging the system or risking electrical shock. The most common and effective method is a power cycle, which involves cutting power to the unit and allowing it to fully reset. Here’s how to do it safely and effectively.
Visual guide about How to Reset Carrier Air Conditioner
Image source: i.pinimg.com
Step 1: Turn Off the Thermostat
Start by switching your thermostat to the “off” position. This ensures that the air conditioner isn’t trying to receive signals while you’re working on it. If you have a programmable or smart thermostat, make sure it’s completely powered down. For digital models, you may need to remove the batteries temporarily or press a reset button if available.
For example, if you have a Carrier Infinity or Performance series thermostat, simply press the “system” button and select “off.” Wait a few seconds to confirm the display shows no active cooling mode.
Step 2: Shut Off the Circuit Breaker
Next, locate your home’s main electrical panel (also called the breaker box). Find the breaker labeled “AC,” “Air Conditioner,” or “HVAC.” It’s usually a 240-volt double-pole breaker. Turn it to the “off” position. This cuts power to both the indoor air handler and the outdoor condenser unit.
Safety tip: Use a flashlight if the panel is in a dark area, and avoid touching any wires or metal parts inside the panel. If you’re unsure which breaker controls your AC, turn off the main breaker to be safe—but be aware this will cut power to your entire home.
Step 3: Wait 5 to 10 Minutes
This waiting period is crucial. It allows the system’s internal capacitors to fully discharge and resets the control board. Think of it as giving your AC a mental reset—just like rebooting a computer. Skipping this step may result in an incomplete reset, and the problem could persist.
Use this time to check other components. Inspect the outdoor unit for debris like leaves or dirt blocking the coils. Clear any obstructions, as poor airflow can cause the system to overheat and shut down. Also, check the air filter—if it’s clogged with dust, replace it. A dirty filter forces the system to work harder and can trigger safety shutdowns.
Step 4: Restore Power
After waiting at least 5 minutes (10 is better), return to the breaker panel and turn the AC breaker back to the “on” position. You should hear a soft click as power is restored. Then, go back to your thermostat and switch it back to “cool” mode. Set your desired temperature a few degrees below the current room temperature to prompt the system to start.
Within a minute or two, you should hear the outdoor compressor kick on and the indoor fan begin circulating air. If cool air starts flowing, congratulations—your reset was successful!
Step 5: Monitor the System
Give your Carrier air conditioner 15 to 30 minutes to run normally. Watch for consistent cooling, listen for unusual noises, and check that the thermostat is responding correctly. If the unit cycles on and off properly and maintains the set temperature, you’re all set.
If the problem returns—say, the unit shuts off again or the error light reappears—there may be a deeper issue. In that case, proceed to advanced troubleshooting or contact a professional.
Alternative Reset Methods for Specific Carrier Models
While power cycling works for most Carrier air conditioners, some models offer additional reset options. These can be especially helpful if you can’t access the breaker panel or if the system has a dedicated reset feature.
Using the Reset Button (If Available)
Some newer Carrier models, particularly those with advanced control boards or smart features, include a physical reset button. This button is typically located on the outdoor unit’s control panel or inside the indoor air handler.
To use it:
- Turn off the thermostat.
- Locate the reset button (often red or yellow and labeled “reset” or “system reset”).
- Press and hold the button for 5 to 10 seconds.
- Release and wait for the system to restart.
Note: Not all Carrier units have this feature. Check your owner’s manual or look for a small button near the wiring compartment. If you don’t see one, your model likely doesn’t include it.
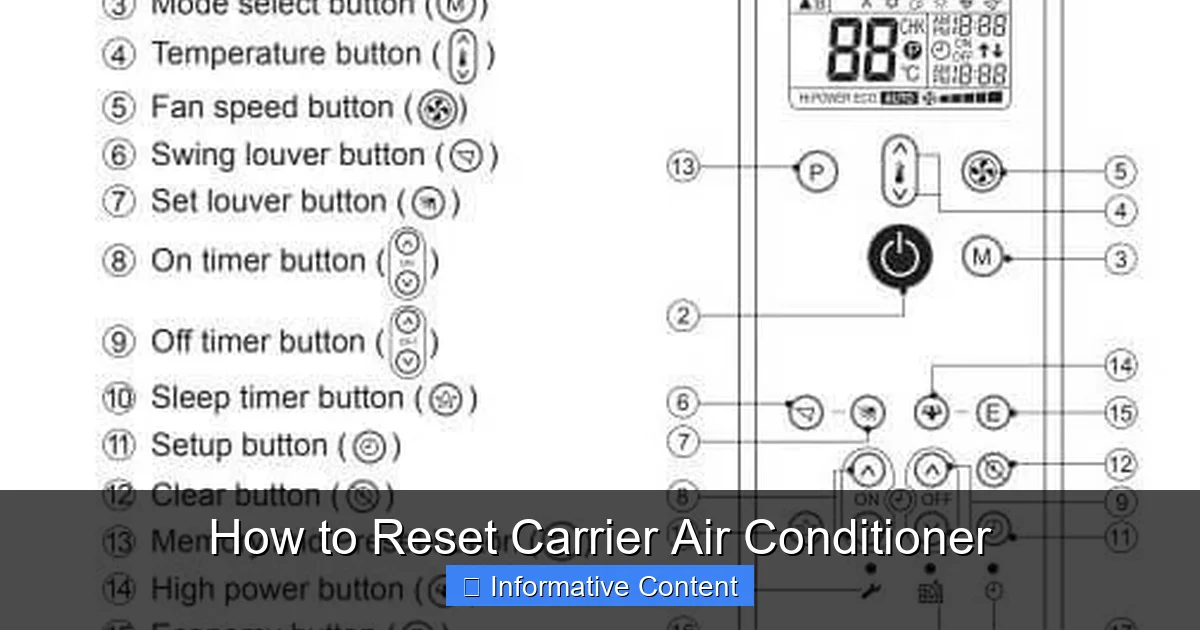
Resetting the Thermostat Separately
Sometimes the issue isn’t with the air conditioner itself, but with the thermostat. A malfunctioning thermostat can send incorrect signals, causing the AC to behave erratically. Resetting the thermostat can often resolve these communication issues.
For most Carrier thermostats:
- Remove the thermostat faceplate from the wall.
- Take out the batteries (if battery-powered).
- Wait 30 seconds, then reinsert the batteries.
- Reattach the faceplate and turn the system back on.
For hardwired thermostats, you may need to turn off power at the breaker, wait, then restore power. Some smart thermostats also have a factory reset option in the settings menu—use this only if other methods fail, as it will erase all programmed schedules.
Factory Reset (Advanced Option)
In rare cases, a full factory reset may be necessary. This restores the system to its original settings and clears all custom configurations. It’s typically used when troubleshooting persistent errors or after a major repair.
To perform a factory reset:
- Consult your owner’s manual for model-specific instructions.
- Access the control panel (usually on the outdoor unit).
- Enter diagnostic mode (often by pressing a sequence of buttons).
- Select “factory reset” or “restore defaults.”
- Confirm the action and wait for the system to reboot.
Warning: A factory reset will erase all settings, including Wi-Fi connections, schedules, and preferences. Only attempt this if you’re comfortable with the process or under technician guidance.
Troubleshooting After a Reset: What If It Doesn’t Work?
Even after a proper reset, your Carrier air conditioner might still not work as expected. Don’t worry—this doesn’t necessarily mean the unit is broken. It could indicate an underlying issue that needs attention. Here’s how to troubleshoot common post-reset problems.
AC Still Won’t Turn On
If the unit remains unresponsive after a reset, check the following:
- Thermostat settings: Ensure it’s set to “cool” and the temperature is below the current room temperature.
- Batteries: Replace thermostat batteries if they’re low.
- Breaker status: Confirm the AC breaker is fully on and hasn’t tripped again.
- Power supply: Use a multimeter to test voltage at the outdoor unit (only if you’re qualified).
If all these check out, there may be a blown fuse, faulty capacitor, or wiring issue. These require professional diagnosis.
Unit Turns On But Doesn’t Cool
If the fan runs but no cool air comes out, consider these possibilities:
- Dirty air filter: Replace it—this is the #1 cause of poor cooling.
- Blocked condenser coils: Clean the outdoor unit with a garden hose (turn off power first).
- Low refrigerant: This requires a licensed technician to inspect and recharge.
- Frozen evaporator coil: Turn off the AC and let it thaw for 24 hours. Check for airflow restrictions.
Running the AC with a frozen coil can cause serious damage, so address this promptly.
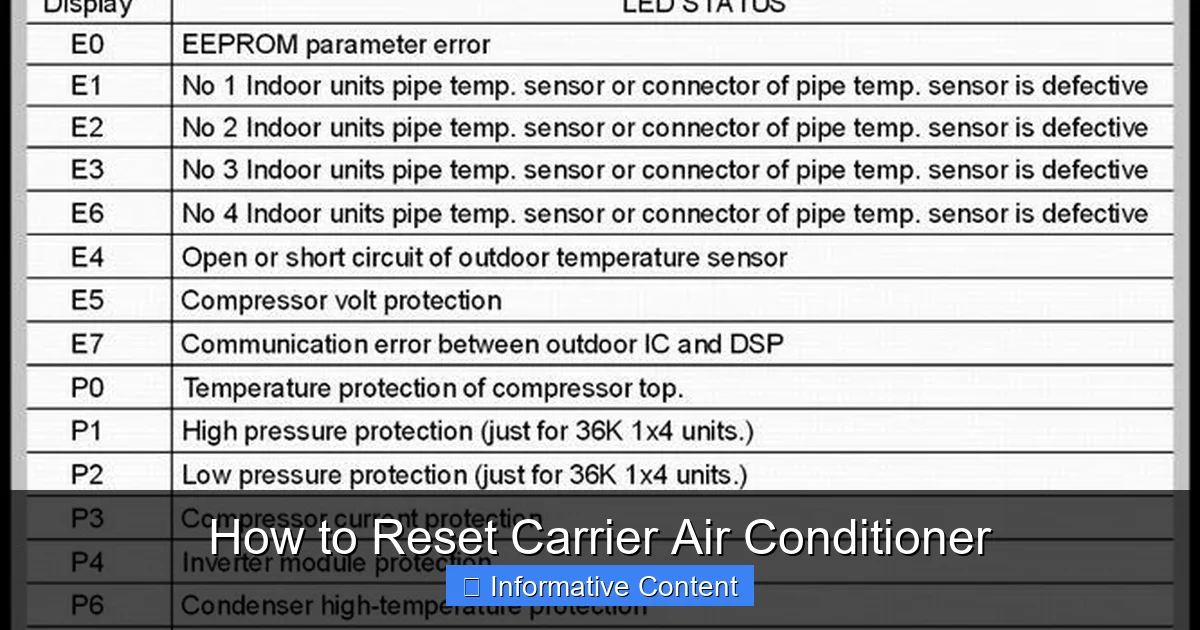
Error Codes Keep Reappearing
Carrier units often display error codes via blinking lights on the outdoor unit or thermostat. These codes help identify specific problems. For example:
- Two blinks: Low pressure switch open (possible refrigerant leak).
- Three blinks: High pressure switch open (dirty coils or blocked airflow).
- Four blinks: Open circuit in the outdoor fan motor.
Refer to your owner’s manual for a complete list of error codes. If the same code returns after a reset, it’s likely a persistent issue that needs professional repair.
Strange Noises or Smells
After a reset, listen for unusual sounds:
- Buzzing or humming: Could indicate a failing capacitor or electrical issue.
- Clicking: Normal during startup, but continuous clicking may signal a relay problem.
- Grinding: Likely a motor or fan blade issue—shut off the unit immediately.
Burning smells are especially concerning. Turn off the AC and call a technician right away—this could indicate overheating wires or motor failure.
Preventing the Need for Frequent Resets
While resetting your Carrier air conditioner is a useful troubleshooting tool, it shouldn’t become a regular habit. Frequent resets can be a sign of underlying problems or poor maintenance. The good news? Many of these issues are preventable with a few simple habits.
Change the Air Filter Regularly
A dirty air filter is one of the most common causes of AC problems. It restricts airflow, causing the system to overheat, freeze up, or shut down. Check your filter every month during peak usage and replace it every 1 to 3 months, depending on usage and filter type.
Tip: Set a calendar reminder or use a smart thermostat that alerts you when it’s time to change the filter. A clean filter not only prevents resets but also improves indoor air quality and energy efficiency.
Keep the Outdoor Unit Clean
The condenser unit outside your home needs plenty of airflow to function properly. Over time, leaves, grass, dirt, and debris can accumulate around the coils, reducing efficiency and triggering safety shutdowns.
To maintain it:
- Clear a 2-foot radius around the unit of plants, furniture, or debris.
- Use a garden hose to gently rinse the coils (never use a pressure washer).
- Trim back shrubs or vines that could block airflow.
Do this at least twice a year—once in spring before the cooling season and again in fall.
Schedule Annual Professional Maintenance
Even the best-maintained systems benefit from a professional tune-up. A certified HVAC technician can inspect electrical connections, test refrigerant levels, clean coils, lubricate moving parts, and check for wear and tear.
During a maintenance visit, the technician may also update your system’s firmware (if applicable) and calibrate sensors to ensure accurate operation. This proactive approach can prevent many issues that lead to resets.
Monitor Thermostat Performance
Your thermostat is the brain of your cooling system. If it’s outdated, poorly placed, or malfunctioning, it can cause the AC to cycle incorrectly or fail to respond.
Consider upgrading to a smart thermostat if you haven’t already. Models like the Carrier Infinity Touch or compatible third-party options (e.g., Nest, Ecobee) offer remote control, scheduling, and energy-saving features. They also provide alerts for maintenance and system errors.
Avoid Overworking the System
During heatwaves, it’s tempting to crank the AC to the lowest setting. But this can overload the system, especially if it’s undersized for your home. Instead, set the thermostat to a reasonable temperature (72–76°F) and use fans to help circulate cool air.
Also, close blinds or curtains during the day to reduce heat gain, and seal windows and doors to prevent cool air from escaping. These small steps reduce strain on your Carrier air conditioner and lower the chance of malfunctions.
When to Call a Professional
While resetting your Carrier air conditioner is something most homeowners can do safely, there are times when professional help is necessary. Ignoring serious issues can lead to costly repairs or even complete system failure.
Call a licensed HVAC technician if:
- The unit doesn’t respond after multiple resets.
- You notice refrigerant leaks (oily residue near the indoor coil).
- The breaker trips repeatedly when the AC is turned on.
- There’s a burning smell, smoke, or sparks.
- The compressor makes loud knocking or screeching noises.
- Ice forms on the refrigerant lines or indoor coil.
Attempting to fix electrical or refrigerant issues yourself can be dangerous and may void your warranty. Always prioritize safety and consult a professional when in doubt.
Conclusion
Resetting your Carrier air conditioner is a simple yet powerful way to resolve many common cooling issues. Whether you’re dealing with an unresponsive thermostat, error codes, or poor performance, a proper reset can often restore normal operation without the need for expensive repairs.
By following the step-by-step guide—turning off the thermostat, cutting power at the breaker, waiting, and restoring power—you give your system a clean slate. Combine this with regular maintenance, like changing filters and cleaning the outdoor unit, and you’ll reduce the need for resets in the future.
Remember, while resets are helpful, they’re not a cure-all. If problems persist, don’t hesitate to call a qualified technician. Your Carrier air conditioner is built to last, and with the right care, it will keep your home cool and comfortable for years to come.
Frequently Asked Questions
How do I reset my Carrier air conditioner without a reset button?
You can reset most Carrier air conditioners by turning off the thermostat and the circuit breaker, waiting 5–10 minutes, then restoring power. This power cycle method effectively resets the system’s control board.
Why won’t my Carrier AC turn on after a reset?
If your AC still won’t turn on, check the thermostat settings, breaker status, and air filter. If those are fine, there may be an electrical issue, blown fuse, or faulty component requiring professional inspection.
How often should I reset my air conditioner?
You should only reset your AC when experiencing issues like unresponsiveness or error codes. Frequent resets may indicate an underlying problem that needs repair or maintenance.
Can I reset my Carrier AC remotely?
If you have a smart thermostat connected to Wi-Fi, you may be able to turn the system off and on remotely. However, a full reset still requires cutting power at the breaker for safety and effectiveness.
Will resetting my AC delete my thermostat settings?
A standard power cycle won’t delete settings. However, a factory reset on the thermostat or control board will erase programmed schedules and preferences—use this only as a last resort.
Is it safe to reset my air conditioner myself?
Yes, as long as you turn off power at the breaker and follow safety precautions. Avoid touching internal components, and call a professional if you’re unsure or encounter electrical issues.