
This guide walks you through the correct way to add water to your LG portable air conditioner, whether it’s a self-evaporative or manual-fill model. You’ll learn when, why, and how to refill the tank to keep your unit running efficiently and avoid common mistakes.
Key Takeaways
- Understand your model: Not all LG portable ACs require manual water filling—some use self-evaporative technology that reduces or eliminates the need.
- Check the water tank regularly: Even self-evaporative units may need occasional draining or refilling in high-humidity environments.
- Use clean, cool water: Always fill the tank with fresh, filtered water to prevent mold, bacteria, and mineral buildup.
- Turn off and unplug before refilling: Safety first—always power down the unit and disconnect it from the outlet before handling the water tank.
- Monitor humidity levels: High indoor humidity can increase condensation, requiring more frequent tank checks or drainage.
- Clean the tank monthly: Prevent odors and clogs by rinsing the water tank with vinegar or mild detergent every 30 days.
- Know when to call support: If your unit leaks, won’t cool, or shows error codes like “E1” or “FL,” contact LG support for assistance.
How to Put Water in LG Portable Air Conditioner: A Complete 2026 Guide
If you’ve just bought an LG portable air conditioner or are struggling with frequent shutdowns, you might be wondering: Do I need to add water to my LG portable AC? The answer depends on your specific model and how it handles condensation. In 2026, LG continues to innovate with smarter, more efficient portable air conditioners—many of which use advanced self-evaporative technology. But even the latest models may require occasional water management.
This comprehensive guide will walk you through everything you need to know about putting water in your LG portable air conditioner. Whether you’re dealing with a manual-fill tank or a self-evaporating unit that still needs occasional attention, we’ve got you covered. You’ll learn how to identify your model type, safely refill the water tank, maintain optimal performance, and troubleshoot common issues—all in simple, easy-to-follow steps.
By the end of this guide, you’ll be confident in managing your LG portable AC’s water needs, ensuring it runs efficiently, quietly, and effectively all summer long.
Understanding How LG Portable Air Conditioners Handle Water
Visual guide about How to Put Water in Lg Portable Air Conditioner
Image source: gscs.lge.com
Before you start pouring water into your unit, it’s important to understand how LG portable air conditioners manage moisture. Unlike window units or central AC systems that drain condensation outside, portable units collect moisture internally. This water comes from the air as the AC cools and dehumidifies your space.
In 2026, most LG portable air conditioners fall into one of two categories:
- Self-Evaporative Models: These units use a built-in system to evaporate collected condensation back into the air through the exhaust hose. This reduces or eliminates the need for manual water removal. Popular models like the LG LP1419IVSM and LP1218GXR use this technology.
- Manual Drain Models: Older or budget-friendly models may require you to periodically empty a water tank or add water if they use a cooling pad or evaporative boost feature (less common in standard portable ACs).
Wait—add water? Isn’t the AC supposed to remove water, not add it?
Great question. While most portable ACs remove moisture, some LG models—especially those with “SmartThinQ” or “Dual Inverter” technology—may include a hydro-boost or enhanced cooling mode that uses a small amount of water to improve efficiency in extremely hot conditions. This is more common in hybrid or evaporative-assisted portable ACs, though still rare.
In most cases, you won’t need to “add” water to cool your room. Instead, you’ll be removing excess water that builds up. But if your model has a refillable tank for enhanced cooling or humidification, this guide will show you exactly how to do it safely.
Step 1: Identify Your LG Portable AC Model
The first step in putting water in your LG portable air conditioner is knowing whether your unit actually requires it. Not all models do—so don’t assume you need to fill a tank just because you see a water compartment.
Check the Model Number
Look for the model number on the back or bottom of your unit. It usually starts with “LP” (e.g., LP1419IVSM, LP1218GXR, LP0818WNR). You can also find it on the original packaging or in the user manual.
Once you have the model number, visit the official LG website or use the LG ThinQ app (available in 2026) to look up your unit’s specifications. Search for “water tank,” “drainage,” or “self-evaporative” to see if your model requires manual water management.
Look for a Water Tank or Drain Plug
Most LG portable ACs have a removable water tank located at the bottom rear of the unit. It’s usually a pull-out tray or drawer marked with a water droplet icon. If you see this, your unit collects condensation and may need periodic emptying.
Some models also have a drain plug or continuous drain hose option for unattended operation. This is common in commercial or high-capacity units.
Check for a “Hydro Boost” or “Cool Boost” Feature
If your model includes a “Hydro Boost” or “Enhanced Cooling” mode (found in select 2024–2026 LG models), it may use a small water reservoir to improve cooling performance. This feature is rare but growing in popularity for extreme heat climates.
In these cases, you will need to add water to a designated tank. The tank is usually small (1–2 liters) and located near the air intake or behind a front panel.
Step 2: Prepare Your Unit for Water Refilling
Once you’ve confirmed your LG portable AC requires water (either for drainage or enhanced cooling), it’s time to prepare for safe refilling.
Turn Off and Unplug the Unit
Safety is critical. Always turn off the air conditioner using the remote or control panel, then unplug it from the wall outlet. This prevents electrical hazards and ensures the internal fan and compressor are completely stopped.
Never attempt to remove or refill the water tank while the unit is running or plugged in.
Let the Unit Cool Down
If the AC has been running for a while, give it 10–15 minutes to cool down. This prevents burns from hot components and makes handling the tank safer.
Gather Your Supplies
You’ll need:
- Clean, cool water (preferably filtered or distilled)
- A soft cloth or paper towels
- A small funnel (optional, for precise pouring)
- White vinegar or mild detergent (for cleaning, if needed)
Avoid using hot water, as it can promote bacterial growth and damage internal components.
Step 3: Locate and Remove the Water Tank
Now it’s time to access the water tank. The process varies slightly by model, but here’s the general method.
Find the Tank Compartment
On most LG portable ACs, the water tank is located at the bottom rear of the unit. Look for a rectangular panel or drawer with a handle or grip. Some models have a small LED indicator that lights up when the tank is full.
Pull Out the Tank
Gently pull the tank straight out. It should slide smoothly. If it’s stuck, don’t force it—check for a locking mechanism or tab that needs to be pressed.
On models with a “Hydro Boost” feature, the water tank may be behind a front panel or near the air filter. Consult your user manual for exact location.
Inspect the Tank
Once removed, check the tank for:
- Visible water level (most tanks have a max fill line)
- Signs of mold, slime, or mineral deposits
- Cracks or damage
If the tank is dirty, clean it before refilling (see maintenance section below).
Step 4: Add Water to the Tank (If Required)
Now for the main event: putting water in your LG portable air conditioner.
Determine If Water Is Needed
Ask yourself:
- Is this a self-evaporative model? (Most are—water evaporates automatically.)
- Does the unit have a “Hydro Boost” or cooling-enhancement feature?
- Is the tank empty and the unit not cooling properly?
If you answered “yes” to the second or third question, proceed with adding water.
Fill the Tank Correctly
Follow these steps:
- Hold the tank on a flat, stable surface.
- Pour clean, cool water into the tank using a funnel if needed.
- Stop filling when the water reaches the “MAX” line. Overfilling can cause leaks.
- Do not use tap water if your area has hard water. Minerals can clog the system. Use distilled or filtered water instead.
For “Hydro Boost” models, the tank is typically small—only 1–1.5 liters. Overfilling can damage the pump or cause overflow.
Reinsert the Tank
Once filled, carefully slide the tank back into the unit. Make sure it’s fully seated and clicks into place. A loose tank can trigger error codes or prevent the unit from starting.
Step 5: Turn On and Test the Unit
After refilling, it’s time to test your LG portable air conditioner.
Plug In and Power On
Reconnect the power cord and turn on the unit using the remote or control panel.
Select the Appropriate Mode
If your model has a “Hydro Boost” or “Enhanced Cooling” mode, activate it. This tells the unit to use the water in the tank to improve cooling performance.
Otherwise, set the AC to “Cool” mode and adjust the temperature as needed.
Listen and Observe
Listen for:
- Normal fan and compressor sounds
- Water pump activation (a gentle hum or trickle sound in Hydro Boost models)
- No leaks or dripping from the tank area
Check the control panel for error codes. Common ones include:
- E1: Water tank full or not seated properly
- FL: Float switch activated (tank overflow)
- EC: Internal error (contact support)
If you see an error, turn off the unit, recheck the tank, and ensure it’s properly inserted.
Step 6: Maintain Your Water Tank for Long-Term Performance
Adding water is only part of the process. Regular maintenance ensures your LG portable AC runs efficiently and lasts longer.
Clean the Tank Monthly
Even if you’re not adding water, condensation can leave behind mold or bacteria. Every 30 days:
- Remove the tank.
- Rinse it with warm water.
- Soak in a solution of 1 part white vinegar to 3 parts water for 15 minutes.
- Scrub gently with a soft brush or cloth.
- Rinse thoroughly and dry before reinserting.
This prevents odors and keeps the system hygienic.
Check Water Levels Weekly
Even self-evaporative models can fill up in high-humidity environments. Check the tank weekly during peak summer months. If it’s more than half full, consider emptying it to prevent overflow.
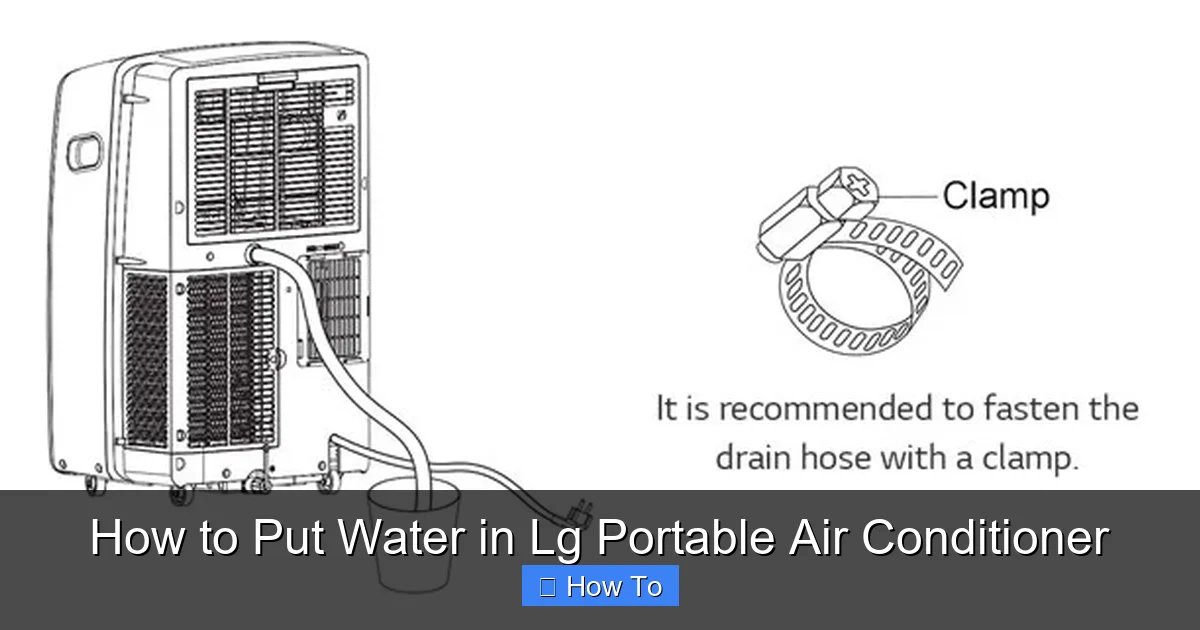
Use a Continuous Drain Hose (Optional)
For unattended operation, connect a drain hose to the rear drain port (if your model supports it). Route the hose to a floor drain or bucket. This eliminates the need for manual emptying.
Monitor Indoor Humidity
High humidity increases condensation. Use a hygroometer to keep indoor humidity between 40% and 60%. If it’s consistently above 60%, your AC may need more frequent tank checks.
Troubleshooting Common Water-Related Issues
Even with proper care, issues can arise. Here’s how to fix the most common problems.
Unit Won’t Turn On After Refilling
Possible causes:
- Tank not fully inserted
- Float switch stuck in “full” position
- Water sensor malfunction
Solution: Remove and reinsert the tank firmly. If the problem persists, clean the float switch (a small plastic piece inside the tank) with a cotton swab and water.
Water Leaking from the Unit
This usually means:
- Tank overfilled
- Cracked tank
- Drain hose disconnected
Solution: Empty the tank, inspect for damage, and ensure all connections are secure. Replace the tank if cracked.
Error Code “E1” or “FL” Appears
These codes indicate a full tank or float switch issue.
Solution: Turn off the unit, remove the tank, empty it, clean it, and reinsert. Reset the unit by unplugging it for 30 seconds.
Unit Not Cooling Well
If your Hydro Boost model isn’t cooling despite a full tank:
- Check if the water pump is working (listen for a hum)
- Ensure the air filter is clean
- Verify the exhaust hose is properly vented
A clogged pump or filter can reduce performance.
Unpleasant Odors
Smells usually come from stagnant water or mold in the tank.
Solution: Clean the tank with vinegar, replace the air filter, and run the unit in “Fan Only” mode for 30 minutes to dry internal components.
When to Call LG Support
If you’ve tried all troubleshooting steps and your LG portable air conditioner still isn’t working properly, it’s time to contact LG customer support.
Call or chat with LG in 2026 via:
- Official LG website: www.lg.com
- LG ThinQ app (available on iOS and Android)
- Phone: 1-800-243-0000 (US)
Have your model number, serial number, and a description of the issue ready. LG offers extended warranties and in-home service for eligible units.
Conclusion
Putting water in your LG portable air conditioner isn’t always necessary—but when it is, doing it correctly ensures optimal performance, energy efficiency, and longevity. In 2026, LG’s smart portable ACs are more advanced than ever, with self-evaporative systems reducing the need for manual intervention. However, models with enhanced cooling features or high humidity environments may still require periodic water management.
By following this guide, you’ve learned how to identify your model, safely refill the water tank, maintain cleanliness, and troubleshoot common issues. Remember: always use clean water, keep the tank clean, and monitor your unit regularly.
With proper care, your LG portable air conditioner will keep you cool, comfortable, and confident all summer long.