
This detailed guide walks you through how to put every part of an LG portable air conditioner back together after cleaning or maintenance. Whether you’re reassembling the filter, fan, or exhaust hose, we’ve got you covered with clear instructions, safety tips, and troubleshooting advice for 2026 models.
Key Takeaways
- Turn off and unplug the unit first: Always ensure the air conditioner is completely powered down before disassembly or reassembly to prevent electrical hazards.
- Follow the manual for your specific model: LG releases updated portable AC units each year—2026 models may have slight design changes, so always refer to the user guide.
- Clean all parts before reassembly: Reinstalling dirty filters or clogged vents reduces efficiency and can damage internal components.
- Align components correctly: Misaligned parts like the evaporator coil or fan blades can cause noise, leaks, or system failure.
- Secure all screws and clips: Loose fittings may lead to air leaks, reduced cooling, or vibrations during operation.
- Test the unit after reassembly: Run a short cycle to confirm proper airflow, cooling, and drainage before extended use.
- Store tools and manuals together: Keep a small toolkit and digital copy of your manual handy for future maintenance.
How to Put Every Part of an LG Portable Air Conditioner Back Together: A Complete 2026 Guide
So, you’ve taken apart your LG portable air conditioner—maybe for deep cleaning, filter replacement, or troubleshooting a strange noise. Now comes the tricky part: putting it all back together. Don’t worry. With the right approach, reassembling your LG portable AC is not only doable but can actually extend the life of your unit and improve its performance.
In this comprehensive guide, we’ll walk you through how to put every part of an LG portable air conditioner back together, step by step. Whether you’re working with a 2026 LG LP1419IVSM, LP0821WSR, or another recent model, these instructions are designed to be universally helpful while accounting for modern design updates. We’ll cover everything from the exterior casing to internal components like the evaporator coil and fan assembly.
By the end of this guide, you’ll know exactly how to reassemble your unit safely, efficiently, and correctly—so it runs like new. Plus, we’ll share expert tips, common mistakes to avoid, and troubleshooting advice to keep your portable AC cooling your space all summer long.
Let’s get started!
Why Reassemble Your LG Portable AC Correctly Matters
Visual guide about How to Put Every Apart Lg Portable Air Conditioner
Image source: gscs.lge.com
Before diving into the steps, it’s important to understand why proper reassembly is critical. LG portable air conditioners are precision-engineered systems. Even a small misalignment or missing screw can lead to:
– Reduced cooling efficiency
– Water leaks due to improper drainage
– Loud noises or vibrations
– Overheating of internal components
– Shortened lifespan of the unit
In 2026, LG has introduced smarter sensors and tighter seals in their portable ACs to improve energy efficiency and quiet operation. That means reassembly requires extra care—especially with components like the condensate pump, air filters, and exhaust hose connections.
Taking the time to put every part back correctly ensures your unit operates at peak performance, saves energy, and avoids costly repairs down the line.
What You’ll Need Before You Begin
Gather these tools and supplies before starting the reassembly process:
- Phillips-head screwdriver (size #2 recommended)
- Soft cloth or microfiber towel
- Compressed air (optional, for cleaning tight spaces)
- Isopropyl alcohol and cotton swabs (for cleaning electrical contacts)
- Owner’s manual (digital or printed—download from LG’s 2026 support site if needed)
- Small container for screws and clips (to avoid losing them)
- Flashlight (to inspect hard-to-see areas)
Having everything ready will make the process smoother and reduce the risk of mistakes.
Step 1: Prepare Your Workspace
Choose a Clean, Dry Area
Find a flat, well-lit surface like a table or workbench. Avoid carpeted areas where small parts can get lost. A clean environment prevents dust from entering the unit during reassembly.
Organize Your Parts
Lay out all disassembled components in the order you removed them. Group screws, clips, and small parts by type and location. This makes it easier to remember where everything goes.
Double-Check for Missing or Damaged Parts
Inspect each component for cracks, warping, or wear. Pay special attention to the air filter, exhaust hose, and drainage tray. If anything is damaged, order a replacement from LG’s official parts store before proceeding.
Step 2: Reinstall the Air Filter
The air filter is one of the most frequently removed and reinstalled parts. In 2026 LG models, the filter is typically a washable mesh or carbon filter located behind the front grille.
Locate the Filter Housing
Open the front panel of your portable AC. On most 2026 LG units, this involves lifting the top edge of the grille or pressing release tabs on the sides.
Insert the Clean Filter
Make sure the filter is completely dry before reinstalling. Slide it into the designated slot with the arrow (if present) pointing toward the unit. The filter should fit snugly without forcing.
Secure the Front Grille
Close the front panel and press firmly until it clicks into place. Some models use small screws to secure the grille—reinstall them if applicable.
Pro Tip: Clean your filter every two weeks during heavy use. A clogged filter reduces airflow and forces the compressor to work harder.
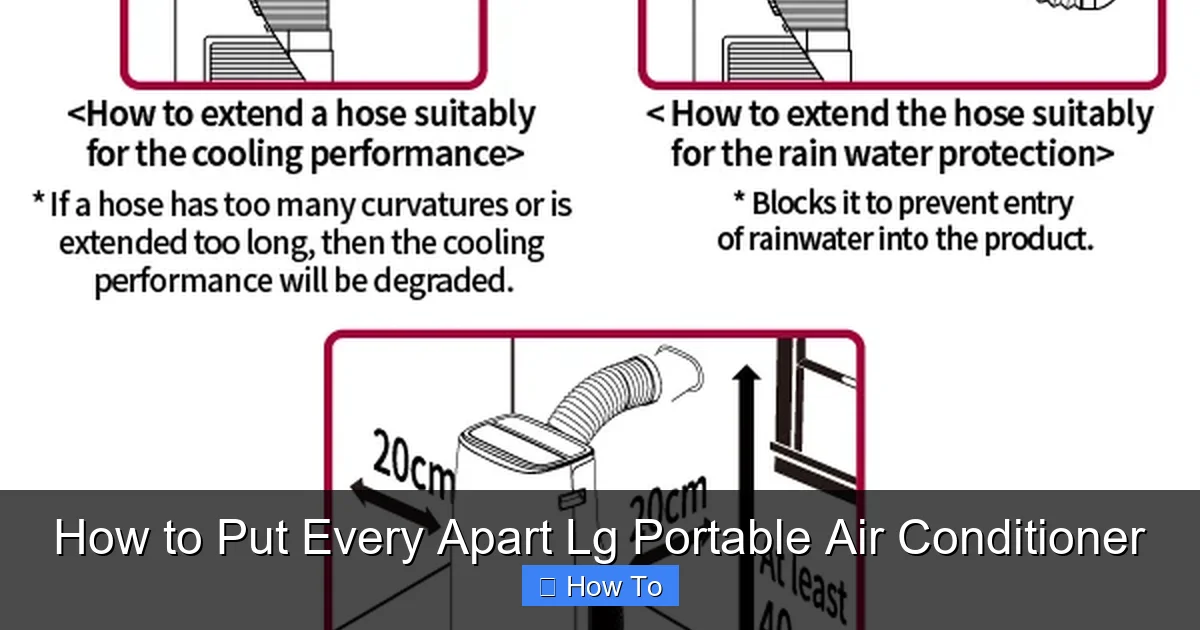
Step 3: Reattach the Exhaust Hose and Window Kit
The exhaust hose removes hot air from your room. Improper installation is a common cause of poor cooling and water leaks.
Connect the Hose to the Unit
Locate the exhaust port on the back or side of your LG portable AC. Slide the hose connector onto the port and twist clockwise until it locks. Most 2026 models use a twist-lock design for a secure seal.
Attach the Hose to the Window Kit
Insert the other end of the hose into the window adapter panel. Ensure the hose is not kinked or bent, as this restricts airflow.
Seal Gaps with Insulation Foam
Use the included foam strips or adjustable window seal to close any gaps around the window kit. This prevents hot air from re-entering the room and improves efficiency.
Important: Never run the unit without the exhaust hose properly installed—it can cause overheating and damage the compressor.
Step 4: Reinstall the Drainage System
LG portable air conditioners in 2026 often feature auto-evaporation systems, but some models still require manual drainage or a condensate pump.
Check the Drain Plug
Locate the drain plug at the bottom rear of the unit. If you removed it during cleaning, reinsert it and tighten by hand—do not overtighten.
Reconnect the Condensate Pump (if applicable)
Some high-end 2026 models include a built-in pump to remove excess moisture. Reattach the pump’s tubing to the drainage port and secure it with a clamp. Ensure the pump is level and unobstructed.
Test the Drainage Path
Pour a small amount of water into the drain tray to confirm it flows freely. If water pools, check for blockages in the hose or pump.
Tip: If you live in a humid climate, consider using a drain hose extension to direct water away from your floor.
Step 5: Reassemble the Interior Components
This step involves reinstalling internal parts like the fan, evaporator coil, and control panel. Proceed carefully—these components are delicate.
Reinstall the Fan Assembly
If you removed the fan for cleaning or repair, align the fan blades with the motor shaft. Slide it into place and secure with the retaining clip or screw. Spin the fan gently by hand to ensure it rotates smoothly without wobbling.
Reconnect the Evaporator Coil
The evaporator coil is usually housed behind the front panel. Reattach it using the mounting brackets and screws. Make sure all refrigerant lines are properly seated and not pinched.
Reattach the Control Panel and Wiring
Carefully reconnect any wiring harnesses to the control board. Match the colors and labels from your disassembly photos. Secure the control panel with screws and ensure buttons are aligned with the front bezel.
Warning: Avoid touching circuit boards with bare hands. Static electricity can damage sensitive electronics.
Step 6: Secure the Outer Casing
Once all internal parts are in place, it’s time to close up the unit.
Align the Side and Top Panels
Position the outer casing panels so they fit snugly around the internal components. Start with the side panels, then attach the top cover.
Reinstall Screws and Clips
Use your screwdriver to reinsert all screws in their original locations. Tighten them evenly to avoid warping the plastic casing. Reattach any plastic clips or snap-on covers.
Check for Gaps or Misalignments
Run your hand around the edges of the unit. If you feel a gap or uneven surface, open the casing and realign the parts. A tight seal prevents air leaks and noise.
Step 7: Reconnect Power and Test the Unit
Now that your LG portable AC is fully reassembled, it’s time to test it.
Plug In the Unit
Connect the power cord to a grounded outlet. Avoid using extension cords, as they can cause voltage drops.
Turn On the Air Conditioner
Press the power button and select a cooling mode. Listen for unusual noises like grinding, rattling, or hissing.
Check Airflow and Cooling
Feel the air coming from the front vent. It should be cool and strong. If the airflow is weak, double-check the filter and fan alignment.
Monitor for Leaks
Watch the base of the unit for water leaks. If you see pooling, turn off the AC and inspect the drainage system.
Pro Tip: Run the unit for 15–20 minutes and check the exhaust hose. It should feel warm—this confirms hot air is being expelled properly.
Troubleshooting Common Reassembly Issues
Even with careful reassembly, problems can occur. Here’s how to fix the most common issues:
Unit Won’t Turn On
– Check the power cord and outlet.
– Ensure the control panel is properly connected.
– Reset the circuit breaker if tripped.
Weak Airflow
– Clean or replace the air filter.
– Inspect the fan for obstructions or misalignment.
– Verify the exhaust hose is not kinked.
Loud Noises or Vibrations
– Tighten all screws and clips.
– Ensure the unit is level on the floor.
– Check that the fan spins freely without hitting the housing.
Water Leaking Inside the Room
– Confirm the drain plug is secure.
– Inspect the condensate pump and tubing for blockages.
– Make sure the unit is slightly tilted backward to aid drainage.
Not Cooling Effectively
– Verify the exhaust hose is properly installed.
– Check for refrigerant leaks (requires professional service).
– Ensure the room is not too large for the unit’s BTU rating.
Safety Tips for Reassembling Your LG Portable AC
– Always unplug the unit before disassembly or reassembly.
– Wear gloves to protect your hands from sharp edges.
– Never force parts into place—alignment should be smooth.
– Keep children and pets away during reassembly.
– If you’re unsure about any step, consult LG’s 2026 support team or a certified technician.
Maintenance Tips to Avoid Future Disassembly
To minimize the need for frequent disassembly, follow these best practices:
– Clean the air filter every 2–4 weeks.
– Wipe down the exterior with a damp cloth monthly.
– Inspect the exhaust hose for cracks or wear every season.
– Store the unit in a dry, covered area during off-seasons.
– Schedule professional maintenance every 2–3 years.
Conclusion
Reassembling your LG portable air conditioner doesn’t have to be intimidating. By following this step-by-step guide, you can confidently put every part back together—whether you’re working on a 2026 model or an older unit. Remember: patience, organization, and attention to detail are key.
Taking the time to reassemble your AC correctly ensures optimal performance, energy efficiency, and longevity. Plus, you’ll save money on service calls and enjoy cooler, more comfortable air all summer long.
Now that you know how to put every part of an LG portable air conditioner back together, you’re ready to tackle maintenance like a pro. Keep this guide handy for future reference, and don’t hesitate to reach out to LG support if you run into issues.
Stay cool!