
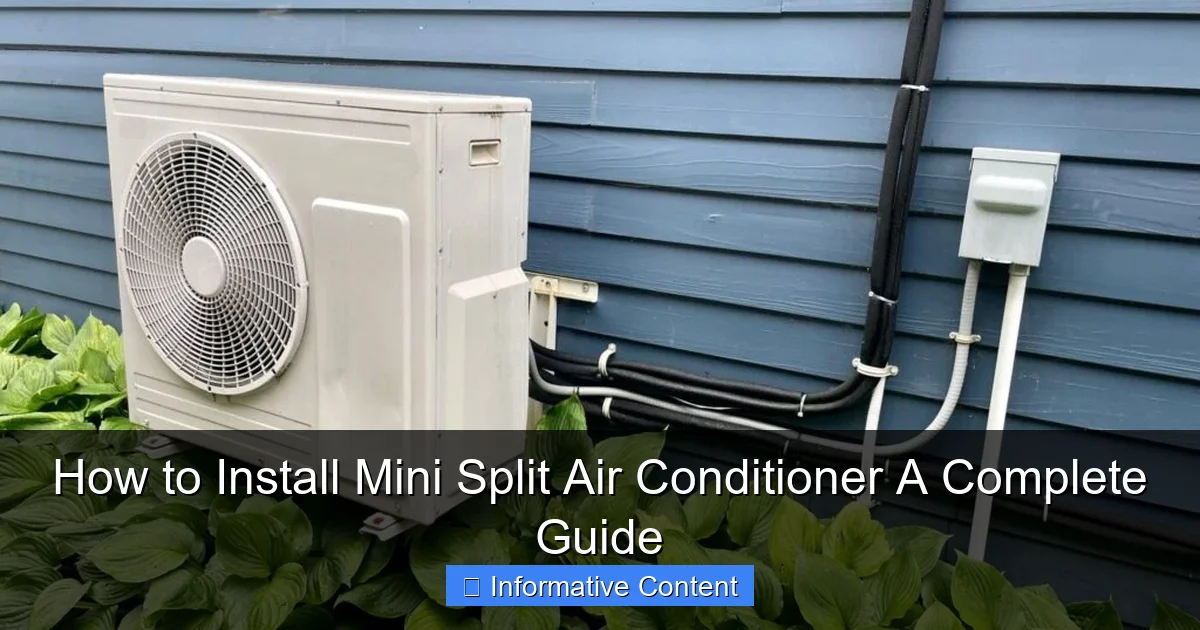
Featured image for how to install mini split air conditioner
Image source: hvacseer.com
Installing a mini split air conditioner yourself can save hundreds of dollars and offers efficient, ductless cooling for any room. This guide walks you through every critical step—from selecting the ideal indoor and outdoor unit locations to safely mounting components, connecting refrigerant lines, and wiring the system—ensuring a reliable, professional-grade installation. With the right tools, clear instructions, and attention to detail, even DIY beginners can complete the job in a single weekend.
Key Takeaways
- Plan carefully: Choose optimal indoor/outdoor unit locations before drilling or wiring.
- Drill precisely: Use a 3-inch hole for refrigerant lines and electrical conduit.
- Secure mounting: Anchor outdoor unit on vibration-resistant pads for longevity.
- Vacuum lines: Remove air/moisture from refrigerant lines to prevent system damage.
- Test thoroughly: Check for leaks, airflow, and thermostat accuracy post-installation.
- Follow codes: Comply with local electrical and refrigerant handling regulations always.
- Hire pros if unsure: Complex electrical or refrigerant work requires licensed technicians.
📑 Table of Contents
- How to Install Mini Split Air Conditioner: A Complete Guide
- Understanding Mini Split Systems: What You Need to Know Before Starting
- Pre-Installation Planning: The Key to a Smooth Setup
- Step-by-Step Installation: From Mounting to Refrigerant Charging
- Testing, Troubleshooting, and Final Setup
- Common Mistakes and How to Avoid Them
- Maintenance Tips to Keep Your Mini Split Running Smoothly
- Data Table: Recommended Tools and Materials
How to Install Mini Split Air Conditioner: A Complete Guide
Picture this: It’s a sweltering summer afternoon. You’re sweating through your shirt, the ceiling fan is doing little more than stirring the hot air, and your energy bill from last month still makes you wince. You start thinking about air conditioning—but the idea of tearing up walls for ducts feels overwhelming. Then you hear about mini split air conditioners. Sleek, quiet, energy-efficient, and ductless—they sound like a dream. But can you really install one yourself?
Good news: Yes, you can. Installing a mini split air conditioner isn’t as intimidating as it seems, especially with the right tools, planning, and a little patience. Whether you’re cooling a single room, a home addition, or even an entire house, a mini split system offers flexibility, efficiency, and modern comfort. I’ve been there—standing in my garage, staring at a box full of parts, wondering if I’d just bought a DIY disaster. But after a weekend of work and a few (okay, maybe a few too many) YouTube videos, I had cool air flowing. This guide is built on real experience—what worked, what didn’t, and how to avoid the common pitfalls. So let’s dive into how to install mini split air conditioner the right way, step by step.
Understanding Mini Split Systems: What You Need to Know Before Starting
How a Mini Split Works
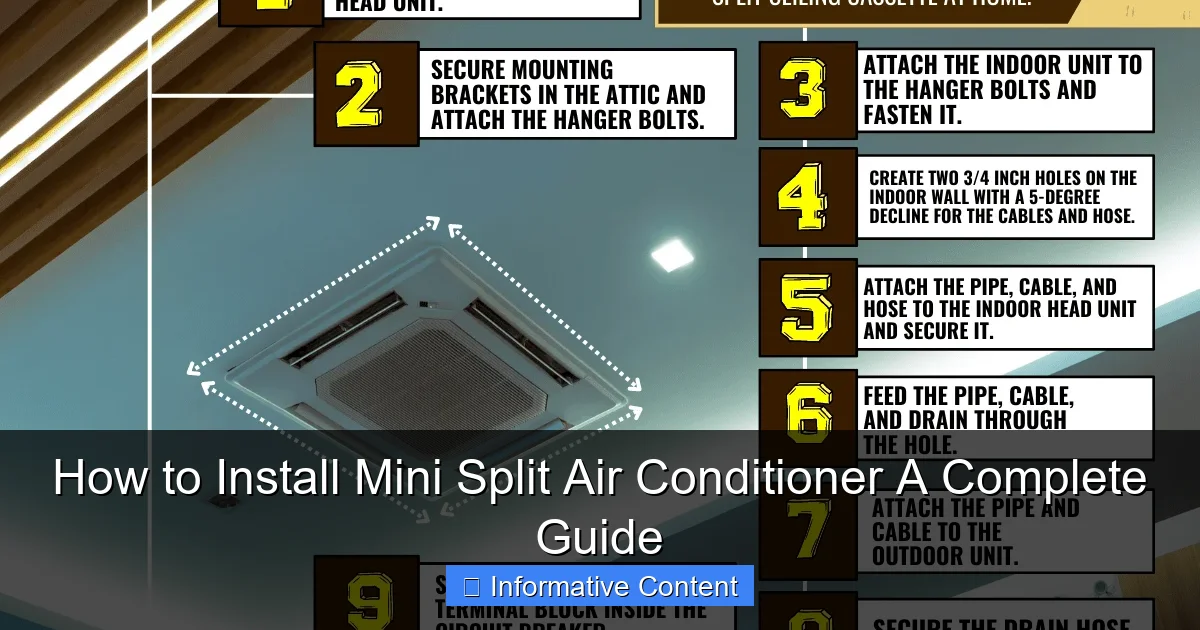
A mini split air conditioner has two main components: an outdoor condenser unit and one or more indoor air handlers. Unlike central AC, there are no ducts. Instead, a small hole (about 3 inches) is drilled through the wall to connect the indoor and outdoor units with refrigerant lines, a power cable, and a drain hose. The refrigerant absorbs heat from the inside and releases it outside—just like a fridge, but for your whole room.
Visual guide about how to install mini split air conditioner
Image source: tempacurehvac.com
What makes mini splits special is their inverter technology. Instead of turning on and off like traditional ACs, they adjust compressor speed to match the room’s needs. This means quieter operation, better humidity control, and up to 30% more energy efficiency. I remember my first night with the system running—I actually had to check if it was on because it was so quiet!
Types of Mini Splits: Single-Zone vs. Multi-Zone
There are two main types:
- Single-zone: One outdoor unit powers one indoor unit. Ideal for cooling a single room like a bedroom, home office, or garage.
- Multi-zone: One outdoor unit connects to 2–8 indoor units. Great for whole-house cooling with individual room control. I went with a multi-zone setup for my house because I wanted different temperatures in the living room and master bedroom.
Choosing the right type depends on your space, budget, and cooling goals. A single-zone is easier to install and less expensive, but if you want whole-home comfort, multi-zone is worth the extra effort.
Key Components and Tools
Before you even think about drilling, make sure you have:
- Mini split system (indoor + outdoor units + mounting brackets)
- Refrigerant lines (usually pre-charged, but verify)
- Drill with hole saw bit (3-inch recommended)
- Vacuum pump and manifold gauge set (for refrigerant work)
- Level and stud finder
- Wrench set, screwdrivers, wire stripper
- Condensate drain line and fittings
- Electrical disconnect switch (required by code)
Pro tip: Rent a vacuum pump from a tool rental shop if you don’t own one. It’s expensive to buy for a one-time job, and you’ll need it to evacuate air and moisture from the refrigerant lines—critical for performance.
Pre-Installation Planning: The Key to a Smooth Setup
Choosing the Right Location for Indoor and Outdoor Units
Location matters—a lot. For the indoor unit, pick a spot on an exterior wall, high up (near the ceiling), with at least 6 inches of clearance on all sides. Avoid placing it behind furniture or in a corner where airflow can be blocked. I once installed a unit too close to a bookshelf—it looked great, but airflow was weak and the unit struggled to cool the room.
For the outdoor unit, choose a shaded, well-ventilated area. Keep it at least 12 inches from walls, plants, or fences to allow airflow. Avoid direct sunlight if possible—heat reduces efficiency. Also, make sure it’s accessible for future maintenance. I placed mine on a concrete pad near the side of the house, away from foot traffic but easy to reach with a ladder.
Assessing Power Supply and Electrical Requirements
Mini splits usually require a dedicated 208/230-volt circuit. Check your electrical panel to see if you have space for a new breaker. The unit’s manual will list the amperage (typically 15–20 amps). If your panel is full, you may need an electrician to upgrade it—don’t skip this step. I learned this the hard way when I tried to piggyback off an existing circuit and tripped the breaker every time the compressor kicked on.
Also, install a disconnect switch near the outdoor unit. This is required by the National Electrical Code (NEC) for safety. It allows you to shut off power without going inside the house. A simple pull-out switch works fine and costs under $20.
Measuring Line Set Length and Planning the Route
The line set includes two copper tubes (liquid and suction) and a control wire. Most kits include a standard 25-foot set. If you need longer, you can buy extensions—but don’t exceed the manufacturer’s max length (usually 50–100 feet). Longer lines reduce efficiency and may require additional refrigerant.
Plan the path from indoor to outdoor unit. The hole should be slightly sloped toward the outside to help with condensate drainage. Avoid sharp bends in the line set—use 90-degree elbows if needed. I once tried to squeeze the lines through a tight corner and kinked the copper tube. Had to buy a new set. Lesson learned: plan the route carefully.
Step-by-Step Installation: From Mounting to Refrigerant Charging
Mounting the Indoor Unit
Start by turning off power to the area. Use a stud finder to locate wall studs. The indoor unit bracket must be anchored into wood or masonry—drywall anchors won’t cut it. Use the included template to mark drill holes, then attach the bracket with lag screws.
Once the bracket is secure, hang the indoor unit. It’s lightweight but awkward—get a helper if you can. Make sure it’s level. I used a laser level for precision, but a regular bubble level works fine. A crooked unit looks unprofessional and can cause drainage issues.
Drilling the Hole and Running the Line Set
Now comes the big moment: drilling the 3-inch hole. Use a hole saw bit with a drill. Start from the inside to control dust, then finish from the outside. Angle the hole slightly downward (about 1/4 inch per foot) to help condensate drain.
Feed the line set, drain hose, and control wire through the hole. On the outside, use a protective sleeve (like a PVC pipe) to prevent damage. Secure the lines to the wall with clamps every 3–4 feet. Don’t let them dangle—they’ll vibrate and wear over time.
Pro tip: Wrap the line set with insulation tape or foam sleeves. This prevents condensation and improves efficiency. I skipped this step on my first install and ended up with water dripping down the wall. Not cool.
Mounting the Outdoor Unit and Connecting the Line Set
Place the outdoor unit on a level, vibration-resistant pad. Use rubber feet or a concrete slab. Connect the line set to the outdoor unit’s service valves. Hand-tighten first, then use wrenches to secure—but don’t over-tighten. Copper threads can strip easily.
Attach the control wire (usually 18-gauge, 3-conductor) to the outdoor unit’s terminal block. Match the colors to the manual’s diagram. Double-check your connections—wrong wiring can fry the control board.
Electrical Wiring and Disconnect Switch
Run a dedicated circuit from your electrical panel to the disconnect switch, then to the outdoor unit. Use weatherproof conduit and connectors. Follow the unit’s wiring diagram closely. If you’re not 100% confident with electrical work, hire a licensed electrician. Safety first.
Install the disconnect switch within sight of the outdoor unit, within 50 feet, and no higher than 6 feet off the ground. This is code—and it’s for your protection.
Vacuuming and Charging the Refrigerant System
This is where many DIYers make mistakes. Never open the service valves until the system is properly evacuated. Use a vacuum pump and manifold gauge to pull a vacuum on the refrigerant lines. Run the pump for at least 20–30 minutes, then check the vacuum level with the gauge. It should hold below 500 microns for 10 minutes.
If it doesn’t hold, there’s a leak—find and fix it before proceeding. Once the vacuum is stable, slowly open the service valves to release the factory-charged refrigerant. Most modern mini splits come pre-charged for up to 25 feet of line. If you used a longer line set, you’ll need to add refrigerant—this requires a scale and precise calculations. I recommend calling a pro for this step unless you’re experienced.
Testing, Troubleshooting, and Final Setup
Powering On and Initial Test Run
Turn on the power at the disconnect switch and main panel. Set the thermostat to cool, and wait for the system to start. The indoor unit should power up, and the outdoor unit’s fan and compressor should engage within a few minutes.
Listen for unusual noises—grinding, buzzing, or rattling. Check for airflow at the indoor unit. Feel the refrigerant lines: the smaller (liquid) line should be cool, the larger (suction) line should be cold and possibly sweating. The drain hose should drip water when cooling.
Checking for Leaks and Proper Drainage
Use a refrigerant leak detector or soapy water on all connections. Bubbles mean a leak. Fix it immediately—refrigerant is harmful to the environment and your system’s efficiency.
Test the condensate drain by pouring a cup of water into the indoor unit’s drain pan. It should flow freely through the hose and out the hole. If it backs up, check for clogs or improper slope. I once had a kink in the drain hose behind the wall—took me hours to find it.
Calibrating the Thermostat and Settings
Most mini splits have a remote control or wall thermostat. Set your desired temperature and fan speed. Try different modes: auto, cool, dry, fan-only. The system should adjust seamlessly.
Use the “test” or “diagnostic” mode if available. It runs the system at full capacity to verify performance. Check the temperature drop—it should be 15–20°F between supply and return air. Less than that? There might be an airflow or refrigerant issue.
Common Mistakes and How to Avoid Them
Improper Line Set Installation
Kinking, sharp bends, or lack of insulation are common. Always use gradual bends, support the lines every few feet, and insulate them fully. I once saw a YouTube video where the installer just shoved the lines through the wall—no insulation, no clamps. It looked messy and would cause long-term problems.
Incorrect Refrigerant Charging
Overcharging or undercharging kills efficiency and damages the compressor. If your system uses R-410A or R-32 refrigerant, never “top off” without measuring. Use the manufacturer’s charging chart based on line length and ambient temperature.
Ignoring Clearance and Airflow
Indoor units need space to breathe. Don’t block them with curtains, furniture, or shelves. Outdoor units need airflow too—keep plants trimmed and avoid enclosing them in tight spaces. My neighbor put his unit in a wooden enclosure for “aesthetics.” It overheated and failed within a year.
Skipping the Vacuum Process
Air and moisture in the refrigerant lines cause acid buildup, which corrodes the compressor. Always evacuate the system. It’s not optional.
Maintenance Tips to Keep Your Mini Split Running Smoothly
Even the best installation needs upkeep. Here’s how to extend your system’s life:
- Clean the indoor unit’s air filter every 2–4 weeks. Just pop it out and rinse with water. I do this on the first of every month—keeps airflow strong and prevents dust buildup.
- Inspect the outdoor unit seasonally. Remove leaves, dirt, and debris. Spray down the condenser coils with a garden hose (low pressure) if they’re dirty.
- Check the drain line annually for clogs. Pour a cup of bleach down the line to prevent algae growth.
- Schedule a professional tune-up every 2–3 years. They’ll check refrigerant levels, electrical connections, and overall performance.
When to Call a Pro
DIY is great, but know your limits. Call a licensed HVAC technician if:
- You need to add refrigerant
- The system isn’t cooling or heating properly
- You hear strange noises or see error codes
- You’re not comfortable with electrical work
I once tried to fix a refrigerant leak myself. Ended up damaging the Schrader valve and had to pay a pro $300 to fix it. Sometimes, it’s smarter to admit you need help.
Data Table: Recommended Tools and Materials
| Tool/Material | Recommended Use | Approx. Cost |
|---|---|---|
| 3-inch hole saw bit | Drilling through wall | $20–$40 |
| Vacuum pump (rental) | Evacuating refrigerant lines | $30–$50/day |
| Manifold gauge set | Reading pressure and vacuum | $80–$150 |
| Level (laser or bubble) | Mounting indoor unit | $20–$100 |
| Electrical disconnect switch | Required by code | $15–$30 |
| Refrigerant leak detector | Finding leaks | $50–$120 |
| Insulation tape or foam | Protecting line set | $10–$20 |
Installing a mini split air conditioner is a rewarding DIY project—but it’s not for the faint of heart. It takes time, patience, and attention to detail. But when you finally hear that quiet hum of cool air and feel the temperature drop, it’s totally worth it. You’ll save money on labor, gain a sense of accomplishment, and enjoy a system that’s tailored to your home.
Remember: how to install mini split air conditioner isn’t just about following steps—it’s about understanding the system, planning carefully, and respecting safety. Whether you’re cooling a tiny cabin or a modern home, a well-installed mini split will serve you for years. So take your time, double-check your work, and don’t hesitate to ask for help when needed. Before you know it, you’ll be sipping iced tea in your perfectly cooled room—proud of what you’ve built.
Frequently Asked Questions
Can I install a mini split air conditioner myself, or do I need a professional?
While DIY installation is possible for those with electrical and HVAC experience, hiring a licensed professional is recommended for proper refrigerant handling, electrical connections, and warranty compliance. Improper installation can lead to performance issues or safety hazards.
What tools do I need to install a mini split air conditioner?
Essential tools include a drill, hole saw, level, vacuum pump, refrigerant gauges, wire strippers, and a torque wrench. A multimeter is also useful for verifying electrical connections during the mini split installation process.
Where should I place the indoor and outdoor units for optimal performance?
Mount the indoor unit high on an exterior wall for even airflow, avoiding direct sunlight or heat sources. The outdoor unit should be on a vibration-resistant pad, with at least 12 inches of clearance on all sides for ventilation.
How long does it take to install a mini split air conditioner?
A typical DIY installation takes 4–8 hours, depending on complexity. Professional installers may complete the job faster, especially if refrigerant line routing and electrical upgrades are required.
Do I need a permit to install a mini split air conditioner?
Most local codes require permits for HVAC installations, especially if modifying electrical systems or refrigerant lines. Always check with your municipality before starting your mini split air conditioner installation.
What’s the most challenging part of installing a mini split system?
The hardest steps are usually refrigerant line evacuation (to remove air/moisture) and matching the line set length to manufacturer specifications. Incorrect pressure or line length can reduce efficiency or damage the compressor.