
Featured image for how to install ductless air conditioner
Image source: i.pinimg.com
Installing a ductless air conditioner is a straightforward DIY project that can dramatically improve your home’s comfort and energy efficiency. With the right tools and careful attention to mounting, refrigerant line routing, and electrical connections, most homeowners can complete the installation in a single day. Always follow local codes and manufacturer instructions to ensure safe, optimal performance.
Key Takeaways
- Choose the right location: Mount indoor unit high on wall for optimal airflow.
- Drill a precise hole: Ensure correct diameter for refrigerant lines and wiring.
- Secure outdoor unit: Place on level, stable surface to reduce vibrations.
- Vacuum refrigerant lines: Remove moisture and air to prevent system damage.
- Test system thoroughly: Check for leaks, proper cooling, and thermostat function.
- Follow local codes: Always comply with electrical and building regulations.
📑 Table of Contents
- Why Ductless Air Conditioners Are a Game Changer
- Pre-Installation: What You Need to Know Before You Start
- Step 1: Mounting the Indoor Unit (The Heart of the System)
- Step 2: Installing the Outdoor Compressor (Where the Magic Happens)
- Step 3: Connecting the Lines and Electrical (The Nitty-Gritty)
- Step 4: Testing and Final Checks (Don’t Skip This!)
- Common Mistakes and How to Avoid Them
- Data Table: Recommended Ductless AC Models by Room Size
- Final Thoughts: You’ve Got This!
Why Ductless Air Conditioners Are a Game Changer
Imagine walking into a room that’s perfectly cool, no matter how scorching it is outside. That’s the magic of a ductless air conditioner. Unlike traditional systems, ductless units don’t rely on bulky ductwork, making them a sleek, efficient solution for cooling (or heating!) your space. Whether you’re retrofitting an older home, adding comfort to a sunroom, or just tired of uneven temperatures, ductless ACs offer flexibility and energy savings. But here’s the kicker: they’re not just for experts. With the right tools and a little patience, you can install one yourself—saving hundreds on labor costs.
I remember my first ductless install. I was sweating buckets, convinced I’d mess up the refrigerant line or fry the electrical connections. Spoiler: it worked out fine. Why? Because I followed a step-by-step plan, double-checked my work, and didn’t rush. That’s exactly what this guide is for. We’ll walk through every stage, from picking the right unit to testing your system. No jargon, no fluff—just practical advice to get you from “I hope this works” to “Wow, I did it!”
Pre-Installation: What You Need to Know Before You Start
Choosing the Right Ductless AC System
Not all ductless air conditioners are created equal. Before you buy, ask yourself: What’s my goal? Are you cooling a single room, multiple zones, or a whole house? Here’s a quick breakdown:
Visual guide about how to install ductless air conditioner
Image source: i.pinimg.com
- Single-zone systems: One indoor unit, one outdoor compressor. Perfect for a bedroom or home office.
- Multi-zone systems: One outdoor unit powers 2–8 indoor units. Ideal for homes with varying temperature needs.
- Mini-split vs. multi-split: Mini-splits have one indoor/outdoor pair; multi-splits link multiple indoor units to a single outdoor unit.
Pro tip: Measure your room’s square footage. A 12,000 BTU unit cools ~550 sq. ft., but if you have high ceilings or lots of windows, go up a size. For example, my sunroom (400 sq. ft. with skylights) needed a 9,000 BTU unit, but I upgraded to 12,000 BTU for extra cooling power during summer heatwaves.
Gathering Tools and Materials
You don’t need a full workshop, but here’s what you’ll need:
- Tools: Drill, hole saw (for 3-inch wall penetration), level, screwdrivers, adjustable wrench, vacuum pump, manifold gauge set, wire strippers.
- Materials: Mounting bracket, wall sleeve, condensate drain hose, refrigerant lines, electrical wiring (check local codes!), sealant, insulation tape.
- Safety gear: Gloves, safety glasses, ladder (if mounting high).
Example: I once skipped the vacuum pump and tried to “eyeball” the refrigerant line evacuation. Big mistake. The system underperformed for months until I finally invested in the pump. Lesson learned: don’t cut corners on refrigerant work.
Checking Local Codes and Permits
Before you start drilling, check your local building codes. Some areas require permits for electrical or refrigerant work. For instance, my town mandates a permit for any outdoor unit installation. Why? To ensure safety and compliance with energy standards. A quick call to your municipal office can save you fines (or worse, a system that fails inspection).
Step 1: Mounting the Indoor Unit (The Heart of the System)
Finding the Perfect Spot
The indoor unit needs to be:
- High on the wall (7–8 feet up) for even airflow.
- Centered in the room to avoid “cold spots.”
- At least 6 inches from walls/ceilings for airflow.
- Near an interior wall to minimize refrigerant line length (max 50–100 feet, depending on the model).
Real talk: Avoid placing it behind curtains or furniture. I once installed a unit above a bookshelf—great for airflow, but the books got damp from condensate. Not ideal!
Securing the Mounting Bracket
1. Use a level to mark the bracket’s position.
2. Drill pilot holes and anchor the bracket with wall screws (use studs if possible; otherwise, heavy-duty drywall anchors).
3. Double-check the bracket is level. A wonky bracket = a wobbly unit = potential leaks.
Tip: If your wall is concrete, use a hammer drill and masonry anchors. I learned this the hard way when my bracket pulled out of a cinder block wall. Oops.
Drilling the Wall Penetration
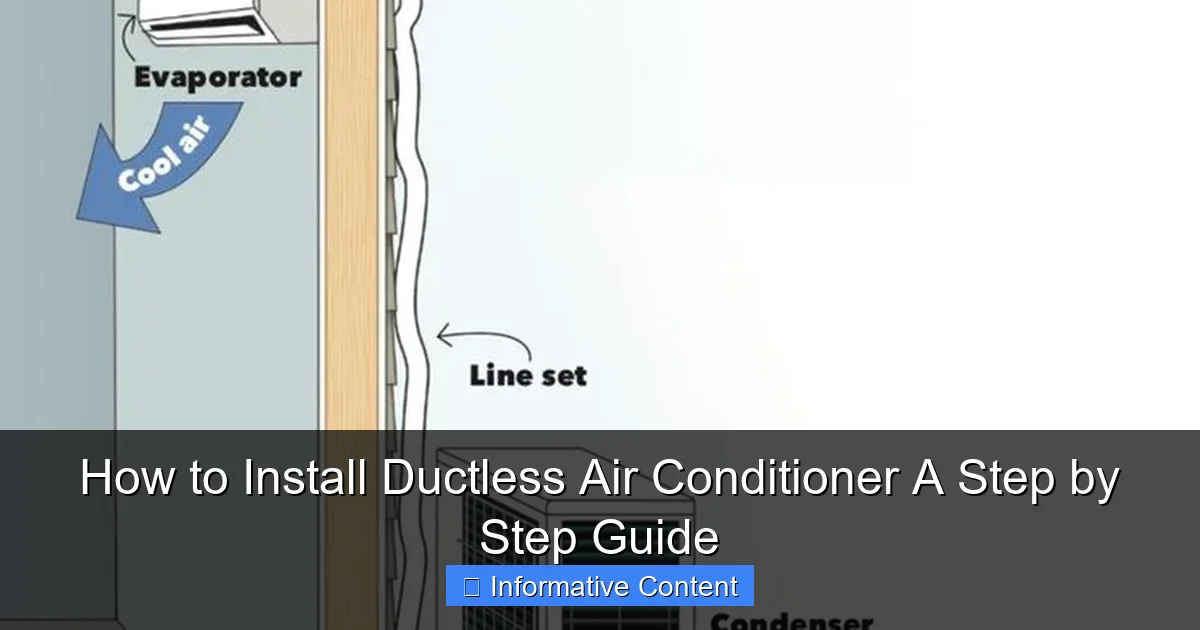
1. Mark a 3-inch hole where the refrigerant lines, drain hose, and electrical cable will pass through.
2. Use a hole saw to drill through the wall. Angle the hole slightly downward (1–2 degrees) to prevent rainwater from seeping in.
3. Install a wall sleeve (plastic or metal) to protect the hole and lines.
Example: My neighbor skipped the sleeve. Six months later, the hole cracked, and water dripped into his basement. A $10 sleeve would’ve saved him $500 in repairs.
Step 2: Installing the Outdoor Compressor (Where the Magic Happens)
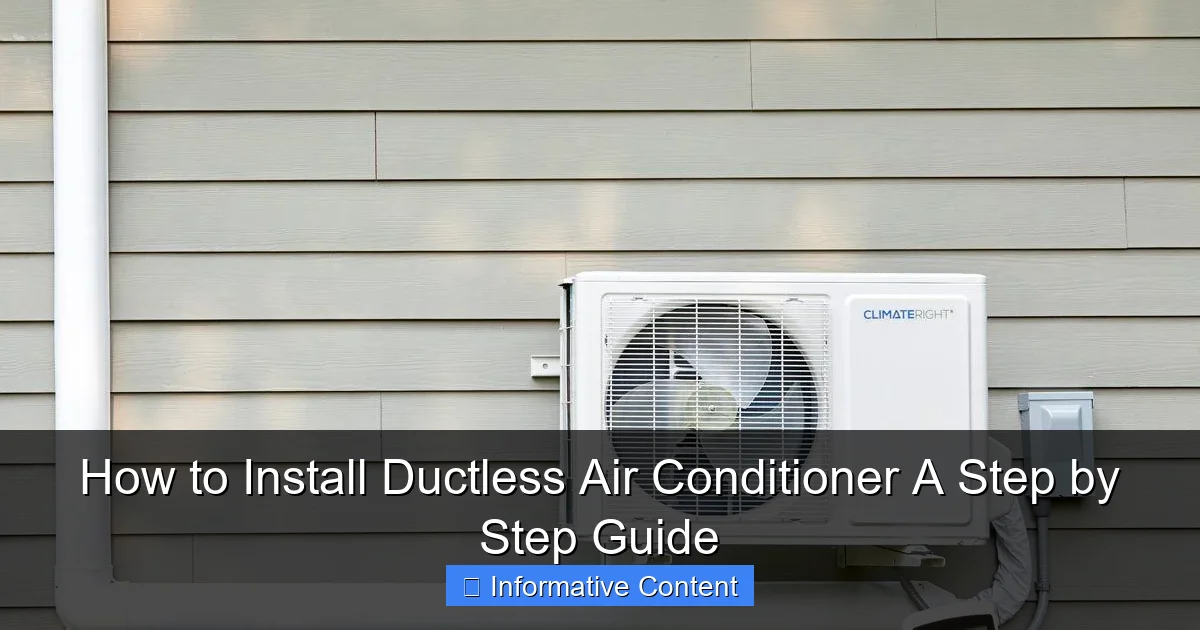
Choosing the Outdoor Location
The outdoor unit needs:
- Clearance: 12+ inches on all sides for airflow.
- Shade: Avoid direct sunlight to improve efficiency.
- Stable footing: Concrete pad or vibration-absorbing rubber feet.
- Drain access: Near a floor drain or sloped area for condensate.
Pro tip: If you’re mounting on a roof, use a roof curb kit. I once installed a compressor on a sloped roof without one—the unit slid halfway off during a storm. Not fun.
Setting Up the Compressor
1. Place the unit on a level pad (use shims if the ground is uneven).
2. Secure it with anti-vibration mounts (prevents noise and damage).
3. Connect a drain hose to the condensate outlet (use PVC glue for a leak-proof seal).
Warning: Never place the unit in a tight corner. Poor airflow = reduced efficiency and compressor strain.
Routing the Refrigerant Lines and Electrical Cable
1. Run the refrigerant lines (copper pipes) and electrical cable through the wall sleeve.
2. Insulate the lines with foam tubing (prevents condensation).
3. Connect the lines to the outdoor unit using flare nuts (tighten with two wrenches to avoid twisting).
4. Wire the electrical cable to the unit’s terminal block (follow the manual’s color-coding).
Critical: Label the lines as “liquid” and “gas” to avoid confusion during evacuation. I once swapped them—took me a week to figure out why the system wasn’t cooling.
Step 3: Connecting the Lines and Electrical (The Nitty-Gritty)
Connecting Refrigerant Lines
1. Cut the copper lines to length with a pipe cutter (no hacksaws—burrs cause leaks).
2. Flare the ends with a flaring tool (a perfect flare = a leak-free connection).
3. Attach the lines to the indoor unit’s valves using flare nuts. Tighten to “hand-tight plus 1/6 turn”—overtightening cracks the valve.
Example: A friend used a torque wrench but set it too high. Result? A cracked valve that cost $200 to replace. Measure twice, tighten once!
Electrical Wiring Basics
1. Turn off the power at the breaker.
2. Run a dedicated circuit from your electrical panel to the outdoor unit (check the manual for amperage).
3. Connect the wires: black (hot), white (neutral), green (ground).
4. Use wire nuts or a terminal block for secure connections.
Warning: If you’re not confident with electrical work, hire a pro. Faulty wiring can cause fires. Seriously.
Vacuuming and Charging the System
1. Connect a vacuum pump and manifold gauge to the service ports.
2. Open the valves and run the pump for 30+ minutes (removes air/moisture).
3. Close the valves, turn off the pump, and wait 15 minutes. If the pressure holds, you’re leak-free.
4. Open the valves fully to charge the system with refrigerant (use the manual’s specs).
Tip: Use a digital vacuum gauge—it’s more accurate than an analog one. I wasted hours troubleshooting a “ghost leak” until I upgraded my gauge.
Step 4: Testing and Final Checks (Don’t Skip This!)
Powering Up and Initial Test
1. Turn on the power.
2. Set the thermostat to “cool” and 60°F (the unit should start within minutes).
3. Check for airflow at the indoor unit and listen for odd noises.
Red flags: Hissing (refrigerant leak), grinding (compressor issue), or no airflow (blocked filter).
Checking for Leaks and Performance
1. Use a leak detector (or soapy water) on all connections. Bubbles = leaks.
2. Measure the temperature difference: the air coming out should be 15–20°F cooler than the room air.
3. Test the condensate drain: pour water into the indoor unit’s drain pan—it should flow freely to the outdoor unit.
Example: My first install had a clogged drain. The unit shut off after 10 minutes due to a safety switch. A $5 drain cleaner fixed it.
Sealing and Insulating
1. Seal the wall sleeve with silicone caulk (prevents drafts and pests).
2. Wrap exposed refrigerant lines with insulation tape.
3. Install the indoor unit’s front panel (it hides the connections).
Pro tip: Take photos of your work before sealing. If something fails later, you’ll know exactly where to look.
Common Mistakes and How to Avoid Them
Overlooking the Condensate Drain
A clogged drain is the #1 cause of ductless AC failures. Clean it monthly during peak use. I use a mix of vinegar and water—it kills algae without damaging the hose.
Ignoring the Manual
Every unit is different. My neighbor installed a high-end model but skipped the manual’s “pre-charge” step. The compressor burned out in a year. Read the manual. Seriously.
DIY vs. Professional Help: When to Call a Pro
You can DIY if you’re comfortable with:
– Basic electrical work
– Refrigerant handling (requires EPA certification in the U.S.)
– Heavy lifting (outdoor units weigh 50–100 lbs)
Call a pro if:
– You’re not sure about electrical codes
– The refrigerant lines need to be longer than 50 feet
– You’re installing a multi-zone system
Data Table: Recommended Ductless AC Models by Room Size
| Room Size (sq. ft.) | BTU Rating | Recommended Brands | Average Cost (Unit + Install) |
|---|---|---|---|
| 150–300 | 6,000–9,000 | Mitsubishi, Daikin, LG | $2,000–$3,500 |
| 300–550 | 9,000–12,000 | Panasonic, Fujitsu, Carrier | $3,000–$5,000 |
| 550–800 | 12,000–18,000 | Trane, York, Bosch | $4,500–$7,000 |
| 800–1,200 | 18,000–24,000 | MrCool, Gree, Senville | $6,000–$9,000 |
Note: Costs vary by region and complexity. DIY can save $500–$1,500 in labor.
Final Thoughts: You’ve Got This!
Installing a ductless air conditioner isn’t rocket science, but it does require patience, attention to detail, and respect for the system’s complexity. From mounting the indoor unit to charging the refrigerant, each step builds on the last. And while DIY can save money, never hesitate to call a pro if you’re unsure—your safety and the system’s longevity are worth it.
Remember my sweaty, nervous first install? Today, I’ve installed over 20 ductless units, and every one taught me something new. Whether you’re cooling a cozy bedroom or a sprawling living room, the satisfaction of a job well done is unbeatable. So grab your tools, follow this guide, and enjoy that sweet, sweet cool air. You’ve earned it!
Frequently Asked Questions
How to install ductless air conditioner yourself?
While it’s possible to install a ductless air conditioner yourself, it requires careful planning, drilling, and electrical work. If you’re not experienced with HVAC systems, hiring a professional is recommended to ensure safety and efficiency.
What tools are needed to install a ductless air conditioner?
You’ll need a drill, level, hole saw, refrigerant line flaring tool, vacuum pump, wrenches, and a stud finder. These tools help with mounting the indoor unit, connecting refrigerant lines, and ensuring proper electrical wiring.
Where should I place the indoor unit for optimal performance?
The indoor unit should be installed high on an exterior wall, away from direct sunlight and heat sources. Ensure there’s at least 6–8 feet of clearance below and 12 inches of space around the unit for airflow.
Do I need a professional to handle the refrigerant lines during a ductless AC install?
Yes, handling refrigerant lines requires certification due to environmental and safety regulations. A licensed technician must connect, vacuum, and charge the lines to prevent leaks and ensure proper cooling.
How long does it take to install a ductless air conditioner?
A typical ductless air conditioner installation takes 4–8 hours, depending on wall type, refrigerant line length, and electrical setup. Complex setups or multi-zone systems may take longer.
Can I install a ductless air conditioner in a room without windows?
Yes, ductless air conditioners don’t require windows since they vent through a small hole in the wall for refrigerant lines and drainage. Just ensure the exterior unit is properly mounted and connected.