
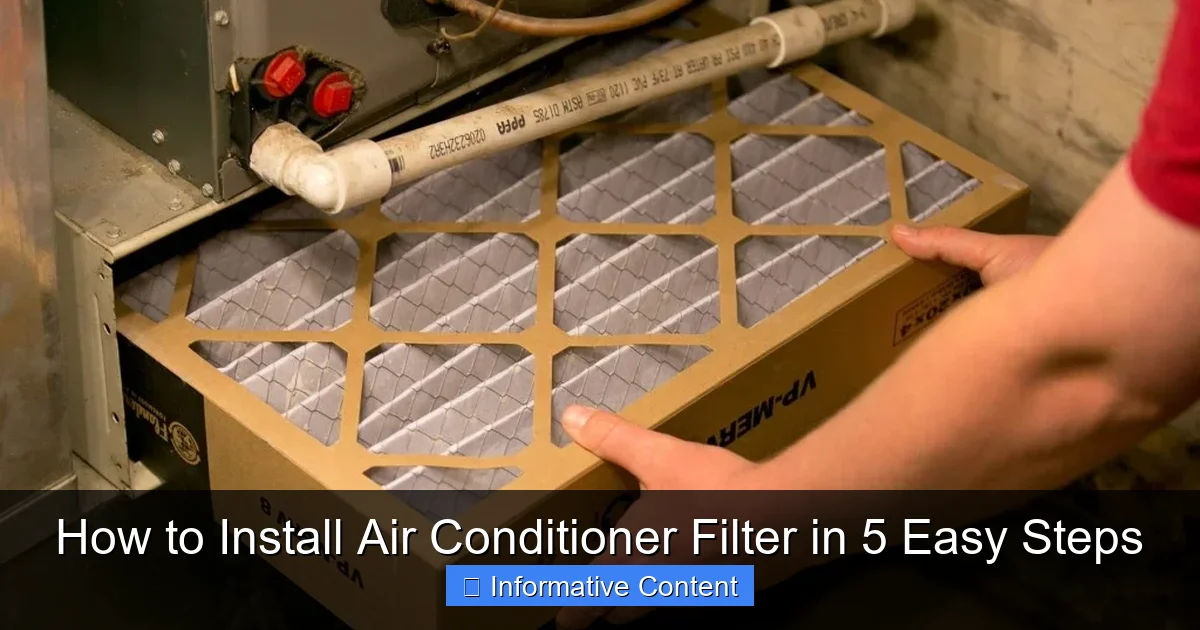
Featured image for how to install air conditioner filter
Image source: romacfacility.com
Installing an air conditioner filter is a quick, DIY task that boosts efficiency and air quality in minutes. Simply turn off the unit, locate the filter panel, remove the old filter, insert the new one matching the airflow direction, and secure the panel. Regular filter changes every 1–3 months prevent clogs and extend your AC’s lifespan.
Key Takeaways
- Turn off the AC: Always power down the unit before filter installation for safety.
- Locate the filter slot: Find it near the air handler, furnace, or return air vent.
- Remove the old filter: Slide it out gently and note its size for replacement.
- Insert the new filter: Align arrows with airflow direction for proper filtration.
- Check fit and seal: Ensure edges are snug to prevent air leaks and inefficiency.
- Set a replacement reminder: Mark your calendar to change filters every 1–3 months.
📑 Table of Contents
- Why Replacing Your Air Conditioner Filter Matters
- Step 1: Locate Your Air Conditioner Filter
- Step 2: Choose the Right Replacement Filter
- Step 3: Turn Off the Power and Remove the Old Filter
- Step 4: Install the New Filter
- Step 5: Test Your System and Maintain Regularly
- Bonus Tips for Long-Term Success
Why Replacing Your Air Conditioner Filter Matters
Let’s be honest: most of us don’t think about our air conditioner filter until something feels off. Maybe the air smells stale, the AC is working harder than usual, or someone in the house is sneezing more than normal. I’ve been there. A few summers ago, my energy bill spiked, and my AC seemed to run nonstop—only to realize the culprit was a clogged, forgotten filter. That moment taught me a valuable lesson: how to install air conditioner filter isn’t just a maintenance chore; it’s a game-changer for efficiency, air quality, and even your wallet.
Your AC filter is like the lungs of your home’s cooling system. It traps dust, pollen, pet dander, and other airborne particles, preventing them from circulating or damaging your unit. Over time, these filters get clogged, reducing airflow and forcing your system to work harder. This not only shortens the lifespan of your AC but also increases energy consumption. The good news? Installing or replacing a filter is one of the simplest DIY tasks you can do. In just five easy steps, you’ll breathe easier, save money, and keep your system running smoothly. And don’t worry—no prior experience required.
Step 1: Locate Your Air Conditioner Filter
Where to Look for the Filter
The first step in how to install air conditioner filter is finding it. Sounds simple, right? But filters can be hiding in plain sight, depending on your AC setup. Most central air systems have the filter in one of three places:
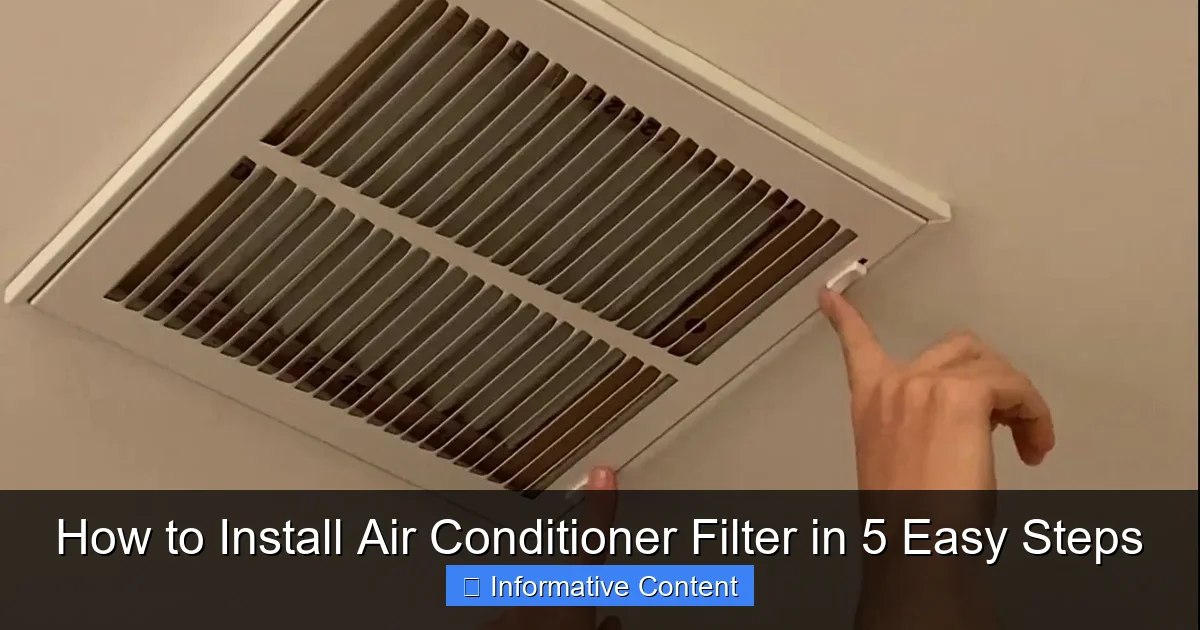
Visual guide about how to install air conditioner filter
Image source: i.ytimg.com
- Return air grille: This is the big vent on your wall or ceiling, usually in a central location like a hallway. The filter sits behind a removable cover. Think of it as the “front door” for air entering your system.
- Furnace or air handler cabinet: If you have a furnace-based system, the filter might be inside the cabinet. Look for a slot or a pull-out tray near the blower motor.
- HVAC unit itself: In some homes, especially with ductless mini-splits, the filter is built into the indoor air handler. You’ll need to open the front panel to access it.
Pro tip: If you’re unsure, check your owner’s manual. It’ll have a diagram showing the exact location. Or, if you’ve had maintenance done, the technician might have left a note on the unit.
How to Identify the Filter Type
Not all filters are created equal. Once you locate the filter, take a moment to identify its type. This ensures you buy the right replacement. Here’s what to look for:
- Fiberglass filters: Thin, blue or white, and disposable. Common in older systems but not the most efficient.
- Electrostatic filters: Reusable and often gray or green. They use static to trap particles.
- HEPA filters: Thick, pleated, and highly efficient. Great for allergy sufferers but may require system modifications.
- Activated carbon filters: Often combined with other types. They absorb odors and gases.
Example: My home has a return air grille in the hallway. Behind the cover, I found a 20x25x1-inch fiberglass filter with arrows showing airflow direction. Knowing this helped me pick the right replacement at the store.
Step 2: Choose the Right Replacement Filter
Check the Size and MERV Rating
Now that you know your filter type, it’s time to buy a replacement. But don’t just grab any filter—size and efficiency matter. Here’s how to pick the right one:
- Measure the old filter: Use a tape measure to check the length, width, and thickness. Even a slight mismatch can cause air leaks or poor performance.
- Check the MERV rating: MERV (Minimum Efficiency Reporting Value) measures how well the filter traps particles. Ranges from 1 (basic dust) to 16 (hospital-grade). For most homes, a MERV 8–12 is ideal. Higher isn’t always better—too high can restrict airflow and strain your system.
Data table: Recommended MERV Ratings by Need
| MERV Rating | Best For | Particle Size Trapped |
|---|---|---|
| 1–4 | Basic dust, lint | >10.0 microns |
| 5–8 | Allergies, pets | 3.0–10.0 microns |
| 9–12 | Allergies, asthma | 1.0–3.0 microns |
| 13–16 | Hospitals, advanced filtration | 0.3–1.0 microns |
Tip: Write the size (e.g., 20x25x1) and MERV rating on your phone or fridge so you never forget. I keep a photo of my filter’s label—it’s saved me from buying the wrong size twice!
Where to Buy Filters (And Save Money)
Filters are sold at hardware stores, home improvement centers, and online. Here’s how to save:
- Buy in bulk: A 6-pack of basic filters is often cheaper per unit than buying one at a time.
- Check for sales: Stores like Home Depot or Lowe’s often have discounts during seasonal transitions (spring/fall).
- Subscribe for delivery: Amazon and FilterTime offer auto-ship programs. Set it for every 3 months, and you’ll never forget a change.
Caution: Avoid “universal” filters unless they’re clearly labeled for your size. They might not fit snugly, leading to air bypass and reduced efficiency.
Step 3: Turn Off the Power and Remove the Old Filter
Safety First: Power Down Your System
Before touching anything, turn off your AC at the thermostat. This stops the blower fan, preventing dust from being pulled into the system while you work. If you have a furnace, also flip the power switch (usually a red toggle) near the unit. Safety tip: If your system has a disconnect box, open it and pull the fuse or turn off the breaker for extra protection.
Why this matters: A running fan can suck in debris when the filter is out, coating your coils and ducts with dust. That’s a costly repair waiting to happen.
How to Remove the Old Filter
Now, gently remove the old filter. Here’s how:
- Return air grille: Unscrew or unclip the cover. Some grilles just pop off. Slide the filter out.
- Furnace cabinet: Open the cabinet door. Look for a slide-out tray or a filter slot. Pull the filter straight out.
- Ductless mini-split: Press the release button or unlatch the front panel. The filter is usually on the back.
Pro tip: Hold a trash bag under the filter as you remove it. Clogged filters can shed a surprising amount of dust. I once dropped mine on the floor and spent 10 minutes cleaning up a dust cloud!
Inspect the Old Filter
Take a moment to examine the old filter. If it’s:
- Dark and caked with dust: It’s past due for a change (every 1–3 months is typical).
- Torn or warped: Replace it immediately. A damaged filter won’t catch particles and can damage your system.
- Wet or moldy: Check your ducts for leaks or condensation. Mold in filters is a health hazard.
Step 4: Install the New Filter
Align the Airflow Arrows
This is the most critical part of how to install air conditioner filter. Filters have airflow arrows printed on the frame. These must point toward the furnace or air handler, in the direction of airflow. Think of it like a one-way street: air should enter the filter, not exit it.
- For return air grilles: Arrows point into the vent, toward the ducts.
- For furnace cabinets: Arrows point into the cabinet, toward the blower motor.
Example: My filter’s arrows point left. I align them with the airflow arrow on the furnace cabinet (yes, it’s labeled!). If you install it backward, airflow is restricted, and your AC works harder.
Secure the Filter and Cover
Once aligned, slide the new filter into place. Make sure it fits snugly—no gaps around the edges. Then:
- Return air grille: Reattach the cover. Screw it in or click it shut.
- Furnace cabinet: Close the door and latch it.
- Ductless mini-split: Snap the front panel back on.
Tip: If the filter feels loose, use filter tape or a foam seal to prevent air leaks. I once had a gap the size of a dime—my energy bill dropped after sealing it!
Step 5: Test Your System and Maintain Regularly
Turn Power Back On and Listen
After installing the filter, restore power at the thermostat and furnace. Turn the AC on and listen. You should hear the blower start smoothly, without unusual noises. If it’s loud or rattling, double-check the filter’s alignment.
Pro tip: Feel the airflow at a vent. It should be strong and consistent. Weak airflow could mean a misaligned filter or a deeper system issue.
Set a Replacement Reminder
Filters don’t last forever. How often to replace them depends on:
- Household size: More people = more dust.
- Pets: Fur and dander clog filters faster.
- Allergies: High-MERV filters need more frequent changes.
- Usage: Heavy summer use = shorter lifespan.
General guidelines:
- Fiberglass: Every 30 days
- MERV 8–12: Every 2–3 months
- MERV 13+: Every 1–2 months (check manufacturer’s instructions)
My trick: I set a phone reminder for every 90 days. I also mark the date on the filter’s frame with a permanent marker. It’s a simple habit that pays off.
Bonus Tips for Long-Term Success
Clean vs. Replace: What to Know
Some filters (like electrostatic or reusable ones) can be cleaned. Rinse them with water and let them dry completely before reinstalling. But never wash disposable filters—they’ll fall apart. And even “cleanable” filters need replacing eventually (usually after 2–5 years).
Watch for These Warning Signs
A dirty or faulty filter can cause:
- Higher energy bills
- Uneven cooling (hot/cold spots)
- Strange smells (dust or mold)
- Frequent system cycling (turning on/off too much)
If you notice these, check your filter first. It’s often the fix!
When to Call a Pro
DIY is great, but some issues need a technician:
- The filter slot is damaged or missing.
- Your system has no filter (some older units don’t).
- You find mold or leaks in the ducts.
Example: My neighbor ignored a moldy filter for months. By the time he called a pro, the ducts needed cleaning—costing $500. A $10 filter change could’ve prevented it.
Installing an air conditioner filter isn’t rocket science, but it’s one of the most impactful things you can do for your home. In just five steps—locate, choose, remove, install, test—you’ll boost efficiency, improve air quality, and extend your system’s life. And let’s not forget the peace of mind: knowing your home is breathing clean, cool air. So next time you’re tempted to skip this chore, remember: a few minutes of work can save you hundreds in repairs and energy costs. Now, grab a filter, follow these steps, and give your AC the care it deserves. Your wallet (and your lungs) will thank you.
Frequently Asked Questions
How do I know which air conditioner filter to buy?
Check your AC unit’s manual or the existing filter’s dimensions (usually printed on the frame). Standard sizes range from 16×20 to 25×30 inches, and the filter’s MERV rating should match your system’s requirements for optimal airflow and filtration.
How often should I install a new air conditioner filter?
Replace your air conditioner filter every 1-3 months, depending on usage, pets, and air quality. A clogged filter reduces efficiency and strains your system, so frequent changes help maintain performance.
Can I install an air conditioner filter myself?
Yes! Installing an air conditioner filter is a simple DIY task that takes minutes. Just locate the filter slot (usually near the air handler), slide in the new filter with the airflow arrow pointing correctly, and secure the cover.
Why is the airflow direction important when installing an AC filter?
The filter’s airflow arrow must point toward the blower motor to ensure proper air circulation. Installing it backward reduces filtration efficiency and can damage your HVAC system over time.
What happens if I install the air conditioner filter incorrectly?
A poorly installed filter can restrict airflow, cause overheating, or allow dust to bypass the filter. This reduces cooling efficiency and may lead to costly repairs, so always double-check the fit and arrow direction.
Where is the air conditioner filter located in my home?
Most air conditioner filters are found in the return air duct, near the air handler, or inside the furnace. Look for a rectangular slot or removable panel marked “filter” on your HVAC unit.