
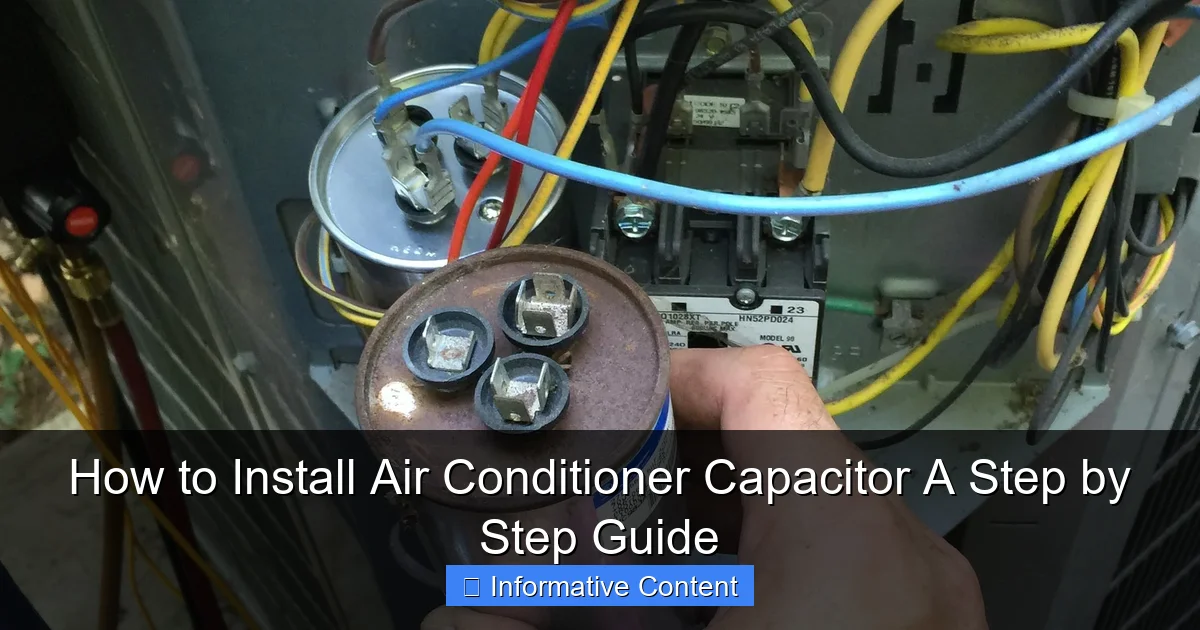
Featured image for how to install air conditioner capacitor
Image source: static.homeguide.com
Installing an air conditioner capacitor safely begins with turning off the power to the unit to prevent electrical shock. Follow a step-by-step process: discharge the old capacitor, match the new one’s specifications, and securely connect the wires to the correct terminals. Proper installation ensures optimal AC performance and extends component life—always double-check connections before restoring power.
Key Takeaways
- Turn off power first: Always disconnect electricity before handling capacitors for safety.
- Match capacitor specs: Ensure new capacitor matches original voltage and microfarad ratings.
- Discharge old capacitor: Use a screwdriver to safely release stored energy before removal.
- Label wires clearly: Mark wire connections to avoid incorrect reconnection later.
- Secure connections tight: Loose wires can cause system failures or hazards.
- Test after installation: Power on and verify AC operation before reassembling unit.
📑 Table of Contents
- How to Install Air Conditioner Capacitor: A Step by Step Guide
- Understanding the Air Conditioner Capacitor and Its Role
- Tools and Materials You’ll Need
- Step-by-Step Guide to Installing the Capacitor
- Testing the New Capacitor and Troubleshooting
- Capacitor Maintenance and Longevity Tips
- Conclusion: Stay Cool and Confident
How to Install Air Conditioner Capacitor: A Step by Step Guide
Imagine it’s the peak of summer. The sun beats down relentlessly, and your home feels more like an oven than a sanctuary. You crank the thermostat down, hoping for that sweet, cool relief—only to hear a weak hum from your air conditioner, followed by… nothing. After some troubleshooting, you suspect the culprit might be the capacitor. If this sounds familiar, you’re not alone. Capacitors are among the most common parts to fail in an AC unit, and the good news is, replacing one is often a straightforward DIY job. But before you dive in, safety and precision are key.
Replacing an air conditioner capacitor isn’t just about swapping parts—it’s about understanding how your system works, respecting the electrical risks, and doing the job right the first time. I’ve been there: standing in my backyard, sweating bullets, trying to remember which wire goes where. But with the right tools, a calm mindset, and this step-by-step guide, you can save hundreds on a technician’s visit and get your cool air flowing again. Whether you’re a seasoned DIYer or a curious homeowner, this guide will walk you through every stage—from diagnosing the issue to testing your newly installed capacitor—with clarity, empathy, and real-world tips.
Understanding the Air Conditioner Capacitor and Its Role
Before you unscrew a single panel, it helps to know why you’re replacing the capacitor in the first place. Think of the capacitor as the “starter motor” for your AC’s compressor and fan motors. It stores electrical energy and delivers a powerful jolt to kick-start these components when they need to run. Without a working capacitor, your AC might hum but never actually start—or it might overheat and shut down prematurely.
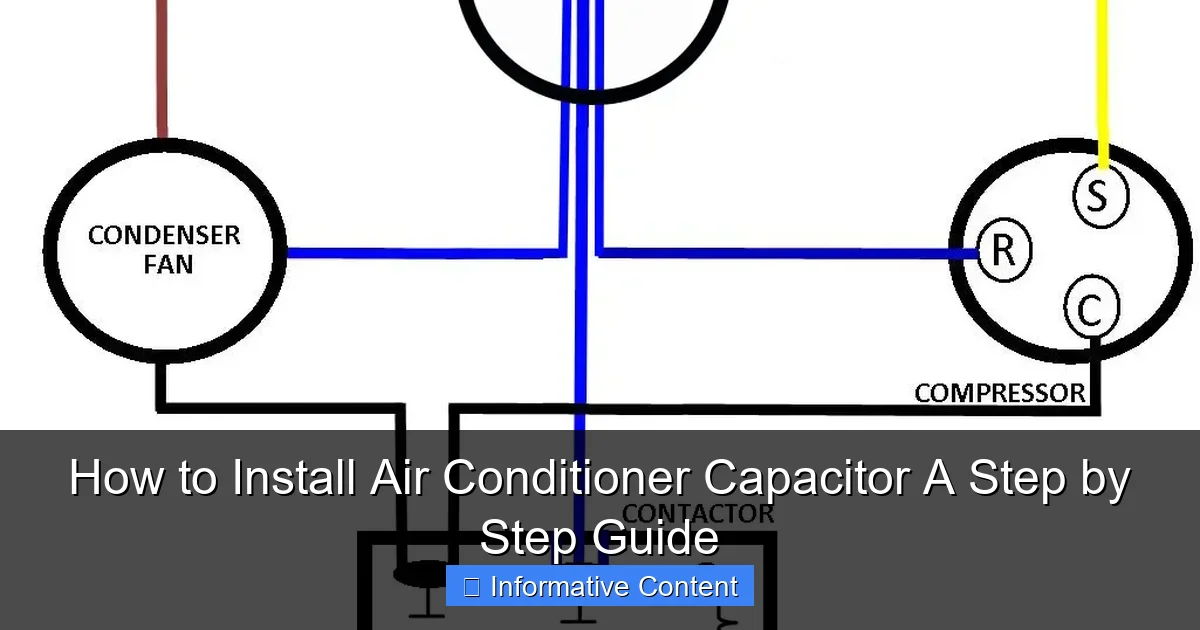
Visual guide about how to install air conditioner capacitor
Image source: i2.wp.com
How Capacitors Work
Capacitors are small, cylindrical components filled with an electrolyte (usually a liquid or gel) that stores and releases electrical charge. In air conditioners, you’ll typically find two types: start capacitors and run capacitors. Start capacitors provide a high-voltage burst to get the motor spinning, then disconnect. Run capacitors, on the other hand, stay in the circuit to improve motor efficiency and maintain consistent torque. Many modern units use a dual-run capacitor, which combines both functions in one unit—serving the compressor and fan motor simultaneously.
Signs of a Failing Capacitor
- AC won’t turn on: The unit hums or clicks but doesn’t start.
- Weak airflow: The fan runs, but the system doesn’t cool effectively.
- Blowing fuses or tripped breakers: A failing capacitor can draw excess current.
- Physical damage: Look for bulging, leaking, or burnt marks on the capacitor’s casing.
- Swollen top: A “domed” or bulging top is a telltale sign of internal pressure buildup.
For example, last summer, my neighbor noticed his AC was taking longer than usual to start. At first, he thought it was just the heat, but after a week of inconsistent cooling, he checked the capacitor. Sure enough, it had a slight bulge on the top—like a tiny, angry volcano. A quick test with a multimeter confirmed it was dead.
Why Replace It Yourself?
HVAC technicians charge anywhere from $150 to $300 to replace a capacitor, even though the part itself costs $10–$30. If you’re comfortable with basic electrical work and follow safety protocols, DIY replacement can save you money and get your AC back online faster. Just remember: electricity is unforgiving. If you’re unsure at any point, don’t hesitate to call a pro.
Tools and Materials You’ll Need
Preparation is half the battle. Having the right tools on hand makes the job faster, safer, and less frustrating. Here’s what you’ll need before you open the AC unit.
Essential Tools
- Insulated screwdriver set: Use non-conductive, insulated tools to reduce shock risk.
- Needle-nose pliers: For gripping and bending small wires.
- Digital multimeter (with capacitance mode): Critical for testing the old capacitor and verifying the new one.
- Work gloves and safety glasses: Protect your hands and eyes from debris or accidental sparks.
- Flashlight or work light: AC units are often in dark, cramped spaces.
Materials
- Replacement capacitor: Match the exact microfarad (µF) rating and voltage. Never use a higher microfarad value—this can damage the motor. Voltage can be equal or slightly higher (e.g., replacing a 370V with a 440V is fine).
- Wire labels or masking tape: To mark which wire goes where. This is a game-changer if you’re forgetful.
- Capacitor discharge tool or insulated screwdriver: To safely discharge the old capacitor before removal. Never assume it’s safe—even after power is off, capacitors can hold a dangerous charge for hours.
Pro Tip: Take a Photo First
Before disconnecting anything, snap a clear photo of the capacitor and its wiring. This acts as a backup reference if you get confused later. I once forgot which wire was for the fan motor and had to call my brother to describe the setup. A photo would’ve saved me 20 minutes of panic.
Where to Buy a Replacement
You can find capacitors at HVAC supply stores, hardware stores like Home Depot or Lowe’s, or online (Amazon, Grainger). Always check the model number and specs on your old capacitor. For example, a common dual-run capacitor might be labeled: 45µF + 5µF, 440V. This means it has two sections—45 microfarads for the compressor and 5 for the fan motor.
Step-by-Step Guide to Installing the Capacitor
Now comes the main event. Let’s walk through the process carefully, step by step. Remember: safety first. If you’re not 100% confident working with electricity, stop and call a licensed technician.
Step 1: Turn Off Power at the Breaker
This is non-negotiable. Locate your AC’s main breaker in the electrical panel and switch it off. Then, go to the outdoor unit and flip the disconnect switch (usually a pull-out handle or toggle near the condenser). Use a non-contact voltage tester to confirm there’s no power at the unit. I can’t stress this enough—double-check, then double-check again.
Step 2: Open the Access Panel
Remove the service panel on the side of the outdoor condenser unit. Use your screwdriver to remove the screws. Keep them in a small container or magnetic tray—you don’t want to lose them in the grass. Once open, you’ll likely see the capacitor mounted in a metal bracket near the compressor and fan motor.
Step 3: Discharge the Old Capacitor
Even with power off, the capacitor can retain a lethal charge. Here’s how to discharge it safely:
- Put on your insulated gloves and glasses.
- Use a capacitor discharge tool (or an insulated screwdriver with a plastic handle).
- Touch the metal shaft of the tool to both terminals of the capacitor at the same time. You might see a small spark—that’s normal.
- Hold it for 5–10 seconds to fully discharge.
Never touch the terminals with bare hands or a regular metal screwdriver. A 370V shock can stop your heart.
Step 4: Remove the Old Capacitor
Now it’s time to disconnect the wires. Use your wire labels or masking tape to mark each wire with its terminal (e.g., “C,” “FAN,” “HERM”). Then, gently pull the spade connectors off the terminals. Use needle-nose pliers if they’re stuck. Unscrew the mounting bracket and remove the capacitor.
Step 5: Install the New Capacitor
Position the new capacitor in the bracket and secure it with the mounting screw. Reconnect the wires to the correct terminals. Most dual-run capacitors have three terminals: C (common), FAN (fan motor), and HERM (hermetic compressor). Match them exactly to your photo or labels. Tug gently on each wire to ensure a snug fit.
Step 6: Double-Check Everything
Before closing the panel:
- Ensure all wires are secure and not touching metal parts.
- Verify the capacitor is mounted firmly.
- Check that no tools or debris are left inside the unit.
Close the access panel and reattach the screws.
Testing the New Capacitor and Troubleshooting
You’re almost there! Now it’s time to test your work. But don’t just turn the power back on and hope for the best. A few quick checks will confirm everything is working correctly.
Step 1: Restore Power
Go back to the electrical panel and flip the breaker on. Then, restore power at the outdoor disconnect switch. Wait a few seconds—don’t rush to the thermostat yet.
Step 2: Set the Thermostat
Turn your thermostat to “cool” and set it 5–10 degrees below room temperature. You should hear the outdoor unit click on within a minute. Listen for:
- A strong, consistent hum from the compressor.
- The fan motor starting smoothly.
- Cold air blowing from the indoor vents within 5–10 minutes.
If the system starts and runs without tripping the breaker, you’ve likely succeeded.
Step 3: Test with a Multimeter
For extra peace of mind, use your multimeter to test the new capacitor:
- Turn power back off and discharge the capacitor again.
- Set the multimeter to capacitance mode (look for the “µF” symbol).
- Touch the probes to the terminals (C to HERM for compressor section, C to FAN for fan section).
- The reading should be within ±6% of the rated value (e.g., a 45µF capacitor should read 42.3–47.7µF).
If the reading is zero or way off, the new capacitor might be defective—return it immediately.
Common Issues and Fixes
- AC still won’t start: Double-check wiring. A reversed fan or compressor wire can prevent startup. Also, ensure the thermostat is set correctly.
- Tripped breaker: This could mean a short in the wiring or a capacitor with too high a microfarad rating. Verify specs and connections.
- Noisy startup: A slight “clunk” is normal, but loud bangs or grinding suggest a deeper issue (e.g., failing compressor). Call a pro.
Capacitor Maintenance and Longevity Tips
Replacing the capacitor is just the start. To avoid repeat failures, a little maintenance goes a long way.
Regular Visual Inspections
Twice a year (before summer and winter), open the AC panel and look at the capacitor. Check for:
- Bulging or cracked casing
- Leaking fluid
- Discoloration or burnt marks
Catching early signs can prevent a mid-season breakdown.
Keep the Area Clean
Dust, grass clippings, and debris can block airflow and cause the capacitor to overheat. Use a soft brush or compressed air to clean the fins and surrounding area. Trim back plants to maintain at least 12 inches of clearance on all sides.
Check for Power Surges
Frequent power spikes (from storms or grid issues) can damage capacitors. Consider installing a surge protector for your HVAC system. It’s a small investment that can save you from repeat replacements.
When to Replace Proactively
Capacitors typically last 5–10 years. If your AC is over 8 years old and the capacitor looks worn, consider replacing it before a failure. Think of it like replacing tires before they blow—better safe than sorry.
Data Table: Common Capacitor Specifications
| Component | Typical Capacitance (µF) | Voltage (V) | Notes |
|---|---|---|---|
| Compressor (HERM) | 35–50 | 370–440 | Higher µF for larger units |
| Fan Motor (FAN) | 3–10 | 370–440 | Smaller value, same voltage |
| Dual-Run Capacitor | e.g., 45+5 | 440 | Most common in modern ACs |
| Start Capacitor (rare) | 100–200 | 250–330 | Used with start relay; disconnects after startup |
Conclusion: Stay Cool and Confident
Installing an air conditioner capacitor might sound intimidating, but with the right tools, a calm approach, and attention to safety, it’s one of the most rewarding DIY HVAC fixes you can do. You’ve just taken control of your home comfort—no waiting for a technician, no surprise bills, just the satisfaction of solving the problem yourself.
Remember, the key steps are: turn off power, discharge the capacitor, label wires, install the correct replacement, and test thoroughly. Don’t skip the safety checks—your well-being is more important than saving 10 minutes. And if anything feels off, don’t hesitate to call a pro. There’s no shame in knowing your limits.
As you enjoy that cool, refreshing air, take a moment to appreciate the small victory. You’ve not only fixed your AC but also learned something valuable about how your home works. Who knows? This might just be the start of your DIY journey. Stay cool, stay curious, and keep your tools handy—you never know when the next summer storm will strike.
Frequently Asked Questions
What tools do I need to install an air conditioner capacitor?
You’ll need a screwdriver, insulated gloves, a multimeter, and a capacitor discharge tool. Safety gear like safety glasses is also recommended to protect yourself during the process.
How do I safely discharge an air conditioner capacitor before installation?
Use a screwdriver with an insulated handle or a capacitor discharge tool to short the terminals, releasing stored energy. Always verify the capacitor is fully discharged with a multimeter before handling it further.
Can I install an air conditioner capacitor without turning off the power?
No, always turn off the power at the breaker and disconnect the unit to avoid electrocution. Even a disconnected capacitor can hold a dangerous charge, so follow safety protocols strictly.
How do I know if my air conditioner capacitor is faulty and needs replacement?
Signs include a humming sound, the compressor not starting, or visible bulging/leaking. Use a multimeter to test capacitance—if it’s significantly off the labeled value, it’s time to replace it.
What’s the correct way to wire a new air conditioner capacitor?
Match the wire colors to the corresponding terminals (common, fan, compressor) as labeled on the old capacitor. Secure connections tightly and double-check for accuracy to avoid damaging the system.
How long does it take to install an air conditioner capacitor?
The process typically takes 30-60 minutes, including discharging the old capacitor and testing the new one. Rushing can lead to errors, so prioritize safety and precision over speed.