
Featured image for how to install a window unit air conditioner
Image source: s3.amazonaws.com
Installing a window unit air conditioner is quick and straightforward when you follow the right steps. Begin by measuring your window opening and selecting a unit that fits securely, then ensure the sill is strong and level before mounting the support brackets and sliding the AC into place. Always secure the unit with side panels and lock the window sash for safety and efficiency.
Key Takeaways
- Measure your window to ensure the AC unit fits securely and safely.
- Install support brackets first to prevent the unit from falling out.
- Seal gaps with foam to improve efficiency and block hot air leaks.
- Secure the unit properly using side panels and locking mechanisms.
- Check drainage slope to avoid water pooling inside the room.
- Test before finalizing to confirm cooling and secure installation.
📑 Table of Contents
- Why Installing a Window Unit Air Conditioner Is Easier Than You Think
- Step 1: Choose the Right AC Unit for Your Window
- Step 2: Gather Your Tools and Materials
- Step 3: Prepare the Window and Surroundings
- Step 4: Install the AC Unit (The Main Event)
- Step 5: Final Checks and Safety Tips
- Step 6: Maintenance and Long-Term Care
- Final Thoughts: You’ve Got This!
Why Installing a Window Unit Air Conditioner Is Easier Than You Think
Let’s face it—summer heat can be brutal. I remember my first summer in a small apartment without central air. I was sweating through my sheets, dreaming of a cool breeze. That’s when I decided to install a window unit air conditioner. At first, I was intimidated. I imagined heavy lifting, confusing tools, and a sweaty mess. But guess what? It was one of the easiest home improvements I’ve ever done. And if I can do it, so can you.
Installing a window unit air conditioner isn’t just about comfort. It’s about taking control of your space, saving money on professional installation, and doing it safely. Whether you’re a renter, a homeowner, or just someone trying to survive the dog days of summer, this guide will walk you through the process step by step. No fancy jargon. No sales pitch. Just real, practical advice to help you get that cool air flowing—fast.
Step 1: Choose the Right AC Unit for Your Window
Measure Your Window First
Before you buy anything, measure your window. I learned this the hard way when I ordered a unit that was too wide for my old double-hung window. Not fun. Grab a tape measure and check:
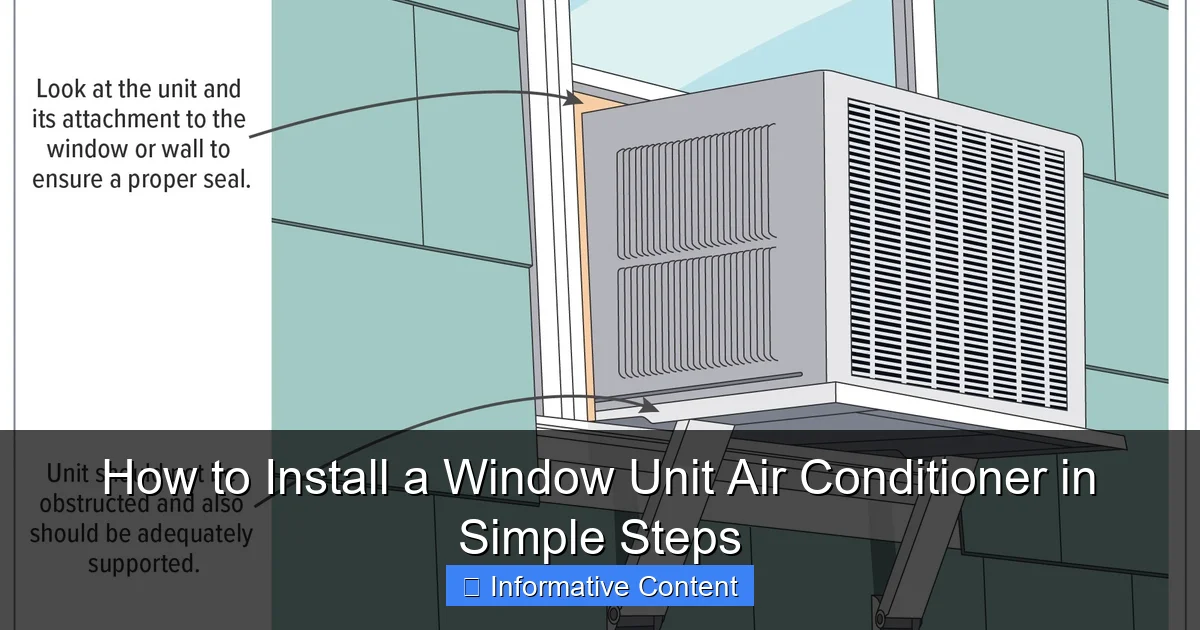
Visual guide about how to install a window unit air conditioner
Image source: cdn.thewirecutter.com
- The width of the window opening (from side to side)
- The height (from the sill to the top of the frame)
- The depth of the window (how far the unit can extend inside)
Most standard window units fit openings between 23 and 36 inches wide and 15.5 to 16.5 inches high. But every model is different. Always check the manufacturer’s installation specs before buying.
Check the BTU Rating for Your Room Size
BTU stands for British Thermal Unit—basically, how much cooling power the unit has. Too low, and your room will still feel like a sauna. Too high, and you’ll waste energy and money. Here’s a simple rule of thumb:
| Room Size (sq. ft.) | Recommended BTU |
|---|---|
| 100–250 | 5,000–6,000 |
| 250–350 | 7,000–8,000 |
| 350–450 | 9,000–10,000 |
| 450–550 | 12,000 |
| 550–700 | 14,000–15,000 |
Pro tip: If your room gets a lot of sunlight or has poor insulation, go up one BTU level. I once installed a 6,000 BTU unit in a west-facing bedroom. By 3 PM, it was like a greenhouse. Upgrading to 8,000 BTU fixed it instantly.
Pick the Right Type: Double-Hung vs. Sliding Windows
Most window AC units are designed for double-hung windows (the kind that slide up and down). But if you have a sliding (horizontal) window, don’t worry—many manufacturers offer kits or models specifically for these. Just make sure the unit you buy includes side panels that can expand or contract to fit your window width.
Also, check the weight of the unit. Most window units weigh between 40 and 80 pounds. If you’re on the second floor or have weak windowsills, you may need a support bracket (more on that later).
Step 2: Gather Your Tools and Materials
Essential Tools You’ll Need
You don’t need a full toolbox. Most of what you’ll use are basic household items:
- Measuring tape
- Pencil (for marking)
- Screwdriver (usually Phillips head)
- Level (a $10 bubble level from any hardware store works)
- Drill (optional, but helpful for securing brackets)
- Scissors or utility knife (for cutting foam or plastic)
I once tried installing an AC with just a butter knife and a prayer. It held… for about two days. Learn from my mistakes—use the right tools.
What Comes with the AC Unit?
Most window units include:
- The AC unit itself
- Expandable side panels (accordion-style foam or plastic)
- Top rail (a thin metal or plastic piece that attaches to the window)
- Window sash seal (foam or vinyl to block gaps)
- Screws and mounting hardware
Double-check the box when you open it. I’ve seen people start installing only to realize the side panels were missing. Annoying, but fixable—most manufacturers will ship replacements for free if you call them.
Optional but Helpful Extras
These aren’t required, but they make life easier:
- Support bracket: Especially important for heavy units or second-floor windows. It screws into the wall and holds the weight of the AC so the window sill doesn’t have to.
- Foam insulation strips: For sealing tiny gaps around the unit. I use these every year—they keep bugs out and cold air in.
- Extension cord (if needed): But only if it’s heavy-duty and rated for AC use. Never use a regular power strip or light-duty cord.
Step 3: Prepare the Window and Surroundings
Clear the Area
Before you start, clear the space inside and outside the window. Move furniture, plants, or anything that could block airflow. I once tried to install an AC with a bookshelf right in front of the window. Not only was it awkward to lift the unit, but the airflow was terrible. Rearranging the room made a huge difference.
Also, clean the window sill. Wipe away dust, grime, or old foam from a previous unit. A clean surface helps the seal stick better and prevents leaks.
Check the Window Frame and Sill
Inspect the window frame for rot, cracks, or loose screws. If the wood is soft or the frame wiggles, don’t install the AC there. It could fall out—and that’s a safety hazard. In one apartment I lived in, the sill had water damage. I ended up installing a support bracket into the brick wall below the window, which worked perfectly.
If you’re renting, check your lease. Some landlords require approval before modifying windows. It’s always better to ask than get hit with a repair bill.
Install a Support Bracket (If Needed)
For units over 60 pounds, or if you’re on the second floor or higher, a support bracket is a smart idea. Here’s how to install one:
- Hold the bracket against the wall below the window sill.
- Use a level to make sure it’s straight.
- Mark the screw holes with a pencil.
- Drill pilot holes (especially in brick or stucco).
- Secure the bracket with screws.
Now, when you place the AC unit, it will rest on the bracket instead of the sill. This protects your window and reduces vibration.
Step 4: Install the AC Unit (The Main Event)
Attach the Top Rail
Most units have a thin metal or plastic rail that attaches to the top of the AC. This rail fits into the window frame to help hold the unit in place.
- Align the rail with the top of the AC.
- Secure it with the screws provided.
- Make sure it’s snug but not bent.
I once skipped this step because I thought it was “extra.” Big mistake. The unit wobbled every time it turned on, and the noise drove me crazy. Always use the top rail.
Open the Window and Position the AC
Now comes the tricky part—lifting the unit. If it’s heavy, ask a friend to help. I tried doing it alone once and nearly dropped it. Not cool.
- Open the window fully.
- Lift the AC and slide it into the window from the outside. The back (with the vents) should face outside.
- Rest the bottom of the unit on the window sill or support bracket.
- Gently lower the window so it rests on the top rail. The unit should sit level—use your bubble level to check.
Important: The AC should tilt slightly downward toward the outside (about 1/4 inch lower on the outside edge). This helps condensation drain properly.
Secure the Side Panels
Most units come with expandable side panels. Here’s how to install them:
- Pull the accordion panels out from each side of the AC.
- Fit them into the window frame.
- Secure them with the screws provided (usually 2–4 per side).
- Cut off any excess foam or plastic with scissors.
For sliding windows, you may need to install a vertical support or use a custom kit. Follow the instructions carefully—these setups are less common but still straightforward.
Seal the Gaps
Even with side panels, there are usually small gaps. Use the foam or vinyl sash seal that came with the unit to block them. I also add extra foam strips around the top and sides for a tighter seal. This keeps:
- Hot air out
- Cool air in
- Bugs and dust from sneaking in
Step 5: Final Checks and Safety Tips
Double-Check the Tilt and Level
Use your level again. The AC should be level side-to-side and slightly tilted back-to-front (downward outside). If it’s not, adjust the unit or add shims (small pieces of wood or plastic) under the inside edge.
I once ignored a slight tilt. After a heavy rain, water started dripping into my living room. A quick adjustment fixed it, but it taught me to always double-check.
Secure the Window
Most units include a small bracket that attaches to the window frame and the top rail. Screw it in to prevent the window from being opened from the outside. This is a safety and security feature—especially important if you live in a busy area.
Plug It In—But Do It Right
Use the nearest grounded outlet. Never plug the AC into an extension cord unless it’s specifically rated for AC units (look for “15A” or “125V” on the cord). I use a heavy-duty 14-gauge cord for my 12,000 BTU unit. It’s safer and prevents overheating.
Also, avoid daisy-chaining power strips. Plug the AC directly into the wall. Most units draw a lot of power when they start up, and overloaded circuits can trip breakers.
Test the Unit
Turn it on and set it to “Cool.” Listen for:
- Smooth startup (no loud bangs or rattles)
- Even airflow from the vents
- Condensation dripping from the outside (this is normal)
If it’s vibrating, check that it’s level and secure. If it’s noisy, make sure nothing is touching the fan or compressor.
Step 6: Maintenance and Long-Term Care
Clean the Filter Monthly
Most window units have a removable filter behind the front panel. Dust and pet hair clog it fast. I clean mine every 4–6 weeks in summer. Just:
- Turn off and unplug the unit
- Remove the filter
- Rinse it under warm water
- Let it dry completely before reinserting
A clean filter improves airflow, lowers energy bills, and helps the unit last longer.
Drain the Condensation (If Needed)
Most window units drain water outside automatically. But in humid climates, the drip pan can overflow. I check mine every few weeks during peak summer. If it’s full, I use a turkey baster to suck out the water (gross, but effective).
Store It Properly in Winter
At the end of the season, remove the unit and store it indoors. Clean it, cover the vents with plastic, and keep it upright. I store mine in a closet with a dehumidifier nearby to prevent mold.
If you leave it in all year, cover it with a weatherproof AC cover. It’ll last longer and be ready to go next summer.
Final Thoughts: You’ve Got This!
Installing a window unit air conditioner might seem like a big job, but it’s really just a series of simple steps. Measure, prep, lift, secure, seal, and test. That’s it. No special skills needed. Just a little patience and common sense.
I’ve installed AC units in everything from tiny studios to old houses with uneven windows. Each one was a little different, but the process stayed the same. And every time, I felt a sense of pride when that first blast of cold air hit my face.
So go ahead—grab your tape measure, pick the right unit, and get started. You don’t need to be a handyman. You just need to be willing to try. And when the heatwave hits, you’ll be the one lounging in cool comfort, sipping lemonade, and smiling at your DIY success.
Remember: safety first, double-check your work, and don’t rush. A well-installed window unit can last 8–10 years or more. That’s a lot of summers saved—one cool breath at a time.
Frequently Asked Questions
How do I install a window unit air conditioner safely?
To install a window unit air conditioner safely, ensure the window frame is sturdy and can support the unit’s weight. Use brackets or support rods to secure the AC and prevent tipping. Always unplug the unit before handling it during installation.
What tools do I need to install a window unit air conditioner?
You’ll need a screwdriver, measuring tape, level, support brackets, and foam insulation strips. Some kits include mounting hardware, but a drill or adjustable wrench may help for custom adjustments.
Can I install a window unit AC alone?
While possible, it’s easier and safer with a helper due to the unit’s weight and awkward positioning. If solo, use temporary props (like a sturdy box) to hold the AC while securing brackets.
How do I seal gaps around my window unit air conditioner?
Attach foam weatherstripping or accordion-style side panels (included in most kits) to block airflow around the unit. For gaps, use foam strips or caulk to improve efficiency and keep bugs out.
Where should I place a window unit for optimal cooling?
Install the unit on the shadiest side of your home (usually north or east-facing) and near a dedicated electrical outlet. Keep it away from heat sources like vents or lamps to maximize efficiency.
How do I secure a window unit from falling?
Use manufacturer-provided brackets or L-shaped supports under the unit, anchored to the window frame. For added safety, install an anti-theft or anti-tilt bracket to prevent inward movement.