
Featured image for how to install a split unit air conditioner
Image source: removeandreplace.com
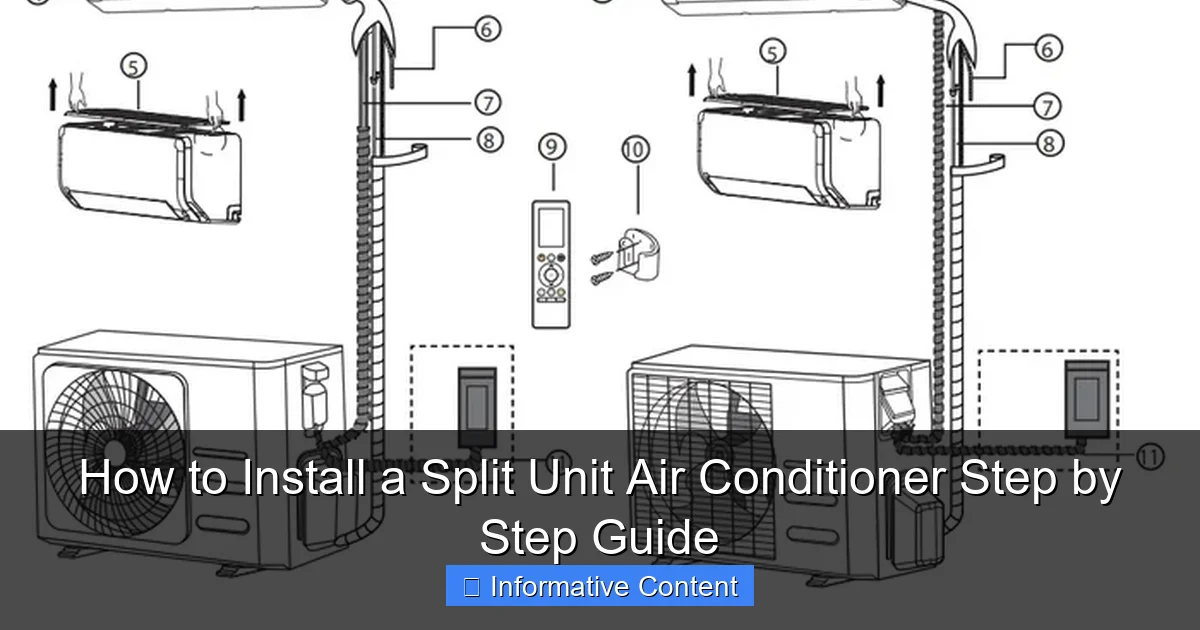
Installing a split unit air conditioner requires careful planning and precision, starting with selecting the optimal indoor and outdoor unit locations for maximum efficiency and airflow. Follow a systematic approach—mount the indoor unit, drill a condensate hole, secure the outdoor unit, connect refrigerant lines and wiring, and vacuum the system to prevent leaks. Always hire a licensed technician for the final gas charge and system test to ensure safe, code-compliant operation.
Key Takeaways
- Plan carefully: Choose optimal indoor and outdoor unit locations before drilling.
- Drill accurately: Make a 3-inch hole for refrigerant pipes, drain hose, and wiring.
- Secure the plate: Mount the indoor unit’s backplate level and firmly on the wall.
- Connect pipes properly: Flare copper pipes and insulate to prevent leaks and energy loss.
- Vacuum the system: Evacuate air and moisture from refrigerant lines before charging.
- Test thoroughly: Run the AC to verify cooling, drainage, and no abnormal noises.
- Hire a pro if unsure: Refrigerant handling requires certification—safety first.
📑 Table of Contents
- Why Installing a Split Unit Air Conditioner Is Easier Than You Think
- Step 1: Planning and Preparation – The Foundation of a Successful Installation
- Step 2: Mounting the Indoor and Outdoor Units
- Step 3: Running Refrigerant Lines, Drain, and Electrical Wiring
- Step 4: Connecting Refrigerant Lines and Evacuating the System
- Step 5: Final Checks, Sealing, and Testing
- Common Mistakes and Pro Tips for a Smooth Installation
Why Installing a Split Unit Air Conditioner Is Easier Than You Think
Let’s face it: summer heat can turn your home into a sauna, and relying on old-school window units or fans just doesn’t cut it anymore. That’s where a split unit air conditioner comes in. It’s sleek, efficient, quiet, and—believe it or not—something you can install yourself if you’re handy (or willing to learn). I remember the first time I installed one in my sunroom. I was sweating bullets—literally—and convinced I’d need a professional. But after a weekend of YouTube tutorials, a few trips to the hardware store, and a minor drill mishap (RIP, my favorite shirt), I had cold air flowing like a dream. And you know what? It wasn’t that hard.
Installing a split unit air conditioner might sound intimidating, especially with all the refrigerant lines and electrical wiring involved. But here’s the secret: most of the work is just careful planning, precise drilling, and patience. This guide walks you through every step, from choosing the right spot to testing your unit. Whether you’re cooling a bedroom, home office, or small apartment, this step by step guide to installing a split unit air conditioner will help you do it safely and correctly—without calling in an HVAC pro (unless you want to, of course).
Step 1: Planning and Preparation – The Foundation of a Successful Installation
Choose the Right Location for Your Indoor and Outdoor Units
Before you pick up a drill or unpack your tools, take a step back and plan. The placement of both the indoor and outdoor units is critical for performance, efficiency, and longevity. Start with the indoor unit. It should be mounted on an interior wall—preferably high up (7–8 feet from the floor) to allow even air distribution. Avoid placing it directly above electronics, artwork, or anything sensitive to condensation. Also, keep it at least 6 inches away from the ceiling for proper airflow.
Visual guide about how to install a split unit air conditioner
Image source: i.pinimg.com
The outdoor unit needs a stable, level surface—ideally a concrete pad or sturdy brackets on the wall. It should be in a shaded area if possible, away from direct sunlight, and at least 12 inches from any walls or obstructions to ensure proper ventilation. I once installed an outdoor unit too close to a bush, and after a month, the leaves were blocking airflow. Lesson learned: give your condenser room to breathe!
Measure the Room and Select the Correct AC Capacity
Not all split units are created equal. The size (measured in BTUs) depends on your room’s square footage, ceiling height, insulation, and even the number of windows. A 12,000 BTU unit is great for a 300–400 sq ft room, while a 18,000 BTU unit handles 600–700 sq ft. Use this general rule: 20 BTUs per square foot. For example, a 350 sq ft room needs about 7,000 BTUs.
Pro tip: if your room gets a lot of sun or has poor insulation, go up one size. I once installed a 9,000 BTU unit in a west-facing room with large windows. It worked, but it ran constantly on hot afternoons. Upgrading to a 12,000 BTU model made all the difference.
Gather Your Tools and Materials
Having everything on hand saves time and frustration. Here’s what you’ll need for a typical split unit air conditioner installation:
- Drill and masonry bits (for concrete/brick walls)
- Stud finder (if mounting on drywall)
- Level
- Wrench set (usually included with the unit)
- Vacuum pump (for refrigerant lines—more on this later)
- Manifold gauge set (for pressure checks)
- Copper pipe cutter (if cutting refrigerant lines)
- Insulated tubing for refrigerant lines
- Electrical cable (check manufacturer specs—usually 12-2 or 14-2 NM-B)
- Wall sleeve or conduit (to protect lines through the wall)
- Condensate drain pipe and hose
- Mounting brackets (indoor and outdoor)
- Safety gear: gloves, goggles, dust mask
Most kits include the refrigerant lines, drain hose, and wall brackets, but double-check the manual. I’ve seen people start installations only to realize they’re missing a critical part—don’t be that person.
Step 2: Mounting the Indoor and Outdoor Units
Install the Indoor Unit Bracket
Start with the indoor unit. Use a stud finder to locate wall studs, then hold the mounting bracket against the wall where you want the unit. Use a level to make sure it’s perfectly horizontal—this prevents water from pooling in the unit. Mark the screw holes with a pencil, then drill pilot holes. If you’re mounting into drywall without studs, use heavy-duty drywall anchors rated for at least 50 lbs (most indoor units weigh 25–40 lbs).
Secure the bracket with the provided screws. I recommend using stainless steel screws if your wall is prone to moisture (like in a bathroom or basement). Once the bracket is mounted, hang the indoor unit—it usually just slides in and locks. Don’t fully tighten anything yet; you’ll need access for the next steps.
Mount the Outdoor Unit Safely and Securely
The outdoor unit is heavier—often 70–100 lbs—so this step requires two people or a sturdy lifting aid. Place it on a concrete pad or wall brackets, ensuring it’s level and stable. If using a pad, make sure it’s slightly sloped (about 1/4 inch per foot) to allow rainwater to drain away from the unit.
Secure the unit with bolts or brackets as per the manufacturer’s instructions. I once skipped this step because the unit “looked stable,” but a windstorm a few weeks later sent it crashing into my neighbor’s garden. Not my finest moment. Bottom line: anchor it down.
Plan the Path for Lines and Wires
Now, decide where the refrigerant lines, drain hose, and electrical cable will pass through the wall. The ideal spot is directly behind the indoor unit, but sometimes you need to go diagonally or around obstacles. Use a stud finder to avoid drilling into studs or electrical wires.
Mark a 2.5–3 inch diameter hole (check your unit’s specs) and drill from the inside out. This helps prevent water from seeping in. I use a long drill bit and go slowly, checking frequently. If you hit something solid, stop and reassess—better safe than sorry.
Step 3: Running Refrigerant Lines, Drain, and Electrical Wiring
Feed the Refrigerant Lines Through the Wall
Most split units come with pre-charged refrigerant lines, but you’ll still need to run them through the wall. Unroll the insulated copper lines carefully—don’t kink or crush them. Feed them from the indoor unit through the hole to the outdoor side. Use a wall sleeve or conduit to protect the lines and seal gaps later with foam or silicone caulk.
Pro tip: leave some slack (6–12 inches) on both sides. This makes connecting the lines easier and allows for minor movement. I once pulled the lines too tight and couldn’t get the flare nuts on—had to redo the entire feed. Not fun.
Install the Condensate Drain Line
The drain hose carries condensation from the indoor unit to the outside. Attach one end to the unit’s drain pan (usually a push-fit or clamp) and run it through the same hole as the refrigerant lines. On the outdoor side, direct the hose downward to prevent backflow. If the outdoor unit is higher than the indoor unit, you may need a condensate pump.
Test the drain by pouring a cup of water into the indoor unit’s drain pan. Watch to see if it flows freely. If it pools, check for kinks or clogs. A clogged drain is a recipe for water damage—don’t skip this step.
Run the Electrical Cable (With Safety in Mind)
Electricity is serious business. Most split units require a dedicated 20–30 amp circuit (check your manual). Run 12-2 or 14-2 NM-B cable from your breaker panel to the outdoor unit. If you’re not comfortable working with electricity, hire a licensed electrician. I’ve seen DIYers try to splice into existing circuits, and let’s just say the fire department wasn’t happy.
On the indoor unit, connect the low-voltage control wires (usually 3–5 wires) as per the manual. These control the thermostat and communication between units. Use wire nuts or terminal blocks, and label each wire to avoid confusion.
Step 4: Connecting Refrigerant Lines and Evacuating the System
Flare the Copper Ends and Make Connections
Now comes the tricky part: connecting the refrigerant lines. First, cut the copper lines to length (if needed) using a copper pipe cutter. Then, use a flaring tool to create a perfect 45-degree flare on the end. This ensures a tight, leak-free seal.
Connect the flared ends to the service valves on both indoor and outdoor units using flare nuts. Tighten with two wrenches—one to hold the valve, one to turn the nut. Don’t overtighten; you can crack the flare. A good rule: hand-tighten, then give it a quarter to half turn with the wrench.
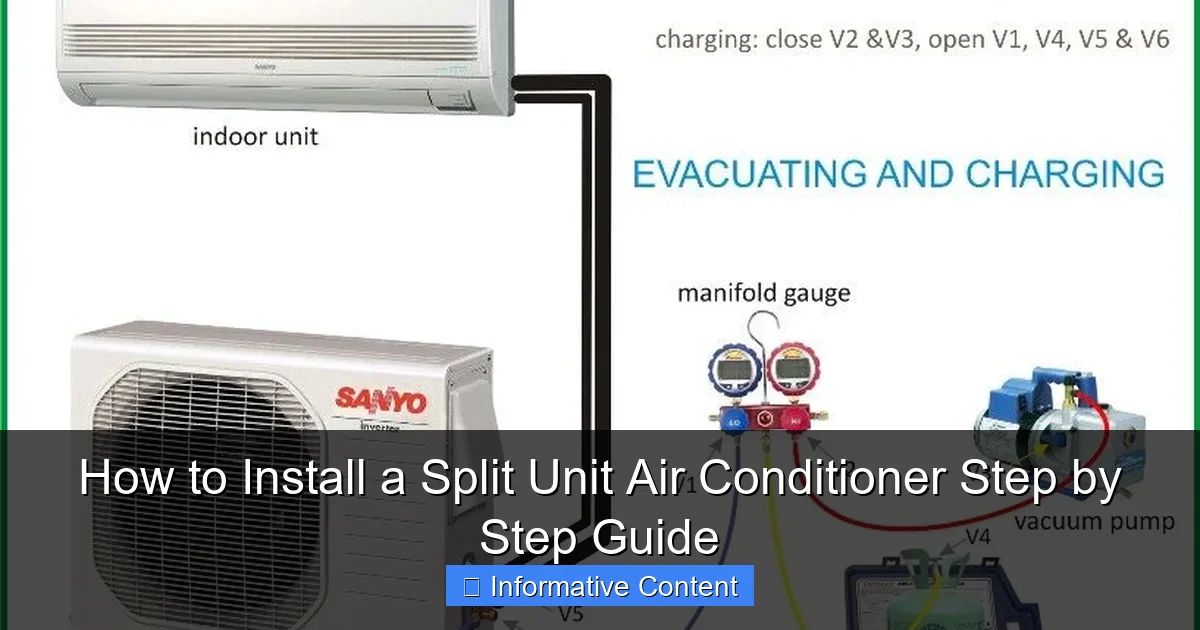
Evacuate the System with a Vacuum Pump
This is the most critical step for efficiency and longevity. Air and moisture in the refrigerant lines can damage the compressor and reduce cooling capacity. Use a vacuum pump and manifold gauge set to pull a vacuum on the lines.
Here’s how:
- Attach the manifold gauge to the service ports on the outdoor unit.
- Connect the vacuum pump to the center port of the manifold.
- Open both gauge valves and turn on the pump.
- Run the pump for at least 30 minutes, then close the valves and let it sit for 15 minutes.
- If the pressure stays below 500 microns, you’re good. If it rises, there’s a leak—check connections and re-flare if needed.
I once skipped this step because I was in a hurry. The unit ran, but it never cooled properly and failed after 6 months. Lesson: never skip the vacuum.
Open the Service Valves to Release Refrigerant
Once the vacuum holds, slowly open the service valves on the outdoor unit to release the refrigerant into the lines. Use a wrench to turn the valve stem counterclockwise. You’ll hear a hiss as the refrigerant flows. Wait until it stops, then close the manifold gauge valves.
Now the system is charged and ready. Don’t touch the valves again unless you’re servicing the unit.
Step 5: Final Checks, Sealing, and Testing
Seal the Wall Opening and Insulate Lines
With everything connected, seal the hole around the lines and drain hose. Use spray foam (non-expanding type) or silicone caulk. This keeps pests out and prevents air leaks. Then, insulate the refrigerant lines with foam pipe insulation—this prevents condensation and improves efficiency.
I also wrap the drain hose with insulation if it runs through a cold area (like an attic). This prevents freezing in winter.
Test the System Thoroughly
Turn on the power at the breaker and fire up the unit. Check for:
- Cool air blowing from the indoor unit (should start within 5 minutes)
- Outdoor unit running (fan and compressor should activate)
- No leaks (use a refrigerant leak detector or soapy water on connections)
- Drain working (water should drip from the outdoor end of the drain hose)
- No strange noises (buzzing, grinding, or rattling)
Let it run for at least 30 minutes and monitor the temperature. A properly installed unit should drop the room temperature by 10–15°F in that time.
Check Airflow and Thermostat Operation
Use the remote control to test all modes: cool, fan, dry, heat (if it’s a heat pump). Make sure the airflow is strong and even. If the unit cycles on and off too quickly, the thermostat might be in a bad spot—move it away from direct airflow or heat sources.
Common Mistakes and Pro Tips for a Smooth Installation
Top 5 Installation Mistakes to Avoid
- Skipping the vacuum process – This leads to poor performance and early failure.
- Over-tightening flare connections – Cracks can cause refrigerant leaks.
- Ignoring the condensate drain – Clogs cause water damage and mold.
- Placing the outdoor unit in direct sun – Reduces efficiency by up to 15%.
- Using undersized electrical wiring – Can cause overheating and fires.
Pro Tips from Experience
- Label everything—wires, lines, valves. It saves time during troubleshooting.
- Take photos at each step. If something goes wrong, you can refer back.
- Install a surge protector for the outdoor unit. Power spikes can fry the control board.
- Keep the manual and warranty card in a safe place. You’ll need them for service calls.
- Clean the air filters monthly. Dirty filters reduce airflow and efficiency.
Here’s a quick reference table of common split unit sizes and room recommendations:
| Room Size (sq ft) | Recommended BTU | Ideal For | Notes |
|---|---|---|---|
| 100–250 | 5,000–7,000 | Small bedroom, office | Use 6,000 BTU for rooms with large windows |
| 250–400 | 9,000–12,000 | Bedroom, living room | 12,000 BTU for sun-facing rooms |
| 400–600 | 15,000–18,000 | Large living room, open kitchen | Consider dual-zone if layout allows |
| 600–800 | 21,000–24,000 | Open floor plan, studio | Ensure proper insulation and sealing |
Installing a split unit air conditioner isn’t a walk in the park, but it’s absolutely doable with patience and attention to detail. The key is taking your time—especially during the vacuum and connection steps. I’ve installed three units now, and each one got easier. The first took me two days. The last one? Under eight hours, start to finish.
Remember, safety comes first. If you’re unsure about electrical work or refrigerant handling, don’t risk it. A professional can save you money in the long run by avoiding costly mistakes. But if you’re confident and follow this step by step guide to installing a split unit air conditioner, you’ll have a reliable, efficient cooling system that keeps your home comfortable for years.
And hey, there’s nothing quite like the satisfaction of stepping into a cool room you built yourself. So grab your tools, take a deep breath, and get started. Your future cool self will thank you.
Frequently Asked Questions
How do I install a split unit air conditioner by myself?
Installing a split unit air conditioner yourself is possible with the right tools and safety precautions. Follow a detailed guide to mount the indoor and outdoor units, connect refrigerant lines, and wire the system properly—but always consult a professional if unsure about electrical or gas connections.
What tools are needed to install a split unit air conditioner?
You’ll need a drill, level, wrench, vacuum pump, refrigerant gauge set, and a hole saw for the wall penetration. Additional tools like a stud finder and wire stripper ensure a secure and accurate installation.
Where should I place the indoor unit when installing a split AC?
Install the indoor unit on a sturdy wall, away from direct sunlight and heat sources, with at least 6–8 inches of clearance around it for airflow. Position it high on the wall for optimal cooling distribution and easy drainage.
How do I connect the refrigerant lines during a split unit air conditioner installation?
Carefully flare the copper lines and connect them to the matching valves on the indoor and outdoor units using a torque wrench. After connecting, perform a vacuum test to remove air and moisture before charging with refrigerant.
Can I install a split unit air conditioner without professional help?
While DIY installation is feasible for handy homeowners, improper setup can lead to leaks, inefficiency, or voided warranties. For safety and optimal performance, hire a certified HVAC technician to handle gas charging and electrical connections.
How long does it take to install a split unit air conditioner?
A basic split unit air conditioner installation typically takes 4–8 hours, depending on wall type, line length, and electrical setup. Complex installations with long refrigerant lines or structural modifications may require more time.