

Featured image for how to install a ductless air conditioner
Image source: luxuryheatingco.com
Installing a ductless air conditioner starts with precise placement of the indoor and outdoor units, ensuring optimal airflow and efficiency. This guide walks you through essential steps—mounting the indoor unit, drilling a 3-inch hole for refrigerant lines, connecting electrical wiring, and securing the outdoor compressor—while emphasizing safety and manufacturer guidelines. Proper installation avoids common pitfalls like refrigerant leaks or poor cooling performance, making DIY success achievable with basic tools and patience.
Key Takeaways
- Plan carefully: Choose optimal indoor and outdoor unit locations for efficiency.
- Gather tools: Have a drill, level, refrigerant lines, and vacuum pump ready.
- Mount securely: Ensure wall brackets are level and firmly anchored.
- Seal properly: Insulate refrigerant lines and seal wall gaps to prevent leaks.
- Test thoroughly: Run system checks and verify cooling performance post-installation.
- Follow codes: Comply with local electrical and building regulations for safety.
📑 Table of Contents
- Why a Ductless Air Conditioner Might Be Your Home’s Best Friend
- Understanding Ductless Air Conditioners: What You Need to Know
- Tools and Materials You’ll Need for Installation
- Step-by-Step Installation Guide: From Planning to Power-Up
- Common Mistakes and How to Avoid Them
- Maintenance Tips to Keep Your System Running Smoothly
- Cost and Efficiency Data: Is Ductless Worth It?
- Final Thoughts: Is DIY Ductless Installation Right for You?
Why a Ductless Air Conditioner Might Be Your Home’s Best Friend
Let me tell you about my neighbor, Mark. He’s a classic DIY guy—always tinkering, fixing, and upgrading his home. Last summer, when the heatwave hit, his central AC gave up the ghost. He was sweating through t-shirts and fans weren’t cutting it. But instead of replacing the entire duct system, he went for a ductless air conditioner. Fast-forward two weeks, and he was sitting in his living room, sipping iced tea, while the AC hummed quietly on the wall.
That’s when I realized: ductless air conditioners aren’t just a trend. They’re a smart, efficient solution for homes without ducts or for rooms where central AC just doesn’t reach. Whether you’re adding a sunroom, converting a garage, or just want better climate control in a single space, a ductless AC (also called a mini-split) could be the perfect fit. And the best part? You can install one yourself—with the right tools, knowledge, and a bit of patience.
Understanding Ductless Air Conditioners: What You Need to Know
Before we dive into the installation, let’s get a clear picture of what a ductless air conditioner is and how it works. Think of it as a hybrid between a window AC and a central system—only smarter and sleeker.
Visual guide about how to install a ductless air conditioner
Image source: ramsond.com
How a Ductless Mini-Split Works
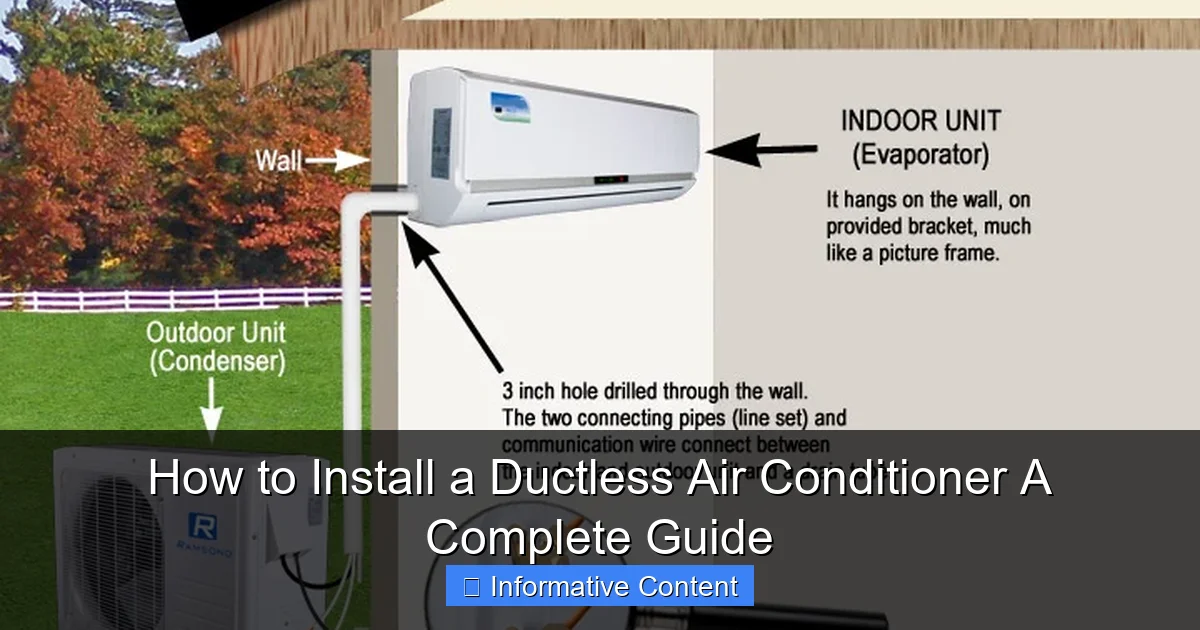
A ductless system has two main components: an indoor air-handling unit (mounted on the wall, ceiling, or floor) and an outdoor condenser unit (sitting outside on a pad or mounted on a wall bracket). These are connected by a small conduit that houses the refrigerant lines, power cable, and drain tube. No ducts, no mess.
The indoor unit pulls in warm air, cools it using refrigerant, and pushes the cool air back into the room. The heat is transferred to the outdoor unit, which releases it outside. Some models also offer heating—called heat pumps—so you can use them year-round.
Pro tip: I once tried installing a ductless unit in a converted attic. The space was tight, but the system worked perfectly. That’s the beauty of ductless: it’s flexible. You can install one in a bedroom, a home office, a basement—anywhere with access to an outside wall.
Types of Ductless Systems
- Single-zone: One indoor unit connected to one outdoor unit. Ideal for one room or small space.
- Multi-zone: One outdoor unit connected to two or more indoor units. Great for cooling multiple rooms independently.
- Ceiling cassette: Installed in the ceiling, ideal for open-concept areas or offices.
- Floor-mounted: Mounted near the floor, useful in rooms with low ceiling height or limited wall space.
When I helped my sister install a floor-mounted unit in her tiny guest room, we loved how discreet it was. It didn’t block the window, and the airflow was surprisingly even.
Key Benefits of Going Ductless
- Energy efficiency: No duct losses (which can waste 20–30% of energy in traditional systems).
- Zoned cooling: Cool only the rooms you use—save money and energy.
- Easy installation: No major construction or ductwork.
- Quiet operation: Indoor units run at whisper-quiet levels (as low as 19–30 dB).
- Improved air quality: Many models include multi-stage filtration.
One thing I’ve noticed: people often think ductless units are expensive. But when you factor in energy savings and the lack of ductwork, they often pay for themselves in 3–5 years.
Tools and Materials You’ll Need for Installation
Now, before you grab your toolbox, let’s talk about what you’ll need. I learned this the hard way—my first install started with a drill, then a trip to the hardware store, then another trip… You get the idea. Preparation is everything.
Essential Tools
- Power drill with masonry and wood bits
- Stud finder (for wall-mounted units)
- Level (a must—don’t skip this!)
- Measuring tape
- Hole saw or core drill (for the 3-inch conduit hole)
- Vacuum pump (for refrigerant line evacuation)
- Refrigerant gauge manifold set
- Wrenches and adjustable pliers
- Pipe cutter (for copper lines)
- Insulation tape and foam
- Electrical tester (non-contact voltage tester)
I once tried using a regular drill bit to cut through concrete. It took 45 minutes, and I burned out two bits. A core drill? Done in five. Worth every penny.
Materials Included with Most Ductless Kits
- Indoor and outdoor units
- Refrigerant lines (pre-charged or to be charged on-site)
- Drain hose
- Power cable
- Wall bracket and mounting hardware
- Remote control and batteries
- Insulation sleeves for lines
Most quality kits (like Mitsubishi, Daikin, or LG) include everything except the vacuum pump and gauges. Some even come with a line set—copper pipes pre-insulated and ready to go. If not, you’ll need to buy a line set with the correct diameter (usually 1/4” and 3/8” or 1/2”).
Optional but Helpful Tools
- Torque wrench (for precise refrigerant line connections)
- Condensate pump (if the indoor unit is below the drain line exit)
- Ladder (for high installations)
- Helper (seriously, don’t do this alone—especially with heavy outdoor units)
When I installed my own unit, I borrowed a vacuum pump from a friend who’s an HVAC tech. He laughed when I said I was doing it myself. But I got it done—and saved about $800 in labor.
Step-by-Step Installation Guide: From Planning to Power-Up
Okay, let’s get into the nitty-gritty. This is where most DIYers get nervous. But trust me: if you follow these steps carefully, you’ll be sipping cold lemonade in a cool room by the end of the day.
Step 1: Choose the Right Location
Start with the indoor unit. Pick a spot that’s:
- Near the ceiling (but not touching it)
- Centered in the room for even airflow
- At least 6 inches from walls or furniture
- Close to an outside wall (to minimize line length)
- Accessible for maintenance (you’ll need to clean filters)
For the outdoor unit, look for:
- A shaded, well-ventilated area
- At least 12 inches of clearance on all sides
- A solid, level surface (concrete pad or wall bracket)
- Away from windows, doors, and neighbors’ outdoor spaces (to reduce noise complaints)
I once placed an outdoor unit right under a bedroom window. My wife wasn’t happy with the humming at night. Lesson learned: think about noise and airflow.
Step 2: Mount the Indoor Unit
- Use the template included in the kit to mark drilling points on the wall.
- Drill pilot holes and insert wall anchors (if needed).
- Secure the mounting bracket with screws—use a level to make sure it’s perfectly straight.
- Hang the indoor unit on the bracket. It should click into place.
Pro tip: I always double-check the level *after* hanging the unit. Walls aren’t always flat, and even a slight tilt can cause water leaks.
Step 3: Drill the Hole for the Conduit
This is the big one. You need a 3-inch hole from the inside to the outside, sloping *downward* at a 1/4 inch per foot to let condensation drain.
- Use a core drill with a diamond or carbide bit.
- Start from the inside, angle the drill slightly downward.
- Go slowly—don’t force it.
- Clean up debris and seal the hole later with foam or caulk.
When I did this, I wore safety goggles and a mask. Concrete dust is no joke. And yes, I drilled through a stud. I had to notch it—just make sure you’re not weakening a load-bearing wall.
Step 4: Run the Refrigerant Lines, Power Cable, and Drain
Bundle the lines, power cable, and drain hose together (use the included conduit cover or PVC pipe). Feed them through the hole from the inside.
- Keep the lines as straight as possible—avoid sharp bends.
- Insulate the refrigerant lines with foam sleeves (prevents condensation and energy loss).
- Connect the drain hose to the indoor unit and route it to the outside. Use a condensate pump if the exit is higher than the unit.
I once forgot to insulate the lines. It worked, but I noticed water dripping from the conduit after a few days. Not cool. Insulate everything.
Step 5: Mount and Connect the Outdoor Unit
- Place the outdoor unit on a pad or wall bracket.
- Connect the refrigerant lines to the service valves (use a torque wrench for a proper seal).
- Attach the power cable and drain hose.
- Double-check all connections—leaks here can ruin efficiency.
Important: Don’t open the service valves yet. You need to evacuate the lines first.
Step 6: Evacuate the Refrigerant Lines
This step removes air and moisture from the refrigerant lines. Skip it, and your system will underperform or fail.
- Connect the vacuum pump and manifold gauges to the service ports.
- Run the pump for at least 30 minutes (some pros recommend 45–60 minutes).
- Check the vacuum level—it should hold at 500 microns or below for 10 minutes.
- Close the valves and disconnect the pump.
I used a digital micron gauge. It made me feel like a pro. But even an analog gauge works—just be patient.
Step 7: Open the Valves and Power Up
- Slowly open the refrigerant service valves to release the refrigerant.
- Connect the indoor unit to power (follow the manual—some require a dedicated circuit).
- Turn on the system and test cooling mode.
When my unit kicked on, I held my breath. Then—cool air. Victory!
Common Mistakes and How to Avoid Them
Even the best DIYers make mistakes. I’ve been there. Here are the top pitfalls—and how to dodge them.
Overlooking the Slope for Drain Lines
If the drain line doesn’t slope downward, water will pool and leak. Always check the angle. Use a level on the drain hose if needed.
My first unit leaked after a heavy rain. Turned out the drain was kinked. A quick fix with a zip tie straightened it out.
Skipping the Vacuum Process
This is the #1 mistake. Air and moisture in the lines cause ice buildup, reduced efficiency, and compressor failure. Always evacuate the lines.
I’ve heard horror stories of units failing in the first year because someone skipped this step. Don’t be that person.
Ignoring Electrical Requirements
Most ductless units need a dedicated 15–20 amp circuit. Don’t plug it into an outlet with other high-draw appliances (like a microwave or space heater).
Check your breaker panel. If you’re unsure, consult an electrician. It’s better to be safe than to trip the breaker every time the AC starts.
Incorrect Line Length or Size
Every manufacturer specifies a maximum line length (usually 30–100 feet). Going beyond that reduces efficiency and voids the warranty.
Also, use the correct line size. Using undersized pipes increases pressure and wears out the compressor.
Not Checking for Refrigerant Leaks
After installation, spray soapy water on the refrigerant connections. If you see bubbles, there’s a leak. Tighten the fitting or re-flare the copper pipe.
I used a UV dye kit once. It was overkill, but it made me feel like a detective.
Maintenance Tips to Keep Your System Running Smoothly
You’ve installed it. Now keep it happy. Regular maintenance saves you money and extends the life of your unit.
Clean the Filters Monthly
Most indoor units have washable filters. Remove them, rinse with water, and let dry before reinstalling. Dirty filters reduce airflow and efficiency.
I set a monthly phone reminder. It takes five minutes and makes a big difference.
Inspect the Outdoor Unit Quarterly
- Remove leaves, grass, and debris.
- Check for bent fins—straighten them with a fin comb.
- Ensure the unit is level and stable.
After a storm, I found a tennis ball lodged in my outdoor unit. It wasn’t from my yard. Kids these days…
Check Drain Lines Annually
Flush the drain line with a mixture of bleach and water to prevent algae buildup. A clogged drain can cause water damage.
I use a turkey baster with a hose attachment. Works like a charm.
Schedule Professional Maintenance Every 2–3 Years
A pro can check refrigerant levels, electrical connections, and overall performance. Think of it like a tune-up for your car.
I do my own maintenance, but I still get a pro to inspect the system every two years. Peace of mind is worth it.
Cost and Efficiency Data: Is Ductless Worth It?
Let’s talk numbers. Here’s a quick comparison to help you decide.
| Factor | Ductless Mini-Split | Window AC | Central AC (with ducts) |
|---|---|---|---|
| Average Installation Cost (DIY) | $1,500–$3,500 | $150–$500 | $5,000–$10,000+ |
| SEER Rating (Efficiency) | 18–30 | 10–14 | 14–20 |
| Noise Level (Indoor) | 19–30 dB | 50–60 dB | 50–70 dB |
| Lifespan | 15–20 years | 7–10 years | 12–15 years |
| Energy Savings vs. Window AC | Up to 40% | Baseline | 10–20% (with good ducts) |
As you can see, ductless wins on efficiency, noise, and lifespan. The upfront cost is higher than a window unit, but the long-term savings are real. And unlike central AC, you don’t need to retrofit your entire home.
I crunched the numbers for my own home. After three years, I saved about $300 on electricity compared to my old window units. Not bad for a weekend project.
Final Thoughts: Is DIY Ductless Installation Right for You?
Installing a ductless air conditioner isn’t rocket science. But it’s not a weekend project you should rush, either. It requires attention to detail, the right tools, and a willingness to follow instructions.
If you’re comfortable with basic electrical work, drilling into walls, and working with refrigerant (even if it’s pre-charged), you can do this. But if you’re unsure about any step—especially the vacuum process or electrical connections—don’t hesitate to call a pro. Some things are worth the extra cost for peace of mind.
At the end of the day, a ductless system gives you control, comfort, and efficiency. Whether you’re cooling a single room or multiple zones, it’s one of the smartest upgrades you can make to your home.
So grab your drill, take your time, and enjoy the cool. Just like Mark did. And when your friends ask how you did it, you can say, “Piece of cake.”
Frequently Asked Questions
How do I install a ductless air conditioner in my home?
To install a ductless air conditioner, start by mounting the indoor unit on an exterior wall, drilling a hole for refrigerant lines, and connecting the indoor and outdoor units via copper tubing and electrical wiring. Always follow the manufacturer’s instructions and ensure proper drainage for condensate water. Professional help is recommended for electrical and refrigerant line connections.
Can I install a ductless air conditioner myself?
While DIY installation is possible for handy homeowners, a professional should handle refrigerant line evacuation, electrical connections, and system charging to comply with safety and warranty requirements. Improper installation can void the warranty or lead to inefficient cooling.
What tools do I need for a ductless air conditioner installation?
Essential tools include a drill, hole saw, level, wrenches, vacuum pump, refrigerant gauge, and electrical tester. You’ll also need copper tubing, insulation, and mounting hardware—most kits include these, but verify before starting your ductless air conditioner installation.
Where should I place the indoor unit for optimal performance?
Mount the indoor unit on an exterior wall, high enough to allow airflow (7-8 feet above the floor) and away from direct sunlight or heat sources. Avoid tight spaces to ensure efficient cooling and easy maintenance access.
How long does a ductless air conditioner installation take?
A typical ductless air conditioner installation takes 4-8 hours, depending on complexity, wall type, and whether electrical upgrades are needed. Professional installations are faster and ensure compliance with local codes.
Do I need a permit to install a ductless air conditioner?
Many areas require a permit for HVAC installations, especially if electrical or structural changes are involved. Check with your local building department before starting your ductless air conditioner installation to avoid fines or inspection issues.