
Featured image for how does through the wall air conditioner work
Image source: hvactrainingshop.com
Through the wall air conditioners work by mounting directly into a wall opening, providing efficient, permanent cooling without taking up window or floor space. They operate like split systems, with an indoor unit circulating cooled air and an outdoor section expelling heat, all connected through the wall for a seamless, energy-efficient design. Ideal for apartments or rooms without windows, they offer powerful climate control with minimal noise and maximum convenience.
Key Takeaways
- Seamless installation: Requires a wall sleeve for secure, weatherproof fitting.
- Efficient cooling: Uses refrigerant cycles to extract heat and cool indoor air.
- Ventilation control: Fresh air intake and exhaust manage airflow effectively.
- Energy savings: Proper sizing reduces electricity use and utility bills.
- Maintenance matters: Clean filters and coils ensure optimal performance.
- Noise reduction: Wall units operate quieter than window-mounted alternatives.
- Year-round use: Many models include heating and dehumidifying functions.
📑 Table of Contents
- The Basics of Through the Wall Air Conditioners
- How Through the Wall ACs Work: The Science Behind the Cool
- Installation: What You Need to Know Before You Start
- Energy Efficiency and Performance: What to Expect
- Maintenance and Troubleshooting: Keeping Your Unit in Top Shape
- Choosing the Right Through the Wall AC: A Buyer’s Guide
The Basics of Through the Wall Air Conditioners
What Is a Through the Wall Air Conditioner?
If you’ve ever lived in an apartment with no central AC or dealt with a room that just won’t cool down, you might have considered a through the wall air conditioner. Unlike the common window units, these are built to fit directly into a wall sleeve—usually installed between studs or in a pre-cut hole. Think of it as a permanent cooling solution that’s more efficient and less obtrusive than a window unit.
These systems are designed to be semi-permanent, often installed by professionals or experienced DIYers. They’re especially popular in urban settings, older homes, or spaces where windows aren’t ideal for AC placement. I remember my first apartment in Chicago—no central air, and the windows were too narrow for a standard unit. The landlord installed a through the wall model, and it was a game-changer. No more blocking the window, no more tripping over the unit, and the noise was significantly reduced.
How It’s Different from Window and Portable Units
Let’s break down the key differences. Window units are temporary, easy to install, but they block natural light and can be noisy. Portable ACs are mobile but inefficient, often requiring venting through a window and consuming more power. Through the wall units, on the other hand, are built for longevity and performance.
- Installation: Permanent, requires a wall sleeve and proper insulation.
- Efficiency: Better energy use due to sealed installation and less air leakage.
- Aesthetics: Cleaner look, doesn’t obstruct views or windows.
- Noise: Quieter because the compressor is outside the living space.
One thing I learned the hard way: a through the wall unit isn’t something you can just pop in and out like a window AC. Once it’s in, it’s in. But if you’re planning to stay put for a while, the investment is worth it.
How Through the Wall ACs Work: The Science Behind the Cool
The Core Components
At its heart, a through the wall air conditioner works on the same principle as any AC: it moves heat from inside your room to the outside. But how exactly does it do that? Let’s dive into the main parts:
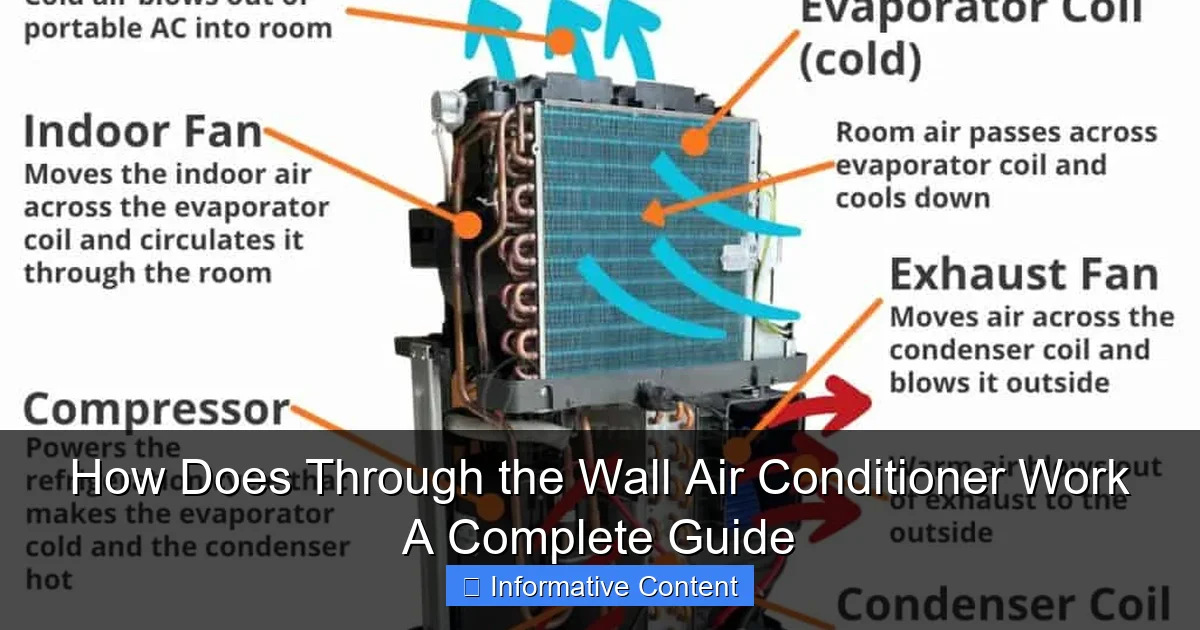
Visual guide about how does through the wall air conditioner work
Image source: asiheatingandair.com
- Compressor: The heart of the system. It pressurizes the refrigerant, turning it into a hot, high-pressure gas.
- Condenser Coil: Located on the outside section of the unit. The hot gas releases heat to the outdoor air and condenses into a liquid.
- Expansion Valve: Reduces pressure on the refrigerant, cooling it down dramatically.
- Evaporator Coil: Inside the room. The cold refrigerant absorbs heat from indoor air, cooling it down.
- Fan: Blows indoor air over the evaporator coil and pushes cooled air back into the room.
- Drain Pan: Catches condensation and channels it outside.
Imagine your room as a hot oven. The AC is like a sponge that soaks up the heat and squeezes it outside. The refrigerant is the sponge—it cycles through hot and cold phases to keep your space comfortable.
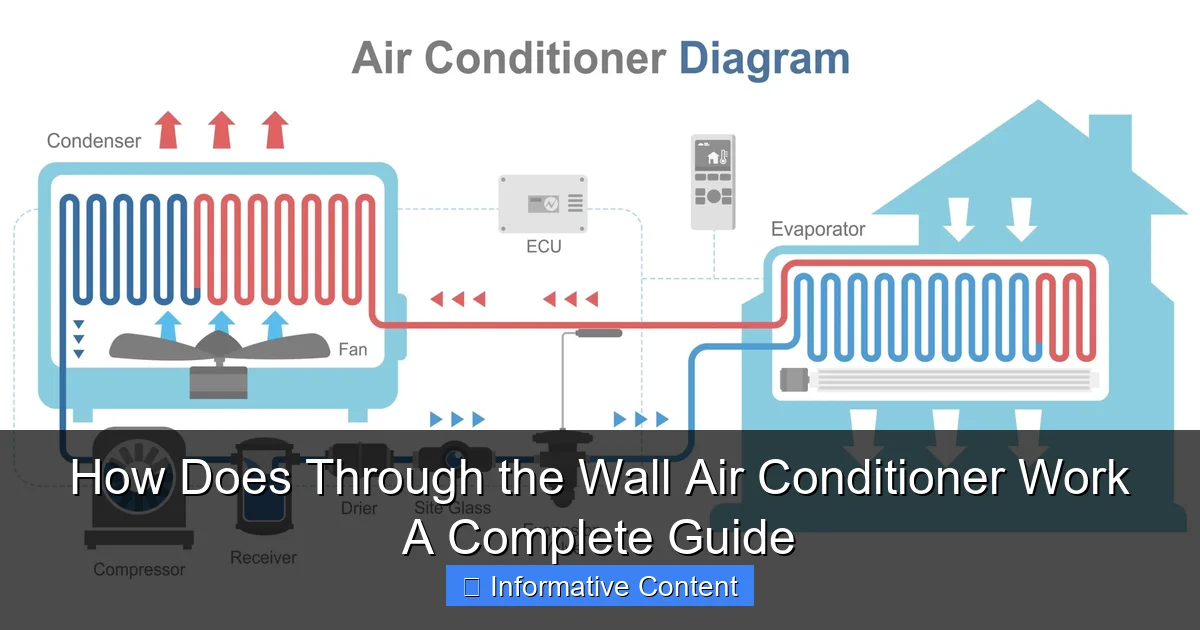
The Refrigeration Cycle in Action
Here’s how the cycle works step by step:
- The compressor pumps refrigerant gas to the condenser coil (outside).
- As the hot gas passes through the condenser, a fan blows outside air over it, releasing heat. The gas cools and becomes a liquid.
- This liquid refrigerant moves through the expansion valve, where pressure drops. It becomes very cold.
- The cold refrigerant enters the evaporator coil inside your room. The indoor fan blows warm air over the coil—heat is absorbed, and the air cools.
- The refrigerant, now warmed, returns to the compressor to start the cycle again.
I like to think of it like a water cycle: evaporation (cooling), condensation (heat release), and precipitation (condensation draining out). It’s a continuous loop that keeps your room at a steady temperature.
Why Through the Wall Units Are More Efficient
Because the unit is sealed in a wall sleeve, there’s less chance for cool air to escape or hot air to sneak in. Window units often have gaps around the edges, leading to drafts and inefficiency. A through the wall unit is like a well-insulated window—tight, secure, and energy-smart.
Also, since the condenser (noisy part) is outside, indoor noise levels are much lower. I once had a window unit that sounded like a jet engine. My through the wall model? Barely a whisper.
Installation: What You Need to Know Before You Start
Choosing the Right Location
Not every wall is a good candidate. You need to consider:
- Wall Type: Exterior walls only. Interior walls won’t work because the condenser needs outdoor air.
- Structural Integrity: Avoid areas with plumbing, electrical wiring, or load-bearing studs.
- Sun Exposure: South- or west-facing walls get more heat. North-facing is ideal for efficiency.
- Clearance: At least 20 inches of unobstructed space on the outdoor side for airflow.
My buddy once tried installing one on a wall with a water pipe behind it. Let’s just say the repair bill was… memorable. Always check for hidden utilities before cutting.
Wall Sleeve: The Foundation of Installation
The wall sleeve is a metal or plastic housing that fits between the wall studs. It:
- Holds the AC unit securely
- Provides insulation
- Channels condensation outside
- Prevents pests and debris from entering
Most modern through the wall units come with a universal sleeve, but older homes might need a retrofit sleeve. Tip: If you’re replacing an old unit, measure the sleeve dimensions carefully. Not all units are compatible.
Step-by-Step Installation Tips
Here’s a simplified guide (always follow manufacturer instructions):
- Mark and Cut: Use a stud finder to locate studs. Cut a hole slightly larger than the sleeve.
- Install the Sleeve: Insert the sleeve, seal gaps with foam or caulk. Ensure it’s level.
- Connect Drain: Attach a drain hose to the pan and route it outside. No sagging—water needs to flow downhill.
- Electrical: Most units need a dedicated 20-amp circuit. If you’re not comfortable with wiring, hire an electrician.
- Insert Unit: Slide the AC into the sleeve. Lock it in place with screws.
- Seal and Insulate: Use foam tape around the edges to prevent air leaks.
I did my first install solo. It took four hours, a few swear words, and one trip to the hardware store for extra foam sealant. But it worked! And I saved $200 on labor.
Energy Efficiency and Performance: What to Expect
Understanding BTUs and Sizing
BTU stands for British Thermal Unit—it measures cooling power. The right size depends on your room:
- 150–250 sq ft: 6,000–8,000 BTU
- 250–350 sq ft: 8,000–10,000 BTU
- 350–550 sq ft: 10,000–14,000 BTU
- 550–700 sq ft: 14,000–18,000 BTU
Too small? The AC runs constantly and can’t cool. Too big? It cools too fast, doesn’t dehumidify well, and wastes energy. I once bought a 14,000 BTU for a 300 sq ft room. It was overkill—my energy bill spiked.
SEER Ratings and Energy Savings
SEER (Seasonal Energy Efficiency Ratio) tells you how much cooling you get per watt of electricity. Higher SEER = better efficiency. Look for:
- Minimum: 10–12 SEER (older models)
- Good: 13–15 SEER (most modern units)
- Excellent: 16+ SEER (premium models)
A 15 SEER unit can save you 20–30% on energy compared to a 10 SEER. Over time, that adds up. My current unit is 14 SEER—it cut my summer bill by about $40/month.
Real-World Performance Tips
- Use a Programmable Thermostat: Set it to 78°F when home, 85°F when away.
- Keep Filters Clean: Clogged filters reduce airflow and efficiency. Clean monthly.
- Seal Gaps: Even small leaks waste energy. Use foam tape around the unit.
- Shade the Outdoor Side: A small awning reduces condenser heat, improving efficiency.
I learned the filter lesson the hard way. After three months of neglect, my unit was working twice as hard. A quick clean brought it back to normal.
Maintenance and Troubleshooting: Keeping Your Unit in Top Shape
Routine Maintenance Tasks
Think of your AC like a car—it needs regular checkups. Here’s what to do:
- Monthly: Clean or replace air filters.
- Quarterly: Check drain pan and hose for clogs. Flush with vinegar if needed.
- Bi-Annually: Inspect coils for dirt or corrosion. Use a soft brush or coil cleaner.
- Annually: Check refrigerant levels (if low, call a pro).
I keep a sticky note on my fridge: “Check AC filter 1st of every month.” It’s simple, but it works.
Common Issues and Fixes
Here are some problems you might face—and how to solve them:
| Issue | Likely Cause | Quick Fix |
|---|---|---|
| Unit not cooling | Dirty filter, low refrigerant, blocked vents | Clean filter, check airflow, call pro for refrigerant |
| Water leaking inside | Clogged drain, tilted unit | Clear drain, level the unit |
| Noisy operation | Loose parts, debris in fan | Tighten screws, clean fan blades |
| Unit won’t turn on | Power issue, thermostat fault | Check circuit breaker, replace thermostat battery |
My unit once started dripping water onto the carpet. Panic! But after checking the drain pan, I found a tiny leaf blocking the hose. A quick flush fixed it.
When to Call a Professional
Some issues need expert help:
- Refrigerant leaks (never try to refill yourself)
- Electrical problems (sparks, tripping breakers)
- Compressor failure (loud noises, no cooling)
- Condensate pump issues (if your unit has one)
Don’t risk it. A pro can diagnose and fix problems safely. I once tried to “fix” a refrigerant leak with duct tape. Spoiler: it didn’t work.
Choosing the Right Through the Wall AC: A Buyer’s Guide
Key Features to Look For
Not all through the wall units are created equal. Here’s what matters:
- BTU Rating: Match to your room size.
- SEER Rating: Aim for 13+.
- Fan Speeds: Multiple speeds for better control.
- Dehumidifier Mode: Reduces moisture in humid climates.
- Remote Control: Handy for adjusting settings from bed.
- Washable Filters: Saves money and hassle.
- Quiet Operation: Look for decibel ratings under 50 dB.
I love my unit’s dehumidifier mode. In Chicago summers, it’s a lifesaver for reducing that sticky feeling.
Top Brands and Models (2024)
Some reliable names in the game:
- Friedrich: High efficiency, great build quality. Model: KCL36A30A (14,000 BTU, 14.5 SEER)
- LG: Smart features, quiet operation. Model: LW1517IVSM (15,000 BTU, 14.7 SEER)
- Frigidaire: Budget-friendly, reliable. Model: FFTH1222U1 (12,000 BTU, 13.5 SEER)
- Honeywell: Compact, easy to install. Model: HJ08B1 (8,000 BTU, 13.0 SEER)
My pick? The Friedrich. It’s pricey, but the energy savings pay off.
DIY vs. Professional Installation
DIY saves money but requires skills. Consider pros if:
- You’re not comfortable with electrical work
- The wall has complex framing
- You need a new circuit installed
Costs: DIY = $0–$200 (tools, materials). Pro = $300–$800 (labor, permits). I did mine myself, but if I had to wire a new circuit, I’d hire someone.
Through the wall air conditioners are a smart choice for anyone wanting a permanent, efficient, and quiet cooling solution. They’re not perfect—installation is more involved, and they’re not portable—but the benefits far outweigh the drawbacks. From the science of heat exchange to the practical steps of installation and maintenance, understanding how these units work empowers you to make better decisions.
Whether you’re cooling a studio apartment, a home office, or a sunroom, a through the wall AC can transform your space. Just remember: size it right, maintain it regularly, and don’t skip the insulation. And if you’re ever unsure, there’s no shame in calling a pro. After all, a well-installed, well-maintained unit can last 10–15 years—plenty of summers of comfort ahead.
Frequently Asked Questions
How does a through the wall air conditioner work?
A through the wall air conditioner works by drawing in warm air from the room, passing it over cold evaporator coils to remove heat and humidity, and then blowing the cooled air back into the space. The heat absorbed is expelled outside through the unit’s rear, which is installed in a wall sleeve.
What is a through the wall air conditioner and how is it different from a window unit?
A through the wall air conditioner is a permanent cooling system installed directly into an exterior wall, unlike window units that sit in an open window. This design offers a cleaner look, better insulation, and frees up window space while providing similar cooling power.
Do through the wall AC units require special installation?
Yes, installing a through the wall air conditioner requires cutting an opening in an exterior wall and securing a metal sleeve for proper support and insulation. It’s recommended to hire a professional to ensure safe electrical connections and prevent air leaks.
Can a through the wall air conditioner also heat a room?
Some through the wall air conditioners come with a heat pump or electric heating feature, allowing them to provide both cooling and heating. These models are ideal for year-round climate control in moderate climates.
How energy efficient are through the wall air conditioners?
Energy efficiency varies by model, but many modern through the wall air conditioners are ENERGY STAR certified and offer high EER (Energy Efficiency Ratio) ratings. Choosing a unit with the right size and features can help reduce electricity usage and lower utility bills.
Do through the wall air conditioners need regular maintenance?
Yes, regular maintenance such as cleaning or replacing air filters, checking refrigerant levels, and inspecting the condenser coils helps ensure optimal performance. Proper upkeep extends the unit’s lifespan and maintains indoor air quality.