
Featured image for how do you install a portable air conditioner
Image source: floridaindependent.com
Installing a portable air conditioner is quick and tool-free—just position it near a window and power source. Connect the included exhaust hose to the unit and seal it to your window using the provided kit to prevent hot air leaks and maximize cooling efficiency. Most models are ready to use in minutes with no permanent modifications needed.
Key Takeaways
- Choose the right window kit: Match it to your window type for a secure fit.
- Seal gaps tightly: Prevent hot air leaks with foam or insulation strips.
- Vent hose must be short: Keep it under 5 feet for optimal efficiency.
- Place near a window: Ensures easy exhaust and proper airflow.
- Drain water regularly: Avoid overflow by checking the tank daily.
- Use a dedicated outlet: Prevents circuit overloads and ensures safety.
📑 Table of Contents
- Why Portable Air Conditioners Are a Summer Lifesaver
- What You Need to Know Before Installation
- Step-by-Step: How to Install a Portable Air Conditioner
- Special Cases: Installing in Non-Traditional Spaces
- Maintenance and Troubleshooting: Keep It Running Smoothly
- Energy Efficiency and Cost-Saving Tips
- Final Thoughts: Cool Comfort Without the Hassle
Why Portable Air Conditioners Are a Summer Lifesaver
It’s 9 p.m. on a sweltering July evening. The fan is spinning at full speed, but the air feels like a warm, damp blanket. You’re sweating through your shirt, and your cat has taken refuge under the couch, panting. Sound familiar? I’ve been there. That’s when I discovered the portable air conditioner—my personal escape from summer’s heat.
Unlike bulky window units or expensive central AC systems, portable air conditioners offer a flexible, no-installation-necessary solution. You can move them from room to room, set them up in under 30 minutes, and enjoy cool air without drilling holes in your walls or breaking the bank. But here’s the thing: how do you install a portable air conditioner? If you’ve ever opened the box and stared at the hoses, brackets, and instruction manual with a mix of excitement and mild panic—this guide is for you. I’ve installed three different models over the years (yes, I’m the friend people call for help), and I’m here to walk you through the process step by step, with zero jargon and zero stress.
What You Need to Know Before Installation
Before you unbox your new cooling companion, let’s talk about preparation. A little planning now saves you frustration later—trust me, I once tried to install a portable AC in a room with only one outlet, and let’s just say the extension cord drama wasn’t worth it.
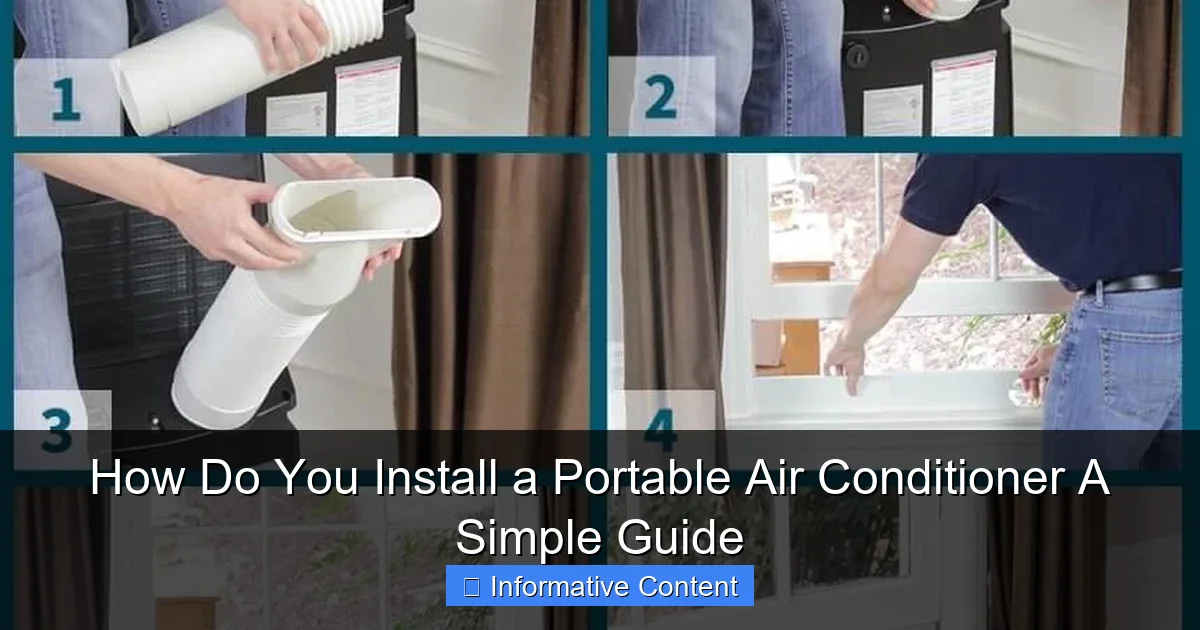
Visual guide about how do you install a portable air conditioner
Image source: hvaclifehack.com
Check Your Room and Window Setup
Not every room is ideal for a portable air conditioner. These units work best in spaces where you can vent hot air outside. That means:
- Windows are a must—most portable ACs require a window kit to vent exhaust. Sliding, double-hung, or casement windows? All work, but the setup varies.
- Room size matters—check the unit’s BTU (British Thermal Unit) rating. A 10,000 BTU unit cools about 450 sq. ft., perfect for a medium-sized bedroom or living room. Too small, and it’ll struggle. Too big, and you’re wasting energy and money.
- Distance from window—your AC should be within 5–7 feet of the window. The exhaust hose usually isn’t longer than that, and longer hoses reduce efficiency.
Pro tip: Measure your window height and width before buying. Some kits include adjustable panels, but if your window is unusually tall or wide, you might need to buy an extension kit separately. I once bought a unit that claimed “universal fit,” only to realize it didn’t work with my 48-inch-wide sliding window. Lesson learned: read the fine print.
Inspect the Unit and Kit Components
Open the box and lay out everything. Most portable air conditioners come with:
- The AC unit itself
- Exhaust hose (usually 5–7 feet long)
- Window kit (plastic or foam panels, brackets, screws)
- Drain hose (for manual draining models)
- User manual and warranty info
Take a photo of the components with your phone. Why? Because if something’s missing, you have proof when contacting customer service. I once received a kit missing a critical bracket—having that photo saved me from a week of back-and-forth emails.
Power and Ventilation Considerations
Here’s the big one: electrical safety. Portable ACs draw a lot of power—usually 115V, but some larger models need 230V. Make sure:
- You’re plugging into a dedicated outlet. Don’t daisy-chain extension cords or power strips. I learned this the hard way when my breaker tripped during a heatwave.
- The outlet is grounded (three-prong plug). Never remove the ground pin—this is a fire hazard.
- You’re not using an outlet shared with a fridge, microwave, or space heater. These appliances can overload the circuit.
Also, think about ventilation. The exhaust hose must have a clear path outside. Avoid kinking or bending it sharply. A bent hose reduces airflow, making your AC work harder and less efficiently.
Step-by-Step: How to Install a Portable Air Conditioner
Now for the main event: installation. I’ll walk you through it like we’re doing it together. No rush—take your time. The whole process should take 20–30 minutes.
Step 1: Position the Unit
Place the portable air conditioner on a flat, stable surface. Avoid carpet or rugs that could block the intake vents. Leave at least 12–18 inches of clearance on all sides—especially the back and top. Why? Because these units draw in air from the sides and top, and if they’re blocked, they overheat and shut down.
Real-life example: I once placed my AC in a corner, thinking it’d be out of the way. Within an hour, it started making a weird noise and the “check filter” light came on. Turns out, the intake was blocked. After moving it, it worked perfectly.
Step 2: Attach the Exhaust Hose
Locate the exhaust port on the back of the unit—it’s usually a round or oval opening. Take the exhaust hose and screw or snap it into place. Most hoses twist clockwise to lock. Make sure it’s secure but don’t over-tighten—this can crack the plastic.
Now, attach the other end to the window kit adapter. This part varies by model, but typically:
- Insert the hose into a plastic or foam sleeve
- Slide the sleeve into the window kit panel
- Secure with a clamp or twist lock
Tip: If the hose feels loose, wrap electrical tape around the connection. I’ve used this trick when the hose kept slipping off during strong winds.
Step 3: Install the Window Kit
This is where many people get stuck. But it’s simpler than it looks.
For double-hung windows:
- Open the window and clean the track.
- Insert the window kit panel(s) into the track. Most kits have adjustable side panels—extend them to fit your window width.
- Lower the top sash so it rests on top of the panel. Use the provided screws or brackets to secure it (if included).
For sliding windows:
- Slide the window open and clean the track.
- Insert the kit vertically, then slide the window shut against it.
- Use foam tape or brackets to seal gaps and prevent drafts.
Pro tip: If your window is drafty, use foam weatherstripping around the edges. This keeps cool air in and hot air out. I once skipped this step and lost about 20% of cooling efficiency—my electric bill proved it.
Step 4: Connect and Test
Now, plug in the unit. But wait—don’t turn it on yet. Double-check:
- Is the hose straight and unkinked?
- Is the window kit secure? Shake it gently—it shouldn’t wobble.
- Is the unit level? Use a small level app on your phone to check.
Once you’re confident, turn it on. Set the mode to “cool” and the fan to “medium.” Listen for any unusual noises—grinding, rattling, or hissing. If everything sounds normal, you’re golden.
Step 5: Adjust Settings and Monitor
Let the AC run for 15–20 minutes. Check:
- Is cool air coming from the front vents?
- Is hot air being expelled through the hose?
- Is the room temperature dropping?
Most units have a digital thermostat. Set it to your desired temperature—I usually start at 72°F and adjust based on comfort. If it’s not cooling enough, check the air filter (more on that later).
Special Cases: Installing in Non-Traditional Spaces
What if you don’t have a window? Or you’re renting and can’t modify the window? Don’t panic. There are workarounds—some clever, some a little DIY.
Sliding Glass Doors
Yes, you can install a portable AC with a sliding door. Use a sliding door kit—it’s like a window kit but taller. Place it in the track, then slide the door shut against it. Seal the top with foam tape or a custom-cut piece of plexiglass.
My experience: I used this setup in my apartment’s living room. It worked great, but I had to remove it every time I wanted to go outside. A small price to pay for cool air.
No Window? Try a Drop Ceiling or Wall Vent
If you’re in a basement or office with drop ceilings, you can vent through a ceiling tile. Cut a hole in the tile, install a vent adapter, and run the hose through. This requires a bit of DIY, but it’s doable with basic tools.
For permanent solutions, some people cut a hole in an exterior wall and install a wall vent. Warning: This is not recommended for renters. It can damage the structure and void your lease. But if you own your home and want a long-term fix, it’s an option. Just hire a professional.
Using a Portable AC Without Venting (Not Recommended)
Some people try to use portable ACs without venting—just leaving the hose inside. Don’t do this. Portable ACs work by removing heat and moisture from the air. If the exhaust stays in the room, you’re just recycling hot, humid air. It won’t cool effectively and can cause mold or condensation damage.
There are “ventless” portable ACs on the market, but they’re really evaporative coolers—better for dry climates. If you live in a humid area (like Florida or the Gulf Coast), they won’t help much.
Maintenance and Troubleshooting: Keep It Running Smoothly
Installing is just the start. To keep your portable AC running efficiently, you need regular maintenance. Think of it like changing the oil in your car—skip it, and you’ll regret it.
Clean the Air Filter Monthly
Most portable ACs have a washable air filter. It traps dust, pollen, and pet hair. A dirty filter reduces airflow and forces the unit to work harder, increasing energy use and wear.
How to clean:
- Turn off and unplug the unit.
- Open the front panel and remove the filter.
- Rinse under warm water. Let it dry completely (24 hours).
- Reinstall and close the panel.
Tip: Mark your calendar to clean it every 4 weeks. I use a phone reminder—it’s easy to forget until the unit starts making noise.
Drain the Water Tank (If Applicable)
Portable ACs collect moisture in a water tank. Some models auto-evaporate it, but many require manual draining—especially in humid climates.
Check your manual. If your unit has a “full tank” alert:
- Turn it off and unplug.
- Place a towel under the unit.
- Remove the drain plug or open the drain port.
- Let the water flow into a bucket.
- Reinstall the plug and turn it back on.
Some newer models have a continuous drain hose—connect it to a floor drain or sink. This is a game-changer if you’re away often.
Common Problems and Quick Fixes
Even with care, issues happen. Here are the most common:
| Problem | Likely Cause | Quick Fix |
|---|---|---|
| Unit won’t turn on | Tripped breaker, loose plug | Check outlet, reset breaker |
| Not cooling | Dirty filter, blocked vents | Clean filter, check hose |
| Leaking water | Full tank, tilted unit | Drain tank, level unit |
| Strange noises | Loose parts, debris in fan | Inspect, tighten screws |
| Hose not venting | Kinked hose, loose connection | Straighten hose, reattach |
If the problem persists, consult the manual or contact customer support. Most manufacturers offer 1–3 year warranties.
Energy Efficiency and Cost-Saving Tips
Portable ACs are convenient, but they’re not the most energy-efficient option. A 10,000 BTU unit uses about 1–1.5 kWh per hour—roughly $0.10–$0.15 per hour in the U.S. (depending on electricity rates). But with smart use, you can cut costs.
Use a Programmable Thermostat
Many portable ACs have programmable settings. Set it to cool the room before you wake up or return home. For example:
- Set to 78°F at 9 a.m. (when you leave for work)
- Cool to 72°F at 5 p.m. (when you come home)
This avoids running it all day at full power. I save about $20/month this way.
Seal Gaps and Use Fans
Even a small gap around the window kit lets hot air in. Use foam tape, magnetic strips, or a custom cover to seal it. Pair the AC with a ceiling or floor fan to circulate cool air—this lets you set the AC 2–3 degrees higher without sacrificing comfort.
Upgrade to a Dual-Hose Model
Single-hose portable ACs pull air from the room, cool it, and expel hot air outside. But they create negative pressure, pulling in hot outside air through gaps. Dual-hose models use one hose for exhaust and another to draw fresh air from outside—this improves efficiency by 20–30%.
They’re more expensive, but worth it if you’re using the AC daily. I upgraded last year and saw a noticeable drop in my summer electric bill.
Final Thoughts: Cool Comfort Without the Hassle
Installing a portable air conditioner isn’t rocket science. With a little prep, the right tools, and this guide, you can go from sweating to sipping iced tea in under an hour. I’ve helped friends, family, and even neighbors set up their units—and every time, the reaction is the same: “Why didn’t I do this sooner?”
Remember: how do you install a portable air conditioner? It’s not about perfection—it’s about getting cool air where you need it, when you need it. Whether you’re in a small apartment, a rental, or just want a flexible cooling solution, a portable AC can be a summer game-changer.
Take your time, follow the steps, and don’t be afraid to call for help if something doesn’t feel right. And once it’s running? Sit back, relax, and enjoy the cool. You’ve earned it.
Frequently Asked Questions
How do you install a portable air conditioner in a window?
To install a portable air conditioner in a window, attach the exhaust hose to the unit and connect the other end to a window vent kit. Secure the kit to the window frame using the included brackets or foam seals to prevent hot air from re-entering the room.
Can you install a portable air conditioner without a window?
Yes, you can install a portable air conditioner without a window by venting the exhaust hose through a wall, ceiling, or drop ceiling using a venting kit. Ensure the hose is as short and straight as possible for efficient operation.
What tools are needed to install a portable air conditioner?
Most portable air conditioners require no tools for installation—just the included exhaust hose, window adapter, and vent kit. For non-standard windows or wall venting, you may need basic tools like a drill or saw.
How do you set up a portable air conditioner for the first time?
First, place the unit near a window and power outlet. Attach the exhaust hose to the back of the AC and connect it to the window kit, ensuring a snug fit. Plug it in and turn it on, following the manufacturer’s instructions.
Is installing a portable air conditioner a DIY-friendly task?
Yes, installing a portable air conditioner is DIY-friendly and typically takes under 30 minutes. Most models come with clear instructions and require only basic assembly of the venting components.
Do you need to vent a portable air conditioner continuously?
Yes, a portable air conditioner must be vented continuously while in use to expel hot air. Failure to vent properly reduces efficiency and can cause the unit to overheat or shut off automatically.