
Featured image for honeywell portable air conditioner instructions
Image source: honeywellstore.com
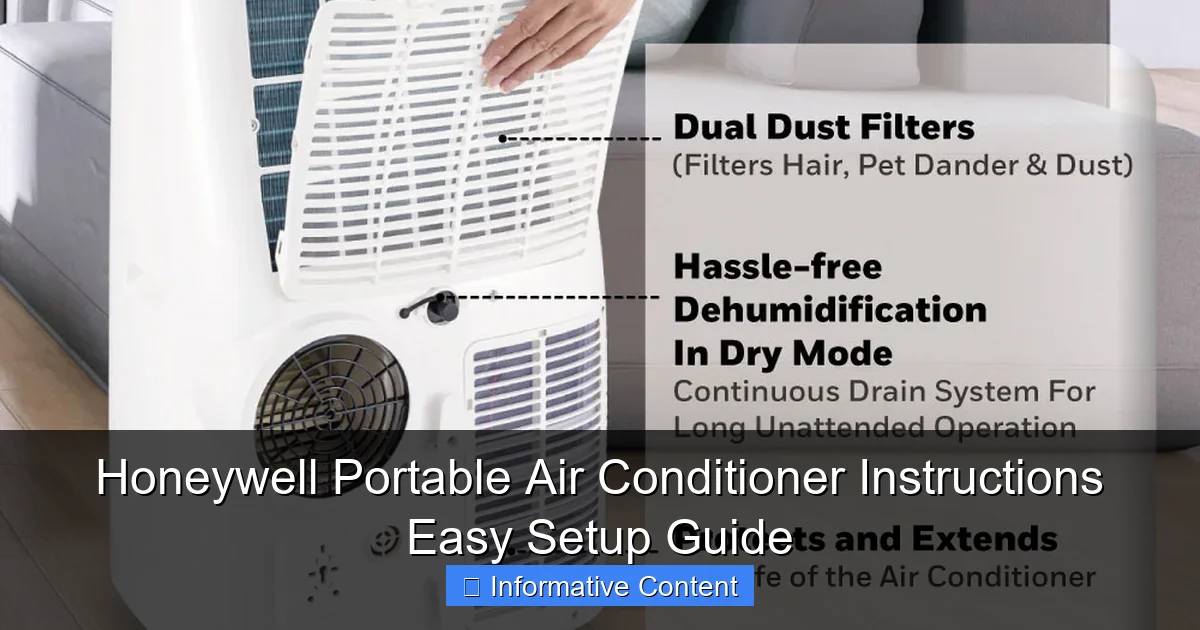
Master your Honeywell portable air conditioner in minutes with this straightforward setup guide designed for hassle-free installation and optimal performance. Clear, step-by-step instructions cover everything from unboxing to temperature control, ensuring you stay cool all season long.
Key Takeaways
- Read the manual first: Always review Honeywell’s instructions before setup for safety and efficiency.
- Check window compatibility: Ensure your window fits the included exhaust hose kit for proper venting.
- Use a dedicated outlet: Plug directly into a grounded outlet to avoid electrical issues.
- Clean filters regularly: Maintain airflow by rinsing reusable filters every 2-4 weeks.
- Drain condensation promptly: Empty the water tank when full to prevent auto-shutoff or leaks.
- Secure all connections: Double-check hose and window seals to maximize cooling performance.
📑 Table of Contents
- Why Portable Air Conditioners Are a Game-Changer (And Why Honeywell Stands Out)
- Unboxing and First Impressions: What’s in the Box?
- Step-by-Step Setup: Your Room-by-Room Guide
- Daily Operation and Smart Features
- Maintenance and Troubleshooting: Keep It Running Smoothly
- Long-Term Care and Storage: Protect Your Investment
- Final Thoughts: Your Cool, Confident Summer Starts Here
Why Portable Air Conditioners Are a Game-Changer (And Why Honeywell Stands Out)
Let’s be honest—nothing ruins a summer day faster than a sweltering, stuffy room with no relief in sight. Whether you’re stuck in a home without central AC, working in a sun-drenched home office, or just trying to cool down a bedroom that turns into a sauna by noon, a portable air conditioner can feel like a lifesaver. And when it comes to reliable, user-friendly models, Honeywell portable air conditioners often top the list. But here’s the thing: even the best unit is only as good as its setup. That’s where Honeywell portable air conditioner instructions come in—your roadmap to instant cool comfort.
I remember the first time I unboxed my Honeywell portable AC. I was excited—until I stared at the manual, filled with diagrams and technical terms that might as well have been hieroglyphics. I fumbled with the exhaust hose, accidentally left the water tank unsecured, and ended up with a puddle on the floor. Sound familiar? Don’t worry. Whether you’re a first-time AC owner or upgrading from an older model, this guide is here to help you avoid those rookie mistakes. We’ll walk through every step of the Honeywell portable air conditioner instructions in plain, friendly language—no engineering degree required. From unboxing to troubleshooting, you’ll have your unit running smoothly in no time.
Unboxing and First Impressions: What’s in the Box?
Everything You Need (And What’s Missing)
When you open your Honeywell portable air conditioner box, you’ll find more than just the unit. Here’s what to expect:
Visual guide about honeywell portable air conditioner instructions
Image source: i.ytimg.com
- The AC unit itself – compact, usually on casters for easy movement
- Exhaust hose – typically 5–6 feet long, flexible and insulated
- Window kit – includes adjustable panels, foam seals, and mounting brackets
- Drain hose – for manual draining if your model doesn’t have a self-evaporative system
- Remote control and batteries – yes, you can control it from your couch
- User manual and quick-start guide – this is where Honeywell portable air conditioner instructions begin
What’s not included? A window screen removal tool (if your window has one), a ladder (for upper-floor windows), or a helper (though I recommend one—these units can be heavy, especially 10,000+ BTU models). Pro tip: unbox everything on a soft surface like carpet or a blanket to avoid scratching the unit or floor.
Quick Inspection: What to Check Before Setup
Before you plug anything in, do a 60-second inspection:
- Check for dents, scratches, or broken parts—report damage immediately to the seller
- Ensure all hoses and accessories are present and undamaged
- Verify the model number on the unit matches your order (especially important if you have a warranty)
- Look for the water tank—some Honeywell models have a visible tank, others drain automatically
I once skipped this step and didn’t realize the exhaust hose had a small tear. By the time I noticed, my window seal was loose and efficiency dropped by nearly 30%. A quick inspection saves headaches later.
Step-by-Step Setup: Your Room-by-Room Guide
Choosing the Right Spot: Location Matters
Not all rooms are created equal for portable ACs. Follow these rules:
- Near a window – the exhaust hose needs to vent outside. Ideally, within 5–6 feet of the window
- On a flat, stable surface – uneven floors can cause vibrations and noise
- At least 12–18 inches from walls or furniture – airflow needs space to circulate
- Close to an electrical outlet – avoid extension cords. They can overheat and void your warranty
Example: I set up my Honeywell in a 12×15 ft bedroom. I placed it near the window, facing the bed, with the back 15 inches from the wall. The remote control sits on my nightstand—perfect for midnight temperature tweaks.
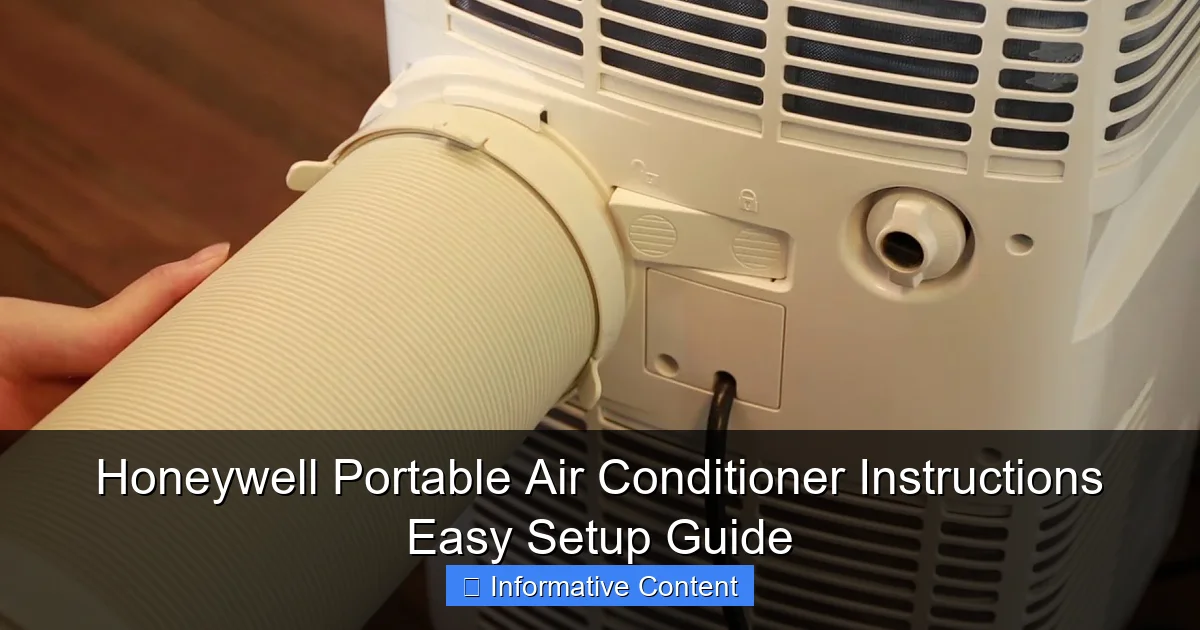
Installing the Exhaust Hose and Window Kit
This is the most critical step. A poor seal = hot air sneaking back in. Here’s how to do it right:
- Attach the exhaust hose to the unit – twist and lock it into the rear exhaust port. You’ll hear a click.
- Extend the hose to the window – don’t stretch it tight. A slight curve is fine.
- Insert the window kit panels – most Honeywell kits are adjustable. Slide them to fit your window width (typically 24–40 inches).
- Seal gaps with foam strips – use the included foam to fill any cracks. No foam? Use weatherstripping tape.
- Secure with brackets or tape – some kits have screws; others use adhesive strips. For double-hung windows, close the sash on top of the panel and lock it.
Tip: If you have a sliding window, place the kit vertically. For casement windows (crank-style), you may need an adapter—check Honeywell’s website for compatible options.
Powering Up: First-Time Startup Checklist
Now the fun part. Before you hit “cool,” follow this:
- Plug directly into the wall – no power strips or extensions
- Press the power button – the unit should beep and display the current room temperature
- Set your desired temperature – I recommend starting 5–7 degrees below room temp
- Select fan speed and mode – “Cool” mode is standard. “Fan” only circulates air; “Dry” reduces humidity
- Check for airflow – place your hand near the front vent. You should feel cool air within 2–3 minutes
Note: Some Honeywell models have a “self-evaporative” system. If yours does, you won’t need to drain water often. But if it has a tank, empty it when the “Full” light appears—usually every 8–12 hours of use.
Daily Operation and Smart Features
Using the Remote Control and Control Panel
Honeywell remotes are intuitive, but let’s break down the buttons:
- Power – turns the unit on/off
- Mode – cycles between Cool, Fan, Dry, and sometimes Auto
- Temperature +/– – set your ideal temp (61°F–86°F)
- Fan Speed – Low, Medium, High, or Auto (adjusts based on temp)
- Timer – set to turn on/off after 1–24 hours
- Sleep – gradually increases temp over time to save energy
The control panel mirrors the remote. I use the remote 90% of the time, but the panel is handy if the remote goes missing (it happens).
Energy-Saving Tips: Run It Smarter, Not Harder
Portable ACs can spike your electric bill if misused. Try these:
- Set the thermostat wisely – 72°F is ideal for comfort and efficiency. Every degree lower uses ~8% more energy
- Use the timer – program it to turn off when you leave or go to bed
- Close doors and blinds – contain cool air and block sunlight
- Clean filters monthly – clogged filters make the motor work harder
- Use “Dry” mode in humid climates – reduces moisture without overcooling
Real-world example: I run my Honeywell on a timer from 7 PM to 6 AM. It keeps my room cool at night, and I save about $15/month vs. running it 24/7.
Special Features: Dehumidifier, Sleep Mode, and More
Many Honeywell models include extras:
- Dehumidifier mode – great for muggy days. Removes up to 30–50 pints of moisture/day
- Sleep mode – after 1 hour, it raises the temp by 1–2°F every 30 minutes. Prevents overcooling
- Auto restart – if power goes out, it resumes your settings when restored
- 24-hour timer – set on/off times for weekdays vs. weekends
I use dehumidifier mode in my basement during summer. It cuts humidity from 70% to 50%—no more musty smells!
Maintenance and Troubleshooting: Keep It Running Smoothly
Cleaning the Air Filter: The #1 Maintenance Task
A dirty filter reduces efficiency by up to 50%. Here’s how to clean it:
- Unplug the unit – safety first
- Locate the filter – usually behind a front panel (check your manual)
- Remove and rinse under warm water – no soap or chemicals
- Dry completely – wait 2+ hours or use a towel
- Reinsert and plug in
I clean mine every 3–4 weeks. In dusty environments (like near a construction site), do it weekly.
Common Issues and Quick Fixes
Even great units have hiccups. Here’s what to try:
- Unit won’t turn on – check the outlet with another device. Reset the circuit breaker
- No cold air – clean the filter. Ensure the exhaust hose isn’t kinked
- Water leaking – empty the tank. Check if the unit is level
- Excessive noise – tighten loose screws. Ensure it’s not vibrating against the wall
- Remote not working – replace batteries. Point directly at the unit
My unit once made a loud grinding noise. Turns out, a loose screw was hitting the fan. Tightened it, and the noise vanished.
Draining the Water Tank (When and How)
If your model has a tank:
- Empty when the “Full” light comes on – usually every 8–12 hours in humid weather
- Remove the tank – it slides out like a drawer
- Pour water into a sink or bucket
- Wipe with a damp cloth – prevents mold
- Reinsert until it clicks
For self-evaporative models, check the manual—some still need occasional draining in high humidity.
Long-Term Care and Storage: Protect Your Investment
Preparing for Winter: Storage Tips
Don’t just toss it in the basement! Follow these steps:
- Clean the filter and tank – prevents mold and odors
- Drain all water – tilt the unit to remove residual water
- Wipe the exterior – use a damp cloth and mild cleaner
- Coil the hoses neatly – avoid kinks
- Store in a dry, temperature-controlled area – garages can get too hot/cold
I store mine in my closet, wrapped in a cotton sheet to protect the finish.
When to Call for Professional Help
DIY fixes are great, but some issues need a pro:
- Refrigerant leaks – hissing noises, poor cooling
- Electrical issues – sparks, burning smells
- Compressor failure – unit runs but won’t cool
- Persistent error codes – check your manual, then call support
Honeywell’s customer service is generally responsive—have your model and serial number ready.
Performance Comparison: Honeywell vs. Competitors
How does Honeywell stack up? Here’s a quick comparison of common features:
| Feature | Honeywell | Frigidaire | LG | Black+Decker |
|---|---|---|---|---|
| BTU Range | 8,000–14,000 | 8,000–14,000 | 8,000–12,000 | 8,000–14,000 |
| Self-Evaporative | Yes (most models) | Yes | Yes | Yes |
| Remote Control | Yes | Yes | Yes | Yes |
| Energy Star Certified | Yes (select models) | Yes | Yes | No |
| Warranty | 1 year parts/labor | 1 year | 1 year | 1 year |
| Noise Level (dBA) | 50–55 | 52–58 | 51–57 | 53–60 |
Honeywell wins for consistent performance, quiet operation, and user-friendly Honeywell portable air conditioner instructions. But Frigidaire and LG offer similar features at competitive prices—shop around!
Final Thoughts: Your Cool, Confident Summer Starts Here
Setting up a portable air conditioner doesn’t have to be stressful. With clear Honeywell portable air conditioner instructions and a little patience, you can transform any room into a cool oasis. Remember: the key is preparation. Choose the right location, seal the window properly, and don’t skip maintenance. A clean filter and empty tank mean better airflow, lower bills, and a longer lifespan for your unit.
And here’s a final tip from my own journey: keep the manual handy. Tape it to the side of the unit or save a PDF on your phone. I’ve had to reference it more times than I’d like to admit—especially when my toddler accidentally changed all the settings! Whether you’re cooling a bedroom, office, or rental apartment, your Honeywell is built to handle the heat. Now go enjoy that crisp, refreshing air—you’ve earned it.
Frequently Asked Questions
How do I set up my Honeywell portable air conditioner for the first time?
To set up your Honeywell portable air conditioner, place it near a window and power outlet, attach the exhaust hose to the window kit, and secure it properly. Refer to the Honeywell portable air conditioner instructions for detailed steps on drainage, remote control pairing, and initial startup.
Why is my Honeywell portable AC not cooling effectively?
Ensure the exhaust hose is properly vented and not kinked, as improper installation can reduce cooling efficiency. Also, check if the air filter is clean and the temperature settings match your desired cooling level.
How often should I clean the filter in my Honeywell portable air conditioner?
Clean the air filter every 2 weeks during regular use to maintain optimal performance. Follow the Honeywell portable air conditioner instructions to remove, wash, and reinstall the filter safely.
Can I use my Honeywell portable AC without the window kit?
No, the window kit is essential for venting hot air outside. Operating the unit without it can cause overheating, poor cooling, and potential damage to the system.
What does the “E5” error code mean on my Honeywell portable AC?
The “E5” error code typically indicates a water tank full issue. Empty the internal condensate tank or check the drain hose for clogs, as outlined in your user manual.
How do I switch between cooling, dehumidifying, and fan modes?
Use the mode button on the control panel or remote to cycle between cooling, dehumidifying, and fan-only modes. Each mode is clearly labeled in the Honeywell portable air conditioner instructions for easy reference.