
Featured image for ge window air conditioner installation instructions
Image source: m.media-amazon.com
Installing your GE window air conditioner is simple and stress-free with the right guidance and tools. This step-by-step guide breaks down GE window air conditioner installation instructions into clear, easy-to-follow steps—from measuring your window to securing the unit and sealing gaps for maximum efficiency. Get cool comfort fast, without the need for professional help.
Key Takeaways
- Read the manual first: Always review GE’s instructions before starting installation.
- Measure your window: Confirm dimensions to ensure a proper, secure fit.
- Secure the unit: Use included brackets and screws to prevent accidents.
- Insulate gaps: Apply foam seals to improve efficiency and reduce drafts.
- Check electrical safety: Verify outlet compatibility and avoid extension cords.
- Test before finalizing: Power on and check airflow before sealing completely.
📑 Table of Contents
- Why Installing Your GE Window Air Conditioner Shouldn’t Be a Headache
- Pre-Installation: What You Need to Know Before You Begin
- Step-by-Step Installation: From Unboxing to First Cool Air
- Post-Installation Checks: Ensuring Safety and Efficiency
- Special Cases: Installing in Non-Standard Windows
- Maintenance Tips: Keep Your GE AC Running Like New
- Data Table: GE Window AC Installation Checklist
- Final Thoughts: You’ve Got This!
Why Installing Your GE Window Air Conditioner Shouldn’t Be a Headache
Let’s face it: summer heat can be brutal. You’ve finally bought a GE window air conditioner to keep your home cool and comfortable, but now comes the real challenge—installing it. If you’ve ever stared at a manual with more diagrams than words and felt your confidence waver, you’re not alone. I remember my first attempt at installing a window AC unit—it took three hours, two YouTube videos, and a minor argument with my spouse about which side of the window frame was “left.” But here’s the good news: GE window air conditioner installation instructions can be simple, even if you’ve never picked up a screwdriver in your life.
This guide is written for real people, not handymen. Whether you’re a college student setting up your first apartment, a busy parent trying to beat the heat, or someone who just wants to do it right without calling a pro, we’ve got you covered. We’ll walk you through every step with clear, practical advice—no confusing jargon, no over-the-top tools, and no assumptions about your DIY experience. By the end, you’ll not only have a cool, quiet, and efficient AC unit running, but you’ll also feel proud of doing it yourself. Let’s get started!
Pre-Installation: What You Need to Know Before You Begin
Before you even unbox your GE window air conditioner, there are a few critical things to check. Skipping this step can lead to wasted time, frustration, or even damage to your window or unit. Think of this as your “pre-flight checklist” for a successful install.
Visual guide about ge window air conditioner installation instructions
Image source: i.pinimg.com
1. Confirm Your Window Type and Size
Not all windows are created equal. GE window air conditioners are designed for double-hung windows, where the sash (the part you slide up and down) opens vertically. If you have sliding windows, casement windows, or fixed panes, this unit won’t work without special adapters (which we’ll cover later).
- Measure your window opening: Measure the width at the top, middle, and bottom. Use the smallest measurement to ensure the AC fits.
- Check the sill: Your window must have a sturdy sill (the bottom ledge) that can support 80–120 lbs (depending on the model).
- Clearance: Ensure at least 12 inches of clearance on each side of the window for proper airflow.
Pro tip: If your window is too narrow, don’t force it. GE offers models in various sizes (e.g., 5,000 BTU for small rooms, 10,000 BTU for medium). Check the manual or product page for exact dimensions.
2. Gather Your Tools and Supplies
You don’t need a full toolbox, but these essentials make the job easier:
- Measuring tape
- Phillips screwdriver (or power drill with a Phillips bit)
- Scissors or utility knife (for cutting foam insulation strips)
- Level (a $5 tool from any hardware store)
- Work gloves (to protect your hands)
- Assistant (optional but highly recommended for heavy units)
All GE window AC units come with a standard installation kit, including side panels (accordion-style foam), mounting brackets, screws, and weather stripping. Double-check the box to ensure nothing’s missing. If it is, contact GE support—they’re usually quick to send replacements.
3. Safety First: Electrical and Structural Checks
Safety is non-negotiable. Here’s what to verify:
- Dedicated circuit: Your AC needs its own outlet. Sharing a circuit with lamps or TVs can trip breakers. If unsure, check your circuit breaker panel or consult an electrician.
- Grounded outlet: The plug must fit a 3-prong outlet (NEMA 5-15R). Never use an adapter to force a 2-prong plug into a 3-prong outlet—it’s a fire hazard.
- Window stability: Test the sash by lifting it. If it wobbles or feels loose, reinforce it with wood shims or consult a professional.
Real-life example: My neighbor once installed an AC in a window with a rotted sill. The unit fell halfway out during a storm. A quick inspection could’ve prevented that!
Step-by-Step Installation: From Unboxing to First Cool Air
Now for the main event. Let’s break down the GE window air conditioner installation instructions into simple, foolproof steps. We’ll use a typical 8,000 BTU model as an example, but the process is similar for all sizes.
1. Prepare the Unit and Window
Start by unboxing your AC in the room where you’ll install it. This avoids dragging a heavy unit through tight spaces. Remove all packaging materials, but keep the foam side panels and brackets—they’re part of the install.
- Open the window fully and clean the sill. Remove dust, debris, or old weather stripping.
- Lower the window sash to the desired height (usually 1–2 inches below the top of the AC unit).
- Place a towel or cardboard on the sill to protect it from scratches.
2. Install the Side Panels (Foam Insulation)
GE’s accordion-style foam panels fill gaps between the AC and window frame. Here’s how to attach them:
- Extend the left panel fully and align it with the AC’s left side. Secure with the provided screws (usually 2–3 per panel).
- Repeat for the right panel.
- Adjust the panels so they’re flush with the AC’s front. They should compress slightly when the window closes.
Tip: If the panels are too long, trim them with scissors. Leave a 1/4-inch gap at the top to avoid blocking the window track.
3. Position the Air Conditioner
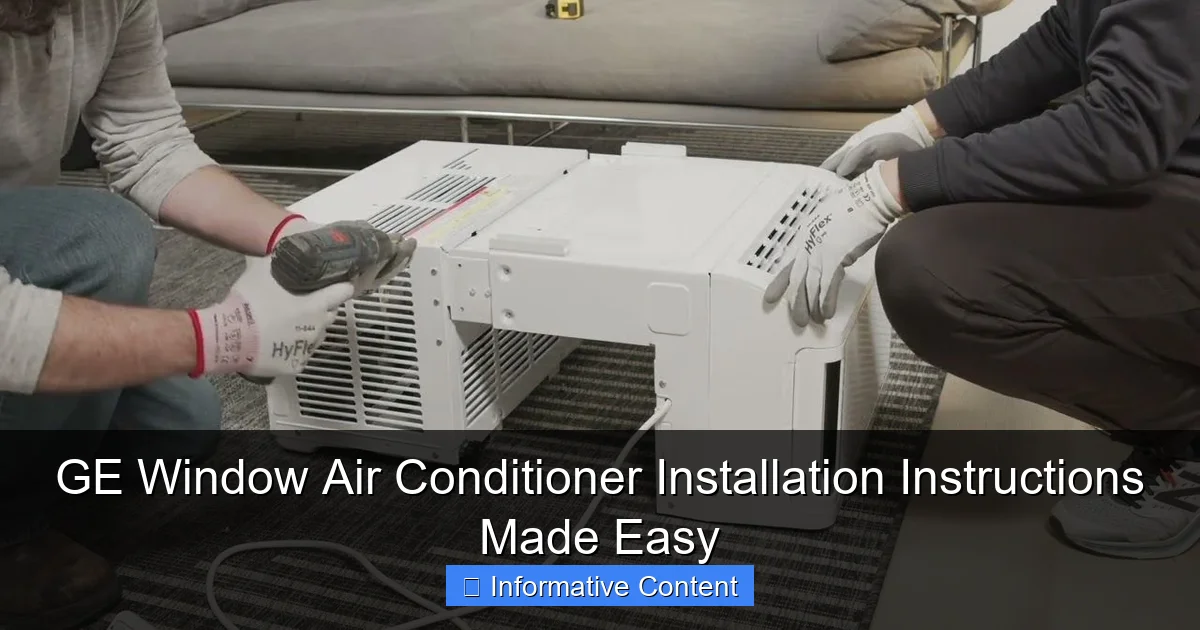
This is where an assistant shines. AC units are heavy (often 60+ lbs) and awkward to lift. Follow these steps:
- With help, tilt the AC slightly forward and slide the bottom lip onto the sill. The front of the unit should face indoors.
- Gently lower the back of the AC into the window. Ensure the side panels compress against the window frame.
- Center the unit so there’s equal space on both sides.
Warning: Never lift the AC by the front grill—it’s not structural! Always grip the sides or base.
4. Secure the Unit
Now, lock the AC in place to prevent accidents:
- Use the included mounting brackets to attach the AC to the window frame. Most GE models use L-brackets with screws.
- Drill screws into the frame (not the sash) to avoid damaging the window. Pre-drill holes if the wood is hard.
- Check that the unit is level. If it tilts, adjust the brackets or add shims under the AC’s base.
Pro tip: For extra security, add a safety strap (sold separately) from the AC to the wall or window frame.
5. Close and Seal the Window
With the AC in place, close the window sash to lock it:
- Lower the sash until it’s 1–2 inches above the AC’s top.
- Use the provided foam tape or weather stripping to seal the gap between the sash and AC.
- Cut excess foam with a utility knife for a clean finish.
This seal prevents hot air from leaking in and keeps bugs out. A tight seal can improve efficiency by up to 15%!
Post-Installation Checks: Ensuring Safety and Efficiency
You’re almost done! But before you hit “cool,” run through these checks to avoid common pitfalls.
1. Test for Stability and Level
Give the AC a gentle shake. If it wobbles, tighten the mounting brackets or add shims. Use a level to confirm the unit is perfectly horizontal. Even a slight tilt can cause condensation to drip indoors or strain the compressor.
2. Verify the Electrical Connection
Plug the AC into the outlet and:
- Listen for the fan and compressor starting. There should be no loud buzzing or grinding.
- Check that the outlet isn’t hot to the touch (a sign of overload).
- Ensure the cord isn’t pinched or stretched.
Important: Never use an extension cord. It can overheat and damage the unit.
3. Check for Airflow and Leaks
Run the AC for 5–10 minutes and inspect:
- Outdoor exhaust: Feel the air blowing out the back. It should be hot and strong.
- Indoor airflow: The front vents should blow cool air evenly.
- Leaks: Look for gaps around the window. Seal any with foam or caulk.
If the room isn’t cooling after 20 minutes, check the filter (clean if dirty) and ensure the thermostat isn’t set too high.
4. Adjust the Louvers
GE ACs have adjustable louvers (the slats on the front). Angle them to direct airflow where you need it most—upward to cool the ceiling, or horizontally for even distribution.
Special Cases: Installing in Non-Standard Windows
What if your window isn’t a perfect fit? Don’t worry—GE offers solutions for unique situations.
Sliding Windows
For horizontal sliding windows, you’ll need a sliding window installation kit (sold separately). It includes a custom bracket and extended side panels. The process is similar to standard installation, but you’ll:
- Attach the bracket to the window track.
- Use longer foam panels to fill the wider gap.
- Secure the unit to the bracket instead of the frame.
Note: Sliding window kits work best with windows that open at least 18 inches.
Casement or Awning Windows
These require a wall sleeve or custom frame. You’ll cut a hole in the wall or frame and install the AC permanently. This is more complex (and requires professional help for structural changes), but it’s ideal for long-term cooling.
Windows with Obstructions
Got blinds, shutters, or a narrow sill? Here’s how to adapt:
- Remove or raise blinds temporarily.
- Use thinner foam panels or cut custom ones from weather stripping.
- Add a wooden platform (painted to match) to extend a short sill.
Maintenance Tips: Keep Your GE AC Running Like New
Installation is just the start. Regular maintenance keeps your AC efficient, quiet, and long-lasting. Think of it like changing the oil in your car—it saves big repairs later.
1. Clean the Filter Monthly
The filter traps dust and allergens. A dirty filter restricts airflow and forces the compressor to work harder. To clean:
- Turn off and unplug the AC.
- Slide out the filter (usually behind the front grill).
- Rinse it with warm water and mild soap. Let it dry completely before reinserting.
Pro tip: Keep a spare filter to swap while cleaning—you’ll never have to wait for it to dry.
2. Inspect the Coils Annually
The condenser coils (on the back) and evaporator coils (inside) collect dirt. Use a coil brush or vacuum to remove debris. For stubborn grime, use a coil cleaner (available at hardware stores).
3. Check the Drain Pan and Condensation
Over time, the drain pan can collect mold or algae. Wipe it with a bleach solution (1 part bleach to 10 parts water). Also, ensure the drain holes aren’t clogged—they let excess water escape.
4. Reapply Weather Stripping
Foam panels degrade over time. Replace them every 2–3 years or if you notice air leaks.
5. Store Properly Off-Season
Before winter, unplug the AC, clean it thoroughly, and cover it with a breathable fabric (not plastic). Store it upright to protect the compressor.
Data Table: GE Window AC Installation Checklist
| Step | Action | Tools Needed | Time Required |
|---|---|---|---|
| 1 | Measure window and confirm fit | Measuring tape | 5 minutes |
| 2 | Gather tools and check kit | Screwdriver, scissors | 10 minutes |
| 3 | Install side panels | Screws, screwdriver | 15 minutes |
| 4 | Position and secure AC | Assistant, level | 20 minutes |
| 5 | Seal gaps and test | Foam tape, utility knife | 15 minutes |
| 6 | Run post-install checks | None | 10 minutes |
Total time: 1–1.5 hours (with help). Add 30 minutes for first-timers.
Final Thoughts: You’ve Got This!
Installing a GE window air conditioner isn’t rocket science—it’s a series of simple, logical steps. From measuring your window to sealing the gaps, each part builds on the last. The key is patience: take your time, double-check your work, and don’t skip the safety checks. I’ve seen too many people rush through installation only to end up with a noisy, leaky, or inefficient unit. But when done right, your AC will cool your space quietly and efficiently for years.
Remember, the GE window air conditioner installation instructions are designed to be user-friendly. The included kit has everything you need, and the process is standardized across models. If you hit a snag, don’t panic—most issues (like a loose bracket or misaligned panel) are easy fixes. And if you’re ever unsure, GE’s customer support is just a phone call away. They’ve helped thousands of DIYers like you, and they’re happy to walk you through any step.
So, take a deep breath, gather your tools, and get started. In a few hours, you’ll be sitting in a cool, comfortable room, sipping iced tea, and feeling proud of your handiwork. That’s the real reward of doing it yourself. Stay cool, friends!
Frequently Asked Questions
What are the basic GE window air conditioner installation instructions?
Start by measuring your window opening and ensuring it matches the unit’s size. Secure the mounting brackets, place the AC in the window, and seal gaps with included foam strips to prevent air leaks.
Can I install a GE window air conditioner alone?
While possible, it’s safer to have a helper due to the unit’s weight. Always follow the GE window air conditioner installation instructions to ensure proper balance and secure mounting.
Do I need special tools for installation?
Most GE models require only a screwdriver, level, and measuring tape. The included manual provides a full list of tools and hardware needed for a hassle-free setup.
How do I seal gaps after installing my GE window AC?
Use the foam insulation strips provided to seal gaps between the unit and window frame. This improves energy efficiency and prevents hot air from entering.
Are GE window air conditioner installation instructions model-specific?
Yes, always refer to the manual for your specific model. Differences in brackets, hardware, or sealing methods may vary across GE window AC units.
Can I use an extension cord with my GE window AC?
No, plug the unit directly into a grounded outlet. Using an extension cord can overload circuits and create safety hazards per GE’s guidelines.