
Featured image for frigidaire air conditioner installation instructions
Image source: acmanuals.com
Installing your Frigidaire air conditioner is simple and stress-free with clear, step-by-step instructions designed for DIY success. From proper window measurements to secure mounting and electrical safety, this guide ensures optimal performance and energy efficiency in under an hour.
Key Takeaways
- Read the manual first: Always review Frigidaire’s instructions before starting installation.
- Measure your space: Ensure proper window or wall dimensions for a snug fit.
- Seal gaps tightly: Use included foam strips to prevent air leaks and boost efficiency.
- Secure mounting hardware: Double-check brackets and screws to avoid unit instability.
- Test after setup: Run a quick cooling cycle to verify correct operation.
- Keep tools handy: Have a screwdriver, level, and tape measure ready for adjustments.
📑 Table of Contents
- Why Installing Your Frigidaire Air Conditioner Doesn’t Have to Be Stressful
- Pre-Installation: Setting Yourself Up for Success
- Step-by-Step: Installing a Frigidaire Window Air Conditioner
- Through-the-Wall Installation: A More Permanent Solution
- Electrical Setup and Safety Checks
- Maintenance Tips to Keep Your Frigidaire AC Running Smoothly
- Data Table: Frigidaire AC Installation Checklist
- Final Thoughts: Cool Comfort Awaits
Why Installing Your Frigidaire Air Conditioner Doesn’t Have to Be Stressful
It was a sweltering summer afternoon when I decided to install my new Frigidaire air conditioner. The sun was relentless, and I was sweating just thinking about the setup process. I’d heard horror stories about air conditioner installations—leaky windows, confusing manuals, and tools flying everywhere. But here’s the good news: installing a Frigidaire air conditioner doesn’t have to be a nightmare. In fact, with the right guidance, it can be a smooth, even satisfying DIY project.
Frigidaire is known for making user-friendly appliances, and their air conditioners are no exception. Whether you’re installing a window unit, a portable model, or a through-the-wall AC, Frigidaire designs its products with homeowners in mind. The key is following the Frigidaire air conditioner installation instructions carefully and taking your time. In this guide, I’ll walk you through every step—from choosing the right location to testing your unit—so you can enjoy cool, refreshing air without the stress. Think of this as your friendly, no-nonsense roadmap to a successful installation.
Pre-Installation: Setting Yourself Up for Success
Before you even unbox your Frigidaire air conditioner, there are a few critical steps to take. Rushing into installation without proper prep is like building a house on shaky ground—it might work for a while, but problems will arise later. Let’s make sure you start strong.
Visual guide about frigidaire air conditioner installation instructions
Image source: acmanuals.com
1. Choose the Right Model for Your Space
Frigidaire offers several types of air conditioners, each suited for different needs:
- Window units: Ideal for single rooms, especially if you have a standard double-hung window.
- Portable units: Great for renters or spaces where window installation isn’t possible. They vent through a window or sliding door.
- Through-the-wall units: Permanent solutions for rooms with exterior walls and no windows.
For example, if you live in a small apartment with limited window options, a portable unit might be your best bet. But if you own your home and want a more permanent, energy-efficient solution, a window or through-the-wall model could save you money in the long run. Check the BTU (British Thermal Unit) rating to ensure your unit is powerful enough for the room size. A 5,000 BTU unit works for rooms up to 150 sq. ft., while a 12,000 BTU unit covers up to 550 sq. ft.
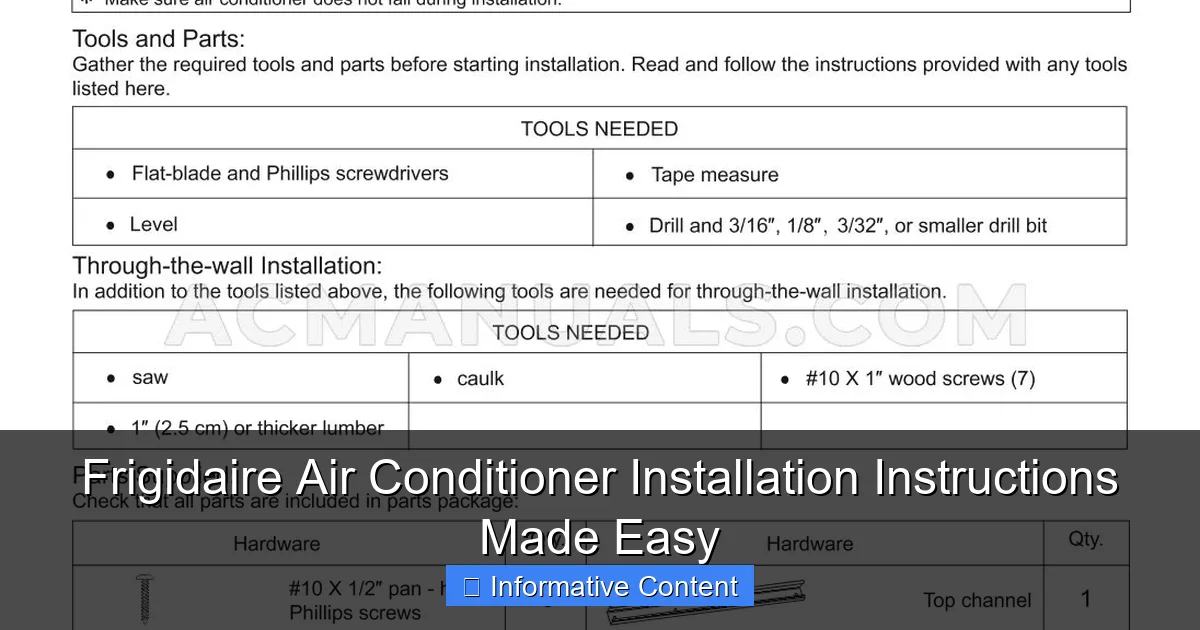
2. Gather Your Tools and Materials
Most Frigidaire ACs come with the essential mounting hardware, but you’ll still need a few tools. Here’s what I kept handy during my installation:
- Measuring tape (for window or wall dimensions)
- Level (to ensure the unit is perfectly aligned)
- Drill and screws (if required for window or wall mounting)
- Weatherstripping or foam seal (to block air leaks)
- Flashlight (for checking tight spaces)
Pro tip: If you’re installing a window unit, check if your Frigidaire model includes a support bracket. Some units come with a built-in bracket, while others require a separate purchase. I once skipped the bracket because I thought I could “eyeball” the installation—big mistake. The unit tilted slightly, causing condensation to leak inside. A $15 bracket would’ve saved me a lot of trouble.
3. Pick the Perfect Spot
Location matters more than you think. Here’s what to consider:
- Sunlight: Avoid placing the AC in direct sunlight. The unit will have to work harder, reducing efficiency.
- Clearance: Leave at least 12 inches of clearance on all sides for proper airflow.
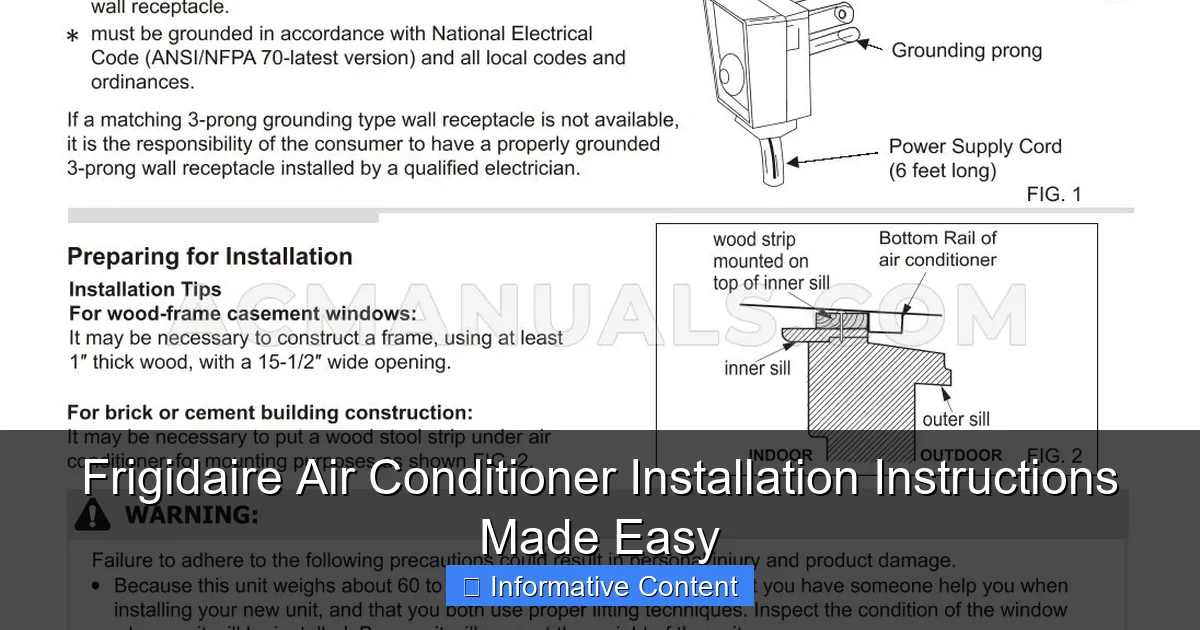
- Electrical outlet: Make sure there’s a grounded outlet nearby. Never use extension cords—they can overheat and pose a fire risk.
For window units, measure your window opening to ensure the AC will fit snugly. If the gap is too large, use adjustable side panels (usually included) to seal the space. For through-the-wall units, consult a professional if you’re not comfortable cutting into your exterior wall.
Step-by-Step: Installing a Frigidaire Window Air Conditioner
Let’s dive into the most common installation type: the window unit. This process is straightforward, but attention to detail is crucial. I’ll walk you through it like we’re doing it together.
1. Prepare the Window
Start by opening the window to its full height. Remove any screens or obstacles. Then, place the AC on the windowsill (with help if it’s heavy) to check the fit. The unit should sit securely without wobbling. If it’s too low, you might need a support bracket. If it’s too high, you’ll need to adjust the window or use a platform.
Once you’re happy with the fit, close the window down onto the AC’s top mounting rail. This creates a seal and holds the unit in place temporarily. Make sure the window doesn’t pinch any cords or hoses.
2. Secure the Unit with Side Panels
Frigidaire window units come with accordion-style side panels that expand to fill the gap between the AC and the window frame. Extend these panels to fit snugly, then secure them with the provided screws. Use a level to check that the unit is perfectly horizontal. Even a slight tilt can cause water to pool inside, leading to leaks.
For extra insulation, apply foam weatherstripping along the edges of the panels. This prevents hot air from sneaking in and cool air from escaping. I like to use self-adhesive foam tape—it’s cheap and easy to apply.
3. Install the Support Bracket (If Needed)
If your Frigidaire model requires a support bracket, now’s the time to install it. The bracket attaches to the windowsill or the exterior wall below the window, providing extra stability. Follow the Frigidaire air conditioner installation instructions for the exact placement. Some brackets have adjustable arms, while others require precise measurements.
Tip: If you’re renting, check your lease before drilling holes. Some landlords require written permission for permanent modifications.
4. Connect the Exhaust Hose (For Portable Units)
If you’re installing a portable Frigidaire AC, the process is similar, but you’ll need to vent the hot air outside. Most portable units come with a flexible exhaust hose and a window kit. Attach the hose to the back of the unit, then connect the other end to the window kit. Use the provided adapters to fit the hose to your window type (single-hung, double-hung, or sliding).
Important: The hose should slope downward slightly to allow condensation to drain outside. If it’s level or uphill, water could back up into the unit and damage it.
Through-the-Wall Installation: A More Permanent Solution
Through-the-wall air conditioners are a great option if you want a sleek, built-in look. They’re also more energy-efficient because they seal tightly against the wall. However, this installation requires more effort and tools.
1. Choose the Right Wall
Not all walls are suitable for through-the-wall ACs. Here’s what to look for:
- Exterior wall: The unit must vent outside, so an interior wall won’t work.
- Structural integrity: Avoid walls with pipes, wiring, or load-bearing studs. Use a stud finder to locate studs and mark safe spots.
- Accessibility: Make sure you can reach the outside of the wall for cutting and sealing.
I once tried installing a through-the-wall unit without checking the wall’s structure—turns out, I was cutting right through a water pipe! Lesson learned: always double-check before cutting.
2. Cut the Opening
Using the template provided in your Frigidaire manual, mark the exact size of the opening on the wall. Use a jigsaw or reciprocating saw to cut carefully. Wear safety goggles and a dust mask—this step gets messy.
Once the hole is cut, install a sleeve (usually included) to frame the opening. Secure it with screws or construction adhesive. The sleeve protects the unit and makes future removal easier.
3. Mount the Unit
Slide the AC into the sleeve, ensuring it fits snugly. Use shims if needed to keep it level. Then, secure the unit with the provided mounting brackets. Seal around the edges with waterproof caulk to prevent air and water leaks.
Pro tip: If you live in a humid climate, consider adding a drain pan underneath the unit to catch condensation.
Electrical Setup and Safety Checks
Even the best-installed AC won’t work if the electrical setup is wrong. Safety first—let’s make sure your unit is powered properly.
1. Plug It In (Correctly)
Frigidaire air conditioners require a grounded 115V outlet (or 230V for larger models). Never use an extension cord or adapter. If the outlet is far away, consider hiring an electrician to install a dedicated outlet nearby.
Check the unit’s power cord for damage before plugging it in. If you see frayed wires or exposed insulation, don’t risk it—contact Frigidaire customer support.
2. Test the Unit
Once everything is installed, turn on the AC and let it run for 10–15 minutes. Listen for strange noises, and check for proper airflow. The room should start cooling within minutes. If the unit cycles on and off rapidly, it might be oversized for the space.
Use a thermometer to measure the air temperature from the vents. It should be 10–15°F cooler than the room temperature. If not, double-check the seals and insulation.
3. Safety First: What to Avoid
Here are a few common mistakes to avoid:
- Overloading circuits: Air conditioners draw a lot of power. Make sure no other high-wattage appliances are on the same circuit.
- Ignoring leaks: Check for water pooling under the unit or inside the room. Leaks can damage walls and floors.
- Skipping the manual: Always refer to the Frigidaire air conditioner installation instructions for model-specific details.
Maintenance Tips to Keep Your Frigidaire AC Running Smoothly
Installation is just the beginning. Regular maintenance ensures your AC stays efficient and lasts for years. Here’s how to keep it in top shape.
1. Clean the Filters Monthly
Dirty filters restrict airflow, making your AC work harder. Remove the filters (usually behind the front panel) and rinse them with water. Let them dry completely before reinstalling. For heavy buildup, use a mild detergent.
I set a reminder on my phone to clean the filters every month during peak summer. It’s a small task, but it makes a big difference.
2. Check the Coils
The evaporator and condenser coils can collect dust and debris over time. Use a soft brush or vacuum attachment to clean them gently. For stubborn dirt, a coil cleaner spray works well.
Tip: Never use high-pressure water—it can damage the fins.
3. Inspect the Drain Pan
If your AC has a drain pan (common in through-the-wall units), check it for standing water. Algae and mold can grow in stagnant water, leading to odors and clogs. Empty and clean the pan every few months.
Data Table: Frigidaire AC Installation Checklist
| Task | Window Unit | Portable Unit | Through-the-Wall Unit |
|---|---|---|---|
| Measure space | ✅ | ✅ | ✅ |
| Install support bracket | ✅ (if needed) | ❌ | ✅ |
| Attach exhaust hose | ❌ | ✅ | ❌ |
| Cut wall opening | ❌ | ❌ | ✅ |
| Seal gaps with weatherstripping | ✅ | ✅ (window kit) | ✅ |
| Test electrical connection | ✅ | ✅ | ✅ |
Final Thoughts: Cool Comfort Awaits
Installing a Frigidaire air conditioner might seem daunting at first, but with the right preparation and a calm mindset, it’s entirely doable. Whether you’re tackling a window unit, a portable model, or a through-the-wall AC, the Frigidaire air conditioner installation instructions are your best friend. Follow them step by step, take your time, and don’t skip the safety checks.
Remember, a well-installed AC not only cools your home efficiently but also saves you money on energy bills and reduces the risk of breakdowns. And if you ever feel stuck, don’t hesitate to call in a professional. There’s no shame in asking for help—especially when it comes to electrical or structural work.
Now, go enjoy that crisp, cool air. You’ve earned it!
Frequently Asked Questions
What tools do I need for Frigidaire air conditioner installation?
You’ll typically need a screwdriver, level, measuring tape, and a drill for mounting the unit. Some models may also require a support bracket or foam insulation strips, which are often included in the packaging. Always check your specific Frigidaire air conditioner installation instructions for model-specific requirements.
Can I install a Frigidaire air conditioner myself, or do I need a professional?
Most Frigidaire window and portable units are designed for DIY installation using the included Frigidaire air conditioner installation instructions. However, if you’re installing a through-the-wall or ducted system, professional help is recommended for safety and warranty compliance.
How do I secure the air conditioner to prevent it from falling?
Use the provided mounting brackets and side panels to firmly attach the unit to the window frame. Make sure the unit slopes slightly backward (about 1/4 inch) to allow proper drainage and stability. The Frigidaire air conditioner installation instructions include detailed diagrams for safe anchoring.
Where should I place my Frigidaire air conditioner for optimal performance?
Install the unit in a shaded window or area with minimal direct sunlight to improve efficiency. Ensure there’s at least 12 inches of clearance on all sides for proper airflow and avoid placing it near heat sources like lamps or electronics.
Do I need to seal the gaps around the air conditioner?
Yes, sealing gaps with foam weatherstripping or side panels (included with most models) helps prevent hot air from entering and cool air from escaping. This improves efficiency and is a key step in the Frigidaire air conditioner installation instructions.
What should I check after completing the installation?
After installation, verify the unit is level, securely mounted, and all panels are properly closed. Run a test cycle to confirm airflow, drainage, and noise levels are normal before regular use.