
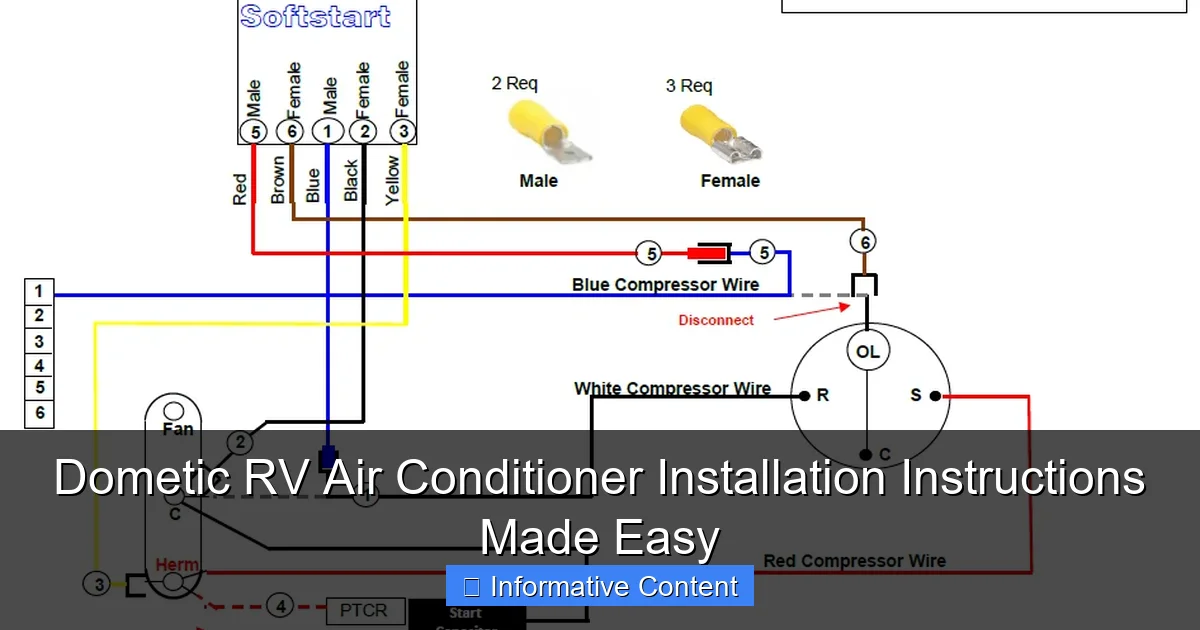
Featured image for dometic rv air conditioner installation instructions
Image source: i1.wp.com
Installing a Dometic RV air conditioner is simpler than ever with clear, step-by-step instructions designed for DIY success. From mounting the unit and securing the roof seal to connecting electrical components and testing airflow, this guide eliminates guesswork and ensures a leak-free, efficient setup—so you can stay cool on the road with confidence.
Key Takeaways
- Read the manual first: Always review Dometic’s instructions before starting installation.
- Turn off power: Ensure RV power is off to prevent electrical hazards.
- Seal properly: Use butyl tape to prevent leaks and ensure a tight fit.
- Check roof compatibility: Verify roof thickness and opening match unit specs.
- Secure wiring: Double-check connections to avoid malfunctions or damage.
- Test before finalizing: Power up and test AC before sealing everything permanently.
📑 Table of Contents
- Why Installing Your Dometic RV Air Conditioner Shouldn’t Be Scary
- Pre-Installation Prep: What You Need to Know Before You Start
- Step-by-Step Installation: From Roof Cut to First Cool Breeze
- Sealing and Weatherproofing: The Key to a Leak-Free Roof
- Powering Up and First-Run Checks
- Common Mistakes and How to Avoid Them
- Dometic RV Air Conditioner Models at a Glance
- Final Thoughts: You’ve Got This!
Why Installing Your Dometic RV Air Conditioner Shouldn’t Be Scary
Let’s be honest: the idea of installing an air conditioner in your RV sounds like a job for a professional. You picture wiring, heavy lifting, and the risk of cracking your roof. I remember the first time I considered replacing my old RV AC unit—my stomach did a backflip just thinking about it. But after doing it myself (and surviving!), I realized it’s not as intimidating as it seems. With the right tools, a clear plan, and a little patience, installing a Dometic RV air conditioner is something most DIYers can handle.
Dometic has been a trusted name in RV climate control for decades. Their units are known for being reliable, efficient, and relatively straightforward to install—especially if you follow the instructions carefully. Whether you’re replacing an old unit or adding a new one to a roof that’s never had AC, this guide will walk you through the entire process in a way that feels like a conversation with a seasoned RV buddy. No jargon, no fluff—just practical, step-by-step advice. By the end, you’ll feel confident tackling your Dometic RV air conditioner installation without calling in a pro (unless you want to, of course).
Pre-Installation Prep: What You Need to Know Before You Start
Assess Your RV and Roof Type
Before you even unbox your new Dometic AC unit, take a close look at your RV. Not all roofs are created equal. Most modern RVs have a 14” x 14” roof opening (the standard for AC units), but older models or custom builds might differ. Use a tape measure to check the existing opening or plan your cut carefully if installing a new one.
Visual guide about dometic rv air conditioner installation instructions
Image source: epi.dometic.com
Also, check the roof material. Is it fiberglass, aluminum, or rubber (EPDM/Thermoplastic)? Each has different sealing requirements. For example, rubber roofs need special adhesives to avoid damage, while fiberglass may require extra reinforcement if the structure is soft or sagging.
Gather the Right Tools and Materials
Here’s what you’ll need for a smooth Dometic RV air conditioner installation:
- Socket wrench set (with extension)
- Drill with various bits (including a 1/4” and 3/8”)
- Jigsaw (for cutting the roof opening if needed)
- Silicone sealant (specifically rated for RV roofs)
- Butyl tape (Dometic often includes this, but have extra on hand)
- Wire strippers and electrical tape
- Voltage tester
- Work gloves and safety goggles
- Ladder (preferably with stabilizers)
- Assistant (seriously—don’t skip this!)
Pro tip: If you’re replacing an old unit, take photos of the wiring and mounting hardware before removing anything. This will save you time when reconnecting the new one.
Check Power Requirements and Circuit Compatibility
Dometic units typically run on 120V AC and draw between 8–12 amps, depending on the model. Before installation, verify your RV’s electrical system can handle the load. Most RVs have a 30-amp or 50-amp service. A single AC unit is usually fine, but if you’re adding a second unit or have other high-draw appliances running (like a microwave or fridge), you might need to manage your power usage.
Check your RV’s circuit breaker panel. The AC should be on its own dedicated circuit. If it’s sharing with other outlets, you risk tripping the breaker. Use a multimeter to confirm the voltage at the roof opening (if pre-wired) or at the breaker box.
Step-by-Step Installation: From Roof Cut to First Cool Breeze
Removing the Old Unit (If Applicable)
If you’re replacing an old AC unit, start by turning off the power at the breaker. Safety first! Then, remove the interior ceiling shroud (usually held by screws or clips). This gives you access to the wiring and mounting hardware.
Inside the RV, disconnect the wiring harness and thermostat connections. Label the wires with tape if they aren’t already marked. Then, go outside and remove the roof shroud (plastic cover). You’ll see the unit mounted to the roof with bolts or screws. Loosen them, but don’t remove yet—support the unit from below with a piece of wood or a helper.
Once all fasteners are loose, carefully lift the old unit off the roof. This is where having a second person is critical. Old units can be heavy (30–50 lbs), and you don’t want to drop it or damage your roof.
Preparing the Roof Opening
With the old unit gone, clean the roof opening. Remove any old sealant, dirt, or debris. Use a putty knife or scraper, but be gentle—don’t gouge the roof material.
If you’re installing a new unit (no existing opening), mark the 14” x 14” area using a template (Dometic provides one in the manual). Drill pilot holes in each corner, then use a jigsaw to cut along the lines. Tip: Cut just inside the marked line first, then sand the edges smooth. This prevents over-cutting.
Apply a generous bead of butyl tape around the opening. This acts as a gasket to seal against leaks. Don’t use regular silicone here—it can shrink and crack over time. Butyl tape stays flexible and lasts for years.
Mounting and Wiring the New Dometic Unit
Now comes the fun part: installing the new Dometic RV air conditioner. With your helper, carefully lower the unit into the opening. Make sure the butyl tape is evenly compressed—no gaps. The unit should sit flush with the roof.
Secure it with the provided mounting bolts or screws. Don’t over-tighten! Snug is good; cranking it down can warp the base or damage the roof. Use a torque wrench if possible (Dometic recommends 25–30 inch-pounds).
Inside the RV, reconnect the wiring harness. Match the colors: black to black (hot), white to white (neutral), green to green (ground). If your Dometic unit has a control board, connect the thermostat wires (usually red, white, and blue). Double-check the manual—some models have specific configurations.
Replace the interior ceiling shroud and secure it with screws. This hides the wiring and gives the unit a clean look.
Sealing and Weatherproofing: The Key to a Leak-Free Roof
Applying Roof Sealant Properly
Even with butyl tape, you need an extra layer of protection. Apply a high-quality RV-rated silicone sealant around the base of the AC unit, covering all mounting screws and the edges of the roof opening. Use a 3/8” bead and smooth it with a finger or tool.
Important: Avoid using regular bathroom silicone or “RV roof sealant” that isn’t UV-resistant. Sunlight degrades cheap sealants quickly. Dometic recommends brands like Dicor or EternaBond for long-term durability.
Checking for Gaps and Weak Spots
After sealing, inspect the area closely. Look for:
- Cracks or bubbles in the sealant
- Loose mounting screws
- Uneven gaps between the unit and roof
Run your hand around the edges. If you feel any roughness or gaps, add more sealant. Better to overdo it than risk a leak during your next rainstorm.
Testing for Leaks (Before You Finish)
Don’t skip this step! Wait 24 hours for the sealant to cure, then simulate rain. Use a garden hose or bucket of water to pour around the unit. Go inside and check the ceiling for drips. If you see water, reseal the problem area. It’s much easier to fix now than after you’ve packed up and hit the road.
Powering Up and First-Run Checks
Electrical Safety Checks
Before turning on the power, do a final electrical check:
- Use a voltage tester to confirm no live wires are exposed
- Ensure all wire nuts are tight and covered with electrical tape
- Verify the breaker is off until you’re ready to test
Turn the breaker on and listen for the AC’s startup hum. If it doesn’t power on, check:
- Thermostat settings (set to “cool” and below current temp)
- Wiring connections
- Breaker panel (reset if tripped)
Testing Cooling Performance and Airflow
Let the unit run for 10–15 minutes. Use a thermometer to check the air temperature at the ceiling vents. A good AC should cool the air to 10–15°F below the intake temp. For example, if it’s 85°F inside, expect 70–75°F at the vents.
Listen for unusual noises—grinding, rattling, or hissing. A slight fan hum is normal, but loud sounds could mean a loose part or airflow blockage. Check the interior shroud for obstructions (like tools or debris).
Adjusting the Thermostat and Dampers
Most Dometic units come with adjustable dampers to control airflow. Open or close them to balance cooling between rooms. If one area feels too cold, close the damper slightly. Use the thermostat to set your desired temperature—many models have programmable features for energy efficiency.
Common Mistakes and How to Avoid Them
Over-Tightening Mounting Hardware
It’s tempting to “crank it down” to make sure the unit is secure. But over-tightening can crack the AC’s base or damage the roof. Follow Dometic’s torque specs (usually 25–30 inch-pounds). If you don’t have a torque wrench, use a short-handled socket wrench and stop when you feel firm resistance.
Skipping the Sealant Step
Butyl tape alone isn’t enough. Without sealant, water can seep in around the screws or edges. I learned this the hard way on my first install—after a heavy rain, I found a small drip in the bedroom. Resealing fixed it, but it could’ve been avoided.
Ignoring Roof Slope or Drainage
RVs aren’t perfectly flat. The roof usually has a slight slope to help water drain. When installing, make sure the AC unit is level *along the slope*, not perfectly horizontal. If it’s tilted the wrong way, water can pool around the base and cause leaks.
Forgetting to Test Before Final Assembly
Don’t replace the roof shroud until you’ve tested the unit! If there’s a wiring issue or leak, you’ll have to remove it again. Do all checks (power, cooling, leaks) with the shroud off, then install it as the final step.
Dometic RV Air Conditioner Models at a Glance
Dometic offers several AC models for RVs, each with unique features. Here’s a quick comparison to help you choose:
| Model | Cooling Capacity (BTU) | Voltage | Features | Best For |
|---|---|---|---|---|
| Dometic Brisk II | 13,500 | 120V | Compact design, quiet operation | Small to mid-size RVs |
| Dometic Penguin II | 13,500 | 120V | Low-profile, energy-efficient | Aerodynamic RVs, fuel efficiency |
| Dometic FreshJet 3 | 15,000 | 120V | Dual-zone cooling, Wi-Fi enabled | Large RVs, tech-savvy owners |
| Dometic Air Distribution Box (ADB) | N/A (add-on) | 120V | Customizable airflow, LED lighting | Upgrading older units |
For most DIYers, the Brisk II or Penguin II are great starting points. They’re widely available, easy to install, and compatible with standard RV roof openings. The FreshJet 3 is worth the extra cost if you want smart features or need more cooling power.
Final Thoughts: You’ve Got This!
Installing a Dometic RV air conditioner isn’t just about staying cool—it’s about confidence. When you do it yourself, you learn your RV’s quirks, save money on labor, and gain peace of mind knowing the job was done right. Sure, there’s a learning curve. Maybe you’ll forget to label a wire or over-tighten a screw. But that’s okay. Every RV owner has been there.
The key is to take your time. Don’t rush through sealing or skip the leak test. A little extra care now prevents major headaches down the road. And if you hit a snag? That’s what the manual and online forums are for. Dometic’s customer support is also helpful—they’ve answered my questions more than once.
Remember: this isn’t just a mechanical task. It’s part of the RV lifestyle. The pride you’ll feel when you step into a cool RV after a hot day? Priceless. So grab your tools, call a friend, and get to work. Your next adventure just got a whole lot more comfortable.
Frequently Asked Questions
What are the basic steps for Dometic RV air conditioner installation?
Start by turning off all power sources, removing the old unit (if applicable), securing the new AC with mounting brackets, connecting the wiring, and sealing the roof opening. Always follow the manufacturer’s Dometic RV air conditioner installation instructions for model-specific details.
Can I install a Dometic RV air conditioner myself, or do I need a professional?
DIY installation is possible if you have basic electrical and carpentry skills, but consult a professional if you’re unsure about wiring or roof modifications. Improper installation may void warranties or cause leaks.
What tools are needed for Dometic RV air conditioner installation instructions?
You’ll typically need a drill, screwdrivers, wire strippers, sealant, a level, and a socket wrench. Refer to the manual for a complete list tailored to your specific Dometic AC model.
How do I ensure the AC unit is properly sealed during installation?
Apply high-quality butyl tape or sealant around the roof opening and under the unit’s mounting flange, then tighten bolts evenly to prevent leaks. Check the Dometic RV air conditioner installation instructions for recommended sealant types.
Why is my Dometic AC not turning on after installation?
Double-check all wiring connections, circuit breakers, and thermostat settings. Ensure the unit receives proper voltage (usually 120V) and matches your RV’s electrical system.
How long does it take to install a Dometic RV air conditioner?
Average installation time is 3–6 hours for a single unit, but this varies based on roof condition, wiring complexity, and whether you’re replacing an existing AC. Plan for extra time if modifications are needed.