
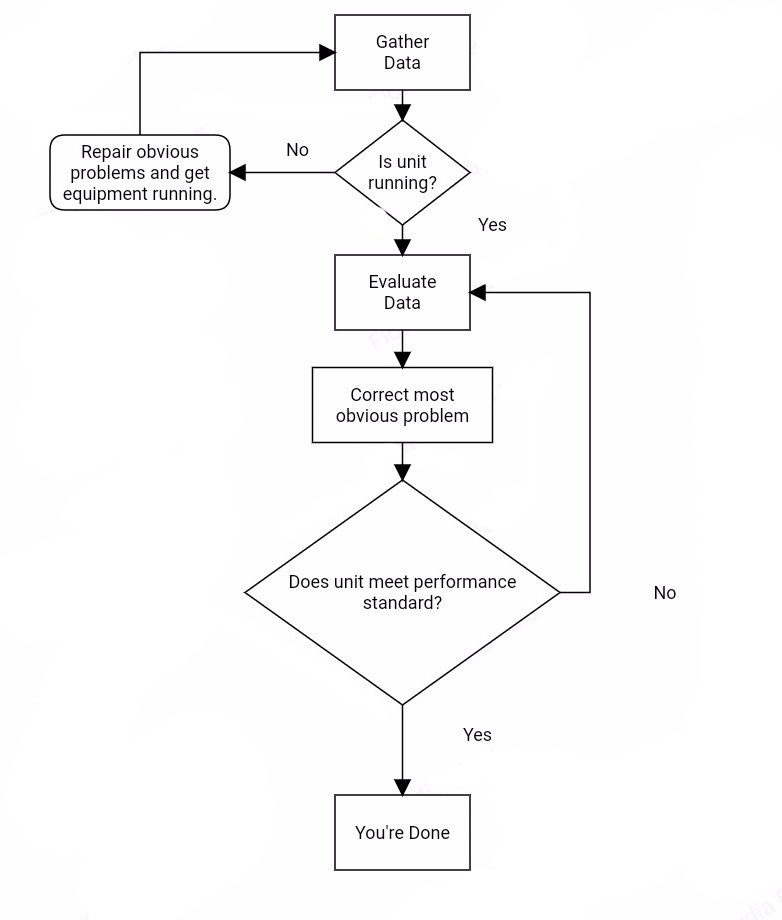
To diagnose HVAC issues, refer to a troubleshooting chart for a systematic approach and check filters, vents, electricity, and the outside unit area. Address common problems like dirty filters obstructing airflow and causing strain on the system.
This guide provides a comprehensive overview of troubleshooting HVAC systems before seeking professional help. It is crucial to perform these steps to ensure efficient operation and prevent costly repairs. By following these diagnostic procedures, you can identify and resolve common HVAC issues promptly and effectively.
Regular maintenance and monitoring are key to maximizing the longevity and performance of your HVAC system.

Credit: www.air-rite.com
Understanding Common Hvac Problems
Common Hvac Problems
An HVAC system may encounter various issues that can impact its performance. Understanding common HVAC problems is crucial for effective troubleshooting.
Diagnosing Hvac Issues
- Start by checking the thermostat settings to ensure they are correct.
- Inspect the air filter for any blockages or dirt accumulation that may hinder airflow.
- Check the condenser unit for debris or obstructions that could affect cooling efficiency.
- Use a multimeter to test voltage levels and ensure proper electrical connections.
- Monitor the system for overheating indicators that may signal a malfunction.
| Issue | Possible Cause | Solution |
|---|---|---|
| Low Cooling Capacity | Refrigerant leak or dirty evaporator coil. | Recharge refrigerant or clean the coil. |
| Inconsistent Temperatures | Faulty thermostat or air duct leaks. | Replace the thermostat or seal duct leaks. |
| Noisy Operation | Loose components or worn-out parts. | Tighten connections or replace worn parts. |
How to diagnose HVAC problems effectively?
Follow a systematic approach by checking each component thoroughly and ensuring all connections are secure.
- Inspect the thermostat settings and adjust if necessary.
- Clean or replace the air filter to improve airflow.
- Examine the condenser unit for any blockages that may hinder cooling.
- Test electrical connections with a multimeter to ensure proper voltage levels.
- Monitor system performance for any signs of overheating or unusual sounds.
Credit: hvacrschool.com
The Diagnostic Process Of Hvac
Visual Inspection
Start by visually inspecting the HVAC system components for any visible signs of damage or wear.
Pressure Testing And Leak Detection
Perform pressure testing to identify any leaks in the system that may be affecting its performance.
Thermostat Calibration
Ensure the thermostat is calibrated correctly to accurately control the temperature in the space.
Proper diagnosis of HVAC issues involves a systematic approach, including visual inspections, pressure testing, and thermostat calibration. By following these steps, HVAC technicians can pinpoint the root cause of problems efficiently.
Improving Hvac Troubleshooting
When diagnosing HVAC issues, a systematic approach can significantly improve troubleshooting efficiency. By following a structured process and carefully examining key components, technicians can uncover underlying problems and address them effectively. Below, we’ll explore some essential steps for improving HVAC troubleshooting.
Checking Power
Before delving into specific components, ensuring that the HVAC system has proper power supply is crucial. Inspect the circuit breaker and fuse box to confirm that there are no tripped breakers or blown fuses. Additionally, use a multimeter to test voltage and continuity at various points in the system to identify any power-related issues.
System Reset
In some cases, a simple system reset can resolve minor glitches in HVAC operation. Initiate a reset by turning off the system at the thermostat and the circuit breaker for a few minutes. Then, restart the system and observe its behavior. This can help clear temporary faults and restore normal functioning.
Thermostat Inspection
The thermostat serves as the control center for the HVAC system, regulating temperature settings and initiating heating or cooling cycles. Verify that the thermostat is functioning correctly by checking for accurate temperature readings and responsiveness to adjustments. Ensure that the wiring is secure and free from damage, as faulty connections can lead to erratic system behavior.
Filter Replacement
Inadequate airflow due to a clogged or dirty filter can strain the HVAC system and impact overall performance. Regularly inspect the air filter and replace it as needed to maintain optimal airflow and indoor air quality. A clean filter promotes efficient operation and reduces the likelihood of system malfunctions.
Key Steps In Hvac Troubleshooting
When it comes to HVAC troubleshooting, following a systematic approach can help identify and resolve issues efficiently. By breaking down the process into key steps, you can ensure a thorough diagnosis and effective troubleshooting. Here are the essential steps to follow:
Checking Filters And Vents
One of the first steps in HVAC troubleshooting is to check the filters and vents. Clogged filters can restrict airflow and put strain on the system, leading to decreased performance and potential problems. Start by inspecting the filters and replacing them if needed. Additionally, ensure that the vents are open and unobstructed to allow for proper air circulation.
Inspecting Electrical Components
The electrical components of an HVAC system play a crucial role in its operation. Inspecting these components is essential to identify any issues. Start by checking the circuit breakers or fuses related to the HVAC unit. Ensure they are in the proper position and have not tripped or blown. Next, inspect the wiring connections for any loose or damaged wires, which can disrupt the flow of electricity. Lastly, examine the capacitor and contactor for any signs of wear or malfunction.
Testing Thermostat
The thermostat is the control center of the HVAC system and can often be the source of issues. To test the thermostat, start by ensuring it is set to the correct temperature and mode. Next, check the wiring connection between the thermostat and the HVAC unit. Using a multimeter, verify that the thermostat is sending the correct signals to the HVAC unit. If necessary, replace the thermostat or recalibrate it to resolve any problems.
Inspecting Outside Unit
The outside unit, also known as the condenser, can encounter various issues that affect the overall performance of the HVAC system. Begin by inspecting the unit for any physical damage, debris, or obstructions. Clear away any debris and ensure that the unit has proper airflow. Next, check the fan motor and blades for any abnormalities or signs of wear. Lastly, inspect the refrigerant lines for leaks or damage, as this can cause a drop in performance.
System Reset
If you have completed the previous steps and the HVAC system is still not functioning properly, a system reset can sometimes resolve the issue. Turn off the power to the HVAC unit and thermostat. Wait for a few minutes, then turn the power back on. This reset can help clear any temporary glitches or errors in the system. If the problem persists after the reset, it may indicate a more significant issue that requires professional attention.
Advanced Hvac Troubleshooting Techniques
When it comes to diagnosing HVAC issues, having advanced troubleshooting techniques can be incredibly helpful. These techniques allow HVAC technicians to quickly and accurately identify problems with the system, saving time and money. In this section, we will explore some common advanced troubleshooting techniques, including how to deal with a restricted evaporator coil, an oversized condenser, and adjusting subcooling.
Restricted Evaporator Coil
A restricted evaporator coil can cause a variety of problems with an HVAC system. It can lead to reduced airflow, decreased cooling efficiency, and even system failure. If you suspect a restricted evaporator coil, here are some steps you can take to diagnose and resolve the issue:
- Inspect the air filter. A clogged or dirty air filter can restrict airflow and cause the evaporator coil to become blocked. Replace the air filter if necessary.
- Check for ice or frost on the evaporator coil. Ice buildup is a clear sign of a restricted coil and can be caused by a variety of factors such as a refrigerant leak or a malfunctioning expansion valve.
- Clean the evaporator coil. If the coil is dirty or covered in debris, it can restrict airflow and reduce cooling efficiency. Use a soft brush or a vacuum cleaner to remove any dirt or debris.
- Ensure proper refrigerant charge. An undercharged or overcharged system can cause the evaporator coil to become restricted. Check the refrigerant levels and adjust as needed.
Oversized Condenser
An oversized condenser can cause excessive cooling capacity, poor humidity control, and increased energy consumption. If you suspect that the condenser is oversized, here’s what you can do:
- Check the manufacturer’s specifications for the HVAC system to determine the correct size for the condenser.
- Measure the cooling capacity of the system using a temperature differential test. Compare the results to the specified capacity to determine if the condenser is oversized.
- If the condenser is indeed oversized, consider replacing it with a properly sized one. Consult with an HVAC professional to determine the right size for your system.
- Adjust the refrigerant charge. An oversized condenser may require adjustments to the refrigerant charge to optimize performance. Consult with an HVAC technician for guidance.
Adjusting Subcooling
Subcooling refers to the temperature difference between the liquid refrigerant leaving the condenser and its saturation temperature. It plays a crucial role in the efficient operation of an HVAC system. If subcooling is not within the recommended range, follow these steps to adjust it:
- Measure the liquid line temperature using a thermometer.
- Measure the condensing temperature using a pressure gauge.
- Calculate the difference between the liquid line temperature and the condensing temperature to determine the subcooling value.
- Compare the subcooling value to the manufacturer’s recommended range. If it’s outside the range, adjust the subcooling by adjusting the refrigerant charge or the airflow.
- Recheck the subcooling value after making the adjustments to ensure it falls within the recommended range.
By understanding and implementing these advanced HVAC troubleshooting techniques, you can effectively diagnose and resolve issues with evaporator coils, condensers, and subcooling. This will help optimize the performance and efficiency of your HVAC system.

Credit: www.alliancecc.com.au
Frequently Asked Questions For Diagnosis Hvac Troubleshooting Chart
How Do You Diagnose Hvac Problems?
To diagnose HVAC problems, perform visual inspections, pressure testing, and leak detection methods like bubble testing. Also, check filters, vents, electricity, outside unit area, and thermostat. Filters are a common issue that can be easily fixed. Regular maintenance can help avoid major problems.
What Is The Most Common Hvac Problem?
The most common HVAC problem is dirty filters, hindering airflow and causing the system to overwork.
What Is The Diagnostic Process Of Hvac?
The HVAC diagnostic process involves visual inspection, pressure testing, and leak detection methods for troubleshooting.
How Can I Improve My Hvac Troubleshooting?
To improve HVAC troubleshooting, ensure to check filters, vents, electricity, and the outside unit area. Reset the HVAC and inspect the thermostat. Visual inspection, pressure testing, and leak detection are crucial in the HVAC diagnostic process. Regular maintenance and proper diagnosis can prevent common HVAC problems.
Conclusion
Troubleshooting HVAC systems can be complex, but with the right approach and tools, many issues can be resolved without calling a professional. By following a systematic approach, such as checking filters, vents, electricity, and the outside unit, you can diagnose and potentially remedy common HVAC problems.
Remember, regular maintenance can prevent these issues from occurring.